Follow along with the video below to see how to install our site as a web app on your home screen.
Note: This feature currently requires accessing the site using the built-in Safari browser.
We noticed you are blocking ads. DO THE TON only works with community supporters. Most are active members of the site with small businesses. Please consider disabling your ad blocking tool and checking out the businesses that help keep our site up and free.
Use modeling clay or Play Doh to check clearance. Michaels, ToysRUs, etc With pistons, the extra mass around gudgeon pins expands more than thinner sections which is another reason 'sides' are reduced diameter. If your pistons are sticking out 0.010", you use a 0.050" head hasket or next thicker one. You want around 0.035"~0.040" piston to head clearance
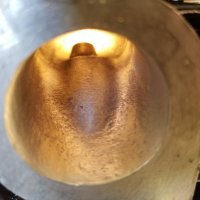
i'm having a hard time getting a good pic of the porting work. It's not stellar, it's not much - I didn't want to overdo it and run into lost power I have seen that on CB360 threads where a guy ported his head out and lost horsepower then argued that he needed better jetting on the carbs. LOL so all I did was smooth the transition area around the seats to get rid of any drastic surface changes, I then used a marker to indicated where on the intakes they matched up to the boots and opened it up so it's a perfect match now (and marked each boot left and right) on the exhaust side I used the old gaskets still in the head to mark the top portion for opening up to that diameter, d-shaped the ports, raising the roof a little where the valve guide bosses are and made the transition really smooth by shaving the sides of the boss near the tip of the guide so it's more triangular.
against all advice I used my dremel tool with a pen extension and carbide bits for this work - it actually went very well I took my time and had all the work done in less than 2 hours. the dremel worked very fast, and I am sure if I was using a 1/4" die grinder I would have destroyed the head in about 42 seconds. the bit also left a finish that is near identical to the factory cast finish inside the ports and I'm happy with that, as it will mean I didn't do anything too crazy changing intake velocity (I'm sure it's not as critical on the exhaust side) the lines inside the intake ports from casting were barely noticable, I took some time making sure that any protrusions were knocked back to the median surface area.
I guess I should assembly the valve train with springs then?
pistons are absolute level with top of deck with the .050" base gasket, so I have a .042" gasket. I wanted to get closer to the min spec but played it safe.
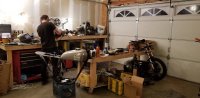
oh and eye candy since it's been a few pages since any good progress was made
thanks PJ!
got front end on so I could measure and make cables for remote master cylinder
Don't try and fit carbs with filters fitted, you need to be able to pull them in until they 'clunk' into place.I don't remember the overflow tube being bent when I shipped the carbs?
Don't try and fit carbs with filters fitted, you need to be able to pull them in until they 'clunk' into place.I don't remember the overflow tube being bent when I shipped the carbs?
oh i'm still a little ways off before I fit the carbs - just put everything together to look.
I think I mentioned the bent tube in PMs - it was done in shipping, pretty obvious in the packaging where it happened it just poked through all padding and bent, not big deal it isn't kinked and I already bought a replacement bowl - I'm not using it, because these polished ones are too pretty
That must have had one hell of a hit, I pack them pretty good. It's the first one I've ever had damaged in shipping.I doubt it's worth the shipping to send it for polishing, probably get it done cheaper local?
Re: 75 CB360 - bad omen "yatagarasu" build
crazypj said:
That must have had one hell of a hit, I pack them pretty good. It's the first one I've ever had damaged in shipping.I doubt it's worth the shipping to send it for polishing, probably get it done cheaper local?
I know it's a lot of work to get them that good, looks like you didn't have any major damage from brake pedal chewing on it Should be fine for 29th but no matter how far you get you'll still be 'tinkering' the night before and probably 'on the day'
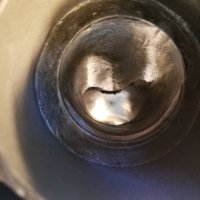
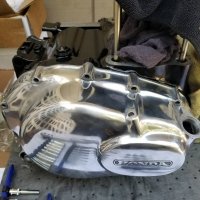
there was a pretty good scratch, it's hard to see in original because the oxidation anyway, but it required a sander, lots of hand sanding to get it flat. I also smoothed the flashing marks and sharp edges where the oil dipstick go, and on the sprocket cover just trimmed a lot of excess in the areas where they simply cheap cast it and made it line up more wit the engine case
I know it's a lot of work to get them that good, looks like you didn't have any major damage from brake pedal chewing on it Should be fine for 29th but no matter how far you get you'll still be 'tinkering' the night before and probably 'on the day'
Sounds like racing. Always work to be done right up to tech inspection, and sometimes we go through that with the bike complete and then tear it down to work on it after it has the royal seal of approval...... ;-)
Sounds like racing. Always work to be done right up to tech inspection, and sometimes we go through that with the bike complete and then tear it down to work on it after it has the royal seal of approval...... ;-)
Lol, I was amazed myself.
Sanding by hand, first with red scotchbrite pad, then 400grit sandpaper, then 600. Then 1000. Then polishing wheel on 8" buffer using semichrome aluminum polish then smaller loose wheel. It's not as good as some I've seen. But ok.
Also. Ports. Feedback? Still got time to make better if needed
That could use a slight clean up. The guide bosses could also be slimmed a little but keep the olive shape so that gas will flow easily past the obstruction. try not to open up the exhaust and don't remove that step in the floor. It will act as somewhat of an anti reversion dam.
But you get most out of porting from the 1/2 inch to an inch past the valve seat. You need a venturi shape and smooth transition. You will probably find that both ports are restricted around the guide and valve and at the point the short turn radius should be as smooth as possible and raise the roof to get the appropriate area. Do not drop the floors - they are already too low for good flow.
And do NOT polish the intake - it hurts power because fuel drops out of suspension and won't burn properly
thanks, what do you mean by olive shape? don't "triangle" them off? I remember from a couple other threads not to go anywhere near the floor of exhausts. I did make sure I smoothed off the radius so it wasn't a "sharp turn" without dropping it
Here is where I know more harm than good can easily be done so I did my best to retain shape and size, only matching the intakes with the boots, the exhausts with the gaskets (except the bottom part) and smooth the transition in the seat area where the casting goes against the seat, made it all nice and neat and a smooth flow.
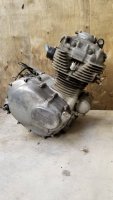
I only kind of understand the theory of port shape and size, I don't know enough algebra to assume that I am a better port designer than Honda was (even in the 70s) so I figured it best to not reshape even in the roof area. I know that the ports get wider in the area of the guide boss as air can get squished in there - I just knocked back all the casting lines and a few imperfections. This head was actually pretty good, not like some cast ones I have seen inside it looks like a huge thick flashing, this was even barely noticeable
Leave guide bosses 'rounded' but narrow them down on valve head side of guide. If you have a 'radius' around guide flow will be better than step. On exhaust you can change the 'lead in' a little more, I like to reduce angle of the 'hump' just before exit (gas is hot and dry so may not actually do any good?
I tend to make 'flow diverters' by making sides of bosses concave (triangular) but it does increase post volume so you loose a little bottom end.
The reason that ports get wider at the restriction is to try to keep the cross sectional area up without dropping the floor or breaking through into the valve seat pockets when the roof is raised too much.
I used teh word "olive" to describe the current shape of the guide boss. It gets wider and then narrower as it approached the guide, that helps flow to go out and them come back around the valve stem. If it was a straight triangle shape the gas would continue to flow "out" away from the valve as it passes it and that would reduce flow.
One issue with our old heads is that the ports are low with tight radius bends and that hurts flow compared to a modern motor with very steep down draft intake ports.
AG Bell in his book on Performance for 4 strokes has the whole intake port mapped out and so do some of David Vizard's texts.
On the intake we tend to open up the apparent restriction just below the seat and unfortunately that cuts flow by directing it at the valve head instead of around it. That's why there's a radius to get the flow around the valve when it's opening.
Quite often I've deepened the 'pocket' on the long side to direct flow around valve head instead of into it. It's often necessary to do so to get venturi 'correct' below valve head, particularly when 'short turn' is a real bad shape (as on 360's or Iron Head Sportsters)
Re: 75 CB360 - bad omen "yatagarasu" build
Working away late into the night, someone asked me how much per ounce I've spent making this bike lighter.... what a stupid question, now I'm depressed
Add lightness. That's how we improve power to weight ratio. Holes are good. Replacing steel with aluminum is good, using Titanium is nuts unless people can see it and admire your excellent tastes and previously deep pockets.
This site uses cookies to help personalise content, tailor your experience and to keep you logged in if you register.
By continuing to use this site, you are consenting to our use of cookies.


")