Follow along with the video below to see how to install our site as a web app on your home screen.
Note: This feature currently requires accessing the site using the built-in Safari browser.
We noticed you are blocking ads. DO THE TON only works with community supporters. Most are active members of the site with small businesses. Please consider disabling your ad blocking tool and checking out the businesses that help keep our site up and free.
Yes, sorry, another retroactive build thread since I was apparently too lazy to post stuff as I went along. Imagine if you will that it is March 2012 and you are in my driveway with me as the uShip guy pulls up with his trailer and we unload this rusty, crusty 1972 CB450 that I bought off ebay from a guy in Tennessee.
A few days later even though I have a CB360 project going I can't help but start to pull a few parts off to she just how rough she is
I moved and was working on the CB360 cafe so I resisted temptation to tear into the CB450 until May 2013 at which point I pulled the engine ...
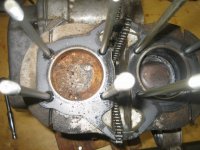
... and took it all apart ...
... only to find one very badly stuck piston. So I'm 2 for 2 on choosing bikes with stuck engines. At least this one only had one stuck piston whereas they were both stuck on the CB360.
Lots of banging with a 4-pound hammer got it freed up and I eventually found some 2nd oversize piston and rings and took they and the jugs to the downtown machine shop to work their magic.
In July 2013 I was playing around with bodywork on the tank after cleaning it out and sealing it with Caswell. My bodywork skills were dismal then and are only a little better now.
The garage is just too hot and humid to do much in the summer months so not a lot happened on the 450 until November 2013 when I started working on the frame mods. Nothing too drastic. I started with a kicked-up hoop that I made from a $12 HF wheel chock. I had to widen it a bit with another chunk of the chock tubing and some slugs. Yes, I know time is money, but I have more time than money available ...
Big gap until July 2014 -- not sure what I was doing. But then I decided that having the engine disassembled taking up 3/4 of a workbench since May 2013 was a really bad idea and decided it was time to start doing something about it.
So I started polishing the aluminum parts
And cleaned and painted the crankcase. I tried putting vasoline on the edges of the polished fins so I could easily reveal the edges after the paint was dry. Did it work? Sorta.
And I baked the parts on my grill to help the paint cure.
Also in July 2014 I painted the rims using some VHT rattle-can epoxy. Next time it will be catalyzed automotive-grade urethane all the way!
Mounted up with new SS spokes the painted hubs and rims turned out nicely
I am using Shinko tires that I had bought months earlier because packages of motorcycles parts arriving at your house makes every day seem like Christmas.
So in August 2014 with the engine parts painted and ready for reassembly I inexplicable decided to let them cure a bit longer and continue to work on the frame. I had to decide what to do about that obnoxiously huge rear fender
I also played around with various ideas for a new battery box
I ended up sectioning the rear fender 2-inches in two different places along the arc that follows the wheel. And I narrowed the back-half of the fender by 1-inch. I cut the original taillight bracket way down as a basis for my custom one
In Jan 2015 I finally got serious about putting the engine back together. I sure hope none of these bolts got accidentally re-arranged in the 18 months they were sitting on the workbench
I wire brushed, degreased these ugly bolts and did a little DIY nickel plating on them. I bought an adjustable power supply and used a $17 crock pot from Walmart to warm the solution. I used four nickel anodes (to surround the part as plating is line-of-sight) sourced via Amazon Prime (a god-send!) and Krohn Nickel plating solution from www.sra-solder.com
I bolted a temporary shelf on the front of my bench for the studs to rest on -- it worked a treat
Cases buttoned up and about to handle the pistons, rings, and cylinder
Oops I realized there were more parts that needed polishing. It was "Shop Saturday" and my wife was nice enough to bring me some pancake -- whatta gal!
Made a nifty tool to remove seals... and then realized I'd already bought one
3rd week of Jan 2015 starting to look like an engine again
But gosh darn it the aftermarket gasket kit is supposed to have three of kind A and one of kind B, but it has the opposite. So cereal box, hole punch and (luckily saved) old gasket to the rescue
By March 2015 attention had turned back to the frame. I used 16ga and 22ga sheet to make and weld on some brackets for rear turn signals. You can also see the as-yet-unbent aluminum seat pan resting on top of the frame and hoop
Here's a nice rear view that also show how the rear fender was narrowed and how much finish welding was still left to do
Sorry this is outta order. Back in December 2014 I had played around with battery box designs and decided on one I'd seen done on a CB450 that was built at Barber by some guys on here. Sorry I will try and find the link. Here's the poster-board template
And here's what you get when you insert tab A in to slot B
So finally in Feb 2015 I realized this in 16ga and 22ga sheet
Here is the battery box on the bike after sculpting the mounting brackets a bit. This pic also reveals my design for bracket to hold the front half of the chopped-down rear fender. And if you look closely you can see that the aluminum seat pan has been bent to nestle nicely against the kicked-up hoop.
Later the painters tape and three little blocks of wood were replaced with an actual welded on bracket to hold the solenoid.
In mid-March 2015 I continued to work on the seat pan and mounting brackets for it. This pic shows from top to bottom: new bracket welded to back of tank, new bracket for front of seat pan, holes drilled and bolts in place for rear-fender bracket, and finally the (mis-placed!) bracket for the back of the seat pan.
Here's the seat pan after I realized that due to the bend that bracket for the sliding catches at the rear of the pan had to be moved up to the hoop itself. Also in this pic you can see how I welded nuts to a piece of steel and riveted that to the aluminum pan. So the pan slides forward and the rear is captured by button-head bolts and the front is secured with a couple of 6mm bolts going up from the bottom into the riveted-on piece of steel.
Here's a rear view showing the piece of steel I welded on to eliminate the huge gap at the back of the tank. On the back side of the rear turn signal brackets to you see threaded rod coupler nuts that serve as mounting points for the back half of the rear fender.
It is still March 2015 and I'm building another overly elaborate license plate bracket (see my CB360 thread and you'll this is not the first time.) In had some 1/4 steel rod, but it got all rusty in my garage/shop so I created a makeshift lathe to get cleaned off to bright, shiny metal
Cut and bent the rod and welding on a few pieces of steel and a few nuts and ended up with what you see below. It mounts to the frame with a pin and a bolt. The pin keeps it from pivoting around (coulda used two bolts, I suppose)
The cavity at the top will have an LED to illuminate the plate
By April 2015 I knew I had to get some painting done before it became too hot/humid in the garage to do so. So I used my HF 40lb Pressure-pot Sand Blaster with some $9-a-bag recycled glass grit from Northern Tool to sandblast the frame and a few other parts
Of course before you can paint there's always a little bodywork to do
This site uses cookies to help personalise content, tailor your experience and to keep you logged in if you register.
By continuing to use this site, you are consenting to our use of cookies.