In the midst of making a fibreglass seat. Need advice. What would you guys do?

RoyalRider

2010 Royal Enfield Bullet 500 - 1982 Honda CB125s
Hello people,

Thanks for taking the time to read my post. I have an '82 Honda CB125S that I am working on as a project and am currently trying to fabricate fibreglass parts for it. I've already made a great fender but I'm struggling with the seat.

I'm 25 now but when I was 16-17 I did some fibreglass work on boats for the sailing club I worked at. Not much experience other than that so I'm pretty much useless when it comes to bodywork.

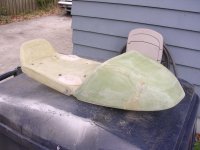
Here is how my seat looks like now :

http://imgur.com/a/h1I4Y (please let me know if you have trouble viewing this I can always attach it to the post or re-upload with a different website)

As you can tell, it is mostly filler... here is what it looked like when it was just glass: http://imgur.com/8mMQKbY. Full of imperfections and a few holes, this pic was taken after I rough sanded off bubbles and stuff before applying 3M bondo.

What would you guys do in my position? Please note that I am recently graduated but with a job...meaning that I am not poor but can't afford to just throw money at it or bring it to a professional shop.

I'm thinking the best course of action is to somehow use the inside of it as a mold. I've never done anything like this so right now my best guess is this and you guys can tell me if it is stupid :

I was thinking of using balsa wood to line the inside and then remove it and nail it together to create another 3D shape with perfectly flat surfaces. Then I just re-do what I did originally to the insulation foam I used which is to tape it, wax it, and glass it using fibreglass cloth as opposed to mat (which is what the seat above was made out of).

Thanks for any and all advice.
 
For future reference you can post pictures using image tags - just put [ img ] at the beginning of the web address to the specific picture and [ \img ] at the end (eliminating any spaces in those tags). You can also paste the address in the text box, highlight it, and just click the little Mona Lisa button in the upper left hand corner of the "Post Reply" box, which should add the image tags automatically. This is great because you don't have to upload the picture more than once.

To your questions, there's nothing wrong with using body filler on your homemade seat, but if it were being done professionally it would be unacceptable IMO. Since the fiberglass would likely flex the filler may be prone to cracking later. Professionals would start by making a smooth finished seat like yours (likely also utilizing some filler as a top coat), but then they'd continue and make a female mold on top of that seat using more fiberglass. Since the original seat was finished smooth the mold should be smooth as well. Then, they'd lay up a release agent, gel coat, and more fiberglass inside the mold to make a finished part. If done correctly the part should be smooth, sturdy and lightweight when pulled out of the mold and only require minimal trimming. As you can see, it's kind of involved. That's why if I needed another fiberglass seat for a bike I'd probably shell out the $100 a finished seat goes for on eBay (or better yet, order from DTT member J-Rod10 who runs Slipstream Cycle Works).

Since this is on an early 80s 125 (not something particularly high value in the first place - no offense), I'd just use the seat you made (provided it fits on the frame). Sand it down to make it as smooth as possible and remove as much filler as possible, then paint it, mount it, and ride it. If it starts cracking later you can still go through the professional process described above. You may find that you want to get a new bike at that point, that you don't like the seat design and want to change it, or you may have the funds to buy one.
 
Hey BarnBuner thanks for the reply.

Sorry I screwed up the image linking I didn't want to use the img tags because my links we're for albums and I wasn't sure if it was going to work or only display one picture. I suck at forum formatting :p

Thanks for the description of the more involved process. Unfortunately I very much want to avoid buying a seat from ebay or DCC (although I did buy a quarter fairing from them :p). I really want to build this seat, it is important to me that most of the fabrication (barring welding since I don't know how) for this project be done by me.

Don't worry there's no offense I know this bike is low value haha it's not my main motorcycle and I don't intend to sell it once completed. I also own a Royal Enfield for riding hence my user name.

I'd like to use it as it is now but I can't....if I sand down all the crazy amounts of bondo I've put on it until it's mainly fibreglass it's going to expose the very warped sides of the seat....definitely not to be painted in that state. It would look like a glob of melted plastic on the back of my bike.

Unless there's a way I can reliably seal the seat as it is now for priming and painting. I am under the assumption that if I prime and paint directly onto the bondo it will look awful and also finish differently depending on which spots are bare fibreglass or bondo.

If there is cracking down the line (a year or two) that's not the end of the world but I don't want it to crack into dust after a few weeks or a month of riding. If its a year or two fine since I will probably continue to work on my fibreglass skills every summer.

I don't expect to get showroom award winning results but I also don't want people to look at my bike and think "oh yeah, backyard DIY". I want to be proud to post pics of my bike without people tearing it apart saying it looks like garbage.

So in your opinion my balsa wood idea is ? or do you think one should only attempt to go the female-mold involved process route.
 
To be clear, I'm not against the involved process. I'd like to go that route but I'm afraid I live in Canada and it's already half-way into September...don't have much time before it gets too cold to work fibreglass here. I don't have a heated garage I am lucky to have any garage space at all....

That's why I'm thinking the balsa wood will allow for a rigid construction (i'd use the styrofoam insulation but it was hard to work with the first time) to be made quickly using the inside of the current piece for measurement. Fibreglass cloth if properly imbibed and draped over a shape dries with a somewhat smooth finish. An easy skim coat of bondo and sanding should make it nearly as smooth as super-professional mold-style fibreglass.

I mean, I feel that way, since the fender I made with cloth was sanded quickly and is extremely smooth (but not glossy like the gelcoat airtech-streamlining puts on their pieces which are sold through DCC).
 
I have two close cousins that are award winning auto body technicians.

There is absolutely nothing wrong or uncommon about using body filler over fiberglass.
 
DohcBikes said:
I have two close cousins that are award winning auto body technicians.

There is absolutely nothing wrong or uncommon about using body filler over fiberglass.

I'm not saying that there isn't anything wrong or uncommon with filler over fiberglass generally (certainly there are lots of early corvettes still driving around covered with filler). I meant my statement to apply to this specific application. With the stress of a full grown adult on a tiny homemade seat on top of a not exactly smooth riding motorcycle, it's realistic to say there could be some flex in the part, which could ultimately crack filler (or even the fiberglass itself). If I was paying a professional for a fiberglass seat, I would be unhappy if it was covered in filler. YMMV.
 
RoyalRider said:
That's why I'm thinking the balsa wood will allow for a rigid construction (i'd use the styrofoam insulation but it was hard to work with the first time) to be made quickly using the inside of the current piece for measurement. Fibreglass cloth if properly imbibed and draped over a shape dries with a somewhat smooth finish. An easy skim coat of bondo and sanding should make it nearly as smooth as super-professional mold-style fiberglass.

I think your idea may work. I have never seen it done, though, so maybe someone else will chime in. If not, you'll just need to try it I guess. You may also want to just start over and take more time/care doing the base and laying the fiberglass. I made a fiberglass seat for my Honda 350 a few years ago and used heavy cardstock (e.g., cereal boxes) to form the seat's shape right on the frame (instead of foam). I covered the whole thing in aluminum foil to avoid it sticking, used several overlapping pieces of mat for most of the seat and a final layer of cloth on top to get a smoother finish. It came out fine and required little finishing.
 
BarnBurner said:
I'm not saying that there isn't anything wrong or uncommon with filler over fiberglass generally (certainly there are lots of early corvettes still driving around covered with filler). I meant my statement to apply to this specific application. With the stress of a full grown adult on a tiny homemade seat on top of a not exactly smooth riding motorcycle, it's realistic to say there could be some flex in the part, which could ultimately crack filler (or even the fiberglass itself). If I was paying a professional for a fiberglass seat, I would be unhappy if it was covered in filler. YMMV.
There is significant flex in almost every automotive fiberglass application.

It is perfectly fine and common to use filler for any type of fiberglass bodywork.
 
Fiberglass is a very forgiving material because you can make something, cut off what you don't like, graft on something new, make any change you want and at the end it is in the main, all just one piece - that is - generally there is not a structural problem at the add on joint. There are a couple of main methods of construction. 1) make a really good mold and lay up your part in it and presto, you have your part - but you have a massive amount of time making the mold. 2)make a crappy mold for a one-shot part and plan on a bunch of sanding and carving to get it perfected. 3) Mold-less construction where you make a really nice form a tiny bit smaller than you want and lay up the glass over it - keeping the core form inside. I have a pretty fair bit of experience building fiberglass parts and use methods 2 and 3 almost exclusively. If I want to reproduce a part I make a pretty sophisticated silicon mold which is super expensive so I invariably only make one of anything - hence methods 2 and 3.

The seat below was made using these 2 methods. The seat part was made over a pretty crude combination of wood, aluminum and modeling clay plus anything I had handy that looked like it would make a shape I wanted. I hacked all this up on the bike. I made it extend over the rear fender a ways so I could add more to it using method 3. That part is now the underside of the cowl section. When I got it like I wanted, I melted some candle wax and painted the whole mess using a throw away paint brush. Then I simply laid up a couple of passes of glass. I use extremely light weight cloth and epoxy, because the epoxy is much stronger (also MUCH more expensive) and the fine cloth conforms well to convoluted shapes, but polyester resin is fine as well and any cloth or mat that works for you is ok also. I popped it off the "mold" the next day, (sometimes a heat gun or hair dryer is useful to melt the wax and release your part) but put it right back on the mold for about a week so the part would hold its shape. The materials I use are pretty flexible in one day, but very rigid after a week so I kept it on the mold so it would retain its shape.

After it was cured up, I trimmed the edges and got it mounted on the bike. It did take a fair bit of work to get it looking good on the underside which shows when you open the seat, but overall it took a reasonable amount of time. I then used method 3 to make the cowl. Just some blocks of green florists foam glued together. I carved out the bottom so it would fit on my "seat pan" and glued it on. Carved it to the shape I wanted, and laid up some glass over it. The glass and epoxy are very transparent, and you can easily see all the joints between the foam blocks. I only had pretty small ones on hand, so I had to glue a bunch together - with Bondo! With a little care you can make extremely smooth and accurate parts. The glass has a texture to it due to the weave of the cloth, but I just sand it smooth, paint on a coat of epoxy, give it another sanding and it is ready for bodywork and paint.

I have found you can make nearly anything with these 2 methods. If you don't like something or it does not do what you expected, you can just cut off what you don't like and keep working. Easy and fairly cheap - you are only limited by your determination.

And there is nothing at all wrong with polyester body filler (Bondo). You do have to have a clean and properly prepared surface, but properly applied it is generally pretty bomb proof. You do need to use appropriate primer/sealer/surfacer etc, but you should expect no issues. In the pic below, the two "islands" are threaded aluminum plates for bolting on the hinges and latch (the third one is not visible in this pic). That's Bondo you see that I used for fairing them in. The part you see was used as a "mold" for the seat pan that got upholstered. I faired in the plates to eliminate corners that that part might catch on. My cowl came out quite well and didn't need any filler anywhere, but that is not always the case. This part got epoxy primer, then a surfacing primer and then paint.
 

Attachments

  • DSCN0797.JPG
    DSCN0797.JPG
    656.2 KB · Views: 257
Very concise explanation of your real world experience mobius. Thank you.

I have seen so many methods of forming 'glass that i couldnt start. It's not about the method it's about the result.
 
Thanks BarnBurner, DohcBikes, and jpmobius for the replies I appreciate it.

Yeah DohcBike I think you're right about bondo but BarnBurner meant that if he received a piece with the amount of bondo that is on my part...he would be worried and I would be too hahah. It should look like mostly glass with spots of pink for the bondo whereas my part looks pink with spots of fibreglass and white plaster. Don't worry, I know the plaster is extremely brittle and useless for paint, I was desperate in trying to get my shape to be smooth and the bondo wasn't cutting it whereas the plaster was helping out. I realize now how brittle it is and that it won't work well with paint.

jpmobius thanks for the info and the support. I think now I have an idea what I will do and that is to persevere. I will attempt to just re-glass the balsa wood that I will construct using the interior of the piece as a form-guide. I still have mat and cloth just need to guy buy more resin.

I thought it over during the day and realized my problem was that the 3M Fibreglass resin solution I was using came with a catalyst hardener that is completely sealed. It's a tiny little squeeze bottle but the tip is shut and you have to make your own hole in it. This is dumb because the back of the resin can says "use this ___ many drops for this many ___ ounces of resin" but if the hole is not the size that they used those drops might be bigger depending on how you big you make the hole.

Thus my drops were too big I suspect and my resin mixture was hardening too fast...I only had legitimately 2-4 minutes to work with the glass and resin. In my haste I was unable to properly imbibe or place the glass and it lead to big bubbles and uneven application.

I think if I remember from when I was glassin' boats back in the day that if you use a tad less hardener it shouldn't impact the result but the glass will simply take a bit longer to cure. That's fine since I'm working in the office during the week so it has plenty of time to dry.

So what I plan to do is build up the balsa into the same shape as the current seat, use aluminium foil to cover it and the coat it with thick wax (I had previously used spray wax! don't do this hahah it doesn't work well enough) glass it with patches of interlapped mat sheets (which makes it harder if I recall correctly) and then place 2 layers of cloth.

I had already made a seat completely out of cloth but it failed when (due to the mixture drying too quickly) 2nd cloth wasn't placed right and ruined the shape. I did notice however that this seat made out of 2 layers of cloth was extremely durable...I hit it as hard as I could with a hammer and it did not crack. It also didn't crack when I stood on the top of it once hollowed out and jumped up and down.

So to anyone wondering...I am 5'11 and weight 160 pounds and was not able to crack 2 layers of fibreglass. I'm positive it would hold up to hitting a huge pot hole in the road.

Thanks for the boost of confidence guys I will keep at it. Maybe i'll post update pics to this thread but I am definitely planning on doing a full post in the project section when the whole bike is done (soon-ish the frame is on the way back from the powdercoaters).
 
Something else you should know is that there are much better fillers than are commonly available in parts or dept. stores. The difference is significant. In addition, the store shelf bought fillers and hardeners have generally been sitting a long time.

Who build hot rods in your area? Take a six pack and have a conversation with him.

I have emailed barnett468 on this matter so im hoping he also weighs in. He has worked on cars that you would instantly recognize. As in, if you've seen Gone in 60 seconds, you've seen some.
 
One of my other hobbies is high performance light weight sailboats, mostly made of hand laid fiberglass or carbon. I'll make some suggestions from my knowledge that may be of use.

I use thin foam on any flat surface or anything with gradual curves, available from most fiberglass suppliers. Leave it as part of the finished product and put a layer of fiberglass on the underside. This "sandwich" can produce a lighter stronger final product.

Next, I used the same epoxy I use for layup together with micro ballons as a filler. This stuff is incredibly light and you will never go back to bondo once you see how easy it is to sand. Pick it up at your local boating store for about $15.
 
Kinda figured this convo would include boats.

Boats constantly sit in water, which means 2 things.

1.His advice is good.
 
For about 6 months I worked for a company that makes after market oversized gas tanks for dual sports and dirt bikes. Part of the mold making process involved making a fiber glass and bondo mold. We also found that the ratio of hardner to gel was to much and it would harden to fast. So we reduced it down to half or even a third of the hardner. It would would get just as hard () but would take 30-40 minutes to harden. Also just as a side note you can mix bondo and the fiber glass gel (different ratios to make it more fluid or not) with the fiber glass hardner to get a super hard bondo that is more resistant to cracking then normal bondo but it is harder then hell to sand so work with it when it is still softish.

Not sure if that helps at all but just something I learned that hopefully contributes to this community.


Sent from my iPhone using Tapatalk
 
DohcBikes said:
Something else you should know is that there are much better fillers than are commonly available in parts or dept. stores. The difference is significant. In addition, the store shelf bought fillers and hardeners have generally been sitting a long time.

Who build hot rods in your area? Take a six pack and have a conversation with him.

Luckily the store I am buying from has recently opened so I know they haven't been sitting on the shelf for too long. I'm sure it's common for this stuff to sit on shelves for years but I'm hoping the cans I've been buying are only months old. Never know though, the supplier they order from could have had them for a long time.

The only place I can think of that would have better stuff is this Marine store in the area but they are notorious for overcharging since the yacht owners in these parts are wealthy. I hope that my next piece is smooth enough that I only need to use bondo for a skim coat and nothing more.

Ply318ci said:
So we reduced it down to half or even a third of the hardner. It would would get just as hard () but would take 30-40 minutes to harden.

Thanks for this, I figured as much and I plan to reduce the amount of catalyst in the mixture. Might have to do a few test batches to see what is the best mix. As for mixing bondo with the resin yeah back in my boat fixing days we used to sometimes take handfuls of the fibreglass dust that accumulated from sanding other boats and sorta mix it in to strengthen the mix. It was all in vain though the kids were so rough with the little optimist sail boats they broke almost daily :p
 
Just a word of caution on materials. Polyester resins - Including Bondo and nearly all other automotive body filler products are very forgiving with the mix ratios. You can use extra hardener for faster cure or less for slower without so severely affecting the end properties that there is a problem. For glass lay ups don't go too far afield of the suggested ratio because strength will be affected if you deviate far enough, and polyester is a bit weak to begin with. If you decide to switch to epoxy, you need to make very accurate mixes and do extremely thorough mixing. Very small discrepancies can result in permanently unusable and un-salvageable parts. Epoxy is a lot stronger (yields lighter) and is worth the extra trouble if you don't mind the extra expense.

Also, protect yourself from all of these chemicals. Polyester is more friendly than epoxy, but it is possible to develop very acute allergies with enough exposure for some people so wear gloves and keep the liquid chemicals away from your skin.

For your project I suggest you stick with readily available automotive body fillers as long as you are using polyester resin for your glass work. Cheap and convenient. I have used every type of filler media I have ever heard of and they all work well, but some are really hard to mix. In boat and aircraft construction, structure as a rule is way more important than on a bike seat, and if epoxy is used (of course this would apply if you use epoxy) there can be an aversion to using polyester products like Bondo because epoxy does not like to go over the top of it. Mix your preferred filler with epoxy and you do not have this issue. If you are using polyester for your glass work stick with polyester filler. Of course, you can mix the fillers (like micro spheres) with polyester resin as well, but it hardly seems worth the trouble when Bondo is cheap and ready to use. Dohc's comment on the shelf life is valid, so buy from a source that has some turn-over. It has to be pretty old to be bad, but be advised.

As far as fabricating your project goes, I suggest you put some focus on creating as high a quality form, base, mold, etc. as you can. I think beginners are sometimes overly focused on the fiber glassing aspect of the job and underestimate the need for a quality form to work from. Get your form exactly how you want it, and the glass work at least will be the right shape regardless of how much of a learning curve you have with the lay up. It's a lot like great paintwork - Spraying on that beautiful paint at the end may look like the important part, but it is actually the quick and easy end of a long and messy process that is all important to the end result. Someone may say "great glass work!" once your project is done, but really it is all about the preparation that is never seen.
 
This thread of my first and last seat pan should provide some insight and some humor, no matter the look before the cover you might just be "okay" in the end :eek:

http://www.dotheton.com/forum/index.php?topic=65243.0
 
The mold we made for gas tanks were one time deals they just had to hold up for the aluminum casting process. So I am not sure how they would hold up on a seat. I am following this thread closely as I plan to build my own seat as well.


Sent from my iPhone using Tapatalk
 
Everyone always seems to be against this way, my preferred method.

Step 1: Make plug, the seat you are making in this instance. Get it perfect.

Step 2: Make mold.

Step 3: Wetsand mold, apply release, gel, lay glass.

Step 4: Pop perfect (as perfect as your plug was anyhow) part out of mold. Trim, lightly sand the surface to rough it up, primer, paint, clear, install.
 
Back
Top Bottom