First ever cafe build progress report

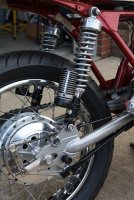
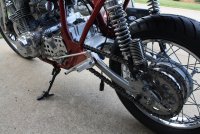
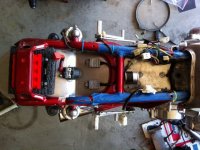
Why have you run your rear brake with the arms in an up/down orientation? Not only are they up/down, but the appear to not be parallel. The short span of the rod and they way it crosses over the pivot points coupled with the arms not being aligned gives me the impression that the pedal action will be less than smooth and terribly inefficient.

I know there are reasons to divert from the standard up/up (or down/down), parallel, and equal length arms setup, so if you have a reason then just ignore my post.
 
Believe me, I would rather see the arms parallel, pointing in the same direction, but it was the only way I could have the lever pull the drum arm. If the arms were both up, the brake actuator would push and I didn't think the stock rod could take that kind of force or apply enough force to effectively stop the bike. Am I wrong in this? Also, if the arms were both in the down position, there would not be enough clearance for the exhaust pipe and the actuator rod would still be pushing on the drum arm. The lever arms will be parallel, but I made a mistake and welded it in the wrong position.
 
Update on the CB750. Not willing to leave well enough alone, I modified my swing arm in order to raise the rear, upgrade to roller bearings, and tap for spools. The pivot mod was done by my local machine shop. They also welded up the new shock mounts. The initial plates were done by me and a friend of a friend who tack welded them in place. Then, I had the swing arm re-powder coated silver, which was a gamble that I feel paid off. While I was at it, I had the powder coat guy do some other parts for the 750 and KZ400. Anyway, I assembled the rear end this afternoon and was pleased with the results. I am finally satisfied with the bike's stance, and I feel the rear sets are all good.
 

Attachments

  • IMG_4338.JPG
    IMG_4338.JPG
    119.3 KB · Views: 401
  • IMG_4340.JPG
    IMG_4340.JPG
    110.9 KB · Views: 391
  • IMG_4342.JPG
    IMG_4342.JPG
    66.4 KB · Views: 395
Assembly of rear end. While I was at it, I brought a bunch of other stuff for the 750 and KZ400 . I am glad I brought the CB's springs over for an opinion. They came out beyond expectations! I love my shocks!
 

Attachments

  • IMG_4415.JPG
    IMG_4415.JPG
    69 KB · Views: 393
  • IMG_4416.JPG
    IMG_4416.JPG
    92.1 KB · Views: 401
  • IMG_4423.JPG
    IMG_4423.JPG
    153.5 KB · Views: 417
  • IMG_4425.JPG
    IMG_4425.JPG
    160.7 KB · Views: 414
First time I've seen this build, It's looking great. I too like the red frame with the silver swing arm and the rear sets also look great. This is why I love this fourm there aways great ideas to build off of. can't wait to see it finished.
 
Thanks. This project sure is taking a long time, but I anticipate start up this spring. I have learned a ton of stuff working on this project, even though I've not done anything radical or innovative (like a lot of others here). The big things left to do are the electronics and bodywork (paint), which I know are going to be expensive. I plan on using a Shorai or Antigravity battery and have the guys who painted up my Buell do the paintwork.
 
Found some 16 gauge steel and finally got my undertail fitted. Now to mount up the electronics. Shorai battery on its way! WOOT!
 

Attachments

  • Undertail 1.jpg
    Undertail 1.jpg
    70.2 KB · Views: 1,453
  • Undertail 2.jpg
    Undertail 2.jpg
    139.8 KB · Views: 1,472
I just read through your entire build thread... Awesome work! I like the way it is turning out. awesome attention to detail too.

I have a question too. what did you use to dent your tank? i am no stranger to a body hammer, but that doesnt sound like the best way to get a smooth and consistant shape on both sides.

just curious...

Keep up the good work!
 
When I stripped down my tank to bare metal, I found it was flawless and didn't have the heart to bash it in. So, I bought one off ebay for about $60. Anyway, I didn't use a body hammer, I used a small mallet that has a soft rubber head on one side and a hard plastic head on the other. If you take small strokes, the resulting dents are small. Crude, I know, but it really was pretty smooth when I got done.
 
Currently arranging the wiring under the seat. I used the foam packing of the Ballistic battery to house the battery itself. I think it will work out great and isolate the battery from vibration/shock. The solenoid is an issue because it's kind of tight with everything stuffed in there. I was just thinking to maybe mount the rectifier under the seat pan. I am also playing around with the center tach mount. Right now, it is up too high. Great visibility, but looks out of place...
 

Attachments

  • Ballistic battery2.jpg
    Ballistic battery2.jpg
    98.3 KB · Views: 1,472
  • Ballistic battery1.jpg
    Ballistic battery1.jpg
    120.4 KB · Views: 1,563
Yeah, your reg/rect need air flow to cool it.
So it sounds like you haven't fired it up yet... curious about those Pods
I too am on one of those forums that PODS is a 4 letter word.
BTW... Build looks friggin awesome!
 
Yep, I figured those cooling fins were meant for something. My seat pan is not closed off, though. I have noticed a lot of guys pack all that stuff under the seat cowl. Personally, I'd rather not have a blaze going under my ass.
 
Finishing up the undertail and laying out the electronics. Getting down to the nitty gritty!
 

Attachments

  • undertail top.jpg
    undertail top.jpg
    72 KB · Views: 1,372
  • rectifier side view.jpg
    rectifier side view.jpg
    36.5 KB · Views: 1,461
  • rectifier.jpg
    rectifier.jpg
    32.3 KB · Views: 1,436
Back
Top Bottom