Yam RD Exhaust Gasket Orientation

2_DONE_THE_TON

Over 1,000 Posts
DTT BOTM WINNER
Hey guys!

I have a question on how the exhaust gasket between headers and mufflers is/are installed.

I made a few pics how i would use them...
Since this is a Yam RD250 Euro it has no 'threaded' fitting piece like the american rd400.
 

Attachments

  • uploadfromtaptalk1414260839316.jpg
    uploadfromtaptalk1414260839316.jpg
    506.1 KB · Views: 157
  • uploadfromtaptalk1414260864555.jpg
    uploadfromtaptalk1414260864555.jpg
    691.2 KB · Views: 157
  • uploadfromtaptalk1414260894358.jpg
    uploadfromtaptalk1414260894358.jpg
    738.2 KB · Views: 159
Ryan, the flat part of the seal goes against the end of the threads of the muffler section. The tapered side goes toward the nut, opposite of the way you have it in your pics. The nut is tapered inside to match the taper on the seal, and when you tighten it down, the flat side seals against the end of the muffler, and the tapered part gets squeezed between the nut and header pipe.
 
Hey moeb!thank you a little helpless here.

Is the header supposed to fit in the gasket?i tried it with the tapered part up but the the header wont fit in there (too thick by dimension).
Or is it supposed to be extra extra tight to improve sealing?


How is the header pipe held in the nut,it will supposedly just slip out when the seal goes between the muffler and the header ...
 
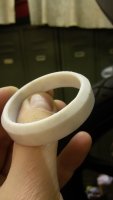
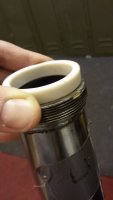
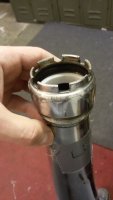
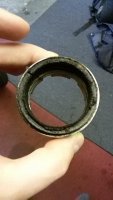
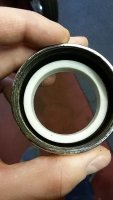
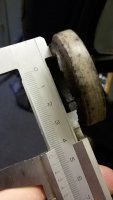
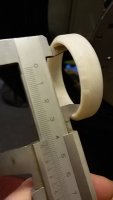
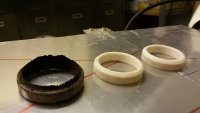
The nut slides onto the header pipe first, then the seal slides onto the pipe. Yea, those seals can be pretty tight. They can break too, so be careful. You may want to take a half round file and make a very slight chamfer to help, but you should be able to coax it on without it. Make sure the header pipe is perfectly clean and smooth with no nicks or burrs. The seals work really well, but are a bit fragile and need smooth mating surfaces to work, so check the inside of the nut and end of the muffler where the seal will touch too. Remember, it is only a seal. You can bolt the header pipe to the cylinder, and the muffler to the chassis without the nut and seal, and you will see the two parts are very rigid, even though there is a lot of clearance between the header and muffler. The won't move much at all. The nut and seal are not really intended to bolt the two together, though they do a pretty good job despite that. You should trial thread the nut on the muffler before hand to make sure it starts easy and threads smoothly, because on the bike, occasionally they tend to be hard to start and bind up a little once all the parts are in place, so a little "practice" is good to ensure you know it is actually threading on correctly. The nut goes on the header pipe first obviously, then the seal with the taper towards the nut. Sometimes the assembly can be a bit tricky to mount to the bike, so put the header pipe on the cylinder loose (but tight enough to keep the exhaust gasket in place) with the nut and seal already on it. It is a bit of an awkward angle and surprisingly hard to know the nut is aligned correctly sometimes. Slide the muffler into place, and spin the nut onto it with out installing the muffler's mounting bolts. Once you have the nut on three or four turns, bolt up the muffler leaving all the bolts loose. Spin the seal nut all the way on, but not enough to compress the seal. Tighten the header nuts at the cylinder, then tighten the muffler bolts. Wiggle the joint between the header and muffler a bit while tightening the header nuts to make sure it slides inside the muffler without hanging up on it causing misalignment of the header at the cylinder. Lastly tighten the seal nut. Don't over tighten it. You only need to compress the seal enough to keep it from leaking and to stop the nut from backing off. Snug it up and run the bike. If it leaks, tighten a bit more. If over tightened, they can be very hard to disassemble after a lot of miles accumulate.
 
so i have news.

the new gaskets i bought seem to be the wrong ones.got it from my local yamaha dealer.you can see in the pics below that these gaskets are too small to fit over the downpipe and wont be snug in the crown nut.

are these gaskets really the wrong ones or will the gaskets "grow" under heat when the muffler heats up?

so i tried installing the old ones .the right gasket lets me snug down the downpipe to the muffler pretty nicely but the left one (which is torn) doesnt let it be snug and nice.

it seems like a got the wrong gaskets and need to wait for my Yamaha Classic Dealer in Germany to send me new ones (they are discontinued in Europe so i guess i have to wait).Yambits dont have them in their assortement.
 

Attachments

  • nutold.jpg
    nutold.jpg
    48.3 KB · Views: 500
  • nut.jpg
    nut.jpg
    62.3 KB · Views: 476
  • old1.jpg
    old1.jpg
    49.5 KB · Views: 488
  • new1.jpg
    new1.jpg
    34.1 KB · Views: 482
  • all.jpg
    all.jpg
    54.4 KB · Views: 144
Just happen to have some of those on hand, so went out to the shop and measured them. ID is right at 40+ mm. Absolutely certain they are correct because I used some recently. Yours look to be the right ones as well, I can't imagine that Yamaha made a larger version for the last air cooled 250's. They are a bit tricky as mentioned before to install.
 
Cant imagine that too.
So i guess i ll need to keep the downpipe clean and ramp the gaskets a little bit with a file before installing (thanks for writing earlier how to install).

The only thing i'm worried about is the gap between the gasket and crown nut.the old seal seems to sit snug with the crown nut.
Maybe the old gasket really deformed under heat and now sits differently then the new one.
 
I think it will be fine. The nut is tapered as well and compresses the gasket into the header pipe, and the threads pull the gasket into the muffler.
 
hey!


today i called my yamaha classic parts dealer in germany.a great and nice guy who knows everything about yamaha 2 stroke parts.

he told me that the gaskets i got from my yamaha dealer are the ones for the earlier (pre 1978 models) models of the RD.
the after 1978 model (2R8´s) got larger diameter gaskets.

so i guess i will either wait for the gaskets to arrive at my classic parts dealer or search the web for the gaskets.
thank you for your support!
 
That is pretty interesting. Post some pics when you get the parts, it would be cool to see the difference. What is the outside diameter of the head pipe where it meets the muffler?
 
I will do!I´ll post the diameter when i´m working on the bike again.

Wrote Yambits,they are currently letting these Gaskets produce,but it will take 1-2 months to finish.....frustrating when everything is finished and just 2 gaskets are missing :)
 
jpmobius said:
That is pretty interesting. Post some pics when you get the parts, it would be cool to see the difference. What is the outside diameter of the head pipe where it meets the muffler?

hey mobius!

today i measured the gasket diameter i will need:

outer diameter: 54 MM
inner diameter: 45 MM
length of the gasket:11MM

i didnt receive an answer of my yamaha dealer yet BUT i found another dealer who has gaskets in different diameters and lengths:

i found one which is:

outer diameter: 51 MM
inner diameter: 45 MM
length of the gasket:20MM


so my qestion here for you is:

should i try these gaskets?

their outer diameter is a little smaller (3MM) and the length is way longer (9MM).

will these 3MM make the exhaust leak?
if the length is a problem i could use a disk and grind them down to 11MM stock length....

help appreciated!!
 
I would try it. The id is the most critical, and it matches. Cutting the length down should be easy (though it is likely asbestos, so don't breath the dust, or let the dust contaminate your area). The od probably will be ok. The gasket seals on the flat side against the muffler, and against the taper of the nut on the header side. You may wish to try it without modification. Assemble all the parts first with no gasket, on the bike, all bolts loose but installed. You want to do a trial run so you know the castle nut threads don't bind and that everything aligns up. Then take it back apart and try it with the gasket in place. Also you can try out the loose fit with all the parts on the bench. Assuming you can start the threads, the gasket may just compress down and expand to the right od. Put it all together on the bike and just snug it down. Then, after you get the bike running, tighten it up until it does not leak. Those big castle nuts usually do not need to be that tight, but need attention right away if there is any leaking. The leaking damages the gasket, so left unattended, the gasket is ruined. Make them tight enough not to leak, and check them after some heat cycles and adjust as needed. Like anything, overdoing it will go wrong!
 
Victory!!!!

This weekend i took the non yamaha gaskets and grinded them down to the height of the stock gaskets and slighlty ramped them.
On the last threads of the muffler joint the connection became super tight.
I followed your earlier layout of the assembly and it worked out fine!!

Finally all the bits and pieces are coming together!soon i can start her up :)

Thank you for your support what a thrill!!
 

Attachments

  • uploadfromtaptalk1424629880389.jpg
    uploadfromtaptalk1424629880389.jpg
    2.5 MB · Views: 184
  • uploadfromtaptalk1424629921056.jpg
    uploadfromtaptalk1424629921056.jpg
    1.8 MB · Views: 158
  • uploadfromtaptalk1424629943559.jpg
    uploadfromtaptalk1424629943559.jpg
    1 MB · Views: 162
  • uploadfromtaptalk1424629961952.jpg
    uploadfromtaptalk1424629961952.jpg
    932.6 KB · Views: 177
Good to see the issue solved. Man, I am super surprised that Yamaha re-sized those header pipes from earlier years. All the components look identical except for the size. In the US, they changed the connection design altogether when they dropped the 350 and went to the 400 in 1976.
 
I dont get it too.if you want i can post the part number.
What could be the advantage to enlarge the diameter if the exhaust setup for a few MM s?
Maybe noise and pollution restriction?
 
Back
Top Bottom