Weslake Nourish

UK Mark

Been Around the Block
I'm just about at the end of my dry build, but I'll update on here as its taking way longer than I expected.

Bikes a slimline featherbed frame with a Manx type rear end, 750 Weslake / Nourish 8 valve engine with a slick shift gearbox upgraded to 5 speed and a Newby clutch. Loads of other things made and added, but it's a daytime only road bike.
 

Attachments

  • image.jpg
    image.jpg
    133.6 KB · Views: 1,548
This bikes been in the family since the early 1980's and I first restored it in 1992/3 when it had a pre unit triumph engine fitted. Lovely thing to ride back then, but twenty years on, it's time to upgrade to something more lively.

The tank I fitted back then was fibreglass, so I've just bought an alloy mini Manx type from Tab. They turned it around in about 5 weeks, so I've just painted it with the bikes new name
 

Attachments

  • image.jpg
    image.jpg
    2 MB · Views: 394
There's a load of pictures over in the UK forum for the project up to date, so kind of in the wrong place there I guess.

I've recently picked up an oil cooler, which will sit up front in the fairing below the speedo and tacho, so I cut a pair of slots to get some air across it.

I've painted more than a few sets of race bike fairings in the past and always just coated the inside with satin black, which was fine as thats generally good enough but I wanted a nicer finish on this. I bought this carbon fibre fairing from Molnar and it's really nice quality, but the weave on the inside could be improved. Laying 30 gram tissue on the inside with polyurethene resin took some time to flat back smooth, but the result is as good a finish on the inside as out. Just 2k primed the top fairing section and it's come out better than I hoped.
 

Attachments

  • image.jpg
    image.jpg
    541.4 KB · Views: 307
On the right hand side of my fairing, I had to make a couple of bulges for the Weslake engine. I looked at an Avon type which wouldn't need these, but I'd already bought this as my bike was going to retain its Triumph engine at that time. I prefer the shape of this fairing too, so it was worth the messing.

A while back, I made an aluminium scoop for the top one to be rivetted on, but I thought stuff it and used it as a mould to glass one in instead. Didn't take long at all to do this at all and it won't dent easy like the alloy one would.
 

Attachments

  • image.jpg
    image.jpg
    665.4 KB · Views: 304
  • image.jpg
    image.jpg
    932.8 KB · Views: 291
  • image.jpg
    image.jpg
    499.6 KB · Views: 294
Top section is still in primer, but I wanted to get the other scoop or bulge glassed in before I lay tissue and resin inside the bottom piece.

You can see the difference on this picture, but what I wanted was the inside of the carbon fibre fairing looking like a modern bike with as good a finish on either side. It does actually look and feel like plastic on the top section and it's not much heavier at all.

It shouldn't crack because of the tissue, so I hope it to be fairly resilient.
 

Attachments

  • image.jpg
    image.jpg
    1 MB · Views: 336
Jeez, done nothing on my bike for nearly two months.... I need a kick up the back side.
 
Managed to get Sunday afternoon in the shed and finished laying up the inside of the bottom part of the fairing. It takes 'time consuming' to a completely different level when doing this, but the result when finished is great.

Just wiped it over with acetone, then coated it with resin and some 30 gram tissue. Not much finesse needed to do it, but once fully cured, I'll block it back with 180 grit paper and then 320 it smooth. There's no air bubbles in this coating, so it sands back lovely. It's just a slow job.

Its hardly put any additional weight on the upper fairing section I did a little while ago and the difference is amazing. Won't ever do it again, but glad I did it this time. Aiming for primer this coming weekend.
 

Attachments

  • image.jpg
    image.jpg
    1.1 MB · Views: 269
I'd been wondering how this one was coming...it's a beautiful piece of work for sure!
 
Took forever blocking that resin down, but it's an even thickness all around - actually no thicker than it was before and it's come out very nice indeed. No way I would ever do this again, due to my patience being tested to its limit, but it's really transformed the finish on the inside.

Shot three coats of 2k high build primer on it yesterday and blocked it back again today after dusting a little Matt black to highlight any flatting marks or pin holes. I used 600 grit paper (wet) on a hand block and this really helped shape it without any grooves from fingers.

I should be painting it with base and clear coat this weekend then I can apply decals and number backgrounds before applying additional lacquer on top.
 

Attachments

  • image.jpg
    image.jpg
    822.8 KB · Views: 252
  • image.jpg
    image.jpg
    838 KB · Views: 277
  • image.jpg
    image.jpg
    364.7 KB · Views: 261
Thought I'd just fit the front screen and drill that before painting. It came with plastic number plate type screws and nuts, but I picked some better quality fixings up about a year ago.

Marking out and drilling it took me a little longer than I expected.

Bits are hanging up now ready for some colour, which they`re getting in the morning..... cant wait
 

Attachments

  • 16704d1446055297-nourish-triton-continuation-image.jpg
    16704d1446055297-nourish-triton-continuation-image.jpg
    739.5 KB · Views: 264
I made a polythene 'booth' a few months ago to paint my tank and it's still intact, so I hung the parts up in there and hosed the walls and floor off.

The basecoat I used is a really dark black if that makes sense. I used an accelerator in the activator for the clear as its only around 13 degrees today, but this also meant I could overthin it and lay it on really wet.

Four hours later and it's just about touch dry and almost zero shit in the paint. I'll leave it to fully cure before I block it down and polish it.
 

Attachments

  • image.jpg
    image.jpg
    797.5 KB · Views: 238
  • image.jpeg
    image.jpeg
    498.3 KB · Views: 264
  • image.jpeg
    image.jpeg
    523.6 KB · Views: 269
  • image.jpeg
    image.jpeg
    358 KB · Views: 304
Cheers, yes I'm happy with how it's turning out. After I nib and polish it, I need to scotch it over and mask up for white oval number backgrounds. These need spraying on, so I'll be putting on another couple of coats of 2k lacquer before its finished.

It'll be next weekend when I do this as basecoat can wrinkle up fresh lacquer and I'd be in pieces if that happened.

I have a few period sponsor decals that I thought about lacquering over, but I'm in two minds about it now. I'll mock the fairing up on the bike and tape the decals on and make my mind up. I want it looking like a 1960s race bike, but not sure about how far to go with it now.

All that time spent on prep work was well worth the effort. I wouldn't recommend it as it's torturous up to the point of putting some colour on.
 
Couldn't resist polishing the inside of the upper section this I morning and Here's the result.

I found this 'before' picture to show the difference.
 

Attachments

  • image.png
    572.1 KB · Views: 1,230
  • image.jpeg
    image.jpeg
    1.2 MB · Views: 245
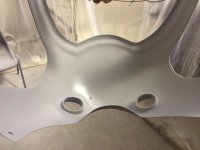
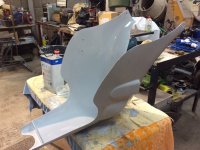
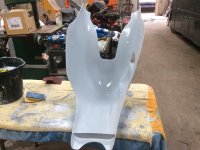
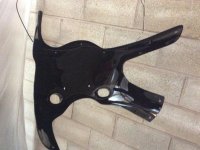
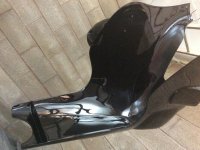
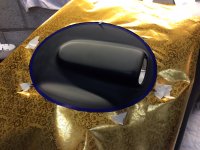
As glossy as that fairing looked, I blocked it down with 1200 wet and dry (only use it wet) and grey scotched it so I can paint white number backgrounds.

Minimum sizes for these on the sides is 260mm wide by 220mm height. There's a really easy way to mark an oval shape out and to save me trying to explain, take a look at this cheesy link. https://m.youtube.com/watch?v=hp7AxUVX714

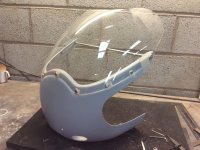
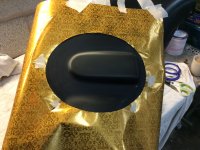
Drawing it out slightly oversize to allow for the width of fine line tape then gives a good template to help mark it out on the fairing. Once I have it positioned where I need it, I fold the paper over on the rear edges of the fairing and the crease helps as a reference point when lining up the other side. I didn't have any large paper, other than this gift wrap stuff, which also has grids on the back, but this helps to make sure you get it level. The right hand side of my fairing would make it really awkward to stick vinyl on, and this will just look so much nicer.

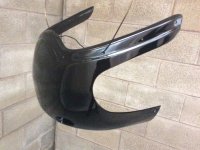
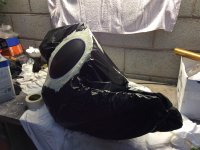
I'll try to learn how to insert pictures in between text, but the quickest way of masking a fairing up for this is use a plastic bin liner and cut out the area you need to paint. You get no paint where it shouldn't be. I dropped on 3 coats of solvent basecoat and after it dried, which Doesn't take very long, gave it a light sand with 1500 grit wet paper to lose any edge.

I'll take a few more pictures tomorrow, but I'll be lacquering the whole thing again and you won't be able to feel any edge or step in paint from the number background. I took pictures on my iPad, which I hate, so if they're upside down, I'll fix them on my laptop!
 

Attachments

  • image.jpeg
    image.jpeg
    1.6 MB · Views: 253
  • image.jpeg
    image.jpeg
    1.3 MB · Views: 258
  • image.jpeg
    image.jpeg
    1.5 MB · Views: 292
Back
Top Bottom