
We noticed you are blocking ads. DO THE TON only works with community supporters. Most are active members of the site with small businesses. Please consider disabling your ad blocking tool and checking out the businesses that help keep our site up and free.
You are using an out of date browser. It may not display this or other websites correctly.
You should upgrade or use an alternative browser.
You should upgrade or use an alternative browser.
1976 CB360t Slightly modded, restored to roadworthiness - Workin' on Beauty
- Thread starter mydlyfkryzis
- Start date
mydlyfkryzis
当有疑问时踢你的敌人在生殖器上,你可以道歉后
Re: 1976 CB360t Slightly modified restore to roadworthiness - Beauty later project
I played around with mounting it, settled on a design, then went for it.
First, cut the wires...arrggg...I hate doing it, but I want the wiring neat.
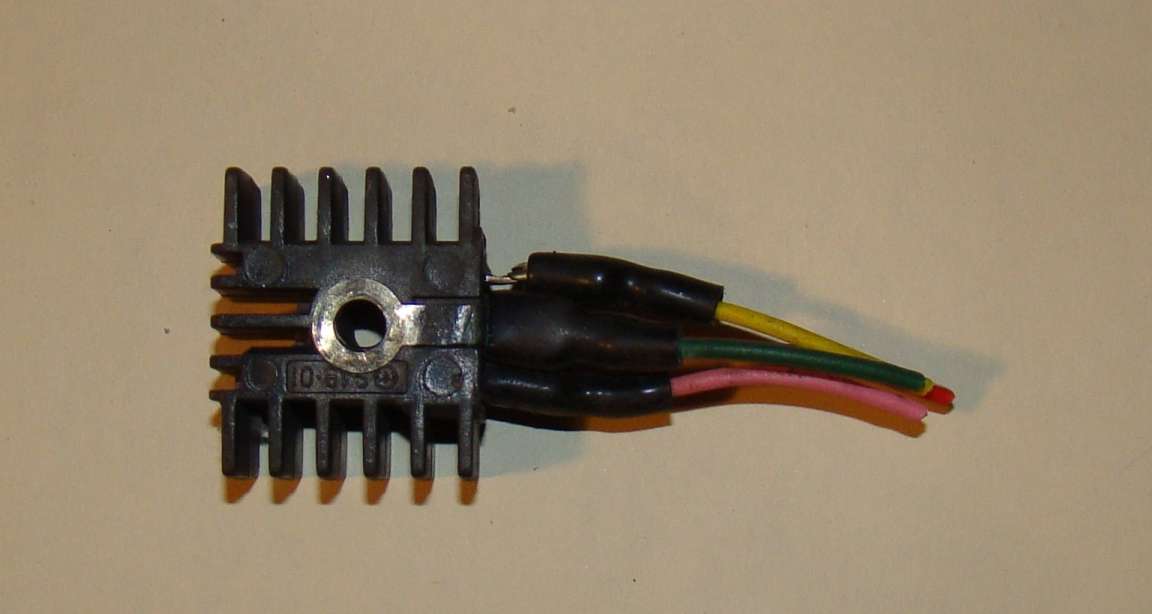
then I used some of the left over aluminum from the kick stand bracket and made a mounting plate. I am putting the new rectifier/regu;ator where the old regulator was, on top of the tool box.
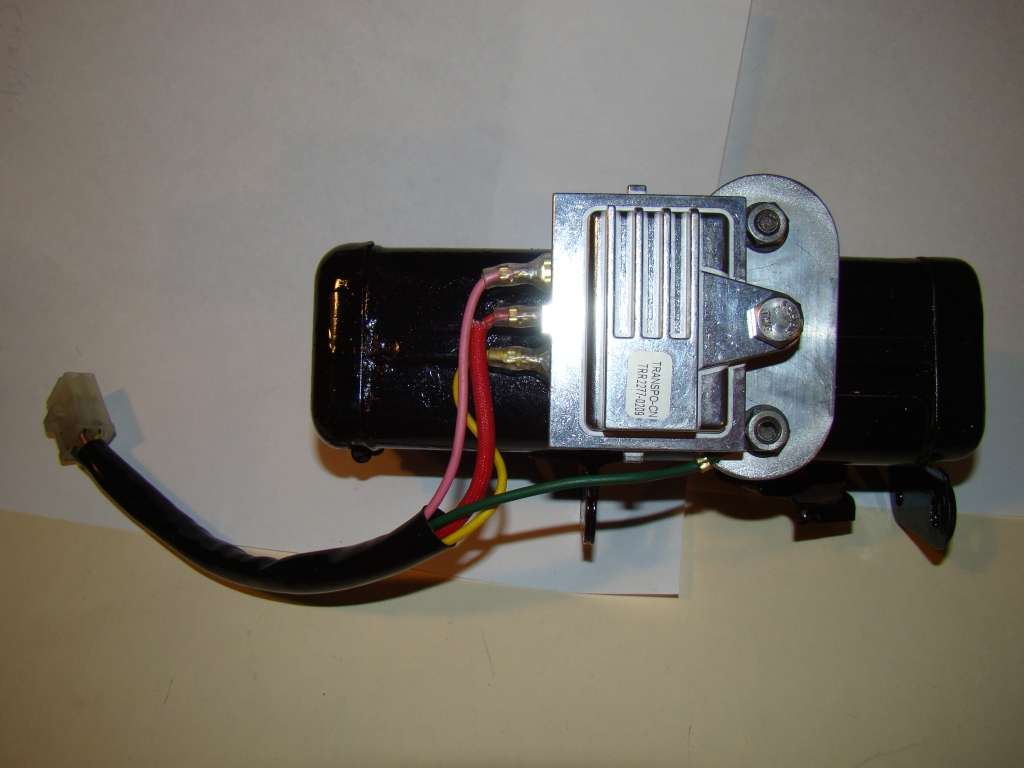
Plenty of clearance. I cheated. I much as I say don't solder, I crimped on spade connectors, but the connector I used were a little large for the wire gauge. To assure good connection at the crimp, I did put a dab of solder on the wire portion of the crimp. the terminals have vinly covers, so they should be good.
I wasn't happy with the stress of the cable resting on the terminals, so I added a wire clamp to relieve some of the pressure.
I didn't picture it installed ..(Later)...but I realized the mounting will interfere with the stock airboxes. I am not going stock until after this coming riding season, so I'll leave it for now. when I take some pics, you can see the issue. The regulator is mounted on the stock bracket which broke from it's spot welds 20 some odd years ago. I pop riveted it on, and it's good. Since the present orientation will interfere, when it comes time, I can drill out the rivets and rotate it 90 degrees, then it will be fine.
I also am going to run a second ground cable to the battery from the regulator. I want there to be be good connections between it and the battery. After looking at the pop rivets, I realized they were the only path to ground. They may have high resisitance, and that may of caused the voltage regulator to allow higher voltage. I want the new one to be "perfect".
So that's my progress so far.
I played around with mounting it, settled on a design, then went for it.
First, cut the wires...arrggg...I hate doing it, but I want the wiring neat.
then I used some of the left over aluminum from the kick stand bracket and made a mounting plate. I am putting the new rectifier/regu;ator where the old regulator was, on top of the tool box.
Plenty of clearance. I cheated. I much as I say don't solder, I crimped on spade connectors, but the connector I used were a little large for the wire gauge. To assure good connection at the crimp, I did put a dab of solder on the wire portion of the crimp. the terminals have vinly covers, so they should be good.
I wasn't happy with the stress of the cable resting on the terminals, so I added a wire clamp to relieve some of the pressure.
I didn't picture it installed ..(Later)...but I realized the mounting will interfere with the stock airboxes. I am not going stock until after this coming riding season, so I'll leave it for now. when I take some pics, you can see the issue. The regulator is mounted on the stock bracket which broke from it's spot welds 20 some odd years ago. I pop riveted it on, and it's good. Since the present orientation will interfere, when it comes time, I can drill out the rivets and rotate it 90 degrees, then it will be fine.
I also am going to run a second ground cable to the battery from the regulator. I want there to be be good connections between it and the battery. After looking at the pop rivets, I realized they were the only path to ground. They may have high resisitance, and that may of caused the voltage regulator to allow higher voltage. I want the new one to be "perfect".
So that's my progress so far.
620dark
You can always get it running with time or money.
Re: 1976 CB360t Slightly modified restore to roadworthiness - Beauty later project
It probably wouldn't hurt to also junction your new ground to a clean frame spot / existing frame ground as well. A lot of stuff grounds through the frame, and improving that ground can only help things.
<goes back to stealing ideas for his CB360 build>
It probably wouldn't hurt to also junction your new ground to a clean frame spot / existing frame ground as well. A lot of stuff grounds through the frame, and improving that ground can only help things.
<goes back to stealing ideas for his CB360 build>
mydlyfkryzis
当有疑问时踢你的敌人在生殖器上,你可以道歉后
Re: 1976 CB360t Slightly modified restore to roadworthiness - Beauty later project
The main ground is from the battery to the side of the frame, right on a motor mount. The frame is well grounded. I cleaned the area up too, to make sure.
With the regulator hanging on the tool box, the frame connection is through a series of connections, mountin bolts, pop rivets, mounting bolts. Since the battery ground to frame is about 6 inches away from the regulator, I decided to run a heavy gauge wire from the regulator bracket to that bolt and share the connection with the frame, right to the battery.
I appreciate the second opinions though..., and stealing ideas is mutual...I decided to get the regulator after you mentioned ordering it... 8)
620dark
You can always get it running with time or money.
Re: 1976 CB360t Slightly modified restore to roadworthiness - Beauty later project
Derp, I just installed that bolt and wire myself when I reinstalled the motor in the frame. I'll aim a ground wire there too.
The CB350 guys on hondatwins.net have been so happy with their regulators that it just made sense to me. My 650 has a Ford pickup regulator and a pair of Radio Shack bridge rectifiers, and that made a huge difference in charging system reliability, so I was all about doing the same thing to the 360. I'm glad it's worked out for you!
mydlyfkryzis said:The main ground is from the battery to the side of the frame, right on a motor mount. The frame is well grounded. I cleaned the area up too, to make sure.
With the regulator hanging on the tool box, the frame connection is through a series of connections, mountin bolts, pop rivets, mounting bolts. Since the battery ground to frame is about 6 inches away from the regulator, I decided to run a heavy gauge wire from the regulator bracket to that bolt and share the connection with the frame, right to the battery.
I appreciate the second opinions though..., and stealing ideas is mutual...I decided to get the regulator after you mentioned ordering it... 8)
Derp, I just installed that bolt and wire myself when I reinstalled the motor in the frame. I'll aim a ground wire there too.
The CB350 guys on hondatwins.net have been so happy with their regulators that it just made sense to me. My 650 has a Ford pickup regulator and a pair of Radio Shack bridge rectifiers, and that made a huge difference in charging system reliability, so I was all about doing the same thing to the 360. I'm glad it's worked out for you!
mydlyfkryzis
当有疑问时踢你的敌人在生殖器上,你可以道歉后
Re: 1976 CB360t Slightly modified restore to roadworthiness - Beauty later project
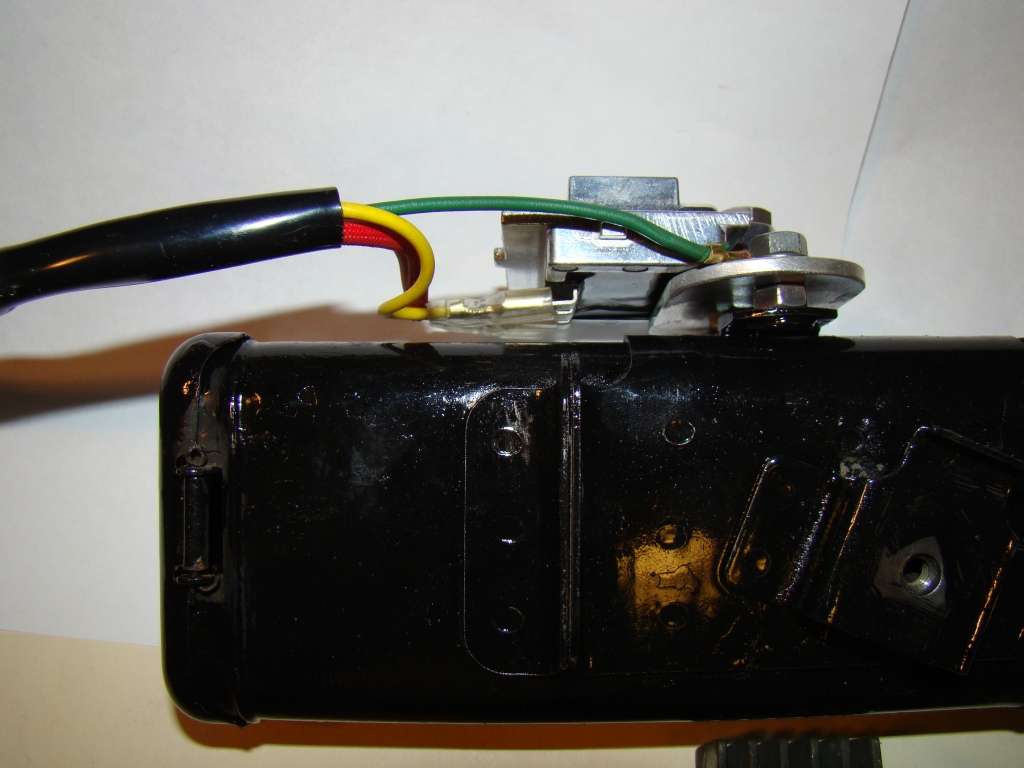
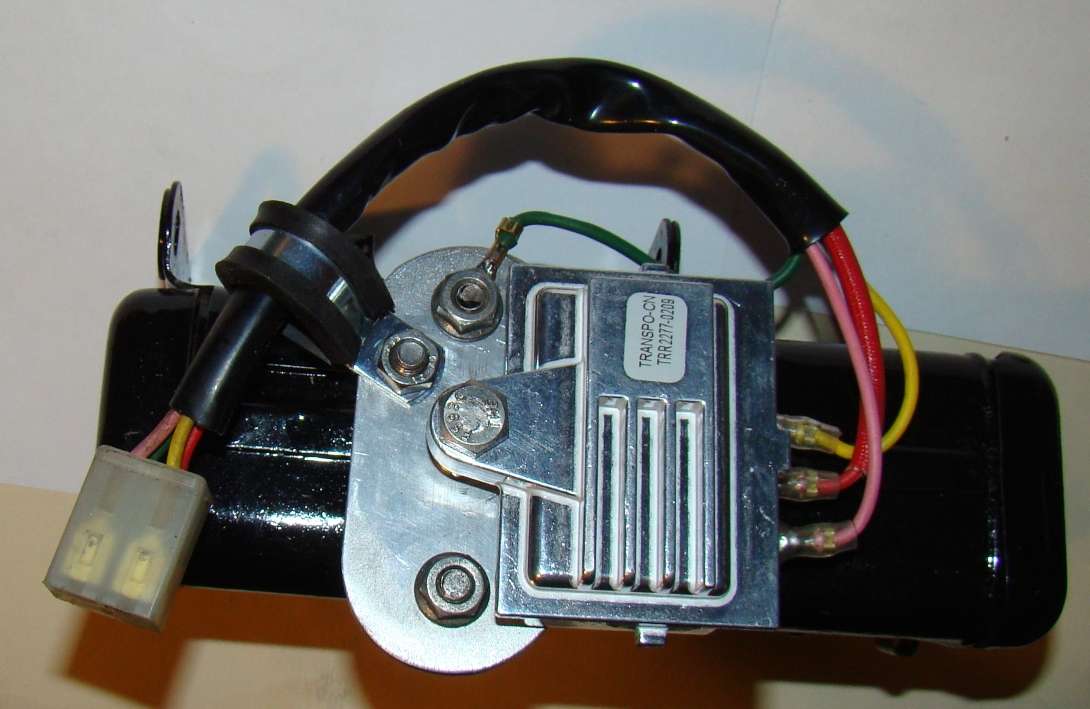
I'll need to update the pictures later. I installed the unit, and realized it would interfere with the stock air box I intend to install later.
so I rotated the mount 90 Degrees so it doesn't interfere. I also ran a ground wire from the aluminum mount to the neg. battery terminal. I was going to the motor mount connection, but I didn't have a suitable ring terminal, and the battery terminal is almost as close anyway.
I want the regulator to have an excellent ground. that was my evening work.
I'll post some pics later, when I take them....
mydlyfkryzis
当有疑问时踢你的敌人在生殖器上,你可以道歉后
Re: 1976 CB360t Slightly modified restore to roadworthiness - Beauty later project
I'll have pictures later, but I was so excited I needed to post.
I was in Lewisburg, PA Thursday and Friday for Work. One of the Customers staff is a really nice guy, has a barn/workshop full of things that my wife would never be interested in. I've been working with ths fellow for a year and a half now, and IU think we could be called friends. I've been telling him about my restoration project, difficulty finding parts, showing pictures from the website and talking about motorcycle in general.
He had a CB360 at one time and has a number of bikes in the crowded workshop. He casually mentioned some parts he had, I expressed interest in buying them, but we never really nailed anything down. I was especially interested in the side covers and exhaust pipes.
Well when I arrived, the guys boss told me to talk to him, as he was cleaning out his shop and wanted to get the stuff out of there ASAP. When I asked my friend if he wanted to discuss the parts, he said, yes, he has a bucket of parts, some covers,, some wheels and a bunch of other parts, $250 for all of it. Sight unseen, I said sure, didn't haggle, and ran to the bank that night to get the cash.
Friday, during lunch break, we run to his house.
OMG....
He brings out a "King Queen Seat" with Custom Seat Pan for a CB360...I'll need to get a PIC, it is so ugly it is beautiful. I had flashbacks to the 70's.
Then he brings out a plastic bin. Speedometer, Tachometer, Taillights, 6 side covers (3 Pairs) in Red, Blue (my Color) and gold. All in nice shape. I feel dizzy now. Also a bunch of other parts, like a good condition chain guard (mine is Cracked).
Now I am getting really happy. Exactly some parts I need and so far, it looks like it is much better deal than E-Bay.
Then he comes out with 2 gas tanks. Both are free of any dents or dings. One is in my color, the other Red. the red one has smudged, rubbed off in places paint, but no dents or dings, the Blue one is from a 1976, it will be my everyday tank (The NOS Tank I bought on e-bay will stay secure for now).
Now I am ecstatic, and have gone to Motorcycle Heaven.
Then he brings a 5 gallon bucket with a cylinder head, clutch, some oil pump parts, etc, lots of nuts and bolts from a tear down.
then finally, comes out with a complete engine. It has enough compression, that it was difficult to use the kick start to turn over. Carbs are siezed, but look servicable, but all in all, a great spare.
Next is 2 rear wheels, for a CB360, and one 19" front wheel with Disk for a 70's CB750.
Finally, he brings out the exhaust headers. One for a 360 in mediocre shape, and 2 for a CB750. Not sure is they are usable for me, I was hoping for 2 CB360 Headers, but I have enough extra parts to sell or swap to really complete the build.
I always read about "Barn" finds, but never had one before. The Spare motor will be great, as I can tear it down, rebuild it, then just swap out for the one on my bike. I really hated the idea that when I finally decide to do a rebuild on my existing motor, the bike would be un-ridable for the time it was down. Looks like I get to have my cake and eat it for desert too...
I'll picture up as I sort through, clean up, and catalog my find.
mydlyfkryzis
当有疑问时踢你的敌人在生殖器上,你可以道歉后
Re: 1976 CB360t Slightly modified restore to roadworthiness - Beauty later project
Today, made some progress.
1. Adjusted Valves. They are dialed in well now.
2. Adjusted Cam Chain Tensioner.
4. Aligned rear wheel, adjusted chain tension.
5. Re-Installed Carburetors
So next is to adjust wiring and install fuel tank, install UNI filters on carb.
Once the tank and filters are done, I need a relatively warm day to try her out...........SOON!!!!
mydlyfkryzis
当有疑问时踢你的敌人在生殖器上,你可以道歉后
Re: 1976 CB360t Slightly modified restore to roadworthiness - Beauty later project
I managed to get the Throttle cables re-routed "properly", installed the carbs all on Monday. Today the mail brought me some Stainless Worm Drive hose clamps. ALL stainless. Replaced the factory carb boot clamps with the shiny ones, installed the UNI filters.
I checked the new tank. there is old gasoline in it, and the petcock was varnished up. The reserve inlet screen is gone also.
So I ordered some brass 80 mesh screen and I have some small brass tubing. I am going to fabricate the inlet screen and clean the tank up a little.
Once the tank is installed, I will just need a reasonably warm day to take her for a ride.
Of course, we are expecting 10 inches of snow day after tomorrow through Saturday.
Ugh...
I can't wait. If I get a clear day, I'll take her outside for some photos.
mikewerx
Been Around the Block
Re: 1976 CB360t Slightly modified restore to roadworthiness - Beauty later project
x2MGD said:Pictures buddy, pictures!! Good to hear your making progress.
mydlyfkryzis
当有疑问时踢你的敌人在生殖器上,你可以道歉后
1976 CB360t Slightly modified restore to roadworthiness - Beauty later project
The bike is surrounded by wooden benches and planters for my son's Boy Scout Eagle project. Can't stand far enough away to take a picture yet. I am hoping we move the stuff out this weekend.
I like the pics too
Sent from planet Earth using mysterious electronic devices and Tapatalk
The bike is surrounded by wooden benches and planters for my son's Boy Scout Eagle project. Can't stand far enough away to take a picture yet. I am hoping we move the stuff out this weekend.
I like the pics too
Sent from planet Earth using mysterious electronic devices and Tapatalk
620dark
You can always get it running with time or money.
Re: 1976 CB360t Slightly modified restore to roadworthiness - Beauty later project
Nice, another fellow Eagle Scout! Good for him - having that helped me get into my preferred college among other things.
My OE petcock was missing its brass screen as well - I think people just lose them the first time they remove the bowl off them. I just ended up buying an ebay replica petcock, as it was within $2 of a rebuild kit.
mydlyfkryzis said:The bike is surrounded by wooden benches and planters for my son's Boy Scout Eagle project. Can't stand far enough away to take a picture yet. I am hoping we move the stuff out this weekend.
I like the pics too
Nice, another fellow Eagle Scout! Good for him - having that helped me get into my preferred college among other things.
My OE petcock was missing its brass screen as well - I think people just lose them the first time they remove the bowl off them. I just ended up buying an ebay replica petcock, as it was within $2 of a rebuild kit.
mydlyfkryzis
当有疑问时踢你的敌人在生殖器上,你可以道歉后
Re: 1976 CB360t Slightly modified restore to roadworthiness - Beauty later project
I have a new "replica" petcock. The inlet screen is plastic. It keeps the crud out, but the plastic collapsed and you lose all fuel feed. I'll use that on my NOS new tank. For the older tank, I am going to build a little screen. If I can do it easily enough, I'll make some extra and sell them to pay for the screen I bought. I am sure a few people would be interested. Haven't seen an intact screen in years.
I Bought this stuff:
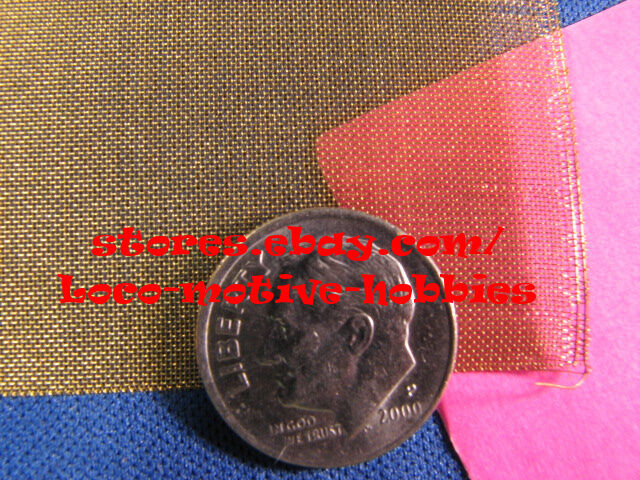
mydlyfkryzis
当有疑问时踢你的敌人在生殖器上,你可以道歉后
Re: 1976 CB360t Slightly modified restore to roadworthiness - Beauty later project
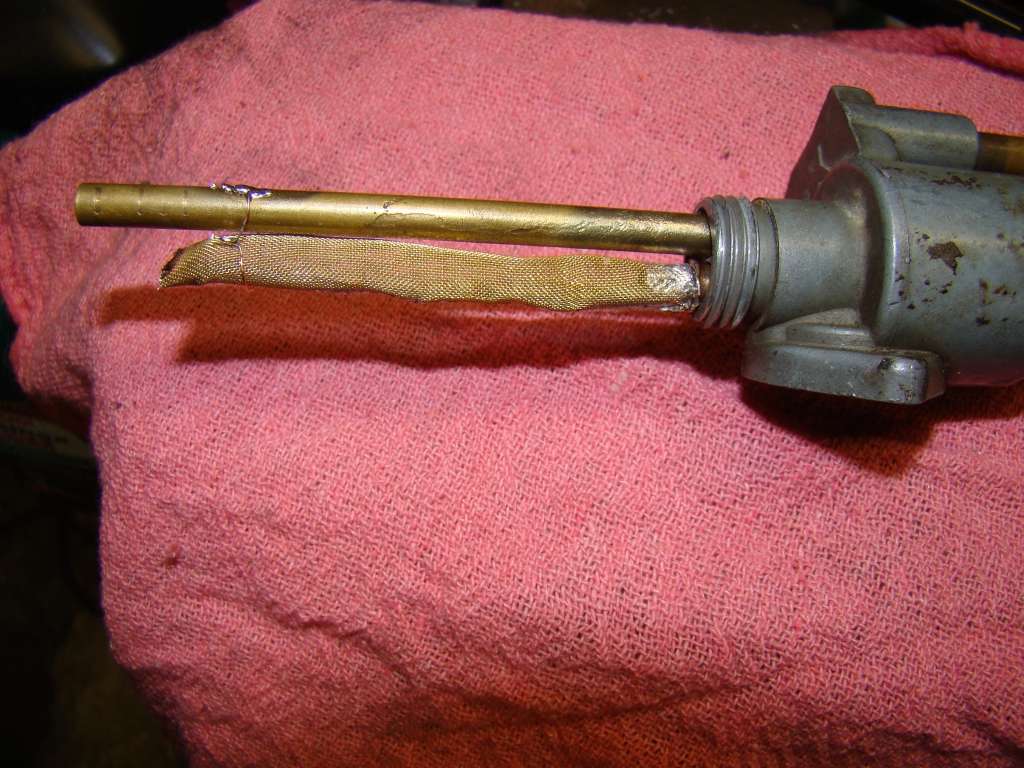
Look what came in today's mail:
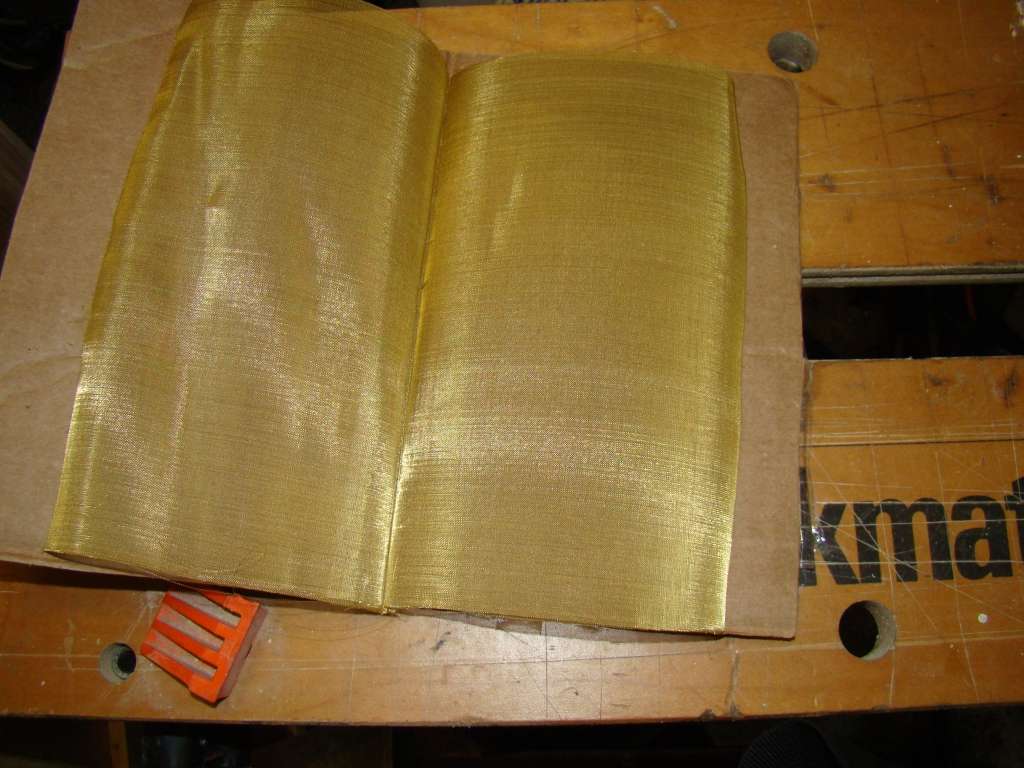
80 Mesh brass screen. Needed some to replace the missing screen on the resrve section of my petcock.
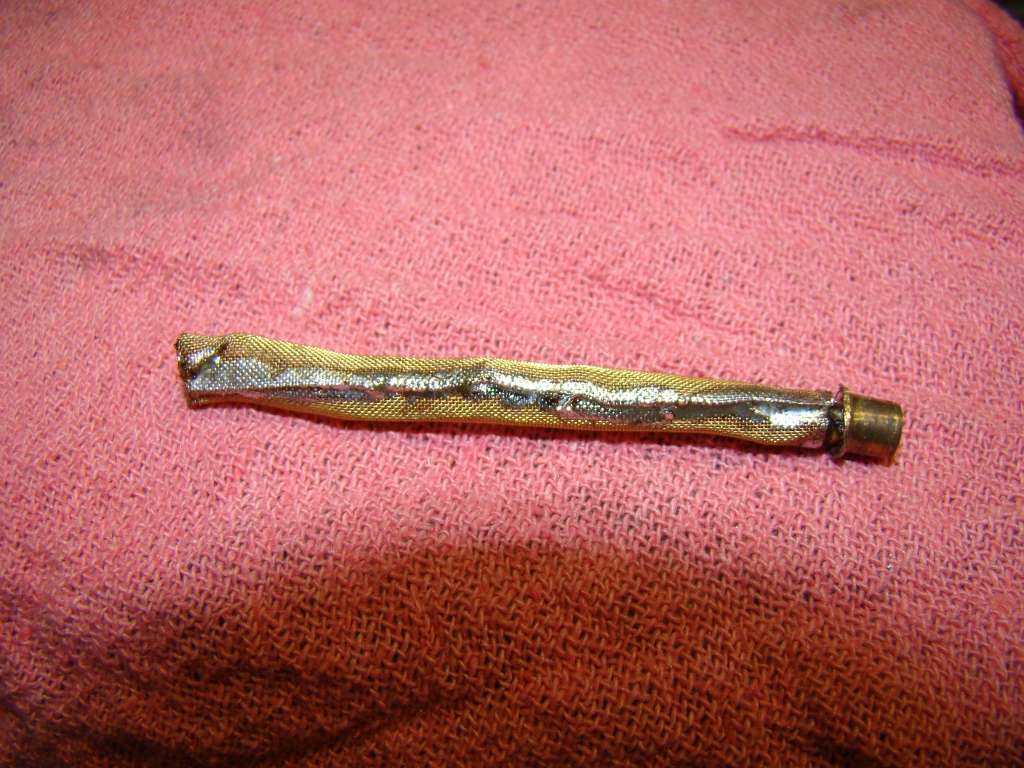
So I take a small strip, and use some small aluminum tube to shape it and hold the shape. I used aluminum because the solder won't stick to it.

I solder it up the seam, and add a small piece of brass tubing at the bottom that will fit inside the existing brass flange that was in the petcok holding the original screen.
The I solder the small tubing into the stock fitting.
Seam side:
Opposite side:
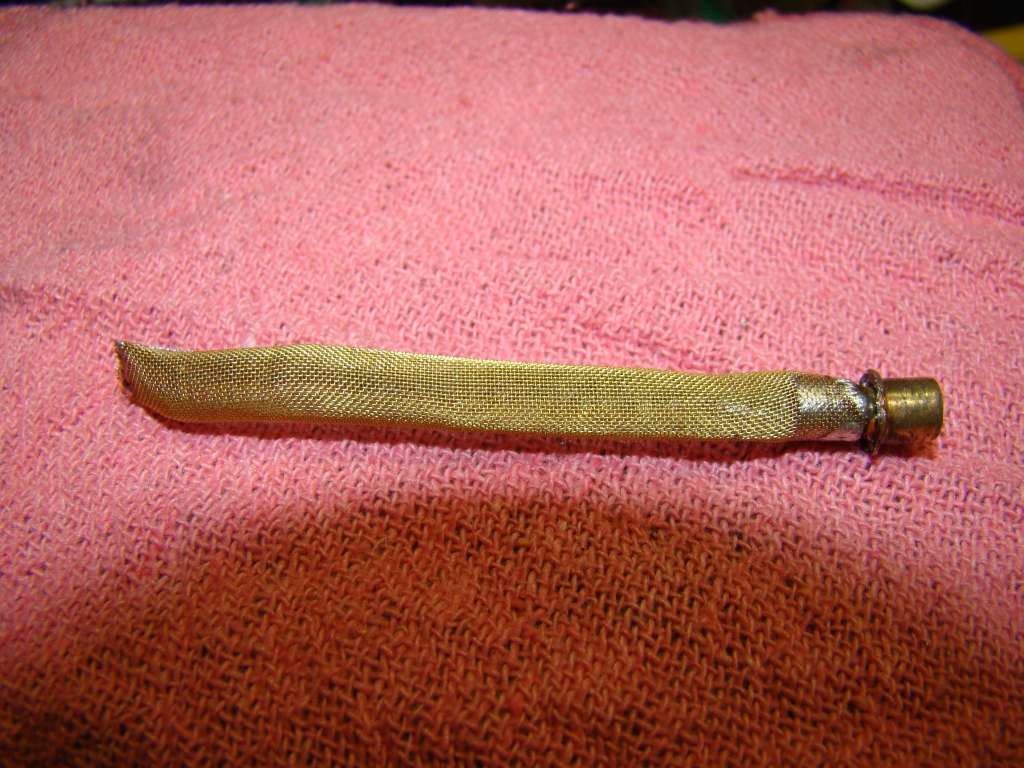
Then I rake a strand of copper wire and tie the top of the screen to the standard dip tube for a little extra support:
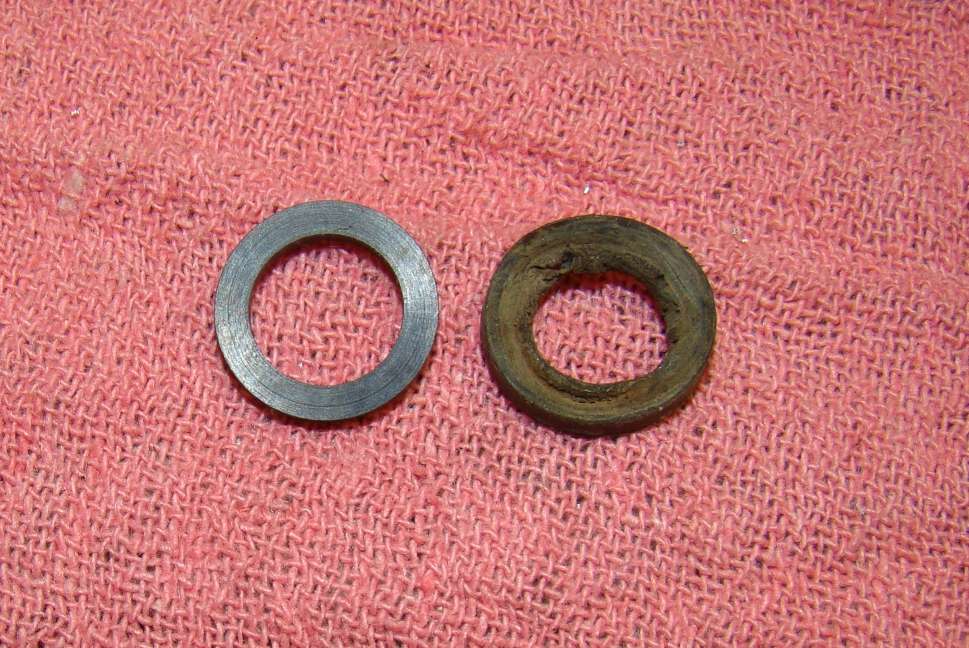
I added new washers to the petcock, but it was amazing how bad the original washer was compared to the new one (on the mounting nut)
So I installed the petcock on my new old tank...picture of that will follow soon...
I want to make a better, aluminum handlebar clamp mount for my ignition switch. With that done, The tank needs to go on, the gas put in the tank and a little running. Some oil got in the cylinders when the engine was upside down being torn down, so it will be a smoky restart. After that, Sophie should be on the road!!!!
When I get a clear day, I'll roll her out and take her portrait, highlighting the changes and parts.
Good day today!!
Look what came in today's mail:
80 Mesh brass screen. Needed some to replace the missing screen on the resrve section of my petcock.
So I take a small strip, and use some small aluminum tube to shape it and hold the shape. I used aluminum because the solder won't stick to it.
I solder it up the seam, and add a small piece of brass tubing at the bottom that will fit inside the existing brass flange that was in the petcok holding the original screen.
The I solder the small tubing into the stock fitting.
Seam side:
Opposite side:
Then I rake a strand of copper wire and tie the top of the screen to the standard dip tube for a little extra support:
I added new washers to the petcock, but it was amazing how bad the original washer was compared to the new one (on the mounting nut)
So I installed the petcock on my new old tank...picture of that will follow soon...
I want to make a better, aluminum handlebar clamp mount for my ignition switch. With that done, The tank needs to go on, the gas put in the tank and a little running. Some oil got in the cylinders when the engine was upside down being torn down, so it will be a smoky restart. After that, Sophie should be on the road!!!!
When I get a clear day, I'll roll her out and take her portrait, highlighting the changes and parts.
Good day today!!
mydlyfkryzis
当有疑问时踢你的敌人在生殖器上,你可以道歉后
Re: 1976 CB360t Slightly modified restore to roadworthiness - Beauty later project
I promise when I have a sunny, reasonably warm day, I'll get some decent pictures. For now, you will have to suffer.
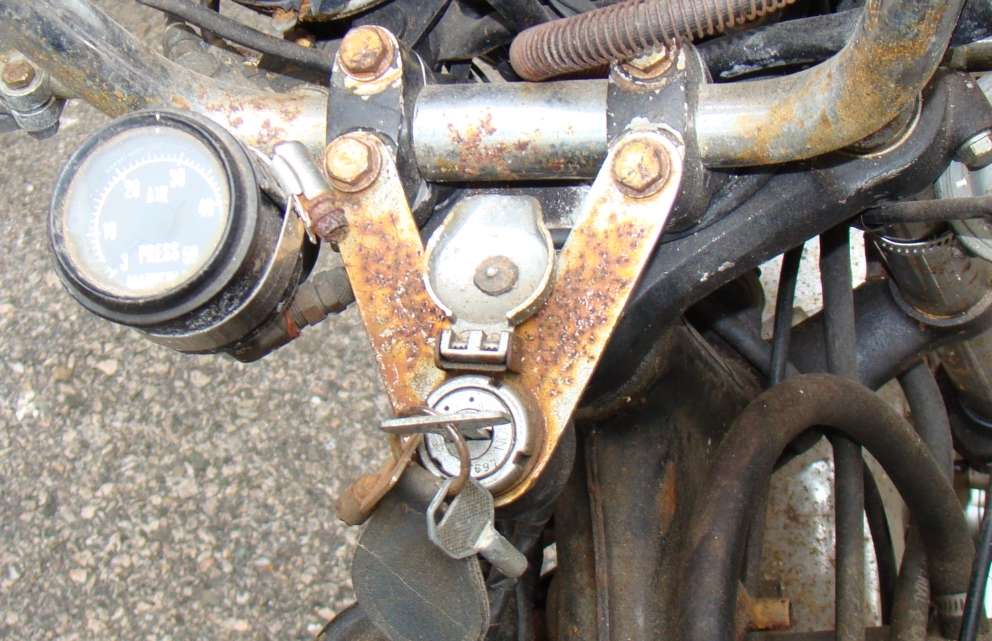
So this past week, I was unhappy with my ignition switch mount, old cover, and was going to put it back on the side. I still might.
But I couldn't keep the really bad shape holder where it was. So
Old Switch and holder:
I took some Aluminum I had laying around, traced the old holder onto it for the dimensional part of it, and cut, sanded, polished a new holder. E-bat , funny place that it is, had used covers, a little rusty, not much better then mine for $20 plus $6 shipping. No improvement and way too much cost. I keep looking, and another vender has the same cover, BRAND NEW, for $10 Shipped.
So I order the new cover, and today, put the cover and holder on.
Now she looks like this:
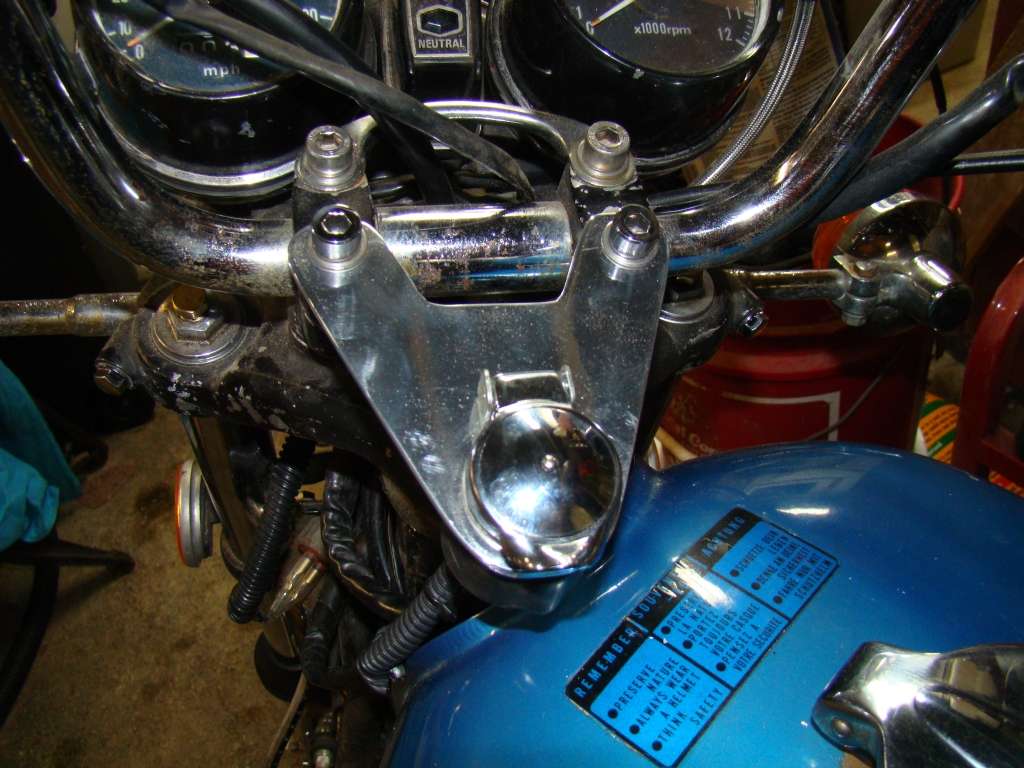
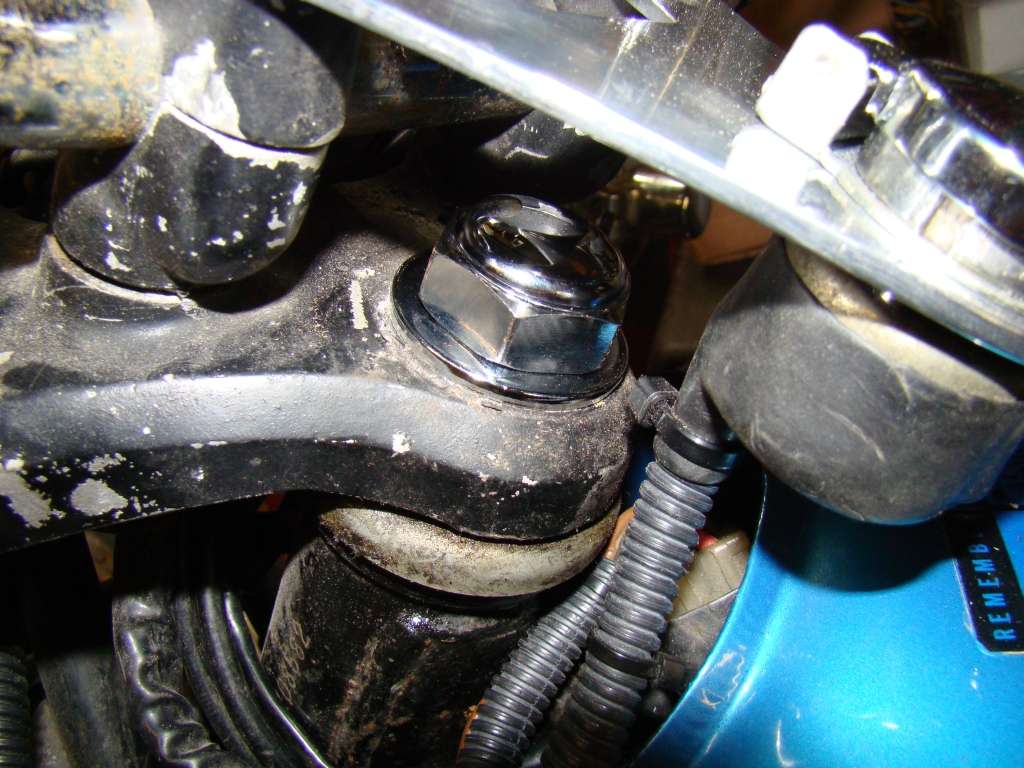
I also had order from a NY Honda Dealer, new chrome pinch bolts and triple clamp Nut and washer. I put them on too. Here's the triple clamp Nut:
I had the side reflectors for the front, I put them on too.
Finally, a teaser. I took a picture as best I could in my overfilled basement/garage. the place is a mess, crowded, as I am working on a couple of other projects too.
But I shot a side picture of the bike with the "New" old tank I recently purchased (see earlier post, I had a great barn find), but this tank is not the NOS tank that is waiting for the finishing, and the side covers that I finally found.
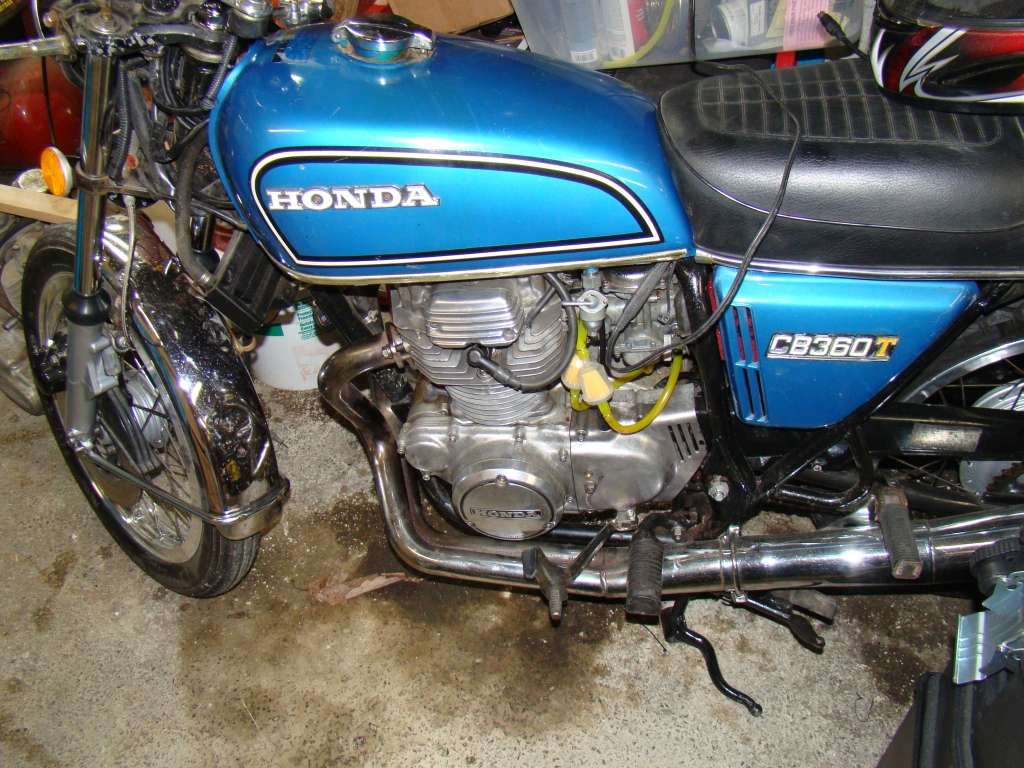
She's a little dusty, the wire is for the battery tender, but right at this minute, I only need a warm day, and some fuel in the tank to go for a ride.
On the next warm day, A ride, and a good cleaning.
I still have lot's of improvements to make. I have another order from the hHnda dealer coming. I say some new fork caps on E-Bay, at $22 shipped. The Honda dealer has them for under $7 each. E-bay is a little pricey some times. I am working on a front fender too. I also need to keep the Center stand off the muffler. I have a new rubber stop coming for the CL center stand I put on, maybe that will keep it low enough, or I may have to shim the stop a little.
But Gas and a warm day = RIDE!! WooHoo!!
I promise when I have a sunny, reasonably warm day, I'll get some decent pictures. For now, you will have to suffer.
So this past week, I was unhappy with my ignition switch mount, old cover, and was going to put it back on the side. I still might.
But I couldn't keep the really bad shape holder where it was. So
Old Switch and holder:
I took some Aluminum I had laying around, traced the old holder onto it for the dimensional part of it, and cut, sanded, polished a new holder. E-bat , funny place that it is, had used covers, a little rusty, not much better then mine for $20 plus $6 shipping. No improvement and way too much cost. I keep looking, and another vender has the same cover, BRAND NEW, for $10 Shipped.
So I order the new cover, and today, put the cover and holder on.
Now she looks like this:
I also had order from a NY Honda Dealer, new chrome pinch bolts and triple clamp Nut and washer. I put them on too. Here's the triple clamp Nut:
I had the side reflectors for the front, I put them on too.
Finally, a teaser. I took a picture as best I could in my overfilled basement/garage. the place is a mess, crowded, as I am working on a couple of other projects too.
But I shot a side picture of the bike with the "New" old tank I recently purchased (see earlier post, I had a great barn find), but this tank is not the NOS tank that is waiting for the finishing, and the side covers that I finally found.
She's a little dusty, the wire is for the battery tender, but right at this minute, I only need a warm day, and some fuel in the tank to go for a ride.
On the next warm day, A ride, and a good cleaning.
I still have lot's of improvements to make. I have another order from the hHnda dealer coming. I say some new fork caps on E-Bay, at $22 shipped. The Honda dealer has them for under $7 each. E-bay is a little pricey some times. I am working on a front fender too. I also need to keep the Center stand off the muffler. I have a new rubber stop coming for the CL center stand I put on, maybe that will keep it low enough, or I may have to shim the stop a little.
But Gas and a warm day = RIDE!! WooHoo!!
mydlyfkryzis
当有疑问时踢你的敌人在生殖器上,你可以道歉后
Re: 1976 CB360t Slightly modified restore to roadworthiness - Beauty later project
Looks a lot better than the old rusty chrome.
I am still working on the polishing skills. I sanded, I wet sanded, the original aluminum was, say, irregular. The original aluminum was 2"x4" angle for shelving. Not the highest quality or alloy. The scratches are far more visible in the picture than in person for some reason. Some of those scratches are just grease streaks when installing. I need to clean it up. But once I am running, I figure it is going to get scratched some more. I'll just redo it...
I intend to strip the frame either next year or the following, and Powder coat the frame and triples. When I have the frame pretty, I also will be painting the motor. When I get to that point, then better looking polishing will be important. This round of work was to make it road worthy.
If you look, I have plastic loom over the wires. I originally put the bracket on around 1980. I had it that way for 10 years with no wear issues. I had it taped well then. Now I removed the tape and put the loom on, it is more flexible with the loom.
I still may return the switch to the stock position, but it will work for now. I originally moved it after burning my fingers for the nth time over reaching for the key.
I need a warmish day..I want to ride it....


