Quintin's honda cx500

Quintin Snell

Active Member
Hi fellow riders! As promised, here is my build log...
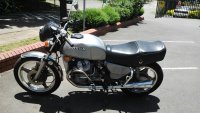
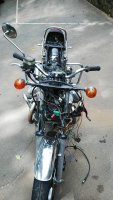
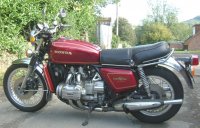
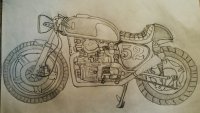
so, i recently decided i had to build a cafe racer, and had a few models in mind, with a suzuki gs or early gsx in mind, but when a nice little plastic maggot became available, i decided that was the one. I've seen quite a few nice examples of cx500s made into cafe racers.
i took the bike for a test ride, and apart from being cosmetically in bad shape, a small oil leak on the gearbox and a rattly cam chain tensioner, the bike seemed to be mechanically sound, surprisingly good performance and sound for a 500cc. (my other bikes are both 1000cc plus...)
I had a couple of other bikes to look at, but wasn't happy with them, so called the seller and made an offer, which he accepted. Some cash and paperwork changed hands, and i rode the nearly 100km home on my noisy new bike ☺
 
I got home with no issues, and first thing, gave the bike a good wash, then dug out an old mirror from my suzuki and fitted it to the right handlebar, i cant stand having only one mirror... Time now to get the bike ready for roadworthy...i then smeared some epoxy into the pinhole in the gearbox gasket, temporarily fixing the oil leak. I will replace the gasket when I pull the motor. I haven't yet decided on how much work i will do inside the engine, i guess that all depends on what i find in there when i replace the cam chain tensioner, or whatever else that rattle turns out to be... oh, by the way, I'm working towards a budget, to see if it can be done on R20000 including the cost of the bike (about usd 1800) once I'm finished, i can do expensive things like usd forks, etc , im doing this in the old fashioned way, small bike, small cash. I'm just under half way through it. When i get my price list, i will see if it is even possible.
i had do figure out where the issue was in the wiring that prevented the indicators from working, found the broken live wire, but really didnt relish the idea of stripping the loom for one broken wire, so i just spliced another in. Again, a temporary job, as i will most likely replace all the wiring anyway. I also had to replace the levers, both were broken. A pair of second hand ones fit and did the job after some modifying. The last thing to do was make a bracket for the speedo. The previous owner had replaced the broken original, but had to cut the original bracket to make it fit, but itwas loose, which the roadworthy centre i went to wouldnt accept. All that done, last thing to do was to get the bike weighed, as the logbook reflected the tare as "0kg", also not accepted for my roadworthy.
all done, cor in hand, off to get the bike registered and ownership transferred. No issues there.
sadly, i was at the end of my leave, so carbs run dry, battery removed and bike stored for the next 2 months
 
Some pics, the bike when i bought it, fairing removed to reveal intimidating nest of electrics, the sneaky temporary wire
 

Attachments

  • IMG_20150108_120339.jpg
    IMG_20150108_120339.jpg
    1.4 MB · Views: 436
  • IMG_20150113_091847.jpg
    IMG_20150113_091847.jpg
    1.5 MB · Views: 345
  • IMG_20150113_091902.jpg
    IMG_20150113_091902.jpg
    942 KB · Views: 421
  • IMG_20150113_091918.jpg
    IMG_20150113_091918.jpg
    1.1 MB · Views: 355
Here is the bike im going to model mine on, and a quick sketch of what i have in mind. I'm not sure who's bike this is, but it's beautiful! This is the colour scheme I'm thinking of, but not the flame pattern... My wife suggested i name the bike "maggie" as the name "plastic maggot" is a horrible name for a bike
 

Attachments

  • custom-motorcycle-paint-jobs.jpg
    custom-motorcycle-paint-jobs.jpg
    1.1 MB · Views: 2,110
  • cx500-cafe-racer-readers-rides-honda-cx500-cafe-racer-return-of-the-cafe-racers-76627.jpg
    cx500-cafe-racer-readers-rides-honda-cx500-cafe-racer-return-of-the-cafe-racers-76627.jpg
    167.5 KB · Views: 8,219
  • IMG_20150121_111427.jpg
    IMG_20150121_111427.jpg
    1.1 MB · Views: 425
Oh, yes, i also drilled out a broken screw in the brake master cylinder, re-tapped it and put a new stainless screw in, that solved the leaky brake fluid issue
 
At the moment (and for the next 7 weeks...) I'm sitting offshore Qatar, so cant do anything on the bike. . What i have done is bring the startline catalogue with me, so i have been plotting my plan of attack, choosing my parts. I will get a friend back home to send in my wish list and get a price list for me. Then I can decide what i NEED to build the cafe racer, and what original parts can stay until the actual build. Obviously some stuff needs to be physically measured up to fit, and i will need to physically see to make sure they will fit with how i plan the bike to eventually look. I can't wait to get home. ...! I'm going to be buying as many new parts as possible, but if i cant find what i want new, then will be sourcing used stuff... i am hoping to put ohlins suspension and brembo brakes to the bike...
 
I've sent in my wish list, now waiting for the prices... i know it's going to hurt! Still, if i want this ike to look epic, it needs to be done... i hope i can stick within my budget...
 
I've had 4 of these as project bikes, my friends always ended up buying them off me and finishing them up. They are such great machines with so much potential.
 
PLAZACYCLEJOSH said:
I've had 4 of these as project bikes, my friends always ended up buying them off me and finishing them up. They are such great machines with so much potential.
people love slagging the plastic maggot off, but theyre really fun to ride. The cx is the smallest bike ive ever owned, but get a kick out of riding it, it's really punchy for it's size and sounds great. I hope the new exhausts (when i eventually fit them) preserve or enhance the sound.
 
they are a blast no matter how you like the

here is my daily rider i call it my superdeluxe its a cx500 with a modded 650 motor mikuni carbs and custom exhaust

modded cx650 39mm front end cx650 rear swingarm final drive and mags and runs like the wind just a blast and i can sit up straight lol


keep at it they are a lot of fun and very reliable
 
While I'm away, I'm using my free time to get some research done. At the moment, I'm looking into my options for spoked rims and rear disk brakes. There are a few, as it turns out. There are companoes that make bolt on hub and frame kits for those old comstar rims, but they are pretty expensive, and also in USA, so shipping and customs charges would destroy me. The other option it to get hold of a set of spoke rims from an old gl1000, apparently they fit with very little modification needed. That also takes care of my brake issue, if i get the calliper mounts sorted. It may be my best bet to get the swingarm too. I dont know if that will fit though. I have been looking at other guys' builds, and some say it fits right in, others reccommend changing out the swingarm. I want to be able to do this, but it would have to be some not so intensive re-engineering, I'm definitely no engineer (i see this project becoming much more intense than i anticipated, i havent even started and I already shifting goalposts...). Next thing to research... any advice?
 
This is what i have in mind, another photo which inspired me to use a cx500 for my build. The bike was built by a guy called Noah Blum, featured in Bike exif. Lovely work.
 

Attachments

  • 1980-honda-cx500.jpeg
    1980-honda-cx500.jpeg
    91.4 KB · Views: 3,803
  • GW slide 1.jpg
    GW slide 1.jpg
    210.7 KB · Views: 1,053
a Gl1000 swing arm will not fit the cx frame it is way to wide amongst other issues

noah used a gl1000 rear wheel with axle adapter bushings a custom brake caliper mount
 
cxman said:
a Gl1000 swing arm will not fit the cx frame it is way to wide amongst other issues

noah used a gl1000 rear wheel with axle adapter bushings a custom brake caliper mount

Cool, thanks. i will definitely be looking intiinto the gl1000 wheels, at this point, These are mostly musings, but by the time i get home, i will have a really good picture of what I'm going to be doing to this bike
 
Ok, quick question, how are you all attaching your seats? Ive been looking for ideas on securing the upholstry to the actual pan, and then the pan to the frame, but most people just show the completed seat, then the seat mounted, but never the actual mounting process... or am i just not looking properly? (I have looked.., promise) advice or links to relevant thread would really be appreciated, thank you. (I have already bookmarked bedlamwerx's incredibly useful post on making your own seat pan and hump ) at this point I'm considerng hinges.. i will be keeping side covers, air box and otiginal battery position, im not so keen on the empty fframe look. (Yes, I know, its more cafe' to be empty...)
 
Here is a more accurate drawing showing how i want Maggie to look when I'm finished. As you can see, there are influences from quite a few different builds here
 

Attachments

  • IMG_20150130_123246.jpg
    IMG_20150130_123246.jpg
    1.3 MB · Views: 274
Ok, i feel i should post a quick caveat here..... i have been reading quite a few threads on this and other sites, ( particularly sonrier's "How to build a functional cafe racer" poster in "engines") and have noticed a lot of people freak out when builds are cosmetic, and not mechanical upgrades too. My build will be mostly visual, at this point i am not planning on doing anything in the motor other than any necessary repair work and maintenance. (Subject to change at my whim, of course.) I do, however, intend improving handling performance, as a result of shedding some weight, replacing rear shocks and changing out brakes.
So, if you are hoping for new cams, rebores and gas flowed heads, and all those other shenannigans, stop reading this build and avoid disappointments. I will complete the build, and, if at a later stage, decide to get creative with the motor, I will post a subsequent thread in the relevant category.
Don't hate me... im building this within my means with limited tools (I hope to do it all myself, as far as possible, apart from powder coating the frame) and to a budget.
 
Back
Top Bottom