
We noticed you are blocking ads. DO THE TON only works with community supporters. Most are active members of the site with small businesses. Please consider disabling your ad blocking tool and checking out the businesses that help keep our site up and free.
You are using an out of date browser. It may not display this or other websites correctly.
You should upgrade or use an alternative browser.
You should upgrade or use an alternative browser.
1975 CB400F Engine knocking
- Thread starter bonbons
- Start date
bonbons
New Member
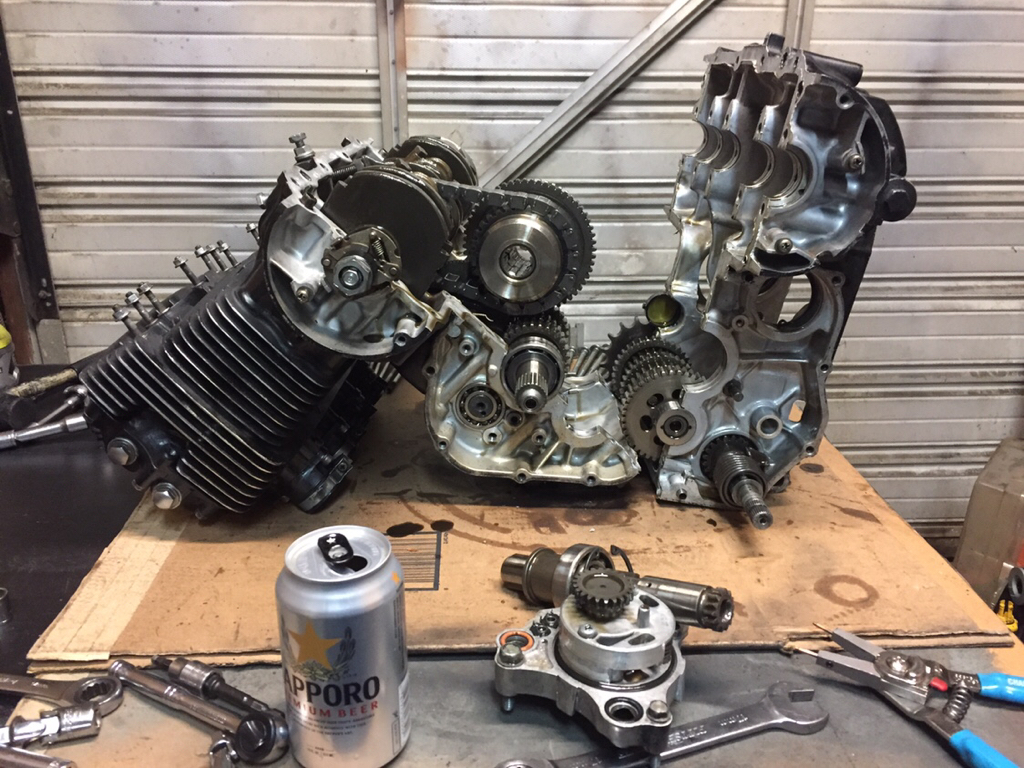
So here’s proof that this can be done - splitting the case while leaving the top-end on. I don’t like this method. It makes working with the engine a tad unwieldy. If you want to inspect/replace bearings or maybe the primary shaft drive/chain, con rods, can chain tensioner or gears, you probably have no business digging into the lower case like this. But since I am, eh once again, working on rebuilding this darn thing I just wanted to see if it could be done.
These screws were a bear to remove. All else are accessible from above and below:
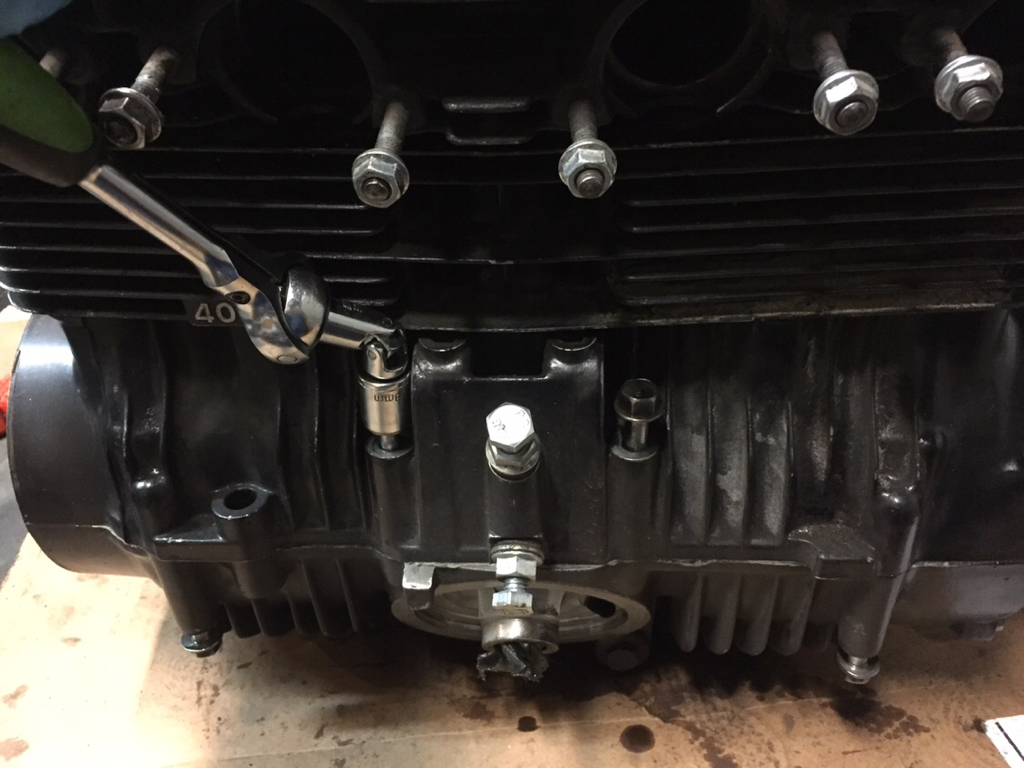
As you can see I had to use a swiveling drive extension that can get into it at an angle. Not fun.
Sent from my iPhone using Tapatalk
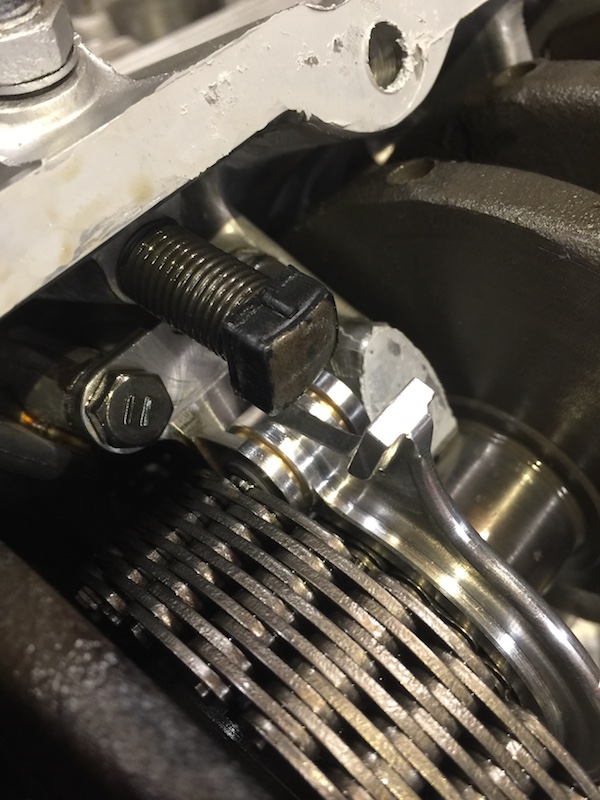
After completing assembly I realized I had installed the tension arm bolt incorrectly. :")
I had to pull the bottom case off to re-orientate.
The SS Allen cap screws made it easy as the heads are small enough to just slip past the jugs.
Correct, w mark on head facing out...
M.E.K. is nasty stuff but it cleaned the Hondabond off nicely.
Then a fresh coat of Hondabond applied.
I gave it about 30 minutes to dry before reassembly. To help prevent it from squishing into the crank bearings.
bonbons
New Member
Trek97, one note about using stainless steel hardware on your engine (aluminum) is that galling can occur since SS is a harder metal than aluminum. Zinc-plated hardware may be the better option. Use Helicoils where you can and always try torquing to spec. Also try not to use that impact driver for torquing and casual removing of hardware - try to do everything by hand if you want to maintain your threads
Sent from my iPhone using Tapatalk
Sent from my iPhone using Tapatalk
bonbons
New Member
Trek97, one other note on the cam chain tensioner bolt that you had to twist around to show that the mark was facing outward... perhaps more important would be to make sure that the flat on that shaft is facing outward toward the hole where the bolt locks that part down. Hopefully, that’s not what that line you have facing outward corresponds with, otherwise you’d have to spin that back around 180°. I’d take a peek thru the lock bolt hole to make sure that the flat is oriented correctly.
Sent from my iPhone using Tapatalk
Sent from my iPhone using Tapatalk
bonbons said:Trek97, one other note on the cam chain tensioner bolt that you had to twist around to show that the mark was facing outward... perhaps more important would be to make sure that the flat on that shaft is facing outward toward the hole where the bolt locks that part down. Hopefully, that’s not what that line you have facing outward corresponds with, otherwise you’d have to spin that back around 180°. I’d take a peek thru the lock bolt hole to make sure that the flat is oriented correctly.
Sent from my iPhone using Tapatalk
Set up as per the Honda workshop manual. But I will double check on that. Im pulling carbs off so it wouldn't be too much of an ordeal to yank engine and re-do.
bonbons
New Member
Though your tensioning bolt does look like OEM, that marking is on rubber that is fused onto a piece of flat metal, which over time can slip or knock itself off. I would not rely solely on that mark and there’s no harm in checking that the flat surface is facing in the correct direction which would be outward toward the bolt hole
Sent from my iPhone using Tapatalk
Sent from my iPhone using Tapatalk
pidjones
Over 1,000 Posts
In my experience, Helicoils are also SS, and SS will pressure weld to SS easily. ALWAYS use some type of anti seize on SS into Helicoils. We had a bunch of SS valves with SS Helicoils @ ORNL, all fine thread. Too many times I had to replace Helicoils that had pulled out when removing bolts that had not been coated with anti seize. Our crafts preferred the copper coat type, while I preferred graphite in isopropyl alcohol. Both worked well, mine was just less messy and if any got into vacuum systems would just evaporate and leave carbon behind. Copper coat is probably better in aluminum as the graphite would make it too easy to strip all of the threads out. Take care to reduce torque when using either! Luckily, most of our flanges were tightened until we saw a certain compression of the copper sealing gasket. Torque wrenches were seldom needed.
bonbons said:Trek97, one note about using stainless steel hardware on your engine (aluminum) is that galling can occur since SS is a harder metal than aluminum. Zinc-plated hardware may be the better option. Use Helicoils where you can and always try torquing to spec. Also try not to use that impact driver for torquing and casual removing of hardware - try to do everything by hand if you want to maintain your threads
Sent from my iPhone using Tapatalk
bonbons
New Member
Agreed on the SS Helicoils. Although I am with you on using some type of anti-seize (I use a zinc-type compound, this one goes up to 750°F! https://www.amazon.com/dp/B004HMLCLI/ref=cm_sw_r_cp_api_oARaCbSAQQ2NH) I also find strangely contradictory that an anti-seize be applied to hardware that you want to be sure fastens and doesn’t back out (i.e. engine bolts). Though I’ve not tried, Helicoils also come in the option of a “screw locking” type where the threads on the Helicoils are slightly distorted to allow some binding (or locking) of the bolt you have fastened to it. Perhaps something like this coupled with a good anti-seize to prevent galling might be beneficial to use to insure that these engine bolts don’t back out?
Sent from my iPhone using Tapatalk
Sent from my iPhone using Tapatalk


