Yeah plagrone youre right.
We noticed you are blocking ads. DO THE TON only works with community supporters. Most are active members of the site with small businesses. Please consider disabling your ad blocking tool and checking out the businesses that help keep our site up and free.
You are using an out of date browser. It may not display this or other websites correctly.
You should upgrade or use an alternative browser.
You should upgrade or use an alternative browser.
Yamaha RD Startup
- Thread starter 2_DONE_THE_TON
- Start date
So guys i got an update.
Tested my (one by one,since i missed a t piece to feed both carbs)carbs with an assi tank for leakage.
The carbs held up fine.
The left one started to leak after 3-4min but after stroking it carefully with a piece of wood it stopped leaking....no leakage on the right one whatsoever.
So i guess this is sorted..
Then i moved on testing spark and i had NO luck.
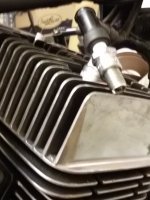
I held the plug body (threaded part) onto the fins then kicked the motor (by hand,i guess 2 revolutions per kick) but NO spark...
Handlebar control is on RUN...
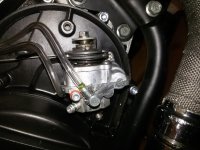
Then i took a look at the coil which i remounted after i repainted the frame...took it off and saw that the parts with which the coil is bolted onto the frame probably needed to be blank metal (earth for the coil?)
So i used some sanding paper and freshened up the connections and removed the paint from the points touching the coil...then i turned the key and suddenly the bike seemed to have a 'break in' in energy supply (the headlights shined bright before i made the move with the coil and now they were like 20 percent...)
Then i tried again with the spark plug and i didnt work out.
Did the energy breakdown happen because the coil was connected to first time?
However i m charging the battery and will try again tomorrow...
Any ideas on this one?
Tested my (one by one,since i missed a t piece to feed both carbs)carbs with an assi tank for leakage.
The carbs held up fine.
The left one started to leak after 3-4min but after stroking it carefully with a piece of wood it stopped leaking....no leakage on the right one whatsoever.
So i guess this is sorted..
Then i moved on testing spark and i had NO luck.
I held the plug body (threaded part) onto the fins then kicked the motor (by hand,i guess 2 revolutions per kick) but NO spark...
Handlebar control is on RUN...

Then i took a look at the coil which i remounted after i repainted the frame...took it off and saw that the parts with which the coil is bolted onto the frame probably needed to be blank metal (earth for the coil?)
So i used some sanding paper and freshened up the connections and removed the paint from the points touching the coil...then i turned the key and suddenly the bike seemed to have a 'break in' in energy supply (the headlights shined bright before i made the move with the coil and now they were like 20 percent...)
Then i tried again with the spark plug and i didnt work out.
Did the energy breakdown happen because the coil was connected to first time?
However i m charging the battery and will try again tomorrow...
Any ideas on this one?
Attachments

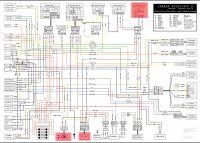
With your system, the battery is not involved in the ignition at all IIRC but the ignition is probably grounded through the main switch. Check the wiring diagram to be sure. It may interrupt the pulser signal, but it could also be a ground. The Run-Off switch is probably to ground as well, so disconnect it if it is and see if that allows the sparks to appear..
I think that one side of the coil goes to the CDI and the other to ground, but check that in the wiring diagram too.
I think that one side of the coil goes to the CDI and the other to ground, but check that in the wiring diagram too.
I think Teazer is correct, but I am no expert on the exact system in your bike. Only wanted to add that when you check for spark, spin the engine over quickly like you would normally kick it. The flywheel has permanent magnets, and they must pass the coils that power the ignition coils rapidly enough to supply the required energy. Pushing the kick lever through by hand may not be fast enough. Examine the wiring diagram and filter out the essential components. Probably only one portion of the startor assembly, the trigger, the "CDI black box", the ignition switch, the ignition coil, and the engine off switch are all that is involved.
http://www.dfn.com/agservices/elecfaq.html
Here is a link about Banshee electrics, which are super simple as mostly they are just the ignition for the engine. I think it likely very similar to your bike, and might make it easier to understand. I often put Banshee ignition on RDs, which made me think of it. Good Luck!
teazer said:With a double ended coils, both ends MUST be grounded either directly or through a plug to work. Best way is to use a simple spark plug tester which clips to a fin but putting both plugs on the head and kicking hard should work
hey guys!
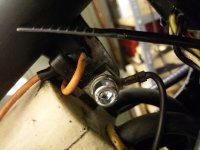
finally could dig out a wiring diagram which shows the setup...sorry its german
")
orange and black goes to the CDI box.
i dont really know where to start testing on the connections,maybe i kust didnt kicked the engine hard enough.
i assembled the motor with a nice handful of 2 stroke oil....do i have to worry that kicking and kicking that engine over with no lubrificating will harm the fresh bore or will the oil left in the bores be enough to protect it?maybe some 2 stroke oil down the plug holes?
The crank moves really nicely and one can hear and feel the compression.
where would you guys start testing...i definitely start just by kicking the motor with more force over...leaving both plugs free and both plug bodies connected to the fins!
Attachments
So guys i got great news!!
After reading trough the banshee CDI article moebius posted i got to understand the basics of my ignition.
Checked all connections try again with harder kicking tried again and again....
Then i saw in the diagram that my Euro RD has 4 key positions...since my guess was that the last position would be the GO i reversed my thinking turn the key to the 3rd tried again and boom!!!
Spark!!!
As moeb said its always something humiliating
Maybe someone can tell me why the last position is a ignition killer?maybe parking light?
Attachments
plagrone
Coast to Coast
Ryan Stecken said:Maybe someone can tell me why the last position is a ignition killer?maybe parking light?
You are correct in your guess. Most bikes have a position after ignition that turns on the tail light and any running lights and allows you to remove the key. (Useful for delivery guys or if you plan on just running in somewhere for a moment)
Oh man i'm so relieved...
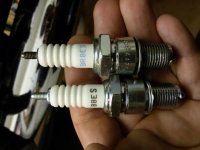
Just saw that my moto shop delivered the wrong spark plugs the one i got from the PO has some kind of a 'threaded' top sliding into the coil plugs.it reads ngk R.
The ones that my moto shop delivered have a 'curved' top with no 'threads'.
Guess i ll need to get these changed cuz i ll def have fouled plugs running it the first time with premix and oil pump (priming precaution).
The round metal top screws off of NGK plugs so you can use either style of connection.
Start your engine with plain old NGK B8ES plugs. Those are the "long reach used on US RD 400's, US RD350's take the "short reach" B8HS plugs, but looking at your cylinder heads, my guess is the B8ES are what you should use. Figure whether you need the long or short reach plugs and use the inexpensive normal plug. The 8 in B8HS indicates the heat range which is the important thing assuming you have the reach correct. Don't waste money on anything expensive until you have the engine broken in and tuned. Then you can go to some fancier plug if you like, though probably won't make any difference except you have less beer money!
If you look at the key switch diagram near the upper left of your wiring diagram, you will see that in position 1, only the ground that disables the ignition is connected. In position 2, this is disconnected, enabling the ignition, and the red, brown, and red/yellow circuits are connected, presumably enabling everything. In position 3, the blue light circuit is added, so evidently if you want to drive with out lights, use position 2; In position 3, you can not turn off the tail light or instrument lights, but you can still turn off the headlight. No idea what use this is, probably to comply with some regulation. In position 4, the ground disabling the ignition is re-engaged, but the red battery and blue lighting are connected, evidently for "parking lights" as previously mentioned. Looks like you are making progress!
jpmobius said:Looks like you are making progress!
thanks to you and the other fellas!
i just checked my manual and saw that there´s a certain to synchronise the cylinders one by another with the slide holding screw and air screw.
1.)unplug left cylinder
2.)run the motor
3.)adjust the right cylinder (1 3/4 out with the air screw,slide holding screw till it bites then adjust till it holds rpm at 2000)
then same procedure for the other cylinder with the right cylinder unplugged.
the. run both together (they will run faster)-->readjust the slide screws till they keep a nice and even rev...
is that method not overly complicated?
i thought just setting both slide screws and air screws at a certain point and starting both cylinders will be enough.
adjusting the slides by feeling the vibtrations of the exhaust (like moeb said before).
is that a common method for 2 strokes?
Ill definitely do.jpmobius said:I think you will be well served to employ the method I detailed earlier. Once you have it running, you can fool around with it to see if alternatives help.
Just compared the old plugs the PO had in there with my ones...
The knew ones are exactly which you recommended...i ll run these (B8ES).
Attachments
Ryan Stecken said:thanks to you and the other fellas!
i just checked my manual and saw that there´s a certain to synchronise the cylinders one by another with the slide holding screw and air screw.
1.)unplug left cylinder
2.)run the motor
3.)adjust the right cylinder (1 3/4 out with the air screw,slide holding screw till it bites then adjust till it holds rpm at 2000)
then same procedure for the other cylinder with the right cylinder unplugged.
the. run both together (they will run faster)-->readjust the slide screws till they keep a nice and even rev...
is that method not overly complicated?
i thought just setting both slide screws and air screws at a certain point and starting both cylinders will be enough.
adjusting the slides by feeling the vibtrations of the exhaust (like moeb said before).
is that a common method for 2 strokes?
the very first thing is to cable pull synch the carbs, the popsicle stick method works fine for this
and it is easiest to do with tye carbs out of the intake resting on top of the seat frame
runmikeyrun
Been Around the Block
any updates?
I had an RD250 and 400 at different times. fun bikes.
The difference between plugs is R stands for resistor. I believe it's to lower RF noise but both plugs will function exactly the same.
My 400 had two screws with large heads near the top cap, when removed and the throttle opened wide and dot on the slide would appear. This was to help sync the slides. Still have to follow up with the popsicle stick to get them correct at idle, but the dots will get you close.
I agree with what was said before. Set the carbs to stock jetting/settings. If it's a stock motor those settings will work.
One thing on the 400s was that the pilot jet needed bumped up one larger size or popping on deceleration would occur. This is due to the addition of ethanol in our fuel in the USA since the time the bikes were manufactured. I'm not sure if this is a problem on 350s and 250s though. Something to keep in mind if you have popping and bucking while decelerating after you've got the machine running properly.
Winter in Ohio is awful as well, no riding at all and working in garage is impossible unless you have a good heater
jpmobius said:Your plan sounds pretty foolproof, though excessive. Better safe than sorry though. If you are starting on premix like start up ratio (20-1 as previously noted - depending on oil), you will be super rich on oil once the injector is completely on line. Possible spark plug fouling is the only real downside besides way too much smoke. If you can run a temporary start up tank of pre-mix, or even just make up a quart of fuel pre-mixed and run it until the injector lines are full and then fill the tank with straight gasoline you will be fine. Prefilling the lines can't hurt, but if you are starting on full strength pre mix it is not necessary. One thing about the injector lines at the carbs: If you have clear lines, you will often see a big air bubble next to the carb, but a full line going down to the pump. That is because the air whizzing past the inlet siphons out a bit of oil near the carb. Don't worry, it is normal. I run clear lines for this reason, because I like to be able to look down and see oil is flowing! I do suggest this though: Once you have the engine running on premix, pull off each injector line one at a time, pull the cable to the oil pump so it is wide open (the pump only, not the throttle) and observe the oil pumping out of the line. Do it for both lines so you absolutely know they are both working. It is totally possible for one to work perfectly and the other to not work at all. Both should appear to work identically. The engine will speed up with the line off, but don't worry about it. There is no load, and the short lean condition will harm nothing. Even wide open, the oil pulses out more as an ooze than a squirt. You will definitely be able to tell if it is working or not once the lines are full.
As for the "choke", it is "on" when the brass plunger on the right side of the left carb is pulled up. That means that the lever on the left side is pushed down. The lever is horizontal, or "up" when it is off. Technically, it is a fuel enricher, and just opens a big fuel jet to dump in some gas when engaged. The rubber tube that connects the two carbs feeds this to the right side carb, which does not have the "choke" at all. Might want to check that the fuel bowels are on the correct carb. The left bowel has a small drilling in the bottom to feed fuel to the enricher. swap bowels, and you will be super frustrated on the first start up. A real common oversight! Remember, this is for US models, and I am assuming yours is the same.
so guys!
long time no hear!i´ve been super busy with my RD,work and everything that messes with motorcycles
i nearly cleared all issues with my RD,she is nearly finished so my plan will be to start her and run the motor in, the next weeks when the weather will clear up in austria.
i´ve had a big issues with getting stock exhaust gaskets,these are discontiued for this model and Yamaha changed the diameter for this specific model so i had to improvise.
the RD got spark,carbs are not leaking and the motor is easy to kick over,oil pump hits mark on exzentric disc when in full throttle,markings on sliders are seen when in full throttle (slides should be synchronised)
so my plan will be for first start up:
-Fill up oil tank and deaerate oil pump,fill up clear oil lines with 2 stroke oil.
-Connect auxiliary fuel tank with 1-20 oil gas mixture
-Start her up (choke?)
ENGINE IS RUNNING
1.)adjust knurled screw for idling- left and right (pre-set before start up)
2.)disconnect clear oil lines from carbs,turn exzentric disc on oil pump on full throttle position,watch if oil pumps works,oil should ooze out on BOTH sides
3.)reconnect oil lines
ENGINE IS OFF
4.)connect stock gas tank with straight gas
5.)check brakes (again)
ENGINE IS RUNNING
6.)ride!
questions:
which screws and connectors should i retorque after the first heat cycle?
My guess:
-head bolts (20 NM´s)->retorque step by step and diagonally
Shoud i retorque the nuts and bolts that hold the cases together too?they have extremely low torques...like 2NM
thanks in advance!!!
I've never sees any case bolts needing to be re-torqued. Cylinder head bolts DEFINITELY! Re-torque those many times. After 1st heat cycle when it completely cools off, and after the second. Keep the first ride short - only enough to completely warm the engine, let it cool and re-torque. I am in the quick, hard break-in camp, but if you are using the stock head gaskets, make that first ride really easy and save the break in ride for next time after you check the heads. ABSOLUTELY DO NOT OVER TORQUE THE HEADS OR THEY WILL LEAK! After 2 or three heat cycles you should be fine if you re-torque EVERY time, but check again after your first long ride. No doubt some will consider this excessive, but the ONLY RD heads I have that reliably seal have o-rings.
There has been quite a bit on 2 stroke oil on this thread already, but just in case, do not forget that you can do no wrong with excessive oil. I run LOTS of oil in new engines, and really quite a lot if they are run hard or raced. On the old bikes, Yamaha shipped their bikes with the oil pumps set up for extra oil. After the bike came back for the first major service, the shims in the oil pumps were changed to reduce the oil volume. Obviously, Yamaha wanted plenty of oil for break-in. Presumably your bike is the same, but it is newer than the bikes in the US, and we have seen numerous small differences so you will have to check your bike yourself. On the US bikes, the stroke of the oil pump is determined by tiny brass shims that go under the washer that sits on top of the eccentric cam the cable operates the pump. More shims makes the pump stroke longer so it delivers more oil. Very possibly your bike could have minimum shims for normal post break-in operation. With a new motor you should have more oil. There should be a spec in your manual for pump stroke which you can check. Be sure to set it up for the max rich setting for break-in. On US models, you measure the stroke at its max travel with a thickness gauge.
There has been quite a bit on 2 stroke oil on this thread already, but just in case, do not forget that you can do no wrong with excessive oil. I run LOTS of oil in new engines, and really quite a lot if they are run hard or raced. On the old bikes, Yamaha shipped their bikes with the oil pumps set up for extra oil. After the bike came back for the first major service, the shims in the oil pumps were changed to reduce the oil volume. Obviously, Yamaha wanted plenty of oil for break-in. Presumably your bike is the same, but it is newer than the bikes in the US, and we have seen numerous small differences so you will have to check your bike yourself. On the US bikes, the stroke of the oil pump is determined by tiny brass shims that go under the washer that sits on top of the eccentric cam the cable operates the pump. More shims makes the pump stroke longer so it delivers more oil. Very possibly your bike could have minimum shims for normal post break-in operation. With a new motor you should have more oil. There should be a spec in your manual for pump stroke which you can check. Be sure to set it up for the max rich setting for break-in. On US models, you measure the stroke at its max travel with a thickness gauge.
Thank you!
I will check my manual for the specs and my pump for shims!
By breaking in you mean the first miles you just described dont you or do you mean a certain period of time where ht fresh motor is run in.
Do i need to shim the pump if its set back on less oil or can i compensate with oil gas mixture?
I will check my manual for the specs and my pump for shims!
By breaking in you mean the first miles you just described dont you or do you mean a certain period of time where ht fresh motor is run in.
Do i need to shim the pump if its set back on less oil or can i compensate with oil gas mixture?
So i checked the pump today for shims...seems like there are 2 tiny copper shims where you said they would be.
I nees to check if thats stock or modded.
My guess is that the oil pump is bone stock and it never had any servicing,so the shims could be the extra oil that the factory wanted.
The frame and motor number matches and the bore was stock,the glue sealant between the cases looked also old and burnt in so i guess the motor was never opened.
I'm just guessing