
We noticed you are blocking ads. DO THE TON only works with community supporters. Most are active members of the site with small businesses. Please consider disabling your ad blocking tool and checking out the businesses that help keep our site up and free.
You are using an out of date browser. It may not display this or other websites correctly.
You should upgrade or use an alternative browser.
You should upgrade or use an alternative browser.
First ever cafe build progress report
- Thread starter biker_reject
- Start date
neevo
Over 1,000 Posts
notlob said:How about a rear wheel Hugger mounted to the top of the swing arm. May need some trimming or the chain guard cutting off. Sure you could get a cheap one on ebay.
That's what I did. Search RS125 Hugger on eBay for a reasonable one what you can trim the bottom off easily to drill it and add some mounting points.
Here is mine on my modified swingarm:
Attachments
biker_reject
Over 1,000 Posts
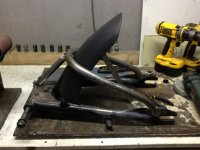
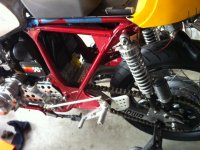
Revised instrument panel fabbed. Undertail reworked to include lip for mounting LED integrated light strip and hooks for battery cable. Warping occurred during welding. Been working to get it to fit. It's getting there. Did my wheels in Duplicolor Chrome Blackout. Makes the tires look more beefy. Powder coated my sprocket which was polished, but being steel, I couldn't keep the corrosion off even with clearcoat.
Attachments
Hoosier Daddy
Earache my eye...
Could you snap a pic for me whenever you have the time?
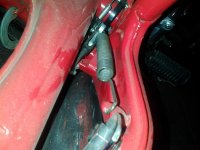
B_R here are two pics of the springs behind the right passengers peg mount.
One is a tab on the mount for the rear brake pedal return as I thought. It is a bear to stretch into place, I used a screwdriver, loop it onto the shaft and use it as a lever .
the other is more like a bent rod welded to the brake arm pivot itself for the brake light switch.
Hope these help
Attachments
biker_reject
Over 1,000 Posts
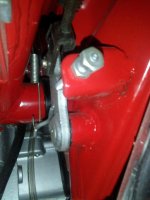
Thanks! I had everything ass-backwards - lever pointing up, brake rod on upside down and pinned in the wrong hole, etc. I still think my spring is too short. It fits, but man is it stiff! I'm wondering if I got it mixed up with another bike's return spring. Stuff gets shuffled around when a project drags on this long.
Hoosier Daddy
Earache my eye...
...and my pics suck. Have you check out the parts micofishe?
biker_reject
Over 1,000 Posts
Oh, I got it sorted. The stiffness is due to me trying to depress the brake lever with my hand while sitting on the driveway. Using my foot feels just right. Thanks so much for the pics! My Clymer's didn't show the spring. This was me today pissed at myself for being a dumb ass.
Attachments
Hoosier Daddy
Earache my eye...
;D ;D ;D
biker_reject
Over 1,000 Posts
Hoosier Daddy
Earache my eye...
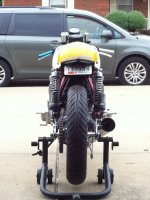
GAWD she's got a pretty ass!
(I still want your shocks)
(I still want your shocks)
biker_reject
Over 1,000 Posts
It's been so long ago that I bought them, I totally forgot! I'll look through my invoices. They're aluminum and very sturdy. Much better than thinner chromed steel brackets you find everywhere. I found out those rust in no time and look pretty cheap.
biker_reject
Over 1,000 Posts
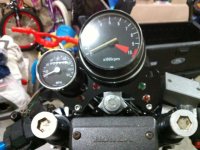
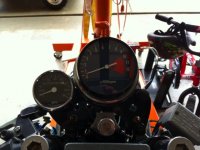
Ebay score! NIB tach for $47 with S&H! It is flawless. Also, got my decals on. Seat is just about there. Last week, I was adjusting my clip ons and dropped the right side clip on and broke the housing holding the throttle cables. Doh! Damn 34 yr old plastic. :-D Another $23 to shell out for one on ebay.
Attachments
Hoosier Daddy
Earache my eye...
Love the look of the big tach / little speedo combo.... very nice!
biker_reject
Over 1,000 Posts
caferay said:“The flame that burns Twice as bright burns half as long.” Is the quote from Bladerunner, which was a character quoting Lao Tzu, a philosopher in China in 6th century BC.
I didn't know that! Very cool that a replicant would quote a 6th century philosopher.
")
biker_reject
Over 1,000 Posts
xb33bsa said:looking good but what's up with your forks ?
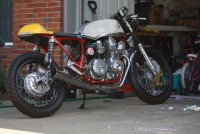
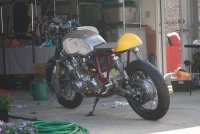
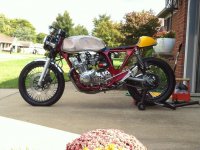
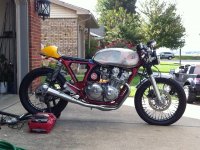
The forks on the '79 are freakishly long, added to that, a 19" front wheel. The stance was a big issue with me from the start. Dropping it through the triple and raising the rear ride height was the only way I could see around it. If I were to do it again (and I probably will since I have done it twice on two other projects), I would do a front end swap to modern USD forks.
biker_reject
Over 1,000 Posts
I am counting on this set up to work. The forks are shortened 2" and beefed up with Progressive springs. The bike hasn't been road tested yet, so this is how she sits with 5" of travel. I don't think I sacrificed shit. And yes, looks are a huge but not the only consideration! What's your ride look like? :-D


