
We noticed you are blocking ads. DO THE TON only works with community supporters. Most are active members of the site with small businesses. Please consider disabling your ad blocking tool and checking out the businesses that help keep our site up and free.
You are using an out of date browser. It may not display this or other websites correctly.
You should upgrade or use an alternative browser.
You should upgrade or use an alternative browser.
The Chinese Tracker/Scrambler thing...
- Thread starter dualero
- Start date
dualero
Been Around the Block
Hi! Went with the 125 head, lots of compression, but not ridiculous. I like the way the motor is now. I've just changed to a new wiring/CDI/stator/RR combo so I can run 12v volts. One of the nightmares I've have to deal with when buying China parts here in Venezuela. Electrical ones are not really respectable.Erskine said:Get the pics up! What did you do about the head dilemna. I'm running a 125 head on 150 and the high comp gives plenty of zap. Check out the ACE section, its the same engine as yours and lots of peops going up to 150.
http://www.dotheton.com/forum/index.php?board=101.0
So, I've manged to run the engine just before tearing the bike down. I'm redoing everything I left behind. And didn't finish.
I'll post some pics later! Glad at least someone is following! Cheers!
Alex jb
Been Around the Block
Brilliant job so far buddy!
Even more kudos that you are doing it while riding the bike as your main transport!
As for the front fork drop and seat height... I'd say stop asking us and get what feels best first (especially as you are tall), then look at the side profile, then ask other people.
You have done a lot of work and learned a lot, but make sure the bike works well for you and feels good to ride.
Erskine
Over 1,000 Posts
Did you stick with the stock carb by the way? Mine is stock and it does the job just fine.
The next level of power increase is to go to 200cc .... This can be done with the crank from a Lifan GY/CG 200 and a spacer under the 150 barrel. Just a thought if you ever have to replace your crank. My CG must be about 30,000 miles now (48k) and under heavy load I fancy it is starting to rumble.
The next level of power increase is to go to 200cc .... This can be done with the crank from a Lifan GY/CG 200 and a spacer under the 150 barrel. Just a thought if you ever have to replace your crank. My CG must be about 30,000 miles now (48k) and under heavy load I fancy it is starting to rumble.
dualero
Been Around the Block
Alex jb, thanks for your kind words! I've managed to mod the bike while it was my only daily driver, but that changed since April this year. I had the chance to buy another Chinese bike new from a friend an Empire Owen (GN125 copy) and that is what led me to restart the project again, I now have an additional vehicle to let the Chinese scrambler to be built the right way.
Today I covered every hole or imperfections there were on the frame tubes with my welder. I've also removed the rear shocks upper mounts in order to redesign and rebuild that section of the frame, I believe was a weak part of the frame. Tomorrow the plan is to grind away those weld beads and leave the ones that are not seen if they are structural.
Erskine, the carb subject is something I wanted to comment you about.
So, before going 150 bore, I had the original carb that the bike came with, a Walbro PZ26, and the bike ran well. Short after making the 150 bore conversion, the bike seized from the crank rod, and after making the necessary repairs, the bike did not run well with that carb.
Seen as I already had trouble tunning that mentioned carb (no change on RPM at mixture screw, low idle cold then fast idle when hot, etc), decided to ditch it as I had a almost new PZ27 one laying around the house. I don't now if the new carb (PZ27) is jetted for 150 or for 200 cc. As I recently made the bike run several times for installing the new wiring, I could notice the bike is running really well in the idle circuit. So I think is jetted correctly for my bike, this seen through the spark plug, if not I will get the right jets when I have the chance.
After changing the wiring and installing the new carb, the bike starts 2nd kick, choke off, and idles constant cold or hot
Another subject of extreme importance is that I have no airbox for this bike. Should I get the airbox right away, no questions asked? Or could I somehow tune the bike to run from a pod (I'm thinking UNI's). What's the best option?
Thaks buds!
Here is a sneak peek of what I've been doing
Erskine
Over 1,000 Posts
See you have been busy. I run mine with a cheap pod filter to keep the rocks out. I dont think these are particularly fussy, unlike CV carbs which need still air. Just make sure you have something to keep the crap from being sucked in. If you were going for technical high speed in a track environment a long bell mouth would deliver an extra fraction of a bhp but what you need is torque and that likes a short tract.
dualero
Been Around the Block
I thought those pics were good, but now I see my blurry-crappie-cellphone-photoshoot was not the best choice. Either way now you have a clue of what I have done. When I have the frame ready I will take some outdoor daylight ones.
I have some of those China made mesh style pods, that I was using before teardown so I guess we have the same setup. It's really dirty but here it is

When you talk about a short tract, how long that is? What would be a good starting point for the length of the intake? I'm thinking PVC pipe for that, and I have to figure out a way to, first open a bit more the filter opening, and then attach the filter to what's going to be the intake.
This is how the filter opening looks like

But that opening is smaller than the carb throat. So, any thoughts?
I have some of those China made mesh style pods, that I was using before teardown so I guess we have the same setup. It's really dirty but here it is
When you talk about a short tract, how long that is? What would be a good starting point for the length of the intake? I'm thinking PVC pipe for that, and I have to figure out a way to, first open a bit more the filter opening, and then attach the filter to what's going to be the intake.
This is how the filter opening looks like
But that opening is smaller than the carb throat. So, any thoughts?
Erskine
Over 1,000 Posts
I think your filter is missing the inlet rubber?? Mine is held on straight to the carb by a jubilee clip around the rubber.
I've seen some air filter tubes made out of plumbing pipe, also from car radiator hoses, which can be quite long and use curved sections to position the filter in places with more room. It doesn't seem to make a big difference, simply it's important that the carb gets clean air.
I've seen some air filter tubes made out of plumbing pipe, also from car radiator hoses, which can be quite long and use curved sections to position the filter in places with more room. It doesn't seem to make a big difference, simply it's important that the carb gets clean air.
dualero
Been Around the Block
Hi folks! Here's an Update
So today got some time in the morning to spend on the bike.
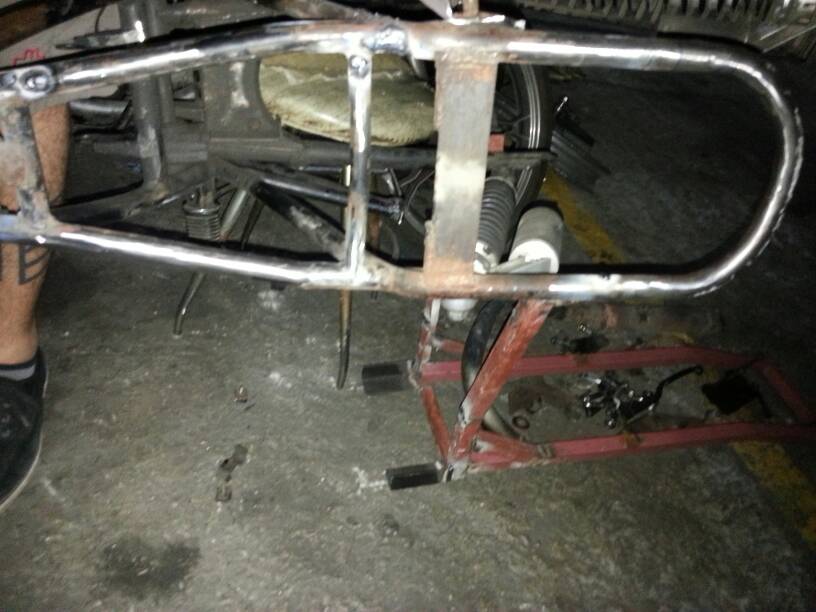
First, finished all the flap disc duties on the frame. You'll notice the bike might be a little twisted on the pics (she's been crashed before, left out in the open, etc), and that the welds may not look as good as they should, but they serve their purpose. I'm in for learning what to do and what not to do when building/rebuilding a bike, and then do it the right way. This bike isn't about aesthetics, I want it to look and perform good, and with good proportions. A ratty, uncluttered, simple, yet not-too-clean look suits the bike very well.
You'll see that as I will soon look for some of the best shots I had of the bike at the last stage I got her in. For you to have an idea of what the bike looks like.


Then got the fork clamps removed from the frame, and proceeded to remove the bearings and bearing races. This is the top assembly. Bottom assembly was almost gone. This bike has really seen the worst.

This is the frame full of the crud that was accumulated during all this years. First, the Bottom. Second, tops.


Then came the bottom triple clamp, got the bearing races pressed out, and gave her a good old clean with degreaser. The shiny spots on the stem are flap disc treatment as it seems some balls of the top bearing got loose and fell down the head stock, and marked the hell out of the stem. I had to grind those marks away in order to remove the lower bearing race completely from the stem. It got stuck bad in some of those marks. Shots before and after cleaning.


Here I have the new bearings, I hope they fit stack wise. I'm going to install them dry to check fitment then remove for paint, then install everything again cleanly.

I'm working on the bike right now, more to follow.
Cheers!
So today got some time in the morning to spend on the bike.
First, finished all the flap disc duties on the frame. You'll notice the bike might be a little twisted on the pics (she's been crashed before, left out in the open, etc), and that the welds may not look as good as they should, but they serve their purpose. I'm in for learning what to do and what not to do when building/rebuilding a bike, and then do it the right way. This bike isn't about aesthetics, I want it to look and perform good, and with good proportions. A ratty, uncluttered, simple, yet not-too-clean look suits the bike very well.
You'll see that as I will soon look for some of the best shots I had of the bike at the last stage I got her in. For you to have an idea of what the bike looks like.
Then got the fork clamps removed from the frame, and proceeded to remove the bearings and bearing races. This is the top assembly. Bottom assembly was almost gone. This bike has really seen the worst.
This is the frame full of the crud that was accumulated during all this years. First, the Bottom. Second, tops.
Then came the bottom triple clamp, got the bearing races pressed out, and gave her a good old clean with degreaser. The shiny spots on the stem are flap disc treatment as it seems some balls of the top bearing got loose and fell down the head stock, and marked the hell out of the stem. I had to grind those marks away in order to remove the lower bearing race completely from the stem. It got stuck bad in some of those marks. Shots before and after cleaning.
Here I have the new bearings, I hope they fit stack wise. I'm going to install them dry to check fitment then remove for paint, then install everything again cleanly.
I'm working on the bike right now, more to follow.
Cheers!
dualero
Been Around the Block
Continued.
Pressed the bottom race.

Upper race

Then pressed the bottom bearing in the stem, and bolted them to the frame to check the stack height. Everything bolted right up as with the previous bearings. I'm happy to having successfully upgraded to angular contact bearings.


If you noticed in the pic of the bottom triple clamp, there are some grinding marks. I removed all the ridge there was around the casting, all that is left is to sand by hand, and then sand blasting!


And last but not least, removed the steer lock to get the frame completely off everything. And give the lock a good clean, then oil it.

Hope you like what I've been doing! Any thoughts, questions or concerns, let me know. If I'm making something wrong, dangerously or whatever, let me know.
Thanks!
Pressed the bottom race.
Upper race
Then pressed the bottom bearing in the stem, and bolted them to the frame to check the stack height. Everything bolted right up as with the previous bearings. I'm happy to having successfully upgraded to angular contact bearings.
If you noticed in the pic of the bottom triple clamp, there are some grinding marks. I removed all the ridge there was around the casting, all that is left is to sand by hand, and then sand blasting!
And last but not least, removed the steer lock to get the frame completely off everything. And give the lock a good clean, then oil it.
Hope you like what I've been doing! Any thoughts, questions or concerns, let me know. If I'm making something wrong, dangerously or whatever, let me know.
Thanks!
dualero
Been Around the Block
Hi there everyone!
Not too much updates other than buying parts for the project such as new fork from a dual sport Chinese bike that has the same diameter tube.
These are longer than stock by only 45mm, but I'm willing to lower them internally first, then if I need to lower the bike more from the front, I'll slide them through the T's.
Here I leave this little glimpse of what is coming. (excuse my malfunctioning-cellphone pics, seems taking pics with flash at low bat percentage makes this issue)
Anyway have a look at my first mock up


I'm trying to make a like from the underside of the tank to the rear of the bike, those two pics seem to have that like almost perfect.
*EDIT: In the previous paragraph I meant line, instead of like. Hope that makes sense.*
What do you guys think? I'm planning on using that teardrop tank, but I will try to make the sides flatter like on tracker tanks. I'm heading the scrambler route, is appealing for this bike.
Cheers from Venezuela Bros! Happy new year!
Not too much updates other than buying parts for the project such as new fork from a dual sport Chinese bike that has the same diameter tube.
These are longer than stock by only 45mm, but I'm willing to lower them internally first, then if I need to lower the bike more from the front, I'll slide them through the T's.
Here I leave this little glimpse of what is coming. (excuse my malfunctioning-cellphone pics, seems taking pics with flash at low bat percentage makes this issue)
Anyway have a look at my first mock up
I'm trying to make a like from the underside of the tank to the rear of the bike, those two pics seem to have that like almost perfect.
*EDIT: In the previous paragraph I meant line, instead of like. Hope that makes sense.*
What do you guys think? I'm planning on using that teardrop tank, but I will try to make the sides flatter like on tracker tanks. I'm heading the scrambler route, is appealing for this bike.
Cheers from Venezuela Bros! Happy new year!
NoRiders
Over 1,000 Posts
I've been following your thread and your work rate is excellent, despite having to do all your work in a multistory car park by the looks of it!!!
Your latest mock up look good, but I'd test that the stroke of the swingarm matches the angle of the shocks as they look a bit too low and might bind mid swing if you get what I mean, by sight alone I'd say stand them up vertically a few degrees more might do it? I'm sure there's a triangulation to prove the final/optimum shock position....or maybe multi-point mounts to allow adjustment might work?
Anyhow, just my view.
Carry on fella, interesting build is interesting. I'm sure you'll be riding it very soon into 2016...sooner than me anyway haha!
dualero
Been Around the Block
NoRiders said:I've been following your thread and your work rate is excellent, despite having to do all your work in a multistory car park by the looks of it!!!
Your latest mock up look good, but I'd test that the stroke of the swingarm matches the angle of the shocks as they look a bit too low and might bind mid swing if you get what I mean, by sight alone I'd say stand them up vertically a few degrees more might do it? I'm sure there's a triangulation to prove the final/optimum shock position....or maybe multi-point mounts to allow adjustment might work?
Anyhow, just my view.
Carry on fella, interesting build is interesting. I'm sure you'll be riding it very soon into 2016...sooner than me anyway haha!
Hi there, NoRiders thanks for the encouragement!
By the looks of it, it is indeed a multistory car park. I live in a apartment building with 48 apts and 2 Park spots for each one. Is not the best place to work you know, but I have the minimum hand/power tools required tackle any jobs regarding a bike build (angle grinder, drill and a 110v welder. It is really not that comfortable nor efficient, but I get my fair amount of enjoyment turning wrenches.
Regarding the rear shocks position I do get what your trying to point out. I've already had the shocks in a more vertical position, before a tore into it for the second time. After having the bike running in that configuration I can assure the bike was oversprung in the back, making it a little uncomfortable to ride for long periods.
As I mentioned in a previous post I'm heading the scrambler route, this means I'm looking to get the bike lifted a little bit from what was previously built.
What I im trying to achieve with the shock position in the mock up, is have the upper shock mount be a little lower and to the front than before. This in theory will make the motion ratio of the wheel travel vs shock travel a little higher, making the bike lift the rear (shock mount reposition) and have a "softer" rear suspension (increase in motion ratio). Is this thinking right?
As that was only the first mock up it is not definitive, so many versions will arise, looking to get the best of the rear suspension without having any compromises.
I will also have the springs removed from the shocks in order to test the swing/travel/binding of the shocks and swingarm.
Thanks for the input!
P.S.: I will definitely put myself to look for the bike pics I promised "years" ago hahahahaha
dualero
Been Around the Block
This is how I had the bike just after looping the frame, fabing new upper shock mounts, getting the tank powder coated, and the wiring just necessarily sorted to make the bike run again.


Ran straight pipes for a month, because the new brake pedal designed for my disk brake adaptation, went in the way the pipe went when stock haha
The bike was a 125 by then, then one day a screw from the carb choke went into the engine causing the spark plug to short. And the bike didn't ran any longer.
Marks the screw left on the piston:


This was an excellent excuse for going 150cc. Bought the CG150 bore kit and went with the 125 head.
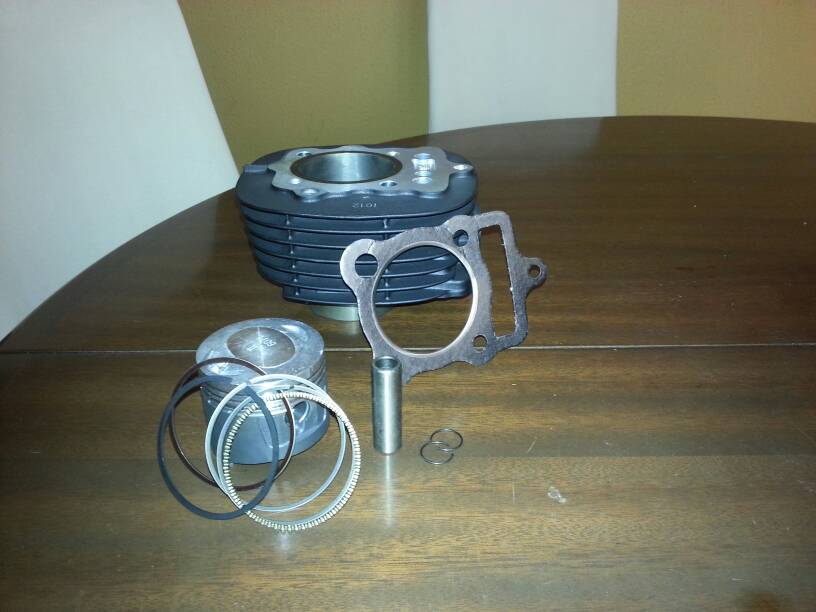
Piston comparison:


How the screw hit the spark plug and made it short circuit:

After having the top end rebuilt with only just the new cylinder and piston, and going 16" in the front, I was going for the tracker look and that tire gave me the stance I was looking for. Some sort of seventies inspired super moto.

Alive after top end rebuild:
https://vimeo.com/150546712
Then found some tubing and went to town on making a silencer.
Mocking up:


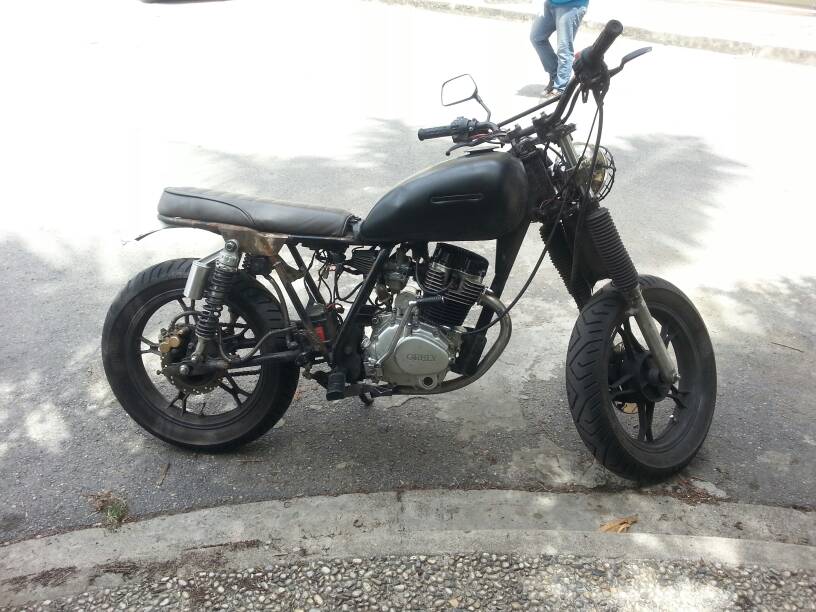
This was the best state of the bike ever. Painted Exhaust, complete rear fender with plate number base, wiring with headlight and horn. No stoplight, no indicators.


From then, everything was electrical gremlins and the sort, carb problems also haunted me for a while until I had the chance to buy the other bike and this just stood there forgotten.
But here we are now, and the point is doing things the right way this time.
Ran straight pipes for a month, because the new brake pedal designed for my disk brake adaptation, went in the way the pipe went when stock haha
The bike was a 125 by then, then one day a screw from the carb choke went into the engine causing the spark plug to short. And the bike didn't ran any longer.
Marks the screw left on the piston:
This was an excellent excuse for going 150cc. Bought the CG150 bore kit and went with the 125 head.
Piston comparison:
How the screw hit the spark plug and made it short circuit:
After having the top end rebuilt with only just the new cylinder and piston, and going 16" in the front, I was going for the tracker look and that tire gave me the stance I was looking for. Some sort of seventies inspired super moto.
Alive after top end rebuild:
https://vimeo.com/150546712
Then found some tubing and went to town on making a silencer.
Mocking up:
This was the best state of the bike ever. Painted Exhaust, complete rear fender with plate number base, wiring with headlight and horn. No stoplight, no indicators.
From then, everything was electrical gremlins and the sort, carb problems also haunted me for a while until I had the chance to buy the other bike and this just stood there forgotten.
But here we are now, and the point is doing things the right way this time.
dualero
Been Around the Block
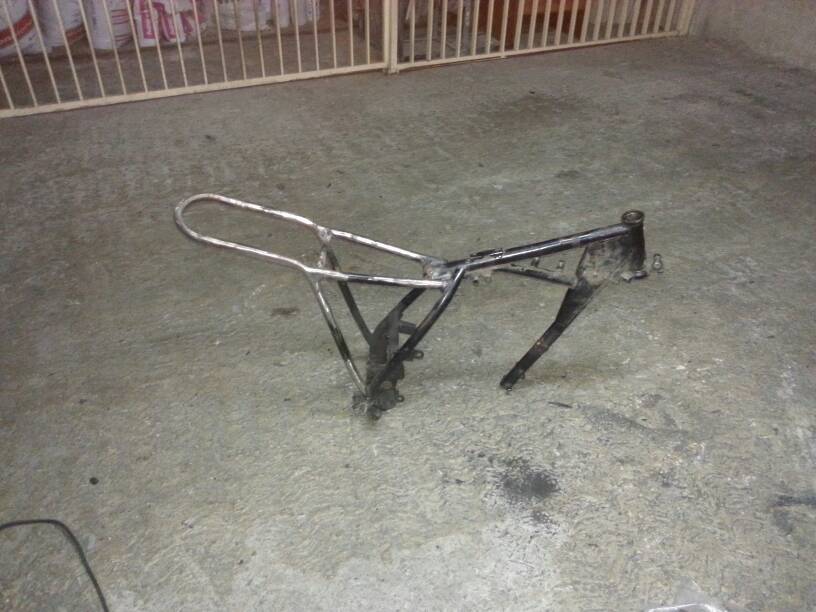
So yesterday had some time to spend on the bike, had some old tires laying around and mounted them to the rims I'll be using so I could start setting the stance.
First mock up, longest fork:

Second mock up, medium fork height:

Last mock up, shortest fork height:

I'm leaning towards the first one, although I'm open to suggestions. I think the first one is the most balanced stance of all.
Also got the new fork disassembled, as well as the stock one in order to visually see the difference between them. As the fork tube diameter so are the same I almost can assure that I can swap any of those parts between forks, having the chance to lower it without having to cut any spring of adding spacers inside the fork.
Left side is new monger fork, on the right the stock one:

Hope you like this little update, IL be bringing more soon!
Cheers!
First mock up, longest fork:
Second mock up, medium fork height:
Last mock up, shortest fork height:
I'm leaning towards the first one, although I'm open to suggestions. I think the first one is the most balanced stance of all.
Also got the new fork disassembled, as well as the stock one in order to visually see the difference between them. As the fork tube diameter so are the same I almost can assure that I can swap any of those parts between forks, having the chance to lower it without having to cut any spring of adding spacers inside the fork.
Left side is new monger fork, on the right the stock one:
Hope you like this little update, IL be bringing more soon!
Cheers!

dualero
Been Around the Block
I'm using new (to me) rims I bought like 3 months ago. For a dime used online. 18" front, 16" rear.NoRiders said:Will you be using the spoked wheel as in the images? Think it should be low on the front, but not too much to affect the steering.
Prefer the fatter front wheel if you can still use that?
The issue I had with the 16/16 combo was that the rim I was using was rear mag (same as a GN125 in shape and size, but disc, not drum) with a rear tire.
If I had found the matching front tire (or any front) by the time I bought them I could try using the 16 on the front again, but could only find 120/8016's. Due to this the bike was really awkward maneuvering and had a lot of inertia, rotation wise, and suspension wise. But somehow that made the bike feel funny, so had to go. I really have to mention that grip was amazing.
So as I have been having some experience with a bike that had 18/16 mag combo, I went with the same size spoke combo for this bike looking to make the bike lighter, and better manoeuvring/ braking.
Also another factor is that now more than ever finding a 16 front tire hasbecome even more difficult than when I had the chance. Rears there are plenty. So tire choice is easier with the 18.
Im using the mag in the rear to use it for reference, I have the hub on the machine shop adapting bearings to work with my axle, and swing arm.
Now about the build.
Another update I have coming is that I bought new fork clamps, the one I have now have the fork tube clamps more to the front of the bike than the new one. They are more parallel in reference to the steering stem than the one I have now. By swapping the clamps, I think I can "remove" the emptiness and too-much-of-a-frame-showing-under-the tank odd looks the bike has now.
Another interesting new is that I will be talking with a friend that runs a metal fab shop as he said he could let me have tubing for making the subframe again. If he can give me the tubing (correct size of course), new subframe is next on the list for sure.
I'm really stoked on this as it will let me make the tank work with the bike and also let me correct some mistakes I made previously, and also let me finish the bike a lot better, As I want it to. I had no taken the decision to make the subframe again as this build is a budget one and I'm truly trying to spend as less as I can, time is what I have to spare.
I want to have some time with the bike tomorrow, let's see what happens...
Cheers!
Sent from my GT-I9300 using Tapatalk


