CB550 78' "KUBATON" cafe/brat type

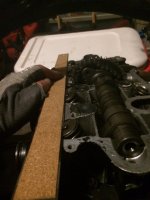
Get a straight edge and check all the valves are still in line.
Tops can get bent then the valves stick.
They still seal fine when tips are bent, guides usually nd up cracked though
If cam timing really is 90 degrees off, you will have 8 bent valves, check the positioning again
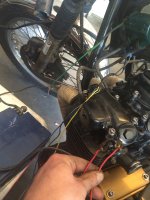
You will get low readings until motor has a few hundred miles. How did you test valves?
Water in ports kinda works, if you put it in combustion chamber,you screwed up
 
work9to5 said:
Just did. Seems good, tube popped out of the spark hole! No air current coming from exhaust now either. I'm wary tho, seems too simple.

Bootsey here's a pic of how the other bike ended up (the one that's not driving me nuts at the moment ;)

Here's hoping that it's an easy fix, and nothing went awry.

The CL is looking good, love the stock look of those bikes!
 
They all line up with a straight edge. Checked both parallel and perpendicular lines. #4 (front side) shows a tiny variance. I now remember why I miffed the line up of the cam. This cam sprocket is giving me a lot of trouble (yes chain adjuster is adjusted loose).
 

Attachments

  • photo (7).JPG
    photo (7).JPG
    45.1 KB · Views: 1,488
They are always 'tight' if you fit a new chain.
The original shouldn't be a problem though?
I've always put sprocket onto shoulder of cam before putting any bolts in, new chain needs a bit of levering even when you turn things to use sprocket cut away. Chain slackens right up after first start and grease gets replaced with oil
You had head fully torqued before fitting cam?
I re-set the adjusted with a large screwdriver before fitting cam, easier to push it 'flat' then tighten lock-nut from inside chain tunnel
The 650 didn't have plain nut and screw slot on adjuster so that was the easiest way to do it (had an acorn nut on tensioner)
Height differences won't be a problem as long as it's less than 0.020" front or back variation is a problem
Going back through posts I see why my '550' was quicker than the others with 591 or 605cc. I turned CB750 pistons to fit, got higher compression than the flat top ones
 
It doesn't seem to be the oem chain but not new old chain. Though research it seems a lot of people have trouble with the sprocket/chain. I'm using the shoulder w/o bolts in too, seems like the only way ill get the clearance I need. Head has been fully torqued and has been sealed for two months now. I'll check it again now to see if has settled and i can get another turn on the nuts. I'll try the screw diver trick as well. I feel like its just one of those tedious things that im just gonna have to carefully work it on. I saw that some people had done that with 750 pistons. You still have yours on the road PJ? I'm curious as to the longevity the engine can sustain with this much of a wall reduction.
 
If you have 61mm pistons (591cc) they are about as reliable as a stock motor.
I did over 70,000 miles on mine after the re-build.
It hasn't been on the road for about 20+ years.
I kinda retired it when it got over 100,000 miles on clock, about 106,000 miles total (few busted speedo cables)
I wouldn't do a 605cc without fitting thicker liners but that gets expensive boring block, fitting oversize liners then boring them to piston size.
If I was going to that much trouble I would find the biggest liners I could then find pistons around 63~70mm (can't remember max possible size ;D )
 
Re applied the valve cover (all rocker arms where rubber banded to prevent bending). I released the bans and found something that's throwing up a warning sign. If I'm following this diagram right (X/O diagram showing which valves should be compressed) My O's are all loose. X's are tight except for intake on #1. Worried that possibly I've bent the valve there. I'm going to adjust all the loose adjusters except for intake 1. I'm going to back the adjuster all the way out and crank and then adjust the X's and go from there.

If anyone hasnt seen this YouTube, who's rebuilding a four cylinder. I'd recommend it. It's been a complete help throughout this engine rebuild. https://www.youtube.com/watch?v=bLw6Av07wik

You can see the X/O diagram I'm refering to at time mark 3:41
 
Silly boy, that's completely correct, crank turns twice for cam to turn once
Rotate another 360 degrees and it will look just like the book ::)
If you read the words it tells you to rotate crank to do 'the other 4 valves' ;D
 
First time doing this LEARNING CURVE. But yeah after cranking 360 it fell in place. PJ you mentioned before that I would get lower compression numbers off a fresh rebuild. What kind of numbers?
 
It varies, maybe as low as 30% and as high as 80% until rings bed in. I've seen some motors fresh from the factory with numbers in the 40psi range, went to 180 after 300 miles
I know it's a learning curve, ridicule means you'll never make that mistake again ;)
 
No I won't make that mistake again. Engine is reading 125 compression across the board with no change with a wet vs. dry test. So I'm considering that one big check off the list and moving on. Tried turn bike on and none of the electrical systems are lighting up. Changed battery same results. So I'm heading to the store now to buy my first voltmeter. AND DOWN THE RABBITS HOLE I GO ;)
 
;D LOL, get ready for some 'interesting times' ;D
Check red wire on back of ignition switch, they are known to break off at solder. May need to buy a soldering iron if you don't already have one ;)
 
I was unable to find where my short in my system is. So because I planned on rewirring her any ways I'm starting that process. I'd like to start simple and build the bikes systems from there so I'm going to start with a "total loss" system". No charging no lights. Just battery coils points condensers. I'm doing this because I'd like to make sure the bike is a runner after all the reconstruction I just put into her and taking the daunting task of rewirring one step at a time.

I attached a pick of how I wired the "total loss" and I'd like some feed back before I kick start her.

My coils original blue and yellow wires are attached the the lead matching blue and yellow from the points system.
The ground is attached to the neg on the battery.
The original (black/white) ignishion wire is attached to a 15 fuse.
The fuse is attached to the pos side of battery.

This is only set up for test start. Is not permanent. Will not be driving it. Only to see if bike will start and to build other systems around. What do you think?
 

Attachments

  • image.jpg
    image.jpg
    934.7 KB · Views: 213
It's an EMF generator, you can't use same or similar wiring diagrams to CB350, et.al.
SOHC CB750 should be easy enough to follow though
 
Need a little help understanding a solenoid a little better. The two smaller wires that come off it (not the larger ones coming from the battery or the wire leading to the starter motor) They are for wiring a the switch to engage or complete the circuit in the solenoid?

Second question. Does the starter motor ground itself somewhere? Or is it grounded from the green lead (in the bunch) coming out of the sprocket cover?

I just replaced the points and condensers. All my plugs are giving spark. I'm getting spark at the points. Power is even throughout system when checked with volt meter. I'm not getting ignition though and am sick of kicking it over to check the systems. So that's the reason I'm trying to introduce the starter into my wiring. I FEEL LIKE I'M SO CLOSE to having her running again!
 
Starter motor grounds through bolts and body. It draws about 40 amps, the wiring coming out of sprocket cover would overheat really quick then probably catch fire. ::)
Solenoid is just an electromagnet, two little wires supply power to copper wire coil and pull bar against weak spring. The is a copper contactor on top so it looks kinda 'T' shape
 
Ok been having trouble all day with this. I've tested my solenoid and has continuity throughout. Also ran one post to neg and other to pos and tapped smaller wires on pos and neg and the solenoid jumps. So I've confirmed that it is working correctly. I still cant figure out how to wire to starter. I'm going to include a pic of solenoid below if someone can point me in the right direction with how to hook it up I'd appreciate it. Keep in mind I'm running a total loss system just no charging system/lights etc. Just solenoid/starter motor/15fuse/coils/points n condensers.

How I'm thinking it should be wired is this-

battery neg to ground
battery pos to large post on top of solenoid
starter motor to other large post on top of solenoid
battery positive going to fuse going to coils
grn/red smaller wire (of the solenoid) to ground
yellow/red wire to ? I'm thinking this has to link to a + terminal somewhere. Could I basically tap it to positive terminal of battery to cause solenoid to complete and starter to fire?

I'm shooting in the dark at this point. have watched SO many vids and diagrams on solenoid function that i'm totally confused. please help
 

Attachments

  • photo.JPG
    photo.JPG
    63.5 KB · Views: 922
It's easy to test solenoid, connect two small wires to a battery/power source. If it clicks, that part is good. Connect multimeter on continuity/Ohms across screw terminals, apply power to small wires, should have really low resistance/continuity. You can do it with solenoid on bike, just disconnect large wire to starter motor there won't be a current path to damage meter
 
Ok. so after tinkering around I figured out how to rewire the starter back into my system. I did run into a problem with the battery and Im not going back in till I've done more research on whats up with that. My battery when engaged and starter was switched on started smoking. Not so much smoking but released steam or gas. After shut off of the starter it made slight gurgling sound. No liquid is coming out. Its a sealed bike master that has seen a lot of action and I'm hoping that its just the age of the battery that caused it. Anyone have a guess? Im planning on writing a comprehensive post when I finish this stage of the build separately on how to rewire with pics as I havnt found much out there. And maybe I could "give back" to the forum with it.

This is what I've done so far-

1.) connected - terminal of battery to frame using engine mount bolt. Used thick oem wire.
2.) connected + terminal to an inline 15a fuse
3.) fuse runs to a keyed ignition which I took from a CB200. I wanted to change the position of my ignition and the 200 ignition back plate fit snugly onto the frame where the battery box used to be (red oem wire going into key)
4.) from the key I've run a wire (black) with a split connector.
-one split leads to the coils. Coils are connected to the points/condenser via their original blue and yellow wires.
-the other split leads to the solenoid. specifically the yellow/red small wire from it.
5.) the solenoid top post1 is connected to the + terminal of battery
6.) the solenoid top post2 is connected to the starter motor
7.) the oem small wire coming from the solenoid (grn/red) i've lengthened and introduced a switch. The switch controls the solenoid enabling it to complete and reach ground. So one side of the switch leads to the solenoid the other side is grounded to engine frame bolt.

It works starter motor is engaging and engine is turning over. I've stopped at this point until I figure out my battery issue.
 
Back
Top Bottom