We noticed you are blocking ads. DO THE TON only works with community supporters. Most are active members of the site with small businesses. Please consider disabling your ad blocking tool and checking out the businesses that help keep our site up and free.
You are using an out of date browser. It may not display this or other websites correctly.
You should upgrade or use an alternative browser.
You should upgrade or use an alternative browser.
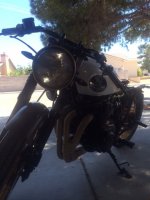
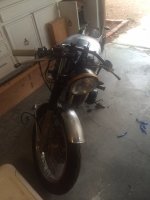
CB550 78' "KUBATON" cafe/brat type
- Thread starter work9to5
- Start date
work9to5
See you in the wind.
That had popped up in my head as well. The two main bolts I'm sure have no paint contact. They have a clear connection and should be usable for a ground. Something I'm noticing on re-inspection. The battery is not steaming when the key is in on position just when switch is flipped to engage starter. Also battery lost power way too quickly (one or two minute span of tme). Battery before placed on bike read 14.3V. I'm going through the system now with voltmeter to check for major variances.
Ended up figuring out battery issue. I was pulling to much current apparently by having two leads directly off the battery. I've moved one of the leads to the post on the solenoid that the battery + leads to. System is now functioning normal. The battery is showing 10Volts and seems to be functioning fine now. But i am wary. More tinkering scheduled for tomorrow and hopefully my first start of the engine.
Ended up figuring out battery issue. I was pulling to much current apparently by having two leads directly off the battery. I've moved one of the leads to the post on the solenoid that the battery + leads to. System is now functioning normal. The battery is showing 10Volts and seems to be functioning fine now. But i am wary. More tinkering scheduled for tomorrow and hopefully my first start of the engine.
work9to5
See you in the wind.
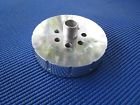
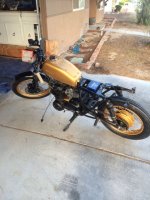
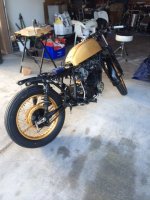
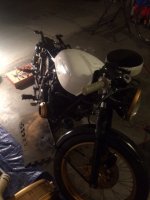
GOT THE MONSTER RUNNING TODAY! That sound when when the engine engages after that long haul of work is one of the best out there! Sounded great nice hum, louder or maybe it's just been awhile since I heard those pipes. Had a bit of smoke come out the exhaust. Hoping its just the engine "cleaning" it self. Was able to start 3 times in a row, which is promising as well. Had to stop as I want to break in the rings properly at running speed and I had an oil leak from the custom filter I put on her. Seems just to be not tight enough but if anyone is running one of these and has insight, lmk. Think I might have to go buy one of those adjustable belt wrench type thingy ") Filter pic below, is leaking between filter attachment and honda oil filter. I've read Soneir's "starting a new build for the first time" and am following those tips. The smoke worries me a bit but have seen much worse from these bikes. My next step is to tighten/fix leak. Then I'm going to go back into the electrical system and make it a more permanent one. Next to refit a slimmer seat and possibly but a KZ cafe end on it. From the pics below I think you'll start to notice a lot of small custom paint/pieces I've got started. Custom horn/headlight/tank/see through points cover and more I haven't started.
Filter pic below, is leaking between filter attachment and honda oil filter. I've read Soneir's "starting a new build for the first time" and am following those tips. The smoke worries me a bit but have seen much worse from these bikes. My next step is to tighten/fix leak. Then I'm going to go back into the electrical system and make it a more permanent one. Next to refit a slimmer seat and possibly but a KZ cafe end on it. From the pics below I think you'll start to notice a lot of small custom paint/pieces I've got started. Custom horn/headlight/tank/see through points cover and more I haven't started.
Filter pic below, is leaking between filter attachment and honda oil filter. I've read Soneir's "starting a new build for the first time" and am following those tips. The smoke worries me a bit but have seen much worse from these bikes. My next step is to tighten/fix leak. Then I'm going to go back into the electrical system and make it a more permanent one. Next to refit a slimmer seat and possibly but a KZ cafe end on it. From the pics below I think you'll start to notice a lot of small custom paint/pieces I've got started. Custom horn/headlight/tank/see through points cover and more I haven't started.Attachments
work9to5
See you in the wind.
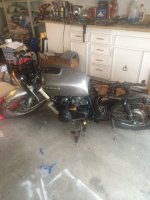
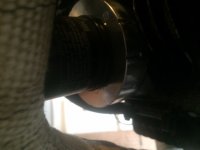
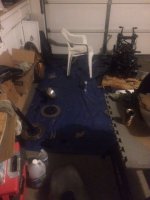
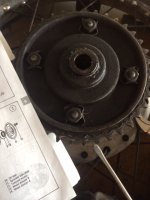
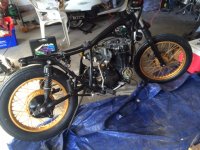
In the middle of a full break down. First time I've attempted taking down a rear wheel. Having trouble with the tabs holding the sprocket cover. (pic below). Am i supposed to bend these back to get at the bolts or turn them some how? Or just try to ratchet/wrench on the nut and turn them out?
Attachments
work9to5
See you in the wind.
Haha, yeah when I first got her. Actually i have two sets. One a self set (that i'm polishing and painting) and one that's on the bike. When I got Carpy's pipes I asked him what he recommended for jetting and it has worked pretty well. But running a bit rich. I'm sure once I get through this rebuild I will have to re-jet though because of the over bore i'm thinking. Not looking forward to that at all.
I'm going to be following up with pics soon of everything I've just done, as I put her back together. It's pretty extensive.
I do need recommendations on a welder. I've never owned one before. I have torch stick welded. 120V so I can use it at home. Something cheap, basic and something capable of welding 16g aluminum. MIG or TIG? recommendations appreciated.
crazypj
Split personality, I fake being smart
If your intending to do aluminium, it's going to be expensive.
You can use MIG on 'thick' stuff around 16g but it needs to have a DC square wave setting
TIG would be nice but learning curve may be a bit steep if you haven't used one before or used O2/Da (oxyacetylene)
There are a few experienced weldors on here, maybe one will turn up with better suggestions? (correct English, Weldor is person, welder is machine ??? )
work9to5
See you in the wind.
Guys need a little help figuring out the wiring for a reg/rec. I pulled this one from a junk yard parts bike for $10 yesterday with a guarantee that it would work. I think I've got the just of it, but want to double check before i go plugging it in an possibly ruining something. The pic below is the rec/reg from looking at it and research here's how i think it should wire?
from reg/rec-
3 yellows- go to corresponding alternator yellows
1 blk wire- coming from rec/reg is plugged to white from the old alternator plastic plug so will leave it like that (thats how it was set up on parts bike, pic shows this)
1 grn from reg/rec, prolly a ground
that leaves me with-
1 white/red- Im guessing this is power/juice Im thinking it would go to the solenoid?
1 black wire- which had a signal relay at one end 9as you can see from pic) so will use that for signal power
1 white- I've got no clue on this one? help
Any help in the right direction appreciated, thank you
Attachments
crazypj
Split personality, I fake being smart
That reg/rect won't work, it's for a permanent magnet alternator.
You have an electromagnet alternator so need a different type with 2 extra wires for field coil (called that because it creates magnetic field)
The black wire is live with ignition on, battery reference voltage
You have an electromagnet alternator so need a different type with 2 extra wires for field coil (called that because it creates magnetic field)
The black wire is live with ignition on, battery reference voltage
work9to5
See you in the wind.
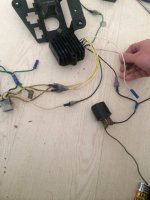
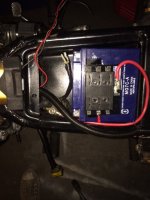
Got a new Rick's reg/rec in today and going to wire it up. Bought it from 4into1.com and really have to say everything I've ever bought from those guys has arrived supper quick (two days) and is exactly what was described. Would like to double check how the wiring from the unit should hook up. Unit came with a pin hook up (no idea why they would put a pin attachment that doesnt match up with the pin on a stock set up but oh well which has 3 yellow wires, 1 thicker green, 1thicker red. It also has three separate wires green/white/black (prolly the regulator portions) Below Im going to show how I plan on hooking this thing up and if someone would double check it (CrazyPJ) I'd appreciate it. After I've done it and tested it I'm going to start a separate topic titled "Ricks regulator rectifier install on cb550" , as there is almost nothing on the web for this and Rick's doesn't send much in info as to how to connect.
reg/rec
3 yellow wires- connect to three yellow wires coming from engine (i gather that which connects to which doesn't matter in this situation)
1 thicker green wire- (which came in the pin formation) connects to green wire coming from engine at pin junction
1 thicker red wire- connects to the solenoid's smaller pos wire (not the plugs but one of the two smaller wires)
1 (thinner) white wire- connects to the engine at pin junction with corresponding white wire
1 (thinner) green wire- grounds to the frame
1 black wire- from research everything tells me to connect it to the ignition (this is the one that is throwing me for a loop, if someone could elaborate as to what this connection actually does I would appreciate it. My aim is not to just plug and play but actually know how the motorcycle functions completely) If I'm thinking about this correctly this wire would attach to the main "back bone" wire of the harness or whatever draws the most power (head light).
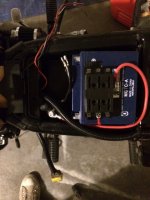
Also from the other pic I've posted you can see how i've set up my battery box. In wiring this thing I figure there are two basic ways I can do this 1.) one set it up similar to stock. Dont run a ton of fuses, wire one main "back bone" wire and power most everything like that. 2.) because i've got that pretty awesome fuse connector run everything separately. I.E.- run coils, headlight, turn-signals, tail all on different fuses. My question is which is the best way in your opinion?
which has 3 yellow wires, 1 thicker green, 1thicker red. It also has three separate wires green/white/black (prolly the regulator portions) Below Im going to show how I plan on hooking this thing up and if someone would double check it (CrazyPJ) I'd appreciate it. After I've done it and tested it I'm going to start a separate topic titled "Ricks regulator rectifier install on cb550" , as there is almost nothing on the web for this and Rick's doesn't send much in info as to how to connect.reg/rec
3 yellow wires- connect to three yellow wires coming from engine (i gather that which connects to which doesn't matter in this situation)
1 thicker green wire- (which came in the pin formation) connects to green wire coming from engine at pin junction
1 thicker red wire- connects to the solenoid's smaller pos wire (not the plugs but one of the two smaller wires)
1 (thinner) white wire- connects to the engine at pin junction with corresponding white wire
1 (thinner) green wire- grounds to the frame
1 black wire- from research everything tells me to connect it to the ignition (this is the one that is throwing me for a loop, if someone could elaborate as to what this connection actually does I would appreciate it. My aim is not to just plug and play but actually know how the motorcycle functions completely) If I'm thinking about this correctly this wire would attach to the main "back bone" wire of the harness or whatever draws the most power (head light).
Also from the other pic I've posted you can see how i've set up my battery box. In wiring this thing I figure there are two basic ways I can do this 1.) one set it up similar to stock. Dont run a ton of fuses, wire one main "back bone" wire and power most everything like that. 2.) because i've got that pretty awesome fuse connector run everything separately. I.E.- run coils, headlight, turn-signals, tail all on different fuses. My question is which is the best way in your opinion?
Attachments
crazypj
Split personality, I fake being smart
The black wire is a reference voltage to control power on the white wire.
If voltage is below certain point it switches power on to magnet
When you turn on ignition, you create an electromagnet in the center of generator.
Use a small screwdriver to check, just bring it close to generator cover, it should 'stick' if things are working properly
If voltage is below certain point it switches power on to magnet
When you turn on ignition, you create an electromagnet in the center of generator.
Use a small screwdriver to check, just bring it close to generator cover, it should 'stick' if things are working properly
work9to5
See you in the wind.
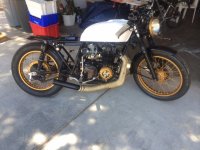
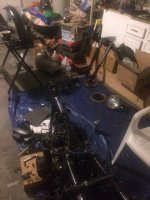
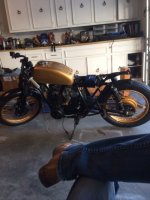
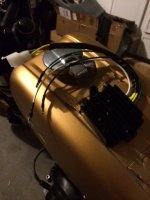
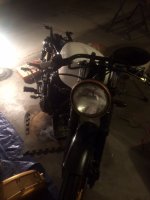
Been working on her all day. Very close to finishing. Crossing my fingers that i've addressed the oil problems from the last start up. Finishing tying everything up tomorrow, running tests and finishing the seat. Pics are with the original tank this time, not happy with the paint job on that one and will have to be redone.
Attachments
work9to5
See you in the wind.
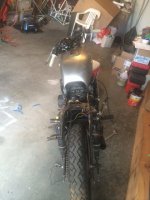
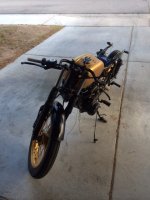
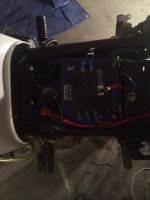
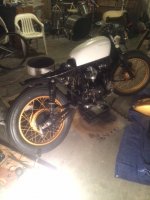
Here's how she sits right now. Completely wired, starter engages, ready to go except for two set backs. Carbs are leaking a ton and seat is taking me way longer than I anticipated to shape. Have to fix carb leaks before i'm comfortable test firing her...one more week.