Krazy Katana

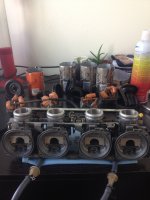
Katana carbs are super easy to remove as soon as the tank is off, probably the easiest of any late 80's designed inline 4 (Yamaha FZR is also easy)
I doubt Seafoam will clean out blocked pilot jets, I've always had to remove them and poke with a copper strand from electrical wire then get some aerosol carb cleaner through them
If your not going to run it again for a while, pull carbs, clean them and plug up intakes while your working on the other stuff
 
Yeah, they look easy enough to pull. I'd like to be running it now, but if the seafoam doesn't work they're coming off.
 
Electrical problems, yay.
Solenoid is toast, crossed terminals and the starter hits immediately. Found out the side stand switch isn't wired in when I had two sheared off wires in my hand ::).
I'll get stuff ordered soon, need to deposit my paycheck.
 
Are you sure the solenoid is getting power when you press the starter button? Connect the sidestand switch wires together to bypass it.
 
It cranked over a couple times with the switch then I got nothing. Could be that they were twisted together then came undone, so I'll go check that real quick. I'd rather not buy a solenoid ;)
 
Yay for fiddling with wires to make things work! And thanks for the tip hillsy :D
Carbs are coming off either tomorrow or Saturday, couldn't get it to idle long enough to run any seafoam through it. I figure I can keep the rack together and just pull bowls to clean jets?
 
Yes - no need to pull each carb off the rack.

Do you have a compressor? You really need to blow out the passages or you're pretty much wasting your time.
 
I don't, school shop does though. So air through passages and cleaner on the jets? Or run cleaner through passages then air? Figure I should take diaphragms off if I'm doing any of that anyways.
 
Side note, bent the headlight ring back in to place on the 400 headlight, so I'm gonna run that. Flat sides for mounting should make it a bit easier to get a good mount. Headlight tested and works.
 
Best to remove the diaphrams and slides as well (you'll probably have gunk on the slide needles anyway).

Take them apart and put all the bits from each carb in seperate containers (IE: don't mix them up). Check for cracks or pinholes in the diaphrams too.

Then carb cleaner in the passages and compressed air to clean.
 
Also - some carbs have small o rings under the diaphram cap - don't lose them.

And there are even smaller o rings behind the idle mixture screws (you will probably need to pick these out with a shop pick or piece of bent wire)
 
I should be fine once I'm inside ;) haha
Did the CV's on my grandpa's VF750, those were a BITCH to get out and put in. I'll steal some tupperware from my roommates to use for separating parts.
 
As far as I know, Suzuki are the only ones who will sell you those 'O' rings' without havig to buy a complete kit
 
If they're in decent shape do they need to be replaced? PO said he tore the carbs down and cleaned them
 
If not damaged they will be fine. Quite often the ones under vacuum cover are missing and the ones on fuel screws 'doubled up'.
I make a tiny hook out of paperclip rather than use any sort of pick.
Only need about 0.50mm bend to reach down inside fuel screw hole. I'll post a pic later
 
Carbs all taken apart for cleaning. One O-ring was missing... such a shame. I'll order the new one along with my clutch cable (pretty sure mine is stretched..) Hopefully will have it by the end of the week, and can get the bike running. Carbs weren't too bad, but all 4 pilots were clogged. There's my problem ::)
 

Attachments

  • IMG_1674.JPG
    IMG_1674.JPG
    843.9 KB · Views: 360
Hadn't really considered the fact that California probably has 'worse' gas than the rest of US, kinda made from oil and recycled plastic water bottles? ;D (Kalifornia, the land of fruits and nuts ;) ;) )
 
Funny thing is the bad gas I got was up in Washington over the summer! But there are probably some water bottle bits floating around in the gas here. There's a reason when I need to refill granola at the yogurt shop I write it as "California" on the list ;D
I figure the cable is stretched out since I can't seem to get it to completely engage the clutch at idle. Enough that the bike will ever so slightly creep. I've done the adjustment based on the manual, not just dicking around with it ;)
 
What am I doing wrong on the clutch adjustment?? I get the screw until resistance, turn out 1/4, tighter lock nut, and adjust cable for freeplay at lever. But, when in gear if the clutch is in and I push it, the engine is definitely dragging.
 
Back
Top Bottom