Yam RD 250 Paint Thread

2_DONE_THE_TON

Over 1,000 Posts
DTT BOTM WINNER
hey guys!

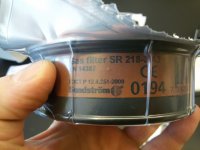
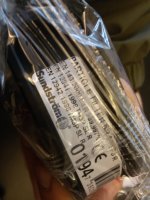
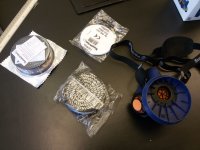
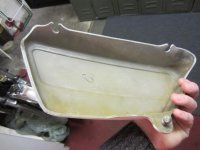
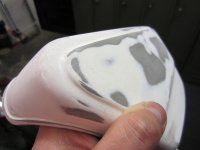
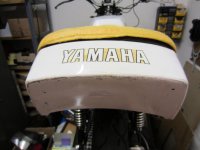
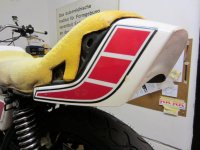
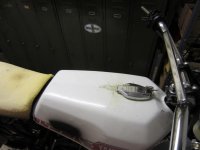
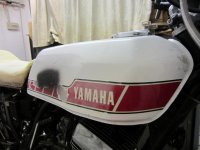
after my question for a good facemask for painting my tins "escalated" a bit :) ,covering themes like how to build a paint booth and how to spray my tins i will start here a little paint thread which will show my experiences on doing the job for my Yamaha RD tins and plastic parts.

this is the "old" thread:

http://www.dotheton.com/forum/index.php?topic=62014.0


This thread will take some time since i´m currently waiting for the last pieces to complete my restoration,start´er up.
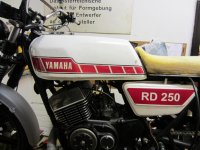
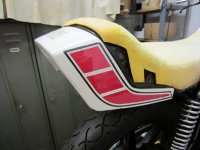
The bike got a nearly full resto with new pistons seals and gaskets.Bolt were replaced,too much to list.

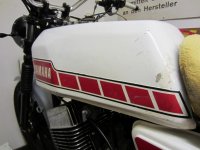
This is my learning project i try to do nearly everything on my own.I already asked a pro painter about the paint job and he would take 700 euros for this job.
So i will take the risk and try this on my own hopefully with the help of you guys! ;D
 

Attachments

  • IMG_4712.JPG
    IMG_4712.JPG
    76.4 KB · Views: 352
  • IMG_4719.JPG
    IMG_4719.JPG
    56 KB · Views: 348
  • IMG_4717.JPG
    IMG_4717.JPG
    44.5 KB · Views: 359
  • IMG_4706.JPG
    IMG_4706.JPG
    59.7 KB · Views: 348
  • IMG_4707.JPG
    IMG_4707.JPG
    53.7 KB · Views: 368
  • IMG_4709.JPG
    IMG_4709.JPG
    66.7 KB · Views: 352
  • IMG_4722.JPG
    IMG_4722.JPG
    50.7 KB · Views: 344
  • IMG_4721.JPG
    IMG_4721.JPG
    62.8 KB · Views: 353
  • IMG_4711.JPG
    IMG_4711.JPG
    62.9 KB · Views: 340
As you can see guys i started to sand already a little bit to see how hard/easy it is to break the old decals and paint jobs.

Mobius wrote me a great expertise on how he would go about the paint job:

This is how I would proceed at my shop:

bare metal sanded with #80.
clean with autobody degreaser.
2 heavy wet coats of epoxy with complete flash (tacky but does not pull "spiderweb" when touched with finger) between coats.
cure and block sand #400
complete any bodywork imperfections and re-epoxy, cure and sand#400 (if needed)
2 heavy wet coats of 2K surfacer with complete flash between coats.
block sand wet #400
1 heavy wet coat of 2K surfacer followed with contrasting guide coat (I use a spray can of anything on hand for a guide coat)
block sand wet #600
repeat last 2 steps if required (rare)

parts are now ready to paint.

Your blue paint would require a silver base with the blue on top (probably) with the solvent base materials I use. no sanding would be possible.

final clean with degreaser and tack.
2 or 3 thin wet coats of silver. flash between coats
2 - 4 thin wet coats blue. flash between coats
1 medium wet coat 2K clear.

This would take me 1 to 1-1/2 hours to complete both colors and the 1 coat of clear on a complete set of bodywork. There is no time to fool around, get lunch or have a beer, so everything has to be ready to go.

Allow 24 hours to cure.
wet sand clear perfectly slick #600 (zero orange peel) where decals go. Scuff with red scotchbrite everything else.
install decals
allow at least 24 hours to dry
clean with autobody degreaser - careful with those decals!!!

1 medium wet coat 2K clear. Allow a few minutes to tack up. Test a spot on masking with finger. needs to be tacky, but still wet enough to make spider web when you remove finger.
repeat with 2 heavy wet coats of 2K clear with tacky test in between.

Time to drink beer! (proceed at once to the pub, otherwise you will be tempted to interrupt the drying of your awesome new paint, causing insects to help, dust to fall from the ceiling - you get the idea. You will never have a more legit excuse to go to the pub - don't waste it!)


The idea is to shoot the tank with 2K filler/primer
shoot b51 bmw blue
place decals
and then shoot 2K clear

this will be the products/color i will use:
 

Attachments

  • 2238_0.jpg
    2238_0.jpg
    11.8 KB · Views: 1,331
  • 680277.jpg
    680277.jpg
    61.5 KB · Views: 349
  • Bmw_M6_cabrio-6.jpg
    Bmw_M6_cabrio-6.jpg
    58.3 KB · Views: 345
Signing up over on this one to watch, help if I can, and see what should be a nice finished product, that blue is awesome.
 
Ryan, you may want to look for a plastic primer to hit the side covers with first. I grabbed a can of duplicolor adhesion promotor for the plastic parts on the Magna because I will be sanding the paint and may expose the plastic, a light coat of that before primer will help the primer bond to where you have sanded to bare plastic. It is in their automotive primers line of paint.
 
Thanks maritime for signing up!!
So you mean hitting the exposed plastic parts with an adhesion promotor before hitting it with my 2K primer filler is the way to go.
I will do that.
would you do dust coat then wet coat and then after 10min hit it with the 2K or let the adhesion promoter cure?

This is the mask i bought yesterday...pricey but my health is worth it.
It has a particle filter and a gas filter and the prefilter keeps it from sucking in too too much dust.
The 3M 7500 didnt really fit my face...
 

Attachments

  • uploadfromtaptalk1424344141014.jpg
    uploadfromtaptalk1424344141014.jpg
    2.6 MB · Views: 325
  • uploadfromtaptalk1424344188840.jpg
    uploadfromtaptalk1424344188840.jpg
    1.9 MB · Views: 304
  • uploadfromtaptalk1424344207640.jpg
    uploadfromtaptalk1424344207640.jpg
    867.1 KB · Views: 321
  • uploadfromtaptalk1424344221334.jpg
    uploadfromtaptalk1424344221334.jpg
    2.4 MB · Views: 317
The adhesion promoter goes on and you top coat while still tacky to help the primer or paint bond better to plastic, instructions on the can and one or 2 light coats just before primer on the plastic bits would be enough. It costs like $5.00 a can so I would check into it.
 
Maritime said:
The adhesion promoter goes on and you top coat while still tacky to help the primer or paint bond better to plastic, instructions on the can and one or 2 light coats just before primer on the plastic bits would be enough. It costs like $5.00 a can so I would check into it.

i will take the spray max adhesion promoter..costs a little more than in the US but i guess its worth it.

yesterday i talked to another paint shop in vienna which has a filling station for automotive paint.
they surprisingly told me that i will need to shoot a blue coat before the B51 BMW blue,which is NOT waterbased but a NITRO color can.
the other shop told me to directly shoot it onto the primer...
i´m confused...

mobius told me to shoot a silver tone.
there are three different primer colours (beige,black and grey).

what colour should i shoot under the B51?
which primer colour should i choose?

thanks in advance!
 

Attachments

  • kunst+.jpg
    kunst+.jpg
    51.6 KB · Views: 287
Spraymax is good stuff. the base could be needed as some auto colours are base/colour/clear. So you prime, base colour then finish colour then clear the whole shebang. I am doing a yellow so I am doing a white base after primer, then yellow, then clear, otherwise the yellow will be dull. It will all depend on where you get the paint from, who makes it as to what you need to base coat with. A lot of metallic are transparent so you need to base with a solid of same or similar to look right. You can play around with different bases to get what you like.


Edit: I guess what I was trying to say is depending on what manufacturer of paint, the requirement for a base or not is up to the way they go about matching the colour to the BMW. My guess is the one that needs a specific base, then top coat will be more expensive but a better match to the OEM BMW paint. If you just want close enough to get the same look as single coat colour will look ok, it just won't have the same richness or depth.
 
Maritime said:
Edit: I guess what I was trying to say is depending on what manufacturer of paint, the requirement for a base or not is up to the way they go about matching the colour to the BMW. My guess is the one that needs a specific base, then top coat will be more expensive but a better match to the OEM BMW paint. If you just want close enough to get the same look as single coat colour will look ok, it just won't have the same richness or depth.

the first shop i wanted to ask about the paint told me that the color doesnt need a base...the manufacturer is Nexa Auto Color.

the second shop is mixing Dupli Color colors.The said blue is needed for the base.

It is not only a question of color depth but of cost, 1 can of mixed color of B51 costs around 31 euros...i will need def 2 cans.

How much time is the base color to top coat color do you spend?

BASE COLOR shoot dust coat-wait 10mins-shoot wet-wait 10 mins repeat 3 times?

(1 dust coat-3 wet coats)

let cure then sand

TOP COAT COLOR B51 shoot dust coat-wait 10mins-shoot wet-wait 10 mins repeat 3 times?

(1 dust coat-3 wet coats)

no sanding due to metallic,mother of pearl

after last coat (still wet) shoot 2K clear

what ya say about that?


will the nitro color (b51 and base coat) interfere with the 2K clear and primer?manufacturer and shop guy says no.
 
The manufacturer should have recommendation on whether a base color is required. My example of the silver base under the blue was only an example of some material I have used. Didn't mean to create confusion - some colors need to be sprayed over a particular base, but many need nothing at all and can go directly over any color primer- it all depends on the particular material you are using. Maritime brings up a good point regarding adhesion promoters, and while I have and do use them as well as flex additives, I do not use anything special on the rigid plastic like you have on your RD. There are indeed plastics that require special treatments as they are crazy hard to get paint to really bond to, but your RD parts are no problem at all. Sand them with #80, and then epoxy like everything else. The epoxy will grip to the plastic very ferociously. The key to all the parts is to keep them contamination free throughout the painting process, but it is by far the most critical when the part is bare steel, plastic, etc and is getting that first coat of epoxy. I ALWAYS sand everything to the bare substrate - plastics included. The reason is that I do not want any possibility of a trace of previous paint - about which I know absolutely nothing -reacting badly with what I am using on top of it.

In general, I only use as much color as is needed to get complete coverage/depth. Most modern materials do not respond all that well with a "dust" coat first. They usually dry way to fast, and that first too light coat can create a horribly rough surface that will not level out with more coats. But different materials handle differently, so test your technique on something you will throw away before you shoot your parts.
 
jpmobius said:
The manufacturer should have recommendation on whether a base color is required. My example of the silver base under the blue was only an example of some material I have used. Didn't mean to create confusion - some colors need to be sprayed over a particular base, but many need nothing at all and can go directly over any color primer- it all depends on the particular material you are using. Maritime brings up a good point regarding adhesion promoters, and while I have and do use them as well as flex additives, I do not use anything special on the rigid plastic like you have on your RD. There are indeed plastics that require special treatments as they are crazy hard to get paint to really bond to, but your RD parts are no problem at all. Sand them with #80, and then epoxy like everything else. The epoxy will grip to the plastic very ferociously. The key to all the parts is to keep them contamination free throughout the painting process, but it is by far the most critical when the part is bare steel, plastic, etc and is getting that first coat of epoxy. I ALWAYS sand everything to the bare substrate - plastics included. The reason is that I do not want any possibility of a trace of previous paint - about which I know absolutely nothing -reacting badly with what I am using on top of it.

In general, I only use as much color as is needed to get complete coverage/depth. Most modern materials do not respond all that well with a "dust" coat first. They usually dry way to fast, and that first too light coat can create a horribly rough surface that will not level out with more coats. But different materials handle differently, so test your technique on something you will throw away before you shoot your parts.


had a good chat today with a guy who claims to have painted a few suzukis back when he was an automotive painter.
he works now in the shop which sells automotive colors and all the shebang.they offered me to fill the cans with B51 WATERBASED COLOR.the waterbased B51 is a 1Step Color can, so no base color is needed.

the other shop i called offered NITRO based B51.

after some time he advised to stick to NITRO based color (not the stuff he sells) because waterbased is too hard to handle for a noob like me :) waterbased tends to "suck" dust and dirt into the paint.and mistakes will only be seen as soon as the clear is curing...

so i guess i will go back again and take a three step NITRO paint scheme : ground color (whatever the manufacturer says)-B51 NITRO and 2K Clear-Decal-2K Clear

questions:

will the protection for 2K paint i will wear (mask with gas filter,balaclava,goggles,full suit,nitril gloves,nearly no exposed skin) be sufficient for Nitro based colors?

is there an explosive threat (venting is given)?

is the waterbased color really that hard to handle?
 
spent some time this weekend thinking about how to "position" the parts i would like to paint.

how do you guys position them?
i guess all the parts should be put in the same way that they are mounted on the bike later so the paint will look the same (read about the alignement of the particles that will be different if the parts are differently positioned)

maybe you have some pics how to put them.

cheers!
 
I generally do not worry too much about orientation of parts with regards to how the metallic lays down etc. because it does not seem to be critical for most bike parts. Cars are much more critical, but bike parts have far less continuity of surface like say a fender against a door panel. Those two adjacent same plane surfaces need to be shot like they were on the car (if they are off the car). Most bike parts don't have those same plane surfaces even if they are adjacent to each other so the metallic mismatch is irrelevant. Candy with a lot of coats to get the color you want is much more important, but more to get identical coats rather than orientation. I am a lot more focused on getting all the edges and corners properly covered as it is so easy to get done and find spots not painted (like spots on the underside of your tank or the lower side of a side cover.) So I make sure I can shoot those easy to miss areas. That may sound silly, but I always find myself focusing on the really high profile areas, and areas that you can't see real well when you are painting are for me easy to leave thin. I generally do not hang parts, because they blow around, but when I do it is with wires that totally constrain the parts. By and large, I spend time to build a custom floor stand for each part so I can easily get all around and underneath. Most of the time these are made of wood and are heavy and stable, and take a pretty good deal of time to design and build. Yes it is a lot of trouble, but it is worth it to have your parts (which you will have a collosal amount of time in plus some very expensive paint) solidly mounted in exactly the right position. I modify and re-use them, so it is not so bad when you have a bunch of stands already mostly made. Most of the time I orient the parts either like they mount on the bike or "flat" so the largest flattest area is horizontal which helps keep runs to a minimum (I am pretty good at avoiding runs, but I do like to get pretty heavy clear coats at the last pass). I rarely have trash issues, so this works for me.
 
jpmobius said:
I generally do not worry too much about orientation of parts with regards to how the metallic lays down etc. because it does not seem to be critical for most bike parts. Cars are much more critical, but bike parts have far less continuity of surface like say a fender against a door panel. Those two adjacent same plane surfaces need to be shot like they were on the car (if they are off the car). Most bike parts don't have those same plane surfaces even if they are adjacent to each other so the metallic mismatch is irrelevant. Candy with a lot of coats to get the color you want is much more important, but more to get identical coats rather than orientation. I am a lot more focused on getting all the edges and corners properly covered as it is so easy to get done and find spots not painted (like spots on the underside of your tank or the lower side of a side cover.) So I make sure I can shoot those easy to miss areas. That may sound silly, but I always find myself focusing on the really high profile areas, and areas that you can't see real well when you are painting are for me easy to leave thin. I generally do not hang parts, because they blow around, but when I do it is with wires that totally constrain the parts. By and large, I spend time to build a custom floor stand for each part so I can easily get all around and underneath. Most of the time these are made of wood and are heavy and stable, and take a pretty good deal of time to design and build. Yes it is a lot of trouble, but it is worth it to have your parts (which you will have a collosal amount of time in plus some very expensive paint) solidly mounted in exactly the right position. I modify and re-use them, so it is not so bad when you have a bunch of stands already mostly made. Most of the time I orient the parts either like they mount on the bike or "flat" so the largest flattest area is horizontal which helps keep runs to a minimum (I am pretty good at avoiding runs, but I do like to get pretty heavy clear coats at the last pass). I rarely have trash issues, so this works for me.

thank you!i have some questions on your paint plan you wrote down earlier:

1.)By autobody degreaser you mean silicone remover (theres even a spray max spray can for it but i think i will just buy a bottle in the autostore)?

2.)What does "complete flash" between coats mean?

3.)After block sanding the parts how do you procede,rinse off with water and wipe down with clean rag and let air dry?can i use a hairblower to dry the parts?

4.)i will use the spray max 2K epoxy primer-surfacer combo product in 1 can-are these any good or should i split up priming and surfacing,like you wrote down in your plan?

5.)the manufacturers manual for the primer/surfacer says:

dust-dry:15 min at 20 C
dry to handle:5hours at 20C
sandable:12h at 20C

and:wet in wet:the product is paintable after 25-30 minutes with any standard paints
overpainting window is 3 days.

would you let the primer/surfacer totally cure and then shoot the paint (silver) or just wait the 25-30 min and then shoot it?
Base and normal color will be Nitro based.

6.)Is there a curing pause (12h) between silver and blue or would you shoot it after 25-30 mins and cover the silver with blue?

7.)when would you shoot the first 2K layer also after 25-30mins after last layer of blue was shot?

cheers and thanks in advance!
 
Yes, auto body degreaser is the same as silicone and grease remover. I buy it in gallon cans, as it is super useful for all kinds of cleaning of motorcycle stuff. It is quite important to use good cleaning technique. Get a disposable towel wet with degreaser and wipe down your part a small area at a time in one direction and then flip it over and wipe again - don't rub back and forth - that is just smearing contaminates around. Throw it away and wipe dry with new clean dry towel with the same technique and throw away. Repeat as needed. Yes, it takes massive amounts of paper towels. A gallon lasts me a year maybe, and I use it nearly everyday for something. It goes really far, but use it liberally! Be super wasteful with the paper towels - they are way cheaper than a re-paint.

Complete flash is dry enough that the wet look of the applied paint changes to a more dull appearance. This applies to most materials except clear or single stage gloss finish coats. Generally the surface is not too sticky, but you can leave a fingerprint.

I use tons of water and make a big mess wet sanding, and use a ton of paper towels constantly drying off my parts. Just get good ones that don't leave behind chemicals or scratch. It takes a lot of trial drying off, or squeegying to see the dry surface so I use a lot of towels. When the surface is dry you can see if it is sanded properly. The sanded areas are uniformly dull. If insufficiently sanded, there will be shiny dots of glossy not yet sanded paint in the low spots of the orange peel. In every task keep in mind not introducing contamination to your work. Some people add a drop of detergent to their water to help de-clog their sandpaper. I do not - contamination. I also use a bucket and completely submerge my block and paper constantly - super messy, but lots of water is key to keeping perfectly clean sandpaper. Lot of guys just use a spray bottle. I use a water hose running constantly on cars. I change out the water a lot.

Sounds like the epoxy primer surfacer would be fine, but looks like an annoying dry time to sand. The epoxy I use takes a day maybe less to sand, but the surfacer I use only takes an hour or two. I usually do at least a couple of iterations of surfacer then sanding, so the dry time is important for me.

You will HAVE to wait to sand the surfacer each time to get the bodywork perfected. the last iteration will need a guide coat to know for sure. Only after that can you be done sanding until you are doing the clear.

Assuming my color required a silver base for the blue, the material I generally use would EITHER require the next coat of the same color, the next coat of the second (third, etc) color to be done within a relatively short time span (10 min to a couple of hours) OR 24 hours and then at least scuffing with scotchbrite. I NEVER attempt to paint another coat beyond the short time window - I make sure I have everything prepared, and have everything needed to work continuously with no interruptions with at least one full coat of clear as a last coating which I can let cure and then sand to prep for more coats.

The first coat of 2K clear goes on within the time window needed by the color base, although when I apply it depends on the project. If it were just 2 or 3 coats of straight color, I shoot clear within an hour. If it is complex, I wait until the end of the time window because there are a lot of solvents to evaporate which skews what the manufacturer requires. The last paint I did was like this for an example: 3 coats high coarse metallic pure silver, four coats candy gold, masking, 3 coats red, masking, 4 coats black. This was a very complex job which took nearly 8 hours to apply - mostly due to the insane masking time which put the next color dangerously close to the time limit to re-coat. With that much paint, I waited until the end of my window before semi-sealing it all under the clear to allow as much time as possible for the solvents to evaporate, but not outside the maximum allowable time window. I am using this as an example of something far outside of what the manufacturer anticipates to show that it is somewhat of a judgement call based on experience. If you have a project that is a straight forward color, you can simply follow the mfgs direction to the letter. If you have a crazy amount of base paint, you need to adjust. The idea is to keep the paint as wet as possible while still getting the solvents to have evaporated first before they are walled in by the clear. Apply the clear too soon, and the solvents will boil out through the clear creating some pretty dreadful defects. As a rule, you have to be pretty impatient to suffer this problem. Wait too long, and the clear will have adhesion problems; I think everyone has seen cars with the clear peeling off. This is usually caused by the painter waiting too long to apply the clear. Looked great when it left the shop, but a year later it simply let go of the color which was too dry to interact with the clear. So follow the mfgs direction, but if you are doing something outside of the standard, compensate accordingly. NEVER EVER apply clear beyond the recommended max window for the base color in any case. Better to wait until the dry re-coat time even if you have to re-coat the last color coat (to fix the metallic for instance that gets screwed up when you have to sand). You ALWAYS have to sand (with all the products I have ever used) if you have to exceed the time window!
 
hey mobius!

thanks again for the in depth infos you are giving me here!this weekend i thoroughly cleaned the room i will work in,wiped down floor ceiling and walls with soap water to catch as much dust as possible.next i will build the cabin so i can paint in approx 1 month when temperatures will rise.
Before i paint the RD will get finally its first run!Nearly all issues are fixed.
as for my paint plan i´m gathering more and more information and try to "distill" a good game plan for the day everything will go down.
this is how the plan looks now, hope this will work:

Parts:
start with bare metal (gas tank,side oil tank,side panels of stock seat=
start with bare plastic (stock hump,epoxy seat,side cover,headlight bucket)

SANDABLE PORTION OF PAINTING
PRIMING/FILLING
PRODUCT: 2K Spray Max Epoxy Primer/Filler
clean with autobody degreaser.

1 heavy wet coats of epoxy
25-30 MINS (manufacturers "wet-in-wet" recommendation)
1 complete flash (tacky but does not pull "spiderweb" when touched with finger) between coats.
25-30 MINS
1 heavy wet coats of epoxy
CURE:12 HOURS

Block sand with grit #400,wash off with just water (no soap),get it dry and look for imperfections

REPEAT IF NECESSARY:
complete any bodywork imperfections and re-epoxy, cure and sand#400 (if needed)

NON SANDABLE PORTION OF PAINTING
COLOR:
PRODUCT: Duplicolor Custom Can of B51 Nitro-Acrylic BMW Blue
blue base
B51 covering can with metallic effect

final clean with degreaser and tack.
1 thin wet coat of blue base
25-30 MINS
1 flash coat of blue base
25-30 MINS
1 thin wet coats of blue base
Dry for 2-3 hours
NO SANDING!
1 thin wet coats of B51 Metallic covering color can
25-30 MINS
1 flash coat of B51 Metallic covering color can
25-30 MINS
1 thin wet coats of B51 Metallic covering color can
1 HOUR
1 medium wet coat 2K clear
shoot rest of 2K can clear on other parts that get no decals
CURE:24-HOURS

SANDABLE PORTION OF PAINTING
Wet sand clear perfectly slick #600 (zero orange peel) where decals go.
Scuff with red scotchbrite everything else.
Install decals

CURE: 24 HOURS
Clean with autobody degreaser - careful with those decals!!!

NON SANDABLE PORTION OF PAINTING
LAST COAT 2K CLEAR
PRODUCT: Spray Max 2K QLS Clear

1 medium wet coat 2K clear.
Allow a few minutes to tack up. Test a spot on masking with finger. ( needs to be tacky, but still wet enough to make spider web when you remove finger.)

1 heavy wet coat of 2K clear
tacky test
1 heavy wet coat of 2K clear
BEER :)

Please give me some feedback on the plan hope i got it right this,the clearcoat part is not complete but i'm moving slowly but surely forward :)
 
Tested my mask today when i primed my stock seat on...oh my god that mask seals so well.i didnt smell any fumes...great quality.
 
jpmobius said:
You should get great results with your paint plan!

Thank you!Hope the dry times in between the coats are right and the paint will have good adhesion!

Just checked the Manufacturers site of the 2K clear coat.

it says dry time 12h and respray time 48 hours...
could this cause an issue since i will let the clear coat cure for 24 hours install decals then let cure again for 24h.or will the scuffing with the redbrite resolve that problem?

the 12 h dry time looks quite short for me (i will work ijn 20C degrees in my cabin).

See here:

1 HOUR
1 medium wet coat 2K clear
shoot rest of 2K can clear on other parts that get no decals
CURE:24-HOURS

SANDABLE PORTION OF PAINTING
Wet sand clear perfectly slick #600 (zero orange peel) where decals go.
Scuff with red scotchbrite everything else.
Install decals

CURE: 24 HOURS

Clean with autobody degreaser - careful with those decals!!!

NON SANDABLE PORTION OF PAINTING
LAST COAT 2K CLEAR
PRODUCT: Spray Max 2K QLS Clear

1 medium wet coat 2K clear.
Allow a few minutes to tack up. Test a spot on masking with finger. ( needs to be tacky, but still wet enough to make spider web when you remove finger.)

1 heavy wet coat of 2K clear
tacky test
1 heavy wet coat of 2K clear


i cant wait to shoot paint!
 
Back
Top Bottom