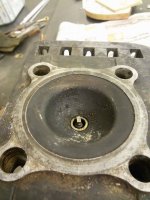
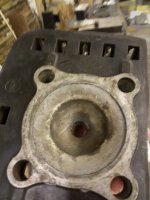
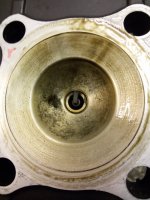
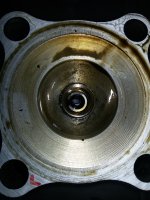
Yam RD "Blue Dream"- Ride,Maintain,Tune

der_nanno said:
I don't think we can take more than 1mm off the head anyway, so going for 0.6 or 0.8mm is pretty much academic. From my past experience, a chamber volume of a tad less than 20cc should yield nice compression without terrible detonation woes. Especially considering how this bike is going to be used, there's absolutely no point in building a proper race engine for Mr. Ryan (which is also illustrated in the pistons selected etc.!)

Good philosophy on a race engine. From memory (I'm doomed now!) 20cc volume on this engine sounds catastrophically small (apologies in advance, I'm not calculating, just feebly remembering - needs 26cc - 23cc (for the daring) or so?).
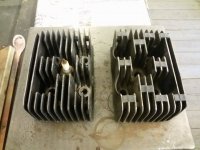
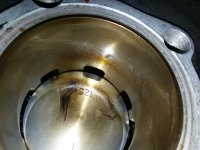
There is great value in considering the two things as disparate tasks. Without making a big engineering discussion, consider setting your squish as described. The ideal thing to do would be to first, ignoring everything else, machine the gasket surface of the head(s) to fit the cylinder tops with no gasket. That means cutting a step in the head that will use the stock copper gasket recess to center the head. This will screw up both the squish and combustion chamber volume (compression ratio), but ignore that for now. Add a groove for an o-ring. Measure the squish gap, and re-machine accordingly to get a bit less than 1 mm, or a bit more than .038". Your squish is now done. For part 2, decide the compression ratio you want (6.5/1 - 7.0/1?) and calculate that volume. Measure the volume you have now (as previously described) and then carve out as much more as you need from the chamber to get it. If you leave the depth of the spark plug threads constant and keep a more or less hemispherical chamber shape (in other words, obtain the needed chamber volume by increasing the chamber diameter rather than increasing the depth) you will reduce the squish band width to a reasonably appropriate size and end up with some very good performing streetable heads that don't leak. You can do a much more detailed analysis, but you will get very, very close to the same thing. Keep your thoughts on the important goals. 1) You need to have reliable sealing of the heads. This is not a problem now, but it WILL be if you get your engine running well - hence the head step and o-ring. 2) the squish distance is very important. Fix it! There is a lot of complicated science and opinion(!) here, keep it simple, get it in the range. The distance between the piston and head at the perimeter of the bore is more important than the width of the squish band or the taper between the piston crown and the band. (not that hose things are UN-important). 3) Compression ratio (when running - pipes greatly impact this) is life threatening for your engine. Get the other things dealt with, and select a ratio you can work with and implement it. Be conservative on a street motor. You can always increase it.

None of this is hard, but it will involve a little cut-and-try. Turning the heads to step them and o-ring seal them will very adversely increase the compression ratio. Bringing the squish clearance in to the the right number will make this problem worse. (there is a definite variation in heads, so consider any statement accordingly). Do those two things alone, and you will have a grenade (usually). However, it is a simple matter to remove enough material from the chamber to bring it into a reasonable volume. Just takes a willingness to bolt it all together, make some measurements, and act accordingly (wash, rinse, repeat as they say). Once it is done, it is DONE! (and you will never buy (or anneal)) another head gasket again! Your bike will be fast and reliable. I promise.
 
Shoeman said:
As a more precise method IMHO, get some solder and use that instead of clay. The biggest we can get here is .062 (1.58mm) and that works well. Run the piston up close to TDC but not all the way, unroll 5 or 6 inches (sorry) put a slight bend in it, and feed it in the plug hole. You'll fell it slide along the piston done and then hit the cylinder wall. Practice if you need to. Once you're confident it's touching the cylinder wall, run the piston up past TDC. You'll feel it hit the solder. Pull the solder out and you'll see it flattened. Measure that section. You can cut that small flattened section off and do the same measurement again at four different points around the circumference of the head. The measurements will vary as probably already discussed in this thread due to mis-alignment issues with the engines design, but don't worry about that yet, you're not building a race motor here. You'll get a good feel for the average squish clearance this way and you can make changes accordingly. If the 1.58 gauge solder is not big enough to be squished by the test then using your clay measurements as a reference, take a small cut or cuts off the head and check clearance again with the solder method until you get can get a measurable squish in the solder. Fine tune the clearance from there.
With a stock chamber design, set it at 1mm and don't worry about MSV or redesigning anything. We did not for decades and stock ported street motors ran just fine set up that way. If you want to further refine it, that is a valuable aspect to refine and there is probably freeware out there now to help you do so. Way back when I bought that and several other programs from TSR, now gone, that greatly aided in designing cylinders and heads. I have not fired those up in years, probably won't even run on current windows machines. I wonder where those are? I should try and run them for fun.
glad you all are here with good advice for ryan ;)
try my solder trick sometime i dont like using one thick piece especially just checking one side of crown the offset force could conscievably damage a moving part but if you use a bundle or rope of the very fine electronics solder
it forms quite easily
use 3-5 strands what ever it takes to make a large enough wound "rope"
ill cut 1/2 a dozen 6" or so long pieces you simply wind them together like a saftey wire pliers would do a test wind tells how many strands needed
it squishes nice and gentle like and holds shape just fine for measuring
 
Re: Yam RD "Blue Dream"- Ride,Maintain,Tune

Hey guys thank you so much for helping me out!
I didnt focus on measuring my sqish yet,i had to put my motor back into the frame and figure out how to deal with the sidestand situation (dg pipes).
However I got my worm shaft for my 400C oil pump and tried it,made a little video.
I want to do an experiment with my stock uprated (400 geared) oil pump and the 400C pump.
I want to measure if the 400C will deliver more oil.
I will run premix and measure the amount of oil from 100 strokes (WOT).i guess however that tue amount will be so tiny that it will be impossible to make a sure measurement.

I will definitely measure my squish,my friend Der Nanno will come by to make sure I wont get it wrong...I hope my first measurement was wrong...
 

Attachments

  • uploadfromtaptalk1454352358122.jpg
    uploadfromtaptalk1454352358122.jpg
    915.3 KB · Views: 287
  • uploadfromtaptalk1454352372379.jpg
    uploadfromtaptalk1454352372379.jpg
    857.1 KB · Views: 286
  • uploadfromtaptalk1454352385377.jpg
    uploadfromtaptalk1454352385377.jpg
    1 MB · Views: 304
hey guys!

long time no hear,there has been a lot going on in my life,but I tried to manage to have some stuff done on my 350 conversion.
Managed to sort my sidestand problem (collision with my DG chambers),just used the shorter sidestand of my KZ400 and silver-soldered a steel "shoe" under it,works a treat and now has a stance like Lady Gaga :D

The engine conversion came to a stop,since it really looks like I have a CRAZY big sqish band.I used several techniques, solder and play doe and I measured 3.1 MM!
The step on my head (flesh for the lathe) is around 2.5MM´ish, so this will be close.
I just bargained a good pair of UNMOLESTED 350 heads, stock squish and stock combustion from the US, so this will take a while till it finds the way to Austria.
When the heads arrive me and my friend Der Nanno will get this finished and run in for the season!
Good thing is, when I get the 2 other heads I will have some backup if we mess something up and we can play around with O-rings and centering pins...
 
Guys i have good news!

Last week the 2 350 Heads from the US came in the mailbox, it looks like they are untouched, which is quite nice considering that these are hard to get in an unmodified state.
The rest of the mods are done,gearing changes as stated,250 oil pump with uprated 400 wheel, K+N´s and DG chambers.
Jets were ordered too, will start at 210 mains and work my way down.
I hope I can start that baby in about 2-3 weeks to get it finally on the road!
 

Attachments

  • 1.jpg
    1.jpg
    85.9 KB · Views: 292
  • 2.jpg
    2.jpg
    90.1 KB · Views: 893
  • 3.jpg
    3.jpg
    74.6 KB · Views: 961
Re: Yam RD "Blue Dream"- Ride,Maintain,Tune

Guys!this saturday first start up!gonna post the video!
 

Attachments

  • uploadfromtaptalk1458858428059.jpg
    uploadfromtaptalk1458858428059.jpg
    2.4 MB · Views: 280
there you go guys!

the unedited footage of the first start up :)!

i´ll write soon about what we ended up with jetting and the other mods on the RD!

She pulls hard!!!

https://www.youtube.com/watch?v=M_OnbcB_cEY&feature=youtu.be
 
Well, we ended up with #170 mains, #30 pilots, Airscrews approx. 1.5 turns from the seat. Squishband-gap is set to a touch over 1.10mm, squishband width is set to 12.5mm (approx 1/2" - less would be better but that's what we have to live with for now) and the piston skirt has been matched to the inlet port so it clears at TDC. Exhausts are DG spannies. If you're careless on the throttle it lifts in 2nd and the hairy troll behind the bars that's c'est moi taking the honours of the first test-ride.

Cheers Don Ryan it was quite a hoot.

Greg
 
Re: Yam RD "Blue Dream"- Ride,Maintain,Tune

Had a little time this weekend to take the bike trough some twisties and see how she pulls.
She runs good,starts a little bit harder now than the stock 250 (the 250 never needed any choke even at cold weather).
I didnt see any bogging or stuttering or noises coming from the engine.
When I have time this week end i might end up playing around a little bit more with the jetting and probably taking a look at the piston tops.
I still need to sort my tach out,that acewell tach doesnt show the right rpm at all different settings.

The DG's are a bit loud for street use but i guess i have to live with that...i'm thinking about boxing the KN filter,so it won't suck any dust or dirt directly from the athmosphere,or is this unnecessary?

Thanks guys for your help so far!
 

Attachments

  • uploadfromtaptalk1459346301231.jpg
    uploadfromtaptalk1459346301231.jpg
    2 MB · Views: 273
  • uploadfromtaptalk1459346252659.jpg
    uploadfromtaptalk1459346252659.jpg
    1.6 MB · Views: 274
  • uploadfromtaptalk1459346208032.jpg
    uploadfromtaptalk1459346208032.jpg
    3.4 MB · Views: 293
Re: Yam RD "Blue Dream"- Ride,Maintain,Tune

Ryan Stecken said:
Had a little time this weekend to take the bike trough some twisties and see how she pulls.
She runs good,starts a little bit harder now than the stock 250 (the 250 never needed any choke even at cold weather).

Which basically means, that your 250 setup was running rich down low (pilots most likely).

Ryan Stecken said:
The DG's are a bit loud for street use but i guess i have to live with that...i'm thinking about boxing the KN filter,so it won't suck any dust or dirt directly from the athmosphere,or is this unnecessary?

Nope, boxing the K&N would only make sense to quiet it down. The filter does all the air-filtering work (hence the name).

Cheers,
Greg
 
Re: Yam RD "Blue Dream"- Ride,Maintain,Tune

Thanks nanno for chiming in again!

Had some time this weekend ro check the piston tops and combustion chamber.
Looks like on one side *left* some tiny bit of dirt or metal dust was burnt and did some tiny damage on the piston top and comb chamber.
There still seems to be a LOT of oil in the engine,the heads were super greasy.the cylinder walls look nice,no palpable scratches.
 

Attachments

  • uploadfromtaptalk1459749584814.jpg
    uploadfromtaptalk1459749584814.jpg
    1.2 MB · Views: 269
  • uploadfromtaptalk1459749694949.jpg
    uploadfromtaptalk1459749694949.jpg
    2 MB · Views: 276
  • uploadfromtaptalk1459749738169.jpg
    uploadfromtaptalk1459749738169.jpg
    1.3 MB · Views: 272
  • uploadfromtaptalk1459749764816.jpg
    uploadfromtaptalk1459749764816.jpg
    1.5 MB · Views: 268
hey guys!


had a wonderful rideout last weekend to bratislava, its around 1 hour from vienna, beautiful twisties and a fun to blast down the country roads!

my RD performed nicely, besides it looks like my battery is fried, so I had to push the bike always when I needed to restart ;D
I ended up now with 185 mains, stock idle jets and my needle is in the middle clip position.the RD pulls nicely trough all the gears, especially in the full throttle position it has a nice and even power feel to it.
Powerband kicks at 5500 and pulls hard till 7000.

the only thing I´m still missing is its power-wheeling abilities, which is in IMO part of the 2 stroke fun 8)....maybe It will just need time for the rings to seat nicely.
Maybe I´m doing something wrong but I just can´t get it on the back wheel.Do I really need to clutch it?
I also tried to change the gearing (front sprocket 15 teeth,17 is stock, rear sprocket is stock)...maybe I got this wrong...
Hope you guys can help?Xb you were telling me something about your wheelies capabilties :)?
 

Attachments

  • 13147295_827881057356034_6215230527272213456_o.jpg
    13147295_827881057356034_6215230527272213456_o.jpg
    193.7 KB · Views: 281
If it's only pulling hard to 7k there is something wrong with it. It should be pulling to 9k real hard. What ignition and coil are you using? The wrong coil can stop it from revving out. Or as Tune-a-fish says the jetting can be all wrong. You're not making anywhere near the full power that thing is capable of.
 
Sorry that was a typo...it revvs up to 9000 but my guess is that is that the low and midrange is on the piss.
Stock coils and stock cdi ignition.
 
Well that's better. Do a little more needle position tweaking and you could make changes to the main jets, one size at a time starting upwards, and see what happens. If it loses power, go the other way with the jet sizes. Try setting your ignition timing to 1.8mm btdc if you have not already too.
 
Shoeman said:
Well that's better. Do a little more needle position tweaking and you could make changes to the main jets, one size at a time starting upwards, and see what happens. If it loses power, go the other way with the jet sizes. Try setting your ignition timing to 1.8mm btdc if you have not already too.

Thanks shoeman for chiming in!I´m currently running 185 mains,I will try to go 200 and see what happens.I will drop the needle 1 clip (go leaner),its currently in the middle position.I´ve set my CDI ignition the last time when I reassembled the 250 engine,thats a good point.

Could the 2 less teeth on the front sprocket hinder the bike from power wheeling?normally this should bring more torque, so it should wheel easier....
 
Dropping a tooth is a standard trick, it helps acceleration. Never tried dropping two. If by power wheelie you mean the front end comes up by itself by just holding the throttle open in say first or second gear, I doubt the bike has lost enough weight and gained enough power to do that yet. Clip-ons and clubmans and low bars put more weight on the front, and you still have that awfully heavy cast wheel set too. I can't recall the details on your engine mods but I think it's DG pipes, re-worked heads, pod filters and that's it? Pretty standard stuff but not big power boosting mods. Those pipes are a decent boost for the money but they are not true high performance pipes. A little bit of port work would help, as would a better pipe, but I'm not really up on what's available where you are.
If you want more details PM me and we can discuss this endlessly.
Check the timing and fiddle with the jets.
 
Back
Top Bottom