Spring is here! more work to the Harley for you HD haters! hahaha

JRK5892

Over 1,000 Posts
ok... want to make a few changes to the bob... 90% are maintenance but some are comfort and power related... here is my "to do" list...
new gaskets in primary, new pulley 70t in back (my stock on broke the retaining ring off the back), new oil cooler lines, new oil cooler gasket for crush plate, floor boards, clean TPS, CPS, Speed sensor, replace fuel pump lines, replace in tank fuel filter, weld up heel toe shifter, re cut and weld then install 2-1 pipe, swap SERT to TTS tuner, dyno tune for new pipe

Powder:

black - headlight mount block, pulley, floor boards, all mounting hardware for floor boards, heel toe shifter
blue - top trans case

should not take to long... got most of the powder work knocked out in the shop last night (least the black)

429705_10150627917003073_594008072_9312425_1798511707_n.jpg


floor boards all coated

421827_10150631610193073_594008072_9325308_568192150_n.jpg


re coated my primary... I scratched the shit out of it last year, also did all the mount bolts this time including the derby cover bolts (re drilled and tapped them larger as well for a beefier look)

419887_10150631610423073_594008072_9325311_1206098519_n.jpg


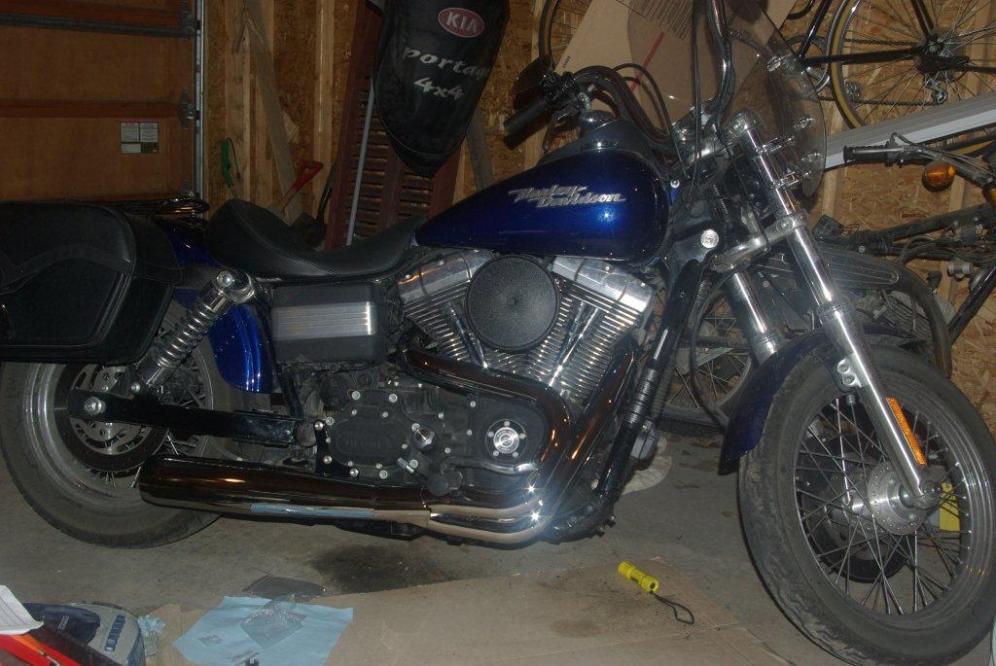
for my changes to the pipe, i do not want it to drag... and dont want a stock pipe either... so i am going to change the angle of the muffler a bit...
right now it sits like this

419461_10150631610313073_594008072_9325309_410809766_n.jpg


I want it to sit more like this.. no does not look like much but now it will not drag and have a cooler look to it

432056_10150631610498073_594008072_9325312_648894681_n.jpg


to do this i am just prob going to ajust the outlet on the pipe

430635_10150631610368073_594008072_9325310_1293149794_n.jpg


simply cut a V out of it and weld it back up to get the right degree i want

418029_10150631610123073_594008072_9325306_104013511_n.jpg


then of course i will have to cut up and re weld up the mounts... good thing i powdered this last year huh hahaha

417639_10150631610063073_594008072_9325305_1432832458_n.jpg


*My V&H big radius with custom coated shields and BCT baffles will be for sale as soon as i get them off the bike
 
well i got the boards done last night... I AM SOLD on them.... still have to weld up a heel shift'r
I kind of pieced together the stock parts the way that they come just did not line up well at all, used some liquid nails all purpose adhesive to attach the rubber back on the boards, and they are good to go! So glad i coated them black they look great on the scoot

431604_10150633512793073_594008072_9331140_302449747_n.jpg


Brake side
422385_10150633512693073_594008072_9331137_1458465931_n.jpg


shifter side
423260_10150633512883073_594008072_9331141_1484659670_n.jpg
 
Ya looks good. If your still planning on wrenching on her tomorrow im still in. And maybe ill bring my camera over so you can get some decent pics of the pig. ;D
 
ok... so took some time to work on the scoot this weekend

few things needed to be re done... my pulley being one of them, got some new bolts for that and coated those and the rotor bolts...figured while i am coating may as well re coat the rotor, headlight mount, lower air damper, and few other odds and ends... but mostly bolts hahaha ooh ya finally was able to get to my top trans case and change that from black cherry to gloss black... got the pipes off the bike and have them boxed up ready to ship to the buyer... and began to mod the bub lakester
*promise to take a real camera out to the shop with me as well!!! sorry for the shit cell pics

new headlight mount/air damer coated
425892_10150641233758073_594008072_9358034_1522866874_n.jpg


moved my horn to the back side of the battery box so it is completely out of site, upgraded it to a take off i had in the shop that was much louder

419417_10150641233863073_594008072_9358037_241602776_n.jpg


420393_10150641233943073_594008072_9358039_1160703605_n.jpg


mock up for the pipe
425740_10150641234023073_594008072_9358042_1296446575_n.jpg


420208_10150641234153073_594008072_9358043_1003583457_n.jpg


428332_10150641234478073_594008072_9358054_2013698425_n.jpg


general mock up with shields on
423140_10150641234348073_594008072_9358050_2035419406_n.jpg


just so happens one of the guys in the shop is the most insane pipe builder i have ever seen in my life!!! his custom turbo piping would blow your mind! so i am going to be leaning on Tim for a bit of help on this one... cut the tip off so i can get the angle right this week then move on to fab up the support bracket

416786_10150641234258073_594008072_9358047_1077166792_n.jpg


top trans case coated black
423885_10150641234713073_594008072_9358059_1779293936_n.jpg


new pulley installed, NEW bolts and coated, rotor freshly coated and new coated rotor bolts
429254_10150641234543073_594008072_9358056_1317453783_n.jpg


423142_10150641234838073_594008072_9358061_187407512_n.jpg
 
making tracks! got home from the shop yesterday, got the rear tire back in lined up and bolted down, installed the new clutch cable and gasket on the housing, new throttle cables are on, wrapped all the cables prior to install, they look great! Got the battery box with the horn on the back bolted in and tested... BEEP BEEP.... then drained all the fluids out of her and spent some TLC time cleaning all the road grime and oil that is all over the place from the faulty gasket on the oil cooler sandwich plate... getting there! just have to mod the pipe (and support bracket), replace the oil cooler lines, replace the oil cooler sandwich plate gasket, install new fluids, install new battery, and check for the stutter (cleaned all the sensors though so that may be it or the bad battery)

424931_10150645200858073_594008072_9372700_445869844_n.jpg


fresh clutch cable wrapped
422983_10150645200963073_594008072_9372702_2102655160_n.jpg


wheel installed
422058_10150645201033073_594008072_9372703_146376879_n.jpg


my bro popped by to give me a hand on his new Z1000... (we have nt done much to this bike.... YET)
425825_10150645201173073_594008072_9372707_751446002_n.jpg
 
well picking up my new submersible fuel line hone after reading formula's how to post... great info!!!!! took some Deoxit5 to all my conectors.. pulled all my sensors and cleaned them, spent few hours cleaning the motor and all the grime and shit off it... did final mock up on the pipe... will weld it all up today, redo the muffler support, new filter/lines on fuel pump, then fluids, dyno and RIP this sucker down the road!!!

what you think about the final position
420712_10150647096928073_594008072_9377227_865657759_n.jpg


pipe is 1 in below the peg... so wifey does not scratch it with her heels
421711_10150647097018073_594008072_9377228_831578593_n.jpg


417975_10150647097108073_594008072_9377229_545741166_n.jpg


431488_10150647097168073_594008072_9377230_2091675521_n.jpg
 
I likes, thats the kind of work it takes to keep things lasting for years.......the occasional clean and service. Looks good too, is your primary open like that or covered because I like the chain primary as opposed to belt.

Nevermind Im an idiot, I just seen the pics where you powdered your primary cover.
 
man you do awesome work...that bike is sick.

what color is that blue? it looks matte? must look unreal in real life. awesome work
 
thanks! it is a flat blue translucent with a heavy silver flake base.. has a awesome ability to change colors in the sun and shade... was a pain in the ass to come up with but i love it!

208447_10150169336603073_594008072_6780425_7494839_n.jpg
 
SX, it is done though mixing clear with your powder and cross linking coats but you have to manage and follow you KV as well as your PMT while shooting

Drew, it is a HF lift, we have 2 of them and now 2 black widow lifts as well... (you will see my bike in these pips is on the black w lift) the air lift is nice makes things way faster but the HF lifts are really nice as well.... i coated the stock pull lock chuck in red to match the lift as well, IMO they are a must to have on this lift
alright! got some work done... replaced the fuel return hose, sure enough had a pin hole in it... from there put in a new fuel filter... then moved on to the pipe... Have to say, it is AWESOME having someone with Tims skill in the shop... Tim is a mad man when it comes to custom pipes, metal, and well to be honest anything he touches... so we got the angle we wanted on the pipe (to allow for a air ride later so i can slam the bike when parked and not worry and then air it up full and not worry about the passanger peg hitting the pipe... also had to make sure the wifes heel would not scratch it while she was on back hahahaha.... got the new angle welded in... then we moved on to the support. after some cutting, welding and bending we where able to get the STOCK bracket from the pipe to work... granted it was cut into a few pieces, but tim was able to weld it all up and bend it to work perfect... around 5am i slapped some gloss black powder on the bracket and we where done! came out PERFECT!!!!

found the hole in the fuel line
430703_10150651181728073_594008072_9387155_1570224293_n.jpg


replaced the hose with NAPA submersible fuel hose #H209 (cut about 3 inches off it) and used some self tight clamps as Formula suggested in his post
429310_10150651181618073_594008072_9387153_1791090523_n.jpg


430453_10150651181658073_594008072_9387154_1998656664_n.jpg


tank all buttoned back up
425777_10150651181563073_594008072_9387152_35051480_n.jpg


then moved on to the pipe... first we found our angle so we mounted up the new flange that was cut
418457_10150651228358073_594008072_9387301_1768623967_a.jpg


418224_10150651228258073_594008072_9387298_690849799_n.jpg


423592_10150651205413073_594008072_9387218_1184026968_n.jpg


then moved on to the bracket, stripped it, and stated to cut and weld
417074_10150651181308073_594008072_9387148_1885190523_n.jpg


all welded up
420260_10150651181423073_594008072_9387150_429121245_n.jpg


426789_10150651192858073_594008072_9387177_818474393_n.jpg


all coated and done... insane the amount of work that goes into something so that you can make it so you can not ever see it
429059_10150651181478073_594008072_9387151_842722860_n.jpg


417366_10150651192798073_594008072_9387176_811424685_n.jpg


how the pipe should sit (sorry to who's pic this was)
120798d1275706515-black-bub-lakester-2-into-1-pics-imgp1086.jpg


how it sits now
420428_10150651181763073_594008072_9387157_1083811465_n.jpg
 
dont have much to update... other than... i need to find a chromer! hahahaha re bend the middle shiedl to allow for the new angle and the cheap ass chrome spider web'd unreal... what happened to good chrome jobs.... anyway i think i needs to be chrome
just waiting on a specialty allen socket and gasket for the oil cooler, dyno tues!

378354_10150655601068073_594008072_9408732_1423186032_n.jpg
 
been kind of circling the base waiting on a small ass gasket to get in... but the good news... IT IS HERE!!!! got the oil cooler all assembled... braided lines made... cooler installed... then coated my oil cap, trans plug, and the joint shield in gloss black... grabbed for my fluids... waaa waaaa waaaahhhhh.... only had 2 qt of oil, 0 gear oil... hahaha go figure! finally ready to start it and i forgot to restock the oil in the shop... nice work JOE!
ooh well ill snag up some Lucas on the way in and get some fresh fluids and fire her up... then load it up and run her to dyno... hope for some big numbers!

coated oil cap
527905_10150663272088073_594008072_9431571_1951708959_n.jpg


552435_10150663272258073_594008072_9431574_1466561532_n.jpg


shield is bent and now works for the new angle of the pipe
523568_10150663272013073_594008072_9431570_1190836213_n.jpg


oil cooler installed and fresh lines
561313_10150663272168073_594008072_9431572_1009023596_n.jpg


561344_10150663272213073_594008072_9431573_1075902840_n.jpg


here she sits ready for a ride
428830_10150663271933073_594008072_9431568_1150104204_n.jpg


oooh ya... while i was pacing pissed i did not have fluids and it was too late to go get some... i was able to take a crappy old shop mechanic chair and tear it apart to make this! now i can finally get the fairing out the nursery wifey is having me build! hahaha

537074_10150663271958073_594008072_9431569_1174514295_n.jpg
 
So much black on that bike, and I love it. Looks great man, hopefully the nursery isnt going to slow down the builds haha.
 
thanks man....


still needs to go to the tuner... he can not fit the bikes Chad and i are bringing him till late this week... but took it for a light ride around the block and the bike sounds awesome! really dig the floor boards as well
551704_10150669161328073_594008072_9455963_1565221924_n.jpg
 
Back
Top Bottom