Follow along with the video below to see how to install our site as a web app on your home screen.
Note: This feature currently requires accessing the site using the built-in Safari browser.
We noticed you are blocking ads. DO THE TON only works with community supporters. Most are active members of the site with small businesses. Please consider disabling your ad blocking tool and checking out the businesses that help keep our site up and free.
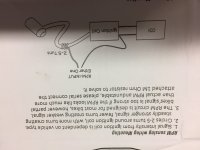
Yes two wire. Just looked at the instructions and shouldn't be too difficult to install. I just wish the Chinese would get better interpreters to write the instructions! Do I just get power from any wire that is hot when the ignition key is switched on? Not sure what they mean by vibration on the speed sensor.
That looks like their reed switch version. You only need keyed ignition unless it has a clock then you may need a battery feed for it to run the clock. Looking at the schematic it appears that they are using battery for the clock. It may be monitored to save settings when the ignition is turned off also.
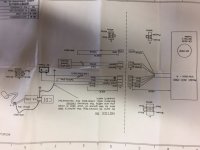
Like Clem said the line from the battery only powers the clock, minimal draw the other line should come from keyed power, probably fused and will run the gauge when you turn the key. those instructions were way better than what my gauge came with, I had to use my multimeter and test light to figure out what the hell each wire did. also my guess the vibration direction = rotation and is part of the poor translation.
Yeah, I've got one of their cable drive adapters that I'm trying to get to work with my custom speedometer and it's tough emailing "george" from Taiwan. Haha
John when you do hook this thing up can you tell me if the green and purple wire put out 5vdc? I am assuming that it does but that doesn't get me very far.
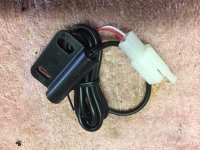
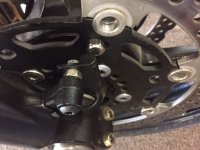
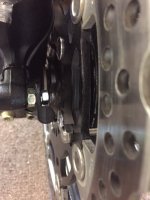
Ok so far I just got the magnet and speed sensor mounted. I have a 7mm gap between them right now and it says max 8mm so should be ok. I will make up a longer spacer at a later date though instead of the nut I have in there now. All I'm really interested in is the tacho feature but might as well hook up the speedo too. Gas gauge and clock are not needed. Clem I'll see what I can do regarding those two wires.
Ok so I got everything mounted and it's time to connect things up. So first of all the yellow rpm input wire it says on the diagram 200cm which is length as supplied, am I supposed to leave it full length and not cut it? If I do leave it 200cm long can I coil it up and strap it to the frame under the tank? Speed sensor I just connect the male and female connectors together...easy. I don't plan on using the bikes battery just the one in the tacho unit so it looks to me as if all i have to do is ground the black wire, am I correct?
Black is gnd on the ace well. Do you have the resistor on the blue wire? I didn't notice that one on the schematic earlier. As far as the tach, I'd try it first wrapping the plug wire from the end of the yellow wire. Check results then wrap where you are wanting to cut it then check results again. If they are both the same I'd cut it.
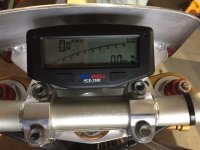
Well it's all connected up now and the speed sensor works because it turned the screen on when I rolled the bike along When I go through the settings do I have to set it for 2 cylinders to allow for wasted spark?
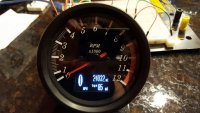
Ok fired it up and the tacho was seriously erratic so I went from 5 coils around the spark plug wire to 2 turns but it's still just all over the place. I guess I have two options according to the instructions; either conected directly to the coil or use the resistor in the yellow wire. If I use the resistor do I just solder it inline somewhere along the wire?
May need to try running resistor type R plugs (assuming ngk) also. Years ago local harescramble club got transponders and went through hell with them before realizing non resistor plugs made them wonky. Worth trying
Thank you guys for suggesting the resistor plugs that did the trick Now to get the engine running a little more sweet. Clem you would have to tell me how to check those wires on the speed sensor that you asked about, I am electrically challenged ;D
This site uses cookies to help personalise content, tailor your experience and to keep you logged in if you register.
By continuing to use this site, you are consenting to our use of cookies.


") I'm not using the blue wire, that's the fuel light.
I'm not using the blue wire, that's the fuel light.