Vintage Privateer Smoker (RD350 Race Bike)

Re: First Vintage Race Inspired Smoker

jpmobius said:
A brake cylinder hone should work fine and be easy to find and cheap. Be careful not to over do it. Realize that the assembled bolt, inner bushings, spacer and end caps are an integral structural component of the frame once tightened down. The swing arm simply pivots around the inner bushings which take up the tangential play and the shims take up all the axial play so the arm can't slide back and forth between the two sides of the frame. If you put it all together without the swingarm and tighten it down you'll see how all the parts make up a precision internal bearing for the arm and that the bolt simply clamps them all together. I don't know if the 650 bolt is the same length or not, but don't see any advantage using the larger same diameter nut. Also, don't misinterpret the two nuts found stock on the RD's. I've had people tell me that you are supposed to tighten the first one down to snug and then lock it with the second nut which is incorrect. The second nut is only a jamb nut intended as a safety feature to make sure the first one doesn't fall off. Rather silly I think as there is no likely hood that it should come loose - there is no rotation of the assembly and the swing arm bolt and nut get tightened fair down clamping everything together very tight to the frame. Yamaha makes a same pitch nut for a later model bike that has a spring plate insert making it a lock nut which I like to use instead of the two nuts (sorry I don't know the part number), but a bit of locktite on a single nut should be fine. You could also drill it for a cotter pin if you wanted. You will also need some spacers to take up the space normally taken up by the passenger peg/exhaust mounting brackets if you remove these parts.

Thanks for all the info, I ordered a small brake hone right after I mentioned that. The rear peg mounts are still there (though not the peg part) as im using the stock rear brake lever.
So, are you saying that the outter bearing should be snug up against the frame without
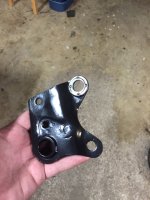
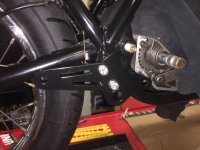
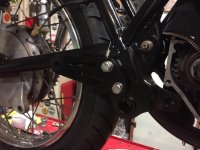
 
Re: First Vintage Race Inspired Smoker

The end caps are against the frame, do not rotate, and are clamped against the frame by the steel inside bushings. The ends of the bronze (or nylon) bushings at the flange are the same outside diameter as the swingarm. Those flanges should fit inside the end caps and be sealed by the rubber seal (if you use the 650 parts). Steel shims go between the end caps and the flange of the bronze bushings. It is a trial and error process to determine the shim thickness. As previously mentioned, I trial assemble with light oil or WD40 etc to determine what thickness shims are needed, and then final assemble with wheel bearing grease or white lithium marine grease. For me, the final result should be very stiff with the swingarm barely able to fall by its own weight as it will loosen up a bit quickly.
 
Re: First Vintage Race Inspired Smoker

jpmobius said:
The end caps are against the frame, do not rotate, and are clamped against the frame by the steel inside bushings. The ends of the bronze (or nylon) bushings at the flange are the same outside diameter as the swingarm. Those flanges should fit inside the end caps and be sealed by the rubber seal (if you use the 650 parts). Steel shims go between the end caps and the flange of the bronze bushings. It is a trial and error process to determine the shim thickness. As previously mentioned, I trial assemble with light oil or WD40 etc to determine what thickness shims are needed, and then final assemble with wheel bearing grease or white lithium marine grease. For me, the final result should be very stiff with the swingarm barely able to fall by its own weight as it will loosen up a bit quickly.

I think thats where im getting confused, i picked up a couple of shims off ebay so when they get here maybe it'll be more clear. However, according to the parts fiche the shim goes between the end cap and the frame. But it also looks like a washer, not really a shim..

yamaha-rd350-1973-usa-swing-arm-rear-shocks-chain-case_bigyau0843d-4_a5a5.gif


Im assuming the shim is the same diameter as the inner bearing so when its pinched in the frame the inner bearings is what doesn't move. However, that will give the swingarm itself a little play. If they go on the outside, then the end caps would still pinch the inner bearing, and the shim would pinch the frame to the cap, not the cap to the frame.
 
Re: First Vintage Race Inspired Smoker

The fiche is all correct except that - like all Yamaha parts exploded views of this era that I have seen - the shims are completely absent. There is no part number(s) I am aware of and I have never been able to get more info from Yamaha. Part # 7 is not a shim, but a washer that goes outboard of the frame under the nut(s) that clamp up the assembly. I can understand that confusion would likely arise when the part is not listed, but trust me, nearly all bikes have them whether shown on the exploded parts view or not. Very nearly every bike I have taken apart - and this is a substantial number - have factory shims in the swing arm assembly, though I have seen a few with none. I am certain that those bikes were deemed to not need any shims due to the chance size of the parts involved and I am sure the factory assembly allowed for more slop than would be deemed optimal! They are VERY easy to miss, as they fit inside the end caps and with old grease all dried up can be easily overlooked. That is irrelevant as the shims you need after replacing any of the parts will almost certainly be different than what it needed with the previous parts. The shims are to take up the tolerance in manufacturing the other parts. The outside diameter of the shims is about the same as the outside diameter of the outer (bronze or nylon) bushing flange, maybe just a bit smaller. The inside diameter is a bit larger than the outside diameter of the steel inner bushings. The stack of the two steel bushings and the center spacer should be very slightly longer than the out to out of the bronze bushings pressed into the swing arm. Assembled with out shims, the arm will slide this difference side to side. The shims are there to reduce this play to zero. There are many sizes (thickness) of shims, though most of them are razor thin like aluminum foil thickness. All of the shims that I have have come from parted out bikes, so I can not offer a practical supplier, but shims are shims, and a bearing jobber will be able to get you what you need if the E-Bay purchase does not work out. For the record, I have had a couple of instances where the span of the inside to inside of the frame was wide enough to need some "shims" to fill the gap. These would not be called shims - technically they would be (were) spacers. Similarly I have had frames that were a bit too narrow and wedging the whole works in was pretty frustrating to not damage the new paint. Both conditions are irrelevant to understanding getting the fitment of the arm right. In the case of a too tight frame, the stack of end caps, inside bushings and center spacer simply has to wedge the frame sides apart a tiny bit, but that has no effect on how much space is between the end caps and the outer bushings and swing arm. The same assembly on a too wide frame will need exactly the same shims. If you don't add an extra spacer to fill the gap, tightening the swingarm bolt will simply tweak the frame sides together to eliminate the gap. For me, if the gap is big enough I add a thin spacer so as not to bend the frame sides in so much, though I doubt it really harms anything.

Edit: The shims go in between the outer bushing and end cap (parts #4 and #6). The inside bushing (Part #5) is clamped tight against the end cap and is centered inside the shim(s) but does not touch the shim(s). They are rings nearly the same inside and outside diameter as the flange of the outer bushings. When correctly assembled, the two end caps, the two inner steel bushings and the center spacer are clamped tightly inside the frame. All these parts along with the swing arm bolt, the two nuts and washer (and the grease fittings) clamp tight with the frame and do not move. The swing arm, the two outer bushings, and whatever shims are needed, fit between the two end caps, and are free to rotate with the arm.

There is of course an alternative to adding shims. That would be to put it together and measure the side to side slop. Then you would take it back apart and shorten one of the steel inner bushings (or center spacer) this amount less maybe half a thousandth of an inch which would be the new slop which is nearly nothing which is what you want. This has the drawback of 1) being permanent, 2) if you overshoot, you then would have to remove material from one of the outer bushing flanges to gain back the tolerance, and 3) making the whole works slightly narrower causing you to have to draw the frame sides in that much more (or add a spacer to compensate!). So plan on shims. Put your rear suspension together and check the play. Add shims until tight. Remove shims until free but zero play. Reassemble with grease. The result will be perfect in five miles.
 
Re: First Vintage Race Inspired Smoker

And if the flange ends of the new bushes are thicker than the old OEM nylon bushes, it is possible to have "negative clearance" i.e. it can be too wide for the frame. The same applies if the bushes are not pressed in tightly. imagine if one of the bushes did not press in correctly and had say 1mm of clearance to teh swingarm, the whole arm might be too wide to fit inside the frame.

If the swingarm seems too tight to fit, try it without the end caps to see how much end play there is. On a GS750 swingarm I just fitted the "shims" wer really thick and it urns out one was just a washer that seemed like a shim but was too thick. Had be going for a while until I removed the beggars and measured them. My usual source of swingarm end play shims is old bikes as they get stripped. They look like really thin washers and are usually stuck inside the end caps.

Just to further mess with your mind, there are two sources of end play. First off we want the spacers and end caps etc to be a nice tight fit in the frame and then we also want the swingarm to have next to zero end play within that stack of caps and spacers and inner bearings and that requires two different shim IDs. In the real world you would rarely see that arrangement. Usually close enough is fine.
 
Re: First Vintage Race Inspired Smoker

Alright, that clears up the shim question. If you look at the part # on that washer that goes behind the nut, its actually the part number for the shims that go inside the cap. So, its just all messed up.

My last swing arm question them. Once I have the thrust washers on both sides, and the shims inside and everything snug, im going to have just under 1/16" of slop in the entire swingarm between the frame mounts. So, do I just fashen up my own shim for between the thrust and the frame? There is no way it'll pull in that far. Way to much bracing around that area
 
Re: First Vintage Race Inspired Smoker

Somebody should do an angular contact bearing upgrade. Maybe when I do my next frame up I'll go that route.
 
Re: First Vintage Race Inspired Smoker

Use a washer a.k.a. thick shim. you are aiming for no more than a couple of thou max and zero to 0.005" that Mobius suggested.
 
Re: First Vintage Race Inspired Smoker

teazer said:
Use a washer a.k.a. thick shim. you are aiming for no more than a couple of thou max and zero to 0.005" that Mobius suggested.

Exactly. I have had chassis with similar gaps. One of the most important things to realize is the great structural value of the assembled inner bushings, caps, spacer and bolt. As previously mentioned, you can simply assemble these components without the swingarm to see how/if you need an additional spacer to make the assembly fit the frame. Since the shims just take up slack between this assembly and the outer bushing faces, they do not impact the fitment of these parts. If you look at this assembly installed sans swingarm, it is much more obvious how it is such an important structural component for stiffening the chassis right at the most critical location. An RD chassis is pretty stout with the two horizontal braces directly above and below the swing arm pivot, but if you were to imagine these braces gone, you can see how important a good fitting, large diameter tube tightly clamped between the frame sides would strengthen and stiffen that area. The stack of inner bushings, spacer and end caps (plus the thin spacer you evidently need to add) make a very strong brace when clamped down very tightly with that big bolt and the whole works functions very much like a welded in brace. As it is, that area with those two welded in braces is already quite strong and rigid, but the swing arm pivot certainly adds to the overall performance. Keep in mind that when you add the new spacer that you will move the swing arm that distance one way or the other across the frame which will have a small impact on the alignment of the two drive sprockets. Might be worth a mock up of the engine and rear wheel to see if one side is better than the other. Even small misalignments impact chain wear, so it's worth a quick check. You can also check the accuracy of the chain adjuster marks which has a similar effect on wear if they are off.
 
Re: First Vintage Race Inspired Smoker

Got the swing arm on hold while I have some pieces coming. Then I'll take it back off and apart and put all this knowledge to use. Seriously great stuff.

Got some help last night getting the motor in the frame, the fairing on, got some more small stuff powdered and the rear set brackets on. Seat and tank are out for body/paint work. Need to get the mounts finished on the fairing and the back cut for my knees so I can get it over on Monday. Lots of stuff in the mail, progress is moving right along.


Sent from my iPhone using Tapatalk
 

Attachments

  • IMG_1499.JPG
    IMG_1499.JPG
    325.8 KB · Views: 707
  • IMG_1501.JPG
    IMG_1501.JPG
    346.9 KB · Views: 616
Re: First Vintage Race Inspired Smoker

here is the final paint scheme im rolling with. The blue will be a more powder blue color than as dark as this is. With my limited Gimp skills this was all I could get out of it.
 

Attachments

  • yamaha_td_3_by_danythemummy-d57gf1b.png
    yamaha_td_3_by_danythemummy-d57gf1b.png
    1.6 MB · Views: 210
Re: First Vintage Race Inspired Smoker

That will look simply amazing on the street. Of course we all realize that A model is fitted with a completely inappropriate C/D/E model seat, but damn, it looks good.

My first RD was a TZ chassis with a 400 motor in it and it was a POS, that had my shed full of RD projects from 250s to highly custom and then I got a TZ with an RD350 motor which became a full blown TZ and a second original TZ250A. Point of the story: be wary of Yamaha twins. They are wicked sirens that draw you in to their web and leave you broke but strangely unrepentant. :)
 
Re: First Vintage Race Inspired Smoker

teazer said:
That will look simply amazing on the street. Of course we all realize that A model is fitted with a completely inappropriate C/D/E model seat, but damn, it looks good.

My first RD was a TZ chassis with a 400 motor in it and it was a POS, that had my shed full of RD projects from 250s to highly custom and then I got a TZ with an RD350 motor which became a full blown TZ and a second original TZ250A. Point of the story: be wary of Yamaha twins. They are wicked sirens that draw you in to their web and leave you broke but strangely unrepentant. :)

This is the second RD ive had, the first was all original that I got up and running. I just didn't have any real use for it at the time, there is actually part of that is this build thread. I have an MT250 that needs rebuilt and then a T500 that needs rebuilt I want to put a side car on, lots to do.
 
Re: First Vintage Race Inspired Smoker

Not a lot got done today, temps were through the roof and we were fending off tornados.

Fairing is on so I can get the lower front mounts fiber glassed in as well as trimming it out so my knees don't hit. Have to have the fairing to the body guy Monday.

Also built a task board. Green dot means I don't know what the fuck to do about it yet and I don't have anything on the way. Obviously those need figured out asap.

If anyone has a right ride control/throttle/cables for sale please let me know.


Sent from my iPhone using Tapatalk
 

Attachments

  • IMG_1522.JPG
    IMG_1522.JPG
    334.3 KB · Views: 660
  • IMG_1523.JPG
    IMG_1523.JPG
    45.1 KB · Views: 647
Re: First Vintage Race Inspired Smoker

Most of those are fairly quick and easy and some require decisions to be made. For example the rear brake would be best with a cable but it might be quicker to rig up a rod actuation for the moment to save time and go back and clean it up later. Or you could decide to go for a cable now and just do it. Easiest way would be to blot a simple bracket on the torque arm to act as a cable abutment and clean it up later.

For clutch cable, and throttle cables, order a couple of yards of cable inner and conduit and a few spare cable ends (nipples/end fittings/ferules) from Flanders cable and make them or order stock OEM cables plus end fittings from Flanders and modify the stock cables. How long do you need the rear brake cable to be? Maybe one of us has something suitable you could use or modify. Examples of suitable cables are CB160, GT500, GT750, GT550 to name a few. You could even chose to change the rear to hydraulic and use a modern master and adapt a small car slave and so on, but probably not this week.

Rear brake switches are usually easy and cheap on ebay. hardest part is locating the switch itself and then lengthen or shorten the pull spring as required.

Get a set of SUPERBIKE grips from Economy Cycle or your local dealer.

License plate light, try to use the rear lamp or a simple license plate surround with light built in or a short strip of white LEDs. Or just two LED in the mounting bolts. I have a pair of those you can have if that's all that you need.

Seat upholstery: see your local auto upholstery guy or stick race foam on it for now and make it nice later. No one else needs to know it was a temporary work around. ;-)

Rear Brake lever: There are people on here who can supply that or make suggestions as how to make or adapt one simply. Remember to K.I.S.S.
 
Re: First Vintage Race Inspired Smoker


teazer said:
Easiest way would be to blot a simple bracket on the torque arm to act as a cable abutment and clean it up later.

Or remember, a Suzuki gt250 brake literally slides in with one small spacer and already has the brake cable stay cast in.
8115f69f89ac9c7cda86d53c23d02841.jpg
 
First Vintage Race Inspired Smoker

I am actually using the stock rear brake linkage. I cut the rear passenger peg mount to retain the stock stuff. It just needs cleaned. Powder coated and installed. My biggest issues to date are finding a right side control with throttle would like stock but may have to end up aftermarket as no one is selling them for less than a small fortune. Also turns, can't decide if I want to run them, or what to do. Was going to French them into the fairing but have been talked out of that. Also the license plate holder don't want to run off the rear axel bolt) and rear fender.


Sent from my iPhone using Tapatalk
 

Attachments

  • IMG_1498.JPG
    IMG_1498.JPG
    310.4 KB · Views: 644
  • IMG_1499.JPG
    IMG_1499.JPG
    325.8 KB · Views: 663
  • IMG_1500.JPG
    IMG_1500.JPG
    322 KB · Views: 648
Re: First Vintage Race Inspired Smoker

Had to swing by the body guy to pick the tank up. Needed to get the liner in it before he paints. So, gotta line it this weekend and get it back to him early next week along with the headlight bucket and fairing. I wish I had a better before pic, this one just doesn't do how bad it really was justice.
 

Attachments

  • IMG_1534.JPG
    IMG_1534.JPG
    2 MB · Views: 217
  • 2013-05-30 05.51.26.jpg
    2013-05-30 05.51.26.jpg
    249.7 KB · Views: 499
Back
Top Bottom