Yamaha XS400 DOHC Cafe Modern

Earlysport

New Member
Hi All,

I'm new to the site and impressed by the amount of activity and positive enthusiasm! I'm Sydney based and have long played with cars, completing s number of ground up builds, typically taking older metal and upgrading performance for fun track use and occasional competition. I've long been a bike fan but haven't taken the plunge until now, and am attracted to the cafe scene as I think it represents my way of thinking - make something older and maybe unloved 'go fast and handle good' and of course have the kind of looks to put a smile on my face :)

Over the years I've taught myself everything needed to complete a ground up build short of trimming requiring a sewing machine. I am not an expert in any area and always learning, but competent enough to hopefully produce a good end result. We shall see I guess!

For my first bike project I am keen to build something moderately powered, but light and agile that can corner hard and stop on a dime. I'm also keen to work on something not so common and maybe seen as undesirable in stock form.. Call me crazy!

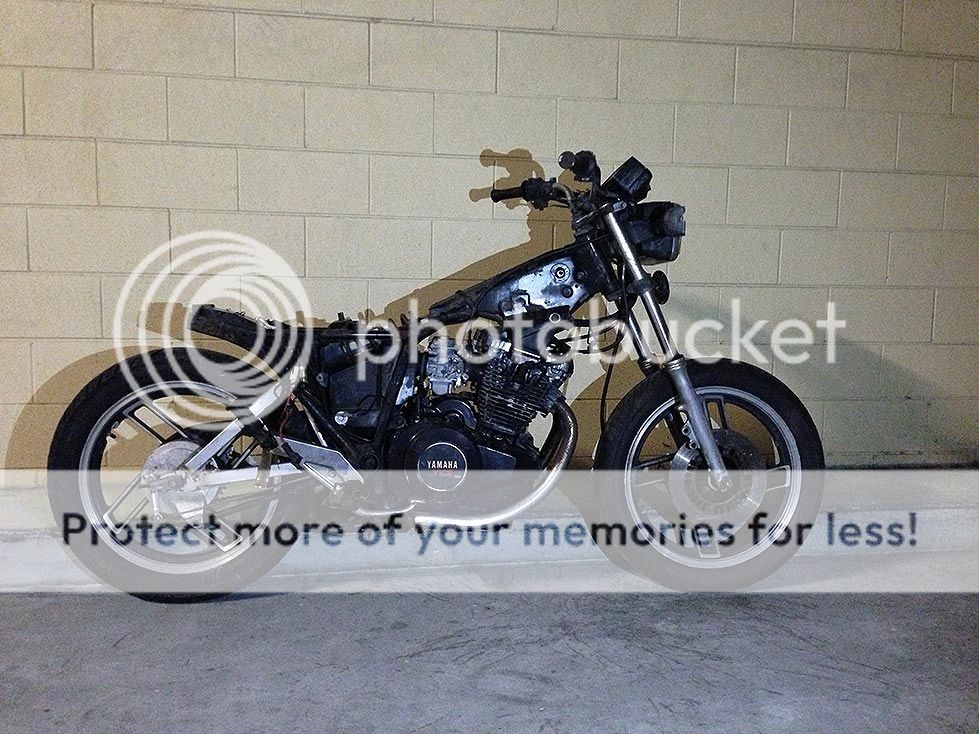
So the candidate picked up in sorry form is a 1981 Yamaha XS400 dohc. Also called the Seca. It's been crashed, abused, and cut up. The high points? a 46hp twin cam motor that is a stressed part of the frame, quite light, and..and.. that's about it. The lows are pretty much everything else! So this will be a big build..


I'm a fair way through this project so I'll bring the thread up to speed quickly..

Cheers,

Earlysport
Yamaha XS400 DOHC project, Future CB750 project, Ducati 996R
 
First up was teardown. You may have noted the bent fork legs and general ugliness. In keeping with my direction I'm keen to feature some more modern suspension and brakes, and I'm also keen to run wider tires than the stock 110's.


The engine hasn't run yet, but a compression test showed good numbers and the PO said it had run up until recently and then 'wouldn't start'. Some quick troubleshooting showed two burnt out coils - ignition has probably been left on for a time and fried them. In short I'm confident I'll get it running when the time is right.

Splitting the engine from the frame, results in not much left, particularly as I've decided to remove the factory rear section to fabricate my own..


The stock Seca tank is an ugly thing from the 80's (IMO), so I sourced an old TX650 tank. Fortunately the tank has already been treated inside but also has a dirty big patch panel so a fair bit of bodywork will be needed. The challenge is the XS DOHC frame has the monocoque style top section that is quite wide, particularly where the engine mounts are. So the tank needed to be widened some in the tunnel..


And then with some removal of stock mounting points it dropped over the frame.


Cheers,

Earlysport
Yamaha XS400 DOHC project, Future CB750 project, Ducati 996R
 
So now the real direction of the project...

Some scouring of ebay and gumtree netted me a deal on the remnants of a crashed 2006 GSXR600.. and the real challenge is in my desire to use the wheelset and rear end.


The rear swingarm is a very nice piece that also weighs about half (or less!) of the stock steel monoshock arm. It is also 2"longer and I think some wheelbase extension is a good thing on the XS400 platform. The challenge is getting a chainline with a 180 rear tire, and also the overall width of the swingarm. It's about 20mm wider than stock. I contemplated machining down the arm but then chain clearance would be impossible, so the only option is to widen the frame.


Above is the frame widened, complete with lower centre stand brackets cut off and the mounts added for a GSXR linkage. The goal here is to replicate the entire rear suspension of the GSXR, including dogbone linkage shock. I ended up pouring over photos and diagrams of GSXR's and then measuring a real bike to get geometry correct. Fortunately adjustable dogbone links and preload on the rear spring will afford me adjustability too.

Here's the rear end with wheel being mocked up.


And yes, this will be quite a big build.. :)

EarlySport
 
With me confident I'm going to get the modern rear end in place getting a front end to match is easy and has been done many times before. A set of all balls races and a spacer for the GSXR triple trees and these bolt right up.


The factory top triple tree has an ugly igntiion key set into it - I want a nice smooth look and will be relocating the ignition switch elsewhere.

First step is cut it off..


Then make up a metal spacer to fill the hole, and spend too long filling and sanding to match the edge profile from right to left.


With front and rear ends in place (rear mock up height) I can start to see the lines of the bike before beginning fab on the rear frame section. Part of the rear frame will support the shock linkage so there is more to this than just cosmetic, but getting the lines of the bike right is still key for me.

The tank is sitting in place as it is also a key part of the overall stance. Here I'm using a piece of wood to act as a sight line and get tank and positioning right for rear subframe upper frame tubes.


More to come..

Earlysport
Yamaha XS400 DOHC project, future CB750 project, Ducati 996R
 
Work on the custom rear subframe progresses.

Step 1 was to get the top tubes in place and sets the line of the bike.


Then a lot fo measuring and work on shock and linkage positioning to get the main support tubes in place for the upper shock mount. Cross tube is thick wall and the shock mounts are cut from 3mm plate that encircles the tube. Lower tube to tube joints have plugs internally for strength.


I have a plan for bolt on stiffening beams in tension from swingarm pivot to upper shock mount.

The lower suspension linkage needs strength, and while already thick wall tube I have double walled it with an insert. This tube is not dead round from factory so the voids are filled with glass and resin. When the frame is apart again all final welding will be completed - pretty much everything is in mockup stage currently.


With some mockup of rider position rear set mounts have been fabricated.


Cheers,

Earlysport
 
And lastly for now rider position testing! I think this is a good compromise between full on sportbike pose and a tourer - still aggressive but not too heavy on the wrists and feels comfortable!


You might have also noticed how poor the condition is of the engine / carbs etc. I'm hopeful though that with a lot of work these will come up nice again - the plan is some nice paint detail on the bodywork and blackout on lots of the mechanicals. Hopefully the end result can match the vision in my mind :)

Cheers,

Earlysport
 
How I cleaned up a lower GSXR triple clamp.

Cut off brackets, file finish, drill and tap for headlight bracket. Fab headlight bracket with exact shape to match trees contour, dab of filler to smooth it in. Finished product will be satin black with gold titanium bolts for the headlight bracket. With his part up front and so visible I want it looking good!


Earlysport
 
Fabrication on the frame continues - this time the rear loop and cowl.

I think the cowl really needs to match the tank so it began by taking a fibreglass mold off the tank. I tape off the tank to stop the glass sticking.


I then sectioned about 3"out of the centre and trimmed the rest to get the desired shape and size.


Filler over the top and with some finishing this should come out OK.

The loop was then fabricated to match the cowl. Maybe the reverse way of doing things compared to some but for me the cowl must be right.

An old handlebar proved ideal to get the tight bends needed, so the rear loop was welded up from about 6 pieces of it.


Then I decided to spend lots more time and french in a pair of super bright LED taillights. Pieces of tube bent to the correct diameter and then sectioned and welded into the loop.


The lights dropped into place and the cowl sanded and cutout around the lights.


Cheers,

Earlysport
 
Thanks for the positive comments guys - it's appreciated!

I had in my head that a bike build relative to a car would be way way less time consuming, and I guess no doubt it is, but the hours keep adding up!

Here in Australia our rules regarding noise output are fairly strict, and I don't want to give the authoritys a reason to pull me over and look closer at the bike. There's no doubt there will be plenty of aspects to this build that bend the rules some, but I'm hoping that the finished example manages to have a semblance of period-correctness about it and doesn't draw too much unwanted attention. So exhaust design needed to fit my aesthetic and performance criteria, and not be too loud, so for me that meant anything off the shelf was out.

To meet performance goals I wanted a straight thru design of effective diameter. Sound requirements dictated some fibreglass packing and I decided early on a two into one system too, with the outlet exiting out the side across the road - ie. not aimed at the nearest footpath or potential sound measuring device!

The factory system has a crossover so this space is ideal for the two into one merge. It also uses double walled pipe so I retained the front sections and then added from there. The below pic shows the right hand side which will have the main muffling section - this is a larger diameter pipe (2.5") which is sectioned down to weld to the outer wall of the primary pipe. The inner of the primary is a neat fit inside the perforated steel inner core. Fibreglass packing will go in between the perforated core and the outer pipe.


The perforated pipe then needed a hole and flanging to meet up with the two into one merge, and flanging near the tip to hold the packing in. The shot shows the two into one merge.


The pipe on the other side is welded up from a number of mandrel bent pieces to neatly curve under the motor.


I don't want to pipe wrap and am looking for a high temp matt black finish, so I've spent a bit of time grinding back welds to have it clsoe to seamless.


And lastly a slash cut outlet that ends just after the rearsets is the look I am going for..


I'm keeping my fingers crossed that this system gives me a nice sound and is loud enough when the throttle is wide open, and is quiet when cruising, and maybe gives me a power boost! It is meeting my goals for looks anyway :)

Cheers,

Earlysport
 
You might have noticed the engine looks a total piece of crap. Years in the weather and who knows what has meant it's corroded and nasty.

I started with a full high pressure degrease and then wire wheeling as much as possible, including inside the fins. The goal is a satin black finish -I toyed with the idea of then sanding off for silver fins like so many do but have decided against it. As part of engine preparation, and because this thing is becoming pretty much it's own entity, the Yamaha badging needed to go, so some metal filler and prep and the logos are gone!


Carbs of course needed a big clean up - both inside and out. Actually inside was OK, not too much junk, so I'm more confident this thing will run when I'm ready. This model XS uses different main size jets in each carb due to some vagary of the airbox, so new jets are on the way in a few different sizes too.

You don't see too many black carbs but I'm liking the look. The gold tops will actually go - I have a different finish in mind already.


You will note some of the gold bolts on the carbs - I'm using a lot of gold titanium on this build :)

Cheers,

Earlysport
 
I think I missed this key pic which should have been further up - the key and challenge to getting the late model swingarm to work was not just width, linkage, and geometry, but chainline, particularly with a 180 tire.

I have gone with a 525 chain and sprocket set to narrow slightly from the stock 530 setup (why a 530 on a 45hp engine I'll never know!). Clearance requires machining down of the GSXR cush drive to get the chain closer to the tire. This also means removal and rework of the factory nylon chain guide, which has now been cut down and will be refitted to the swingarm post paint. So effeceively the chain will run through a narrow gap next to the swingarm casting and between the frame rail. With chain alignment sorted for the rear wheel and swingarm I then needed to determine exact motor position in my widened frame and calculate an offset sprocket requirement. Allowing for some fine adjustment I ended up with an 11mm offset sprocket required. I purchase two sprockets, both 17 tooth (one tooth up from stock to allow for smaller rear GSXR sprocket), and had my local machinist manufacture a single offset sprocket to my spec. He did a great job (thanks RPM engineering Brookvale!)


Next challenge is ensuring there is clutch actuation clearance, with a little bit of material removal required from the worm gear actuator, and some clearancing of the lower section of the sprocket cover. Looking down the chainline all looks good, and using a straightedge indicates alignment too. This is critical - I don't want chain jumping or any other issues.

Anyway in less important stuff here's a shot of the engine freshly cleaned up and painted, although again the gold rocker cover will change in future..


With late suspension (forks) and different tree offset from stock I wanted a steering damper. My entire geometry is being setup like a GSXR although with 1 degree less head angle. Made sense to me to use a stock GSXR steering damper. Drilling and tapping a boss under the tree and then a bracket welded to the frame gave ideal geometry and travel and keeps the damper nicely tucked up and out of the way.


Lot's more to come however fabrication is nearing an end, so from here on in there's going to be a lot of paint and detail stuff..

Cheers,

Earlysport
 
Here's a quick example of some detail stuff I tend to waste too much time on! The fuel cap is another item like the triple trees that I really want to look right as I'll be staring at it a lot! Rather than switch out the factory cap (which would have needed me to weld in a new bung I think?) I spent some time on the stock chrome piece. First strip the chrome and prime, and drill some even holes for detail. I also fitted a new rubber seal to the mechanism.


And then a coat of flat black PPG and the holes are filled with gold ano spoke nipples I had laying around from a bicycle project.


I think it came out neat :)

Earlysport
 
The engine has come in for some detailing and is wearing it's final colour coat. High temp satin black with a coffee brown satin urethane cam cover. Gives some idea as to the final colour scheme of the bike too. carbs have also been sorted and finally assembled.

The engine has also been fitted with a lot of gold titanium bolts, both for appearance, anti corrosion, and sort of fits with the lightweight theme to this build.

The amount of weight that has been saved from stock is huge honestly. The GSXR swingarm and forks weigh a fraction of the original steel items, the wheel and tire package is significantly lighter, tank is lighter, my custom frame weighs 11kg total, shock weighs way less than the original, clip ons weigh a fraction of the original bars, and OEM fairing, gauges, lights etc have all been deleted. I think I could be 30kg under factory weight, which with 48 odd HP and modern tires, suspension and brakes should make it really fun :)


The wheels are also now flat coffee brown. Urethane base coat followed by DNA paints flat clear. This shot was taken right after shooting the clear, which is why it looks glossy. It dries flat.


And here's some of the bodywork in high fill primer. Tank, rear cowl, headlight bucket etc.


The seat pan is also finished - I have this shot of the early version, before the centre was removed to create a gap underneath where the electrics will live. AL perforated mesh will support the foam.


Soon to come masking for graphics, some gold leafing, and not far off assembly!

Cheers,

Earlysport
 
Hey guys, I've been away OS for a month, but I have some updates ready to go.. Will post progress in the next few days. The project is nearing completion, and has been for a gentle test ride :)

Earlysport
 
Back
Top Bottom