
We noticed you are blocking ads. DO THE TON only works with community supporters. Most are active members of the site with small businesses. Please consider disabling your ad blocking tool and checking out the businesses that help keep our site up and free.
You are using an out of date browser. It may not display this or other websites correctly.
You should upgrade or use an alternative browser.
You should upgrade or use an alternative browser.
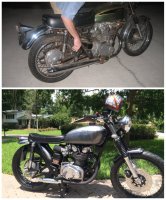
1972 CB450 brat-style
- Thread starter kosmjon
- Start date
Sderbyshire
Into Sailing, classic Triumph cars and motorbikes.
Really nice thread, congrats on the build it looks great!
Im building a 360 cafe and contemplating the flat renthal bars ( currently have clip ons but they are too low for any comfort....)
How did you find drilling the bars, im guessing it was pretty easy as they are alloy?
Steve
Im building a 360 cafe and contemplating the flat renthal bars ( currently have clip ons but they are too low for any comfort....)
How did you find drilling the bars, im guessing it was pretty easy as they are alloy?
Steve
Sderbyshire said:Really nice thread, congrats on the build it looks great! Im building a 360 cafe and contemplating the flat renthal bars ( currently have clip ons but they are too low for any comfort....) How did you find drilling the bars, im guessing it was pretty easy as they are alloy? Steve
Thanks Steve! I really like the look and comfort of the Renthals. Yes, they are thick aluminum and very easy to drill out. They are normally used for MX where you'd never want to drill them. I was a little worried about loss of strength, but I just kept the holes as small as possible and smoothed out the edges. Be advised the inside dimension is a lot smaller than steel bars and cannot handle too many wires. I was able to get the standard controls wire bundles stuffed through without too much trouble.
Thank you! Yes, It was unbelievably huge to start with so lots of sectioning bought it down to a much nicer size/shape. I got the idea for the front mount made from steel rod from a bobber I saw in Cycle Source magazine.Luugo86 said:Great looking bike man. I really like how you did the rear fender.
Flugtechnik
My bike is not transportation, it is a respite
Very well done! Sometimes it is nice to see the entire build at once. I love all of the details.
I might borrow your battery cover idea to clean up mine. I think I might have enough leather left over.
I might borrow your battery cover idea to clean up mine. I think I might have enough leather left over.
Thank you. I made it. It is about the top 25% of the originally huge taillight bracket. I welded on a bottom piece after drilling and welded three nuts on the inside. I welded on a back piece with two 5mm nuts welded in. It is hollow inside for the wires to pass through. The taillight bolts to the back and the whole thing attaches with three 6mm bolts coming up from the underside of the rear fender. Sounds complex to describe, but not too bad really.Luugo86 said:What is the tail light bezel? did you make that or buy it? it looks nice
Thanks very much. I'm gonna have to spring for real leather one of these days. The marine vinyl looks OK here, but I think leather would've look nicer than vinyl on the 360 seat I made later.Flugtechnik said:Very well done! Sometimes it is nice to see the entire build at once. I love all of the details.
I might borrow your battery cover idea to clean up mine. I think I might have enough leather left over.
Sometimes the updates are not so good. About two weeks after I finished the bike at the end of June 2016 I happened to notice this

I had put a run in the clear, waited a day, sanded it down and put on another couple of coats and thought I'd outsmarted the paint, but nope. Actually not really sure yet which layer decided not to stick or what, but I'll let you know after I strip it off and repaint the tank.
I also found that I did not notch out the rear fender enough to avoid it occasionally making contact with the chain guard. So I have this issue to fix as well.
Thank you!bezugo said:Great looking bike!!
How did you mount the front caliper that way? Mine is on the stock mount and it really doesn't line up with the disk that well.
I basically just swapped the fork legs left->right/right->lift and flipped them and the front wheel around 180-degrees. I am using the original caliper bracket and everything lines up exactly the same as it did before the flip. The arm holding the caliper allows for some minor alignment adjustment via a long 6mm bolt.
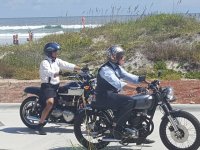
I cut away enough fender now to avoid collision with the chain guard. And rode the 450 in the Jacksonville Gentleman's Ride #dgrjax yesterday. Bike ran perfectly and our Jacksonville team of ~75 riders raised over $8000.
Attachments
Sorry just saw this. Yes it is and thank you!Bootsey said:Another impressive build, like your work! Is that a Lucas style tail light grafted into the modified original brake light housing?
revel.motorcycles
Been Around the Block
Cool build! How does it ride?
Thank you! It runs very well. The engine pulls strongly having had just a simple refresh using new .75 over pistons and rings. The riding position is comfortable since the only real difference from the stock position is the slightly lower handlebars and seat.revel.motorcycles said:Cool build! How does it ride?
So I finally got around to fixing all of the issues noted in the post above from 19 September 2016.
The tank paint had bubbled up due to a pin-hole leak in the area where the Honda emblem had been. I ground-down to the bare metal and used another coat of Caswell on the inside and dabbed a bunch in that area of the outside as well.

In taking the rear fender off I discovered I had too little clearance between it and the tire at very front edge. This resulted in "tire dust" and yellowed, burnt clear coat.
I sanded all of the the chainguard and fender and tank with 600 wet. Then I masked off areas where I was hoped to only have to spray clear and sanded the damaged areas with 80 to give the filler something to bite to. I filled and sanded the damaged areas.


I decided it was easier to completely repaint the rear fender which meant remasking the scallop design and shooting silver over the charcoal metallic. In the end I re-shot KD3000 primer/sealer plus gray and/or silver over 80% of the tank, 1/2 of the chainguard and all of the fender. All of the parts got three new coats of House of Kolor clear.

During reassembly I cut and re-welded the front fender bracket to pull the front of the fender nearly 1/2-inch further away from the tire and I stiffened up the shocks a couple of clicks.
It was certainly annoying to have to redo these parts, there is nothing quite like learning the hard way from ones mistakes, eh? So now she is back together and better than ever.

The tank paint had bubbled up due to a pin-hole leak in the area where the Honda emblem had been. I ground-down to the bare metal and used another coat of Caswell on the inside and dabbed a bunch in that area of the outside as well.
In taking the rear fender off I discovered I had too little clearance between it and the tire at very front edge. This resulted in "tire dust" and yellowed, burnt clear coat.
I sanded all of the the chainguard and fender and tank with 600 wet. Then I masked off areas where I was hoped to only have to spray clear and sanded the damaged areas with 80 to give the filler something to bite to. I filled and sanded the damaged areas.
I decided it was easier to completely repaint the rear fender which meant remasking the scallop design and shooting silver over the charcoal metallic. In the end I re-shot KD3000 primer/sealer plus gray and/or silver over 80% of the tank, 1/2 of the chainguard and all of the fender. All of the parts got three new coats of House of Kolor clear.
During reassembly I cut and re-welded the front fender bracket to pull the front of the fender nearly 1/2-inch further away from the tire and I stiffened up the shocks a couple of clicks.
It was certainly annoying to have to redo these parts, there is nothing quite like learning the hard way from ones mistakes, eh? So now she is back together and better than ever.
focusinprogress
City Limit Moto:Parts-Service-Apparel (716)8038606
your paint scheme looks really, REALLY good.


