Moto Guzzi 750 "Freccia tricolore"

Roar

New Member
Hi!

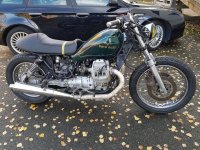
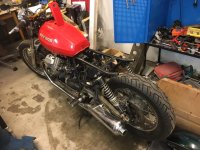
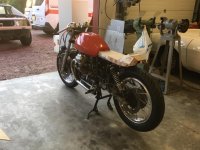
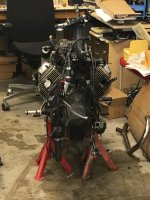
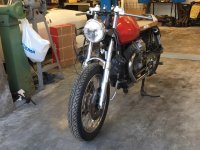
I bought this 96 Guzzi Nevada 750 the other day, it was a started/stranded brat project with a lot of strange solutions.... :)
Not so keen on the cruiser style or brat look so I am going to make my own version af a café racer.
This is my second attempt at a café racer, a few years ago I did a CB550. It was fun building the 550, but I love Italian cars and bikes so a Guzzi café will be closer to home.
 

Attachments

  • 66487964_2803801229636255_396449400093671424_n.jpg
    66487964_2803801229636255_396449400093671424_n.jpg
    79.7 KB · Views: 737
  • 66182066_2803801246302920_461881959832879104_n.jpg
    66182066_2803801246302920_461881959832879104_n.jpg
    72.5 KB · Views: 306
  • 66281560_2803801372969574_7947886678314582016_n.jpg
    66281560_2803801372969574_7947886678314582016_n.jpg
    94.4 KB · Views: 370
  • 66148601_2803801429636235_7770991943353368576_n.jpg
    66148601_2803801429636235_7770991943353368576_n.jpg
    79.6 KB · Views: 685
Last edited:
The tank I am going for is the V50 Guzzi, I like the shape and I think it will give the bike a nice low stance. I found one cheap on ebay, it has some light rust inside but I am going to use vinegar trick to get it clean.

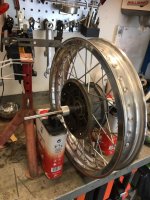
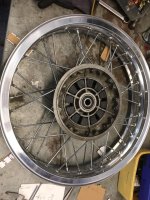
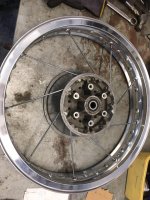
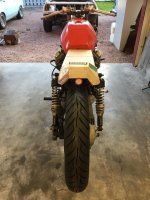
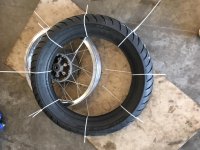
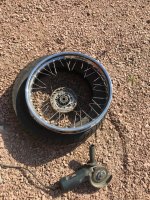
Also I am not digging the small rear wheel, so I bought 18" Borrani VM (copy)rims and spokes from Italy. So this is my first lacing and truing of a wheel, exiting stuff. Luckily the Guzzi wheels have straight spokes, so that makes everything a lot easier.
 

Attachments

  • 67224479_2815287585154286_4844700526949957632_n.jpg
    67224479_2815287585154286_4844700526949957632_n.jpg
    85.1 KB · Views: 661
  • 66634240_2815287495154295_3185004805907021824_n.jpg
    66634240_2815287495154295_3185004805907021824_n.jpg
    94.1 KB · Views: 638
  • 67236401_2815287365154308_3628731307619516416_n.jpg
    67236401_2815287365154308_3628731307619516416_n.jpg
    88.3 KB · Views: 627
  • 66368819_2803802059636172_3390521744094658560_n.jpg
    66368819_2803802059636172_3390521744094658560_n.jpg
    116.7 KB · Views: 304
  • 66508654_2803801856302859_9067059055758934016_n.jpg
    66508654_2803801856302859_9067059055758934016_n.jpg
    80.9 KB · Views: 735
  • 66319238_2803801576302887_6797315538725896192_n.jpg
    66319238_2803801576302887_6797315538725896192_n.jpg
    89.8 KB · Views: 298
The rear tire and tube arrived today, Avon Road Rider 120/90/18". It was easy putting them on the wheel with the cable tie trick, it means only one time of forcing the tire over the rim and it keeps the tube in place.
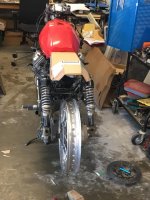
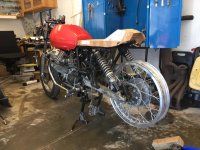
Also been making a cardboard mock up of a seat to get a 3d visual of my design idea. Also to get an idea of how much I need to rise the rear of the bike. I can rise it either by moving the shock mounting points further rear, or get some longer shocks. I see the sportier Guzzis with the same frame has the shock mounted closer to the rear of the bike so I guess that is the best solution.

Thanks for watching! :)
 

Attachments

  • 67369697_2832907010059010_1849864443274461184_n.jpg
    67369697_2832907010059010_1849864443274461184_n.jpg
    73.8 KB · Views: 418
  • 67581775_2832906986725679_8249660426380378112_n.jpg
    67581775_2832906986725679_8249660426380378112_n.jpg
    70.6 KB · Views: 345
  • 67127738_2832906943392350_8123901743844032512_n.jpg
    67127738_2832906943392350_8123901743844032512_n.jpg
    74.6 KB · Views: 371
  • 67295795_2832906926725685_9210158088932294656_n.jpg
    67295795_2832906926725685_9210158088932294656_n.jpg
    68.6 KB · Views: 279
  • 67286688_2832906870059024_1715673971136921600_n.jpg
    67286688_2832906870059024_1715673971136921600_n.jpg
    78.2 KB · Views: 428
  • 67067858_2832906803392364_7062508938662510592_n.jpg
    67067858_2832906803392364_7062508938662510592_n.jpg
    90.4 KB · Views: 293
  • 67058303_2832906816725696_7750669021397123072_n.jpg
    67058303_2832906816725696_7750669021397123072_n.jpg
    90.6 KB · Views: 441
Some great progress already man.. Im lovin it.. Im all in on this project, I love the way those Guzzi Vtwins sound.. and they make real good looking cafe bikes.
How do you plan to do the seat piece? fiberglass? or are you gonna shape some steel and weld her up?
 
...Also, that is a pretty slick trick with the zip ties to help mount the tire.
 
Wish I had known about the cool zip tie trick before I left my knee skin all over the tyres and my guts all over the floor. Love the guzzi.
 
Good choice with the angular seat design. Really ties in with the shape of the tank!

Sent from my SM-A530F using Tapatalk
 
Luugo86 said:
Some great progress already man.. Im lovin it.. Im all in on this project, I love the way those Guzzi Vtwins sound.. and they make real good looking cafe bikes.
How do you plan to do the seat piece? fiberglass? or are you gonna shape some steel and weld her up?

Thanks!

The plan is to make it in steel, never worked with metal before so it will be interesting and a steep learning curve for sure!

No guts no glory!
 
Odontologist said:
Wish I had known about the cool zip tie trick before I left my knee skin all over the tyres and my guts all over the floor. Love the guzzi.

Thanks!

I can not take credit for the cable tie trick, found it on YouTube. But I can definitely recommend it as it works great both for getting the tire off and on! Be generous with the lubricant!
 
Aussie Steve said:
Good choice with the angular seat design. Really ties in with the shape of the tank!

Sent from my SM-A530F using Tapatalk

Thank you!

That’s what I am going for!
 
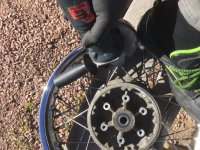
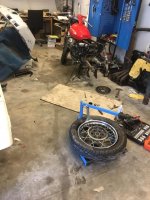
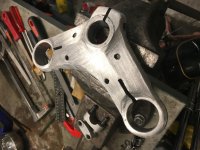
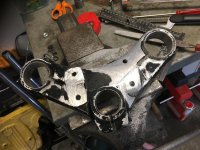
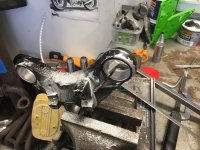
I took apart the front today, made the front wheel ready for new spokes and rim.(spokes on the way)
While I had the chance I took of the top of the triple and got rid of the bar risers. A lot of work but worth it.
Also ordered new customisable throttle, clutch and brake lines.
 

Attachments

  • 4565BAAD-3183-452E-818B-BA843C65BA84.jpeg
    4565BAAD-3183-452E-818B-BA843C65BA84.jpeg
    1.1 MB · Views: 296
  • 02487E58-BA16-427A-8D52-0E710CCAC0FD.jpeg
    02487E58-BA16-427A-8D52-0E710CCAC0FD.jpeg
    1.3 MB · Views: 355
  • 1BDE6D91-6F24-4843-A991-C1EB3C26C0EB.jpeg
    1BDE6D91-6F24-4843-A991-C1EB3C26C0EB.jpeg
    2.4 MB · Views: 296
  • 09415C39-205D-4922-B725-E359110F068B.jpeg
    09415C39-205D-4922-B725-E359110F068B.jpeg
    3.6 MB · Views: 309
  • F39166F3-7487-4DE1-B40A-6FD4AD1528AE.jpeg
    F39166F3-7487-4DE1-B40A-6FD4AD1528AE.jpeg
    1 MB · Views: 279
  • BBE9F4AE-D882-4402-9289-04FF80698724.jpeg
    BBE9F4AE-D882-4402-9289-04FF80698724.jpeg
    141.9 KB · Views: 286
I am at it again!
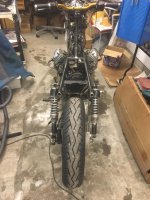
Removed all the electrics, i am going to start from scratch using Munit blue. With the electrics out of the wayi could remove all the tabs/brackets i dont use from the frame.
The wheels are finished so now it is 18” front and rear.
On the to do list is lower the front fork and move the rear shock mounting backwards to rise the rear of the bike.

4C0A5824-16A5-49EC-805E-C85266CB9291.jpeg
CD4A384D-A7EB-442B-927E-C6EF8A5090B5.jpeg
686A8391-1E7C-4895-9F0D-6C6D50CEEEE7.jpeg
0F566AC3-5DED-451E-8289-CC95B4B7871F.jpeg
4C0A5824-16A5-49EC-805E-C85266CB9291.jpeg
180F822A-B52A-45FD-BF06-9E9E77B37AEB.jpeg
93F98B72-4ABD-4E56-850A-15CFAA278695.jpeg
 
I Made some new brackets for the rear shocks, Now I’m happy with the rear height.
I still need to lower the fork, does any of you have some tips on how to do it? (1996 Nevada)
I also got started on the seat, hopefully it will come out ok...
0448B079-C624-4A97-B8A3-AD48B1477613.jpeg
16EF7239-7777-4167-986E-2F3E420665F7.jpeg
3264EBCD-51D2-49E0-8B04-2930CB07FD85.jpeg
BE067BF1-EE5B-44FC-BC8C-BA258FFE1C98.jpeg
6EB31611-EBBC-4BBE-A61A-0DD236B0A611.jpeg
A8C12DB4-CFD6-4288-A4CC-9A71D808F15E.jpeg
 
Back
Top Bottom