$50 mod thread

montessa172 said:
Yep, cause they are brass i'll just solder some metal screen on the inside - 2 pieces and sandwich some foam in between,
Neat idea, only thing I see wrong is your concept of a filter

For example,
2" Black Open Screen Vent, tab style
1.846 si nfa (square inches of net free ventilation area)

https://ventmastersstore.com/shop/2-round-open-screen-vent-tab-style-black-p-247.html

Your reducing flow to about half of what carb is capable of, good way to loose a lot of power
 
It also looks like you got sum purdy finger symbols.Come on over fur some knee slapping good times.I'll maw to tune up ma banjo and we'll have us a blow out country style.I'll even invite Bubba over with his wood box bass. ;D
 
Nice and original. Took a bit of work I am sure. I would skip the foam and just do the screens. Bet it looks real good polished up too.
 
regarding turnn signal to rear light conversions: can you paint an orange lens red or does it have to be white/clear?
 
montessa172 said:
SIX DOLLAR shorty velocity stacks...
[pic]
Just cause I wanted to see if it would work.. I went a bought two of these at the thrift shop,
[pic]
total cost 2.89 each. Bring a magnet and make sure it doesn't stick, these are silver plated brass..
Take your newly purchased cup, chalice, champagne flute thing home and cut the bottom off as such
[pic]
Next, measure the carb that you will be enhancing and get the diameter of the filter side of the carb.. mine was 2.160, measure the thickness of the material of your cup, mine was .040 and then do some math.. 2.160 and .040*2 (theres two sides of the cup) and I got 2.240 and then I took off ten just to make sure i didn't cut too big. Slide your vernier calipers down the cup from the narrowest part of the taper to the rim until you reach the portion that is your measured amount and mark it..
Next mount your cup in your nearest drill press.. Like so..
[pic]
Fire it up and hold your chosen cutting device on your mark and cut the top off of the cup. I used the edge of a flat file, and seeing the the base metal was brass it made short work of it...
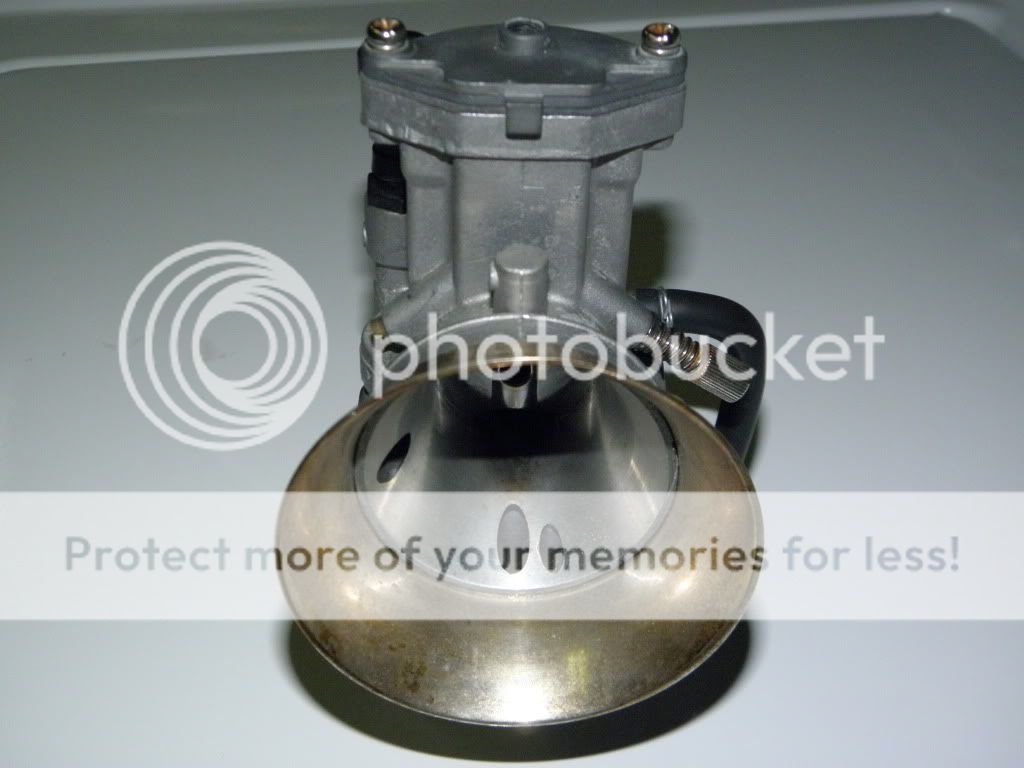
And my finished product, all I have left to do is pick up 3 very fine thread set screws, drill and tap the cup and drill 3 dimples in the lip of the carb for the set screw to seat into... Some locktite and the finished product will look like this..

P1090515.jpg

I need to shop around a bit more and see if I can find some that are a little taller.....

You, my dear sir, are a genius and scholar! Nice ingenuity I must say! my favorite mod in a long time! :)
.. everything making a home-built cafe is all about.. making cool shit from old cheap shit ;) Awesome.
 
Thanks! They got better, 3 bucks for two small kitchen strainers from the dollar store, cut soldered to mount. They might rust, they're cheap cheap stainless but then i'll paint them. Total cost 9 bucks.

4ac6099e-32a9-796d.jpg
 
montessa172 said:
Thanks! They got better, 3 bucks for two small kitchen strainers from the dollar store, cut soldered to mount. They might rust, they're cheap cheap stainless but then i'll paint them. Total cost 9 bucks.

4ac6099e-32a9-796d.jpg

That is the shat right there.
 
montessa172 said:
Thanks! They got better, 3 bucks for two small kitchen strainers from the dollar store, cut soldered to mount. They might rust, they're cheap cheap stainless but then i'll paint them. Total cost 9 bucks.

4ac6099e-32a9-796d.jpg
... I'd almost consider that porn ;D Is it morally acceptable to have intimate feelings for a velo-stack? and for all the trolls that take everything litterally... yes, that was a joke. ;D
 
Tea strainer is a good idea, gives a lot more surface area so shouldn't restrict flow
 
montessa172 said:
Thanks! They got better, 3 bucks for two small kitchen strainers from the dollar store, cut soldered to mount. They might rust, they're cheap cheap stainless but then i'll paint them. Total cost 9 bucks.


yeah that looks pro. well done
 
The next wedding reception I go to is going to be short 4 chalices, or whatever those goblets are called..

Brilliant!
 
Great thread! A lot of good ideas and awesome ways to save money! I need to come up with a mod under $50!
 
Somebody turned the page so I'll ask again. Can you paint an amber lens transparent red or de you have to start with a clear/white one?
Thanks
 
I have been told that you can paint the inside of an amber lens with Testors model red clear coat and it works well. I haven't done it myself, but several on VRCC have done it while converting turn signals to running/brake lights and say it works well.
 
yes you can shoot them in transpearant orange and clear on the amber lenses as well... another option is to take them to a eyeglass store that does their own tinting and repairs, they can dye them for you. that is how i do mine, my brother has a huge tint maching at his stores
 
Thank you both. My concern was that red on top of amber was going to be to dark, but I guess that's not the case.
 
After reading up a bit, it appears you can dye them at home as well.
The bit I read (and can no longer find) spec'd RIT dye, but be warned RIT is vegitable dye and will bleach out over time. However, go to a craft store or a fabric store and you can get 'real' dye that's got all the good noxious chemicals in it that will hold up better over time.
Which reminded me that we used to dye a lot of our parts for the RC cars....

The trick is to mix your dye about twice as strong if mixed with water. To that solution add a good portion of iodized table salt. Looks like if you are mixing 2 quarts of dye around a cup of salt is a good starting point. The salt aids in penetration.
Scuff your lens with GREY scotchbright (not very course) of clean 000 steel wool until it looks just vaguely dull and drop in your boiling dye. Don't want to boil too hard, just enough to agitate it, let'r go for an half an hour or so keeping the level topped off with more water as needed.

Rinse it off and see it's to your liking, if you want darker let it go for more time.
Once you get it dark enough, rinse in water then drop into a container of white vinegar, we did that to 'seal' the part. This last bit is something we did, but I can't remember where I heard it so take it on advisement.

Last bit....a little clear urethane and you should be ready to go!
I'm going to give it a try soon to be certain it works on lenses but if you try, post up your results.
 
Back
Top Bottom