BSA ZB32 Goldstar

davidc

Been Around the Block
Not up to the scale or stadnard of swan's DB, but my goldstar was bought off EBAY a few years ago in a shed in England.
The guy selling, posted that it was a genuine GS but with different numbers- I made a low bid and was successful.
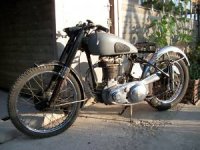
I drove to his house in England (I am in Ireland) with a van and looked hard at what I had bought.
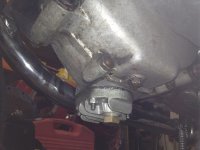
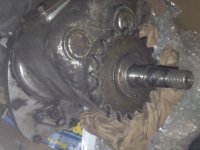
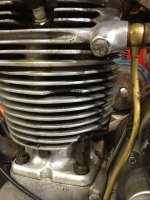
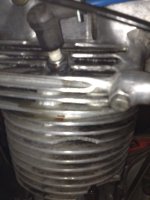
The engine was genuine, the tin ware looked right, the gear box was standard and incorrect, the frame num,ber didnt' match but there was enough to get it registered with the departmant and import it to IReland - so I bought it!
Well, I had already bought it anyway (Ebay).
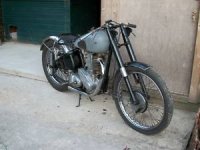
The wife was amused when I brought it home. - For the money, I think she was expecting a full bike in running condition.
These Goldstars! - they are so sought after, that anything goes once it's got the right engine number. there were so many of them raced and damaged that the frames were replaced regularly.
The guy I bought it off was a little bit unbelievable- but I wasn't going to let it get in the way of a goldie
 

Attachments

  • Goldstar 1.jpg
    Goldstar 1.jpg
    16.3 KB · Views: 1,884
  • Goldstar2.jpg
    Goldstar2.jpg
    11.6 KB · Views: 2,049
Yeah, I got a goldstar, nothing special, nothing like Swans. Just nipped down and picked it up for cheap in England, nothing too exciting, I don't want to raise a fuss.

I can imagine you inspecting your fingernails and flicking lint disinterestedly off your shoulder while typing this up hahahaha. Man its a GOLDSTAR get fucking excited already! I know I am! Matching frame numbers? Who cares! Incorrect gearbox? BAH! As long as you can get it on the road, that's all that matters!
 
oh, and DTT has a goldstar policy that requires you to post full sized pictures as often as humanly possible.
 
ProSimex said:
oh, and DTT has a goldstar policy that requires you to post full sized pictures as often as humanly possible.
LOL!

Davidc, congratulations on your Goldie! She is beautiful and I love the early styles just as much as the DBD's. The frame and motor numbers were not matched with they left the factory, but they should be from the same year.

Please start a build thread. let me know if I can help in any way (parts, sources, information, links etc) I'll be watching your progress and post full sized pictures as often as humanly possible....
 
Well Gentlemen, I wasn't expecting such a response - postive or otherwise!
Please excuse the air of flippancy of the first post- I didn't write it that way.
I was very excited to have won a goldstar- however these are some of the most copied and falsified bikes on the planet!
The use of e-bay, kind of doesn't allow you to make a genuine informed decision when your so far away - i.e. Ireland to England- is a different country involving a ferry ship and 2 days travelling.
It would be like taking a ferry from Chicago across the great lake to the other country and then driving for 5 hours at the other end.
so explanation and geography lesson over-
THE BIKE!!
It's a plunger frame 1949-50 model ZB32 GOldstar 350.
The condition was poor and on strip down things didn't improve- some of the parts were put together to sell as a rolling chassis.
I started this build 3 years ago - so I have a lot of it done

I will be riding it very soon

I will post some photos over the next day or 2 as I have to convert them to the iphone- the camera being fu**ked
I dont' have a lot of the early strip down shots - but a flavour of the conditions are attached

More over the next day or 2

David C- Ireland
 

Attachments

  • Plunger springs- a bin job!.JPG
    Plunger springs- a bin job!.JPG
    268 KB · Views: 447
And the newly over hauled plungers in position.
There is no damping in these plunger units just springs - makes for a more comfortable ride then rigid- but no real benefit for speed or control if it gets out of sorts.
I also will post some other before and after shots in another post- I don't seem to be able to attach more than 1 photo at a time- some one might be able to help me with settings or something
 

Attachments

  • Plunger -after new springs- watch out for missile if you unclamp!.JPG
    Plunger -after new springs- watch out for missile if you unclamp!.JPG
    180.4 KB · Views: 2,077
The triple clamps were in a state, a lot of work and some black powder coat to finish.
The speedo was missing -I could not find an original unit for any sensible money- so I got one from my indian friends- dehli - that is
The ammeter and switch gear were a present from a mate who got an incorect one for his M20 restoration
Not exaclty great quality- like the electrical switch that Swan got- but it is close to the original - they were rubbish too!
 

Attachments

  • Triple clamps - at present.JPG
    Triple clamps - at present.JPG
    182.1 KB · Views: 2,140
I think I have the attaching of photos sorted now!
The pic of the bike as bought shows the tank in primer and the state of the rubber knee grip holders.
The clutch basket was just that, - a basket case! I was unable to restore this and got a used clutch basket and plates from a friend for €40.00 ($52.00).
I got new plates from Hennie DeGroot in Holland for €85.00 ($110.00) - these are not indian and are stamped on the friction pad (photo later)
The primary chain was OK but teh chaincase was badly bent and incapable of sealing- I got new a cork gasket from Hennie ($5.20) and tried to straighten the chain case.
It's the orignal and correct-for-year, chrome type.
There was no luck sealing it. - I might have ot go with a belt drive later if I've any money left.
The oil gauze cover (bottom of sump) was pissin' and even with new gaskets wouldn't seal -so I got an alloy one on e-bay for $40.00- this came with new gaskets, a magnetic sump plug and seal ring for the plug.
Unfoturnately the studs in the enigne were too short and I had to get longer ones- these are threaded studs with a different thread on each end - therefore diffiucult to source extended versions.
Hennie in Holland- sorted me out for $8.00.
What a job ot get the old ones out! - I tried all the old tricks- eventually with some local heat (with the smallest gas welding head) and the 'twin nut' trick - I got them all out.
New alloy plate now in place
 

Attachments

  • State of the tank rubber mounting plates LH.JPG
    State of the tank rubber mounting plates LH.JPG
    100.4 KB · Views: 1,968
  • Internal clutch basket- this was suppoed to be a runner!.JPG
    Internal clutch basket- this was suppoed to be a runner!.JPG
    267 KB · Views: 432
The old oil gauze plate and the new alloy unit
 

Attachments

  • Oil filter cover -pissing like a horse at the ditch.JPG
    Oil filter cover -pissing like a horse at the ditch.JPG
    137.3 KB · Views: 1,735
  • Alloy oil cover c-w sump plug and extended studs.JPG
    Alloy oil cover c-w sump plug and extended studs.JPG
    63.8 KB · Views: 1,697
The restore continued unitl I got a serious leak fromthe gear box output at the sprocket- see photo.
I was dissapointed as it meant a strip down of the gear box- which I was trying to avoid as I don't know a lot about them.
I was assured by the previous owner that the gearbox was good - although standard
I also noted that the sprocket was a 16T unit which was probably the right one for trials trim- this sprocket was in good shape and I thought that it would be OK- even if geared a little low.
However the oil just passed straight out behind the sprocket.
A mate of mine- who knows more than me looked at the unit and suggested that, seen it was a standard box and not an RRT2 or RR of any sort, that I get a gearbox on e-bay -I found one which had been overhualed in the UK for £70stg - this is approx $140 + post
I got it and fitted it to the bike, first having swapped my sprocket- well f**k me! it was worse.

I took it apart again and my mate happened to show up- he reckoned that the old gear box (which came with the bike) -keep up, was OK - but that the sprocket which was fitted to it was an older type which did not use a seal- but had a worm machined into the leading edge which kept 99.9% of the oil in the box.
The e-bay gear box was different and the original gear box (still there?) was newer and needed a rubber seal type sprocket.
I sold te e-bay gear box and the 16T sprocket for my money back, and I replaced the std gear box and got a rubber seal type sprocket- phew! Unfortunately the only sprocket I could get was a 19T one and the gearing may be a bit high.
Anyone notice that when you're working on these bikes - every thing takes 4 times as long as nromal- you have to make every thing from brackets to shims to spacers.
 

Attachments

  • Chain to be replaced!.JPG
    Chain to be replaced!.JPG
    122.7 KB · Views: 1,849
  • Gear box output- in shite!.JPG
    Gear box output- in shite!.JPG
    110.7 KB · Views: 2,007
I continued on with the restore and (if you remember the first photos) the engine condition was OK but dirty and leaking at the cylinder upper.
Someone had tried to seal the rocker cover, the upper push rod cover and the lower tappet cover with red pipe sealant -this stuff is from the 70s and is not silicon based. We know it as 'Red Stag' over here and it was generally used for sealing gunbarrel pipes in central heating systems and steam.
The leaks had left a sticky coating on the whole engine- every fin! and the last owner's sawdust had got everywhere.
I spent a few nights just cleaning off the residue, the old sealant and 40 years of shite.
I became such a saddo using toothbrushes and baby bottle cleaner brushes and detergent trying to clean the alloy engine.
I got on to my new best friend Hennie DeGroot in Holland and got new upper push rod cover, gaskets, timing cover gaskets, tappet cover gaskets and new bolts as far as possible.
The quality of the newly cut Whitworth and Cycle thread bolts, nuts and screws is not good- and I reverted to using some of the old fasteners.
I scoped the clyinder through the spark plug hole and it all looked OK- minor scoring as expected- no sign of pick-up or corrosion.
The cylinder/barrel is held down by using bolts from the crankcase to the barrel and bolts fromt the lower part of the barrel up to the cylinder head- very odd! given the long stroke of this model and the fact that this is a competition unit.
I think this technology was a throwback to WW2- the bolts having to be heavy material and in good shape.
Mine were neither!
Still, I took the decision not to strip the enigne- I could see from the scope and looking from the timing side, that all appeared to be in good enough order.
Fingers crossed for fire up!
 

Attachments

  • Bolts are from the casing-up!.JPG
    Bolts are from the casing-up!.JPG
    231.1 KB · Views: 1,903
  • Broken fin on cylinder and poor bolts.JPG
    Broken fin on cylinder and poor bolts.JPG
    135 KB · Views: 1,874
Cool, if you can get a video of fire up, I think everyone would love to hear the bike roar to life, or (whimper as the case maybe), but hopefully roar!
 
Should be in a position to fire her up this week.
will see if I can upload a vid- does anyone know what setting to use on the iphone video so that it is small enough to upload?
 

Attachments

  • This shot doesn't need a name!!.JPG
    This shot doesn't need a name!!.JPG
    188.1 KB · Views: 1,861
The chain case is not in great shape -but it is original and as per specification - i.e Chromed.
I cleaned it only- beat it straight as far as possible and fitted the new cork gasket- I got a set of new screws to hold it in place - and it all went on to the backing plate OK.

The oil tank was in poor order and had been painted a greeny diahorrea colour- it was also scratched and full of crud.
I left some petrol and old ball bearings in the tank on the work bench and over a few weeks I shook the tank around and emptied it a couple of times.
I managed to clean it out internally - practically completely and was happy to try it on the bike without further work.

The fuel tank was in primer and in good enough condition- it is a great looking tank shape and I was able to preserve most of the primer and noticed some filler- but not a lot and it seemed to be for minor blemishes. I dug it out, but had to replace it with new filler- the tank had been filled and in primer for 20 years (according to PO)

I took the decision to paint the tank and oil tank the same colour - a bright silver- close to BMW silver in a modern 2 pack water based paint- then baked it for a few hours- luckily there is a complete body shop across from my workshop and I know the guy for a long time.
I got him to paint darker gunmetal colour panels on the tank as per a photo I have of a 1950 ZB- originally they had a red pinstripe around the panels and tank- but I wasn't keen on that so I left it plain.
I also got a transfer of a 350 Goldstar logo from the internet- all fitted and lacquered over

A bit of a risk- but I like it - less is more some times!
 

Attachments

  • JUne 2012 bike 015.JPG
    JUne 2012 bike 015.JPG
    151.2 KB · Views: 1,580
  • BSA350ZB 001.JPG
    BSA350ZB 001.JPG
    139.6 KB · Views: 1,444
  • Oil tank after paint job- you didn't want to see it originally.JPG
    Oil tank after paint job- you didn't want to see it originally.JPG
    155.5 KB · Views: 1,672
Jaysus Lads! I should be working- not posting up this stuff- restoration fo old bikes is fuc*in' addictive.
There should be a warning on this site!

As I have explained, a lot of this work was done over the past 2 years or more - so I don't have all of the stages recorded
If I had read swan's post earlier, I would have paid more attention and probably done a better job.

Attached is a shot of one of the clutch plates from Hennie in Holland (you can see the stamp on the friction pad), it's around 4.0mm thick and is good quality- this may be a problem (unbelievably) for some of the early clutch baskets, as there is too much meat on the friction plates. This makes the build-up dimension of the clutch too thick, leaving the clutch push-rod too short and not enough adjustment (poor action).
I found this out after buying a full set, which can't be returned once having been fitted to a basket.
I also show the front brake hub. It's original, chrome plated and internally looks in good order- that is shoes, drum and cam.
The trials unit, (and maybe all pre-1952 bikes) have a SLS with a puny cable and thin shoes- don't know how good this will be on the road.
I drained out the fork oil - this took more work than I thought and needed the use of the air line up the drain hole- this blew the way clear and created some mess.
 

Attachments

  • ZB32 001.JPG
    ZB32 001.JPG
    117.3 KB · Views: 1,471
  • ZB32 004.JPG
    ZB32 004.JPG
    185.1 KB · Views: 1,526
Great find on that Goldstar.

As for iphone video settings, it always records in its native highest resolution. When you upload it the phone should automatically compress the video to a more easily managed sized.
 
I got an over haueld magneto from a bloke in England- he had just finished it and it looked great and was spinning and sparking. ($220.00)
I set it up on the engine and shimmed it in position- I didn't have a dynamo at this point, so I used a correct diameter pipe as a spacer for the dynamo and got a couple of new straps and tightened it all up.
First thing wrong was the height of the magneto drive shaft- it was compressing the shims or bending them (they were brass) and every time I tightened the straps- it was different.
I was at it for 2 nights and eventually one of the new straps broke at the clamp bolt - Again, the quality of some of these reproduction parts is crap. I threw it there for a couple of weeks in disgust.
When I cooled down, I welded the strap at the rivets and pre-formed the correct curve- oh yes, I forgot to mention, by now I had got a pretty poor looking dynamo (for free from a mate with an Ariel 350) but it was exactly right for the year and diameter.
The next set-up of the mag was more successful- I used shims from brass and HDP (I hear some of you saying that HDP will compress). - Well, in another existence, (one that pays the bills), I use HDP shims for large diesel engine alignment and I have never had a problem with it.
What I did have a problem with, was the 'fit' of the magneto gear to the drive shaft- the taper was slightly out on one of them. I took it apart again and lapped the gear to the taper with some valve paste and then replaced it - It was not perfect - but I ran out of patience and after setting up the timing, I used some 'Loctite' and tightened it in the correct position. The advance cable will allow for further adjustment if needed.
In a bid to get the bike on the road and not spend too much more money, I decided not to use the dynamo as a dynamo- just as a spacer..
This was because, although the dynamo worked, it didn't feel great and would need a full over haul,- then I would need to get a voltage regulator, then a Zenor, then I would need to wire the bike as per original, then I would need to get a full size battery box then a cover- it was all going to take too much time and money - so I went for a radical idea of using a total loss system - to explain ...
The dynamo is driven off the magneto, if the dynamo seized (likely) it would strip the gears on the magneto and /or timing.
So I removed the dynamo gear, and it justs sits over the mag as per normal.
 

Attachments

  • JUne 2012 bike 014 - Copy.JPG
    JUne 2012 bike 014 - Copy.JPG
    1.1 MB · Views: 442
Back
Top Bottom