
We noticed you are blocking ads. DO THE TON only works with community supporters. Most are active members of the site with small businesses. Please consider disabling your ad blocking tool and checking out the businesses that help keep our site up and free.
You are using an out of date browser. It may not display this or other websites correctly.
You should upgrade or use an alternative browser.
You should upgrade or use an alternative browser.
Kawasaki - 1966 W1s
- Thread starter w1neophyte
- Start date
w1neophyte
New Member
Quick update: frame and other blackware sent off for media blasting. If all goes well, I should be painting the frame etc. this weekend.
JustinLonghorn
No Purple Hearts, No Blue Ribbons
Fantastic. I am definitely on board.
w1neophyte
New Member
I haven't been entirely idle. The painting has been going slowly... especially on the frame which has all kinds of nooks and crannies. Lay down a few coats, let dry for a week or so, sand, lay down a few more coats, rinse, repeat. Given the cold weather here it's been a bit tough to get a good run at it. However, we are making progress: the frame has a decent coat of paint on it, and the other blackware is coming along as well:
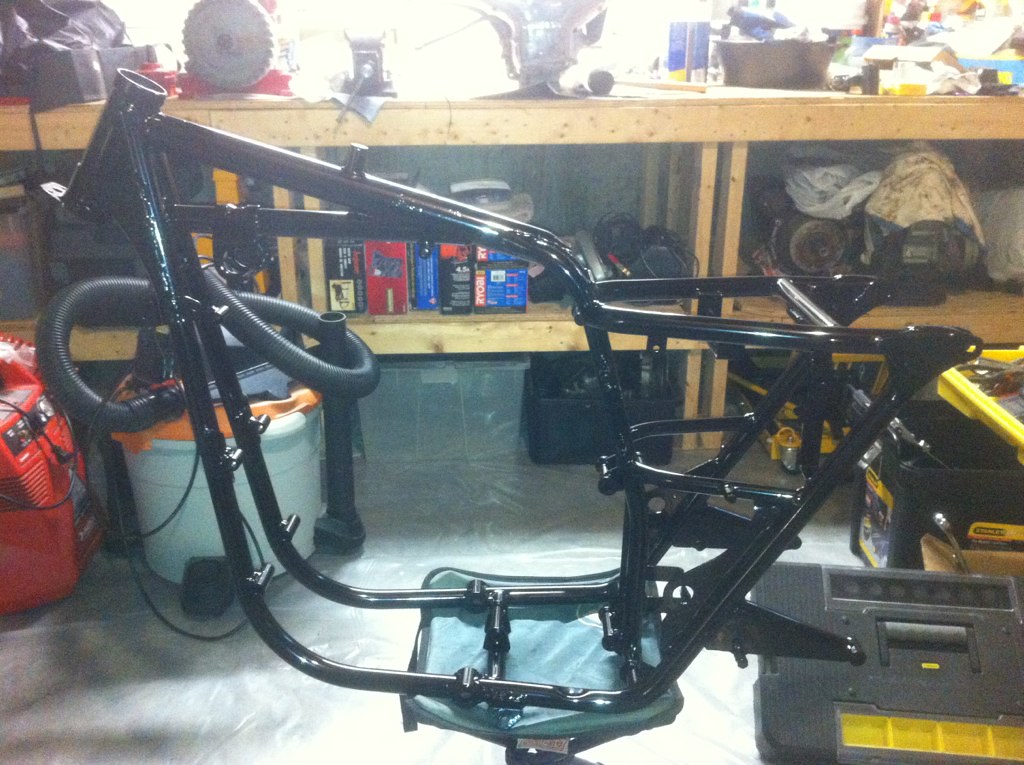
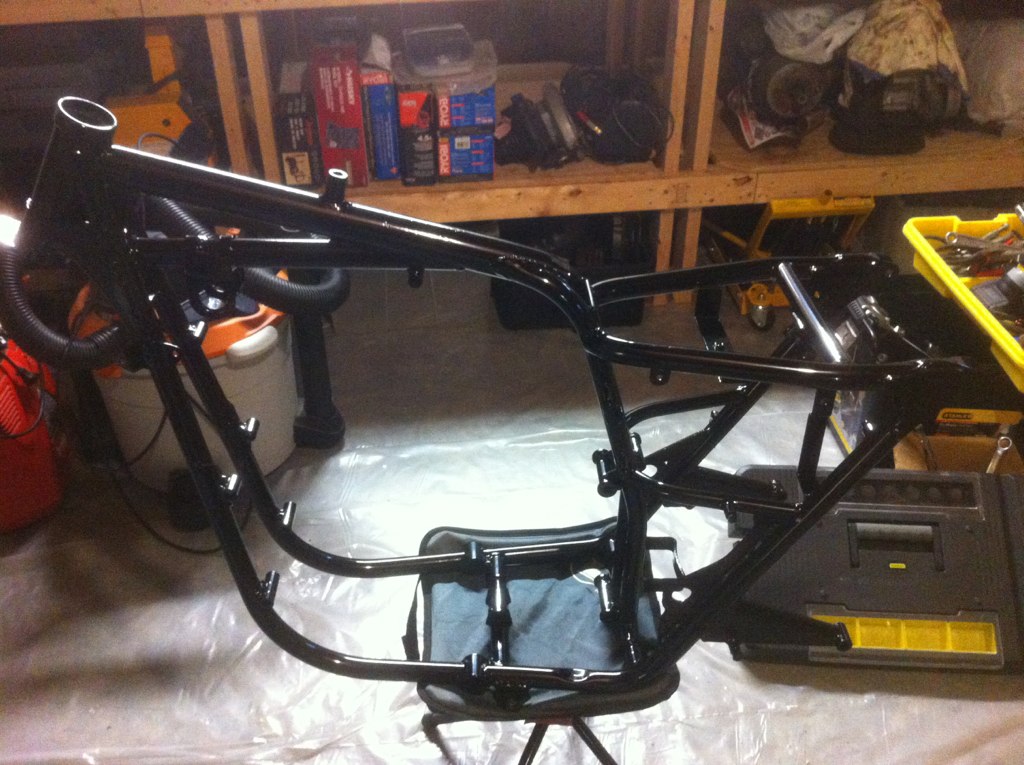
The next things up will be swing arm, center stand, side stand and triple trees. Hopefully they'll all get done over the next week or so... they all have a number of coats of paint, and just need a sand, and a final coat.
I'm contemplating running tapered roller bearings rather than the standard bearings. It seems that the older Ducati steering heads have roughly the same dimensions.
The only thing that might kill that plan is that the races that press into the steering head have different heights, then though the total bearing height is the same (the tapered roller dust covers will all a little extra, but not much). I may reserve the tapered roller bearings for the cafe racer (maybe a bobber) I'm planning to build after this restoration.
The next things up will be swing arm, center stand, side stand and triple trees. Hopefully they'll all get done over the next week or so... they all have a number of coats of paint, and just need a sand, and a final coat.
I'm contemplating running tapered roller bearings rather than the standard bearings. It seems that the older Ducati steering heads have roughly the same dimensions.
| Ducati | W1 | |
| OD | 51.9mm | 52mm |
| ID | 25.8mm | 25.8mm |
| Total Height | 15.5mm | 15.5mm |
The only thing that might kill that plan is that the races that press into the steering head have different heights, then though the total bearing height is the same (the tapered roller dust covers will all a little extra, but not much). I may reserve the tapered roller bearings for the cafe racer (maybe a bobber) I'm planning to build after this restoration.
w1neophyte
New Member
Already a member on the weezer forum. I did go back through the archives and I did have one frame with timken bearings... so I know those will work, though there seem to be concerns about height with the timken. The Ducati bearings seem to be just about perfect though... those measurements were taken with my calipers.
Anyway, I have some more painting to do this weekend, let things cure for a bit (might bake everything for a bit too) then I'll start getting the frame back together. I am probably going to rechrome the original rear shocks and fork sliders, though Hagon has rear shocks that look much the same. I'll check the swingarm bushings, replace fork seals, and probably replace wheel bearings in the process. Various bitsand bolts will also get zinc plated.
Roller first, then onto rebuilding the engine and transmission.
w1neophyte
New Member
I haven't been entirely idle. Between the bad weather and work it's been tough to get the painting done. I decided to use baked enamel rather than powder coating to keep things pretty much as they would have been from the factory. This is basically, sand, paint, wait a week, repeat again and again. The good news is that the parts have a really resilient finish (leave brake fluid on for a day, and no problems), and the finish looks much like a factory finish would. Here are some before and after photos:
Transmission plates as they were attached.

As they appear now:

Brackets for the rear subframe before:

As they appear now:

Engine mount/generator bracket:

Now:

Side stand and brake pedal

Now

Frame, all nicely painted


Center stand

Swing arm

Everything here has had at least 6 "layers" of enamel, each consisting of a few light coats, and has been baked at around 250 for an hour, then 150 for 3-5 hours. The goal wasn't to make it look perfectly glass-like, so some of the imperfections, weld splatter etc. were left on intentionally. The satin finish is the result of baking and polishes out with turtle wax.
I have also started zinc plating/cleaning up the hardware ready to start putting the frame back together (photos will be uploaded at some point, showing the process). The plan is to get the swing arm back in, then the triple trees (still to be painted), to rebuild the forks and rear shocks (including re-chroming), polish front and rear hubs, replace wheel bearings etc. and to get the handlebars chromed so we get to a basic rolling chassis. I'm also in the process of painting the tool box and battery holder (a long process, as we can see). Then I'll start on the engine/transmission and other body work... not sure if I'm going to use enamel there too yet, but I most likely will.
I also got a nice new set of tank mounting rubber

Also a new main harness for the wiring.

Slow progress, but progress nonetheless.
Transmission plates as they were attached.
As they appear now:
Brackets for the rear subframe before:
As they appear now:
Engine mount/generator bracket:
Now:
Side stand and brake pedal
Now
Frame, all nicely painted
Center stand
Swing arm
Everything here has had at least 6 "layers" of enamel, each consisting of a few light coats, and has been baked at around 250 for an hour, then 150 for 3-5 hours. The goal wasn't to make it look perfectly glass-like, so some of the imperfections, weld splatter etc. were left on intentionally. The satin finish is the result of baking and polishes out with turtle wax.
I have also started zinc plating/cleaning up the hardware ready to start putting the frame back together (photos will be uploaded at some point, showing the process). The plan is to get the swing arm back in, then the triple trees (still to be painted), to rebuild the forks and rear shocks (including re-chroming), polish front and rear hubs, replace wheel bearings etc. and to get the handlebars chromed so we get to a basic rolling chassis. I'm also in the process of painting the tool box and battery holder (a long process, as we can see). Then I'll start on the engine/transmission and other body work... not sure if I'm going to use enamel there too yet, but I most likely will.
I also got a nice new set of tank mounting rubber
Also a new main harness for the wiring.
Slow progress, but progress nonetheless.
crazypj
Split personality, I fake being smart
DesmoBro said:badass looks like a BSA motor
Yep, it's based on A10 with improvements
I'm jealous as hell two of them
")
w1neophyte
New Member
Starting to put things back together... I still owe a post abut zinc plating, but I ran into an issue with the swing arm. Once I started putting it back together, I realized it has quite a bit of "play" in it... probably 1/8 to 1/4 of an inch at the end of the swing arm... not terrible, but certainly not good either (don't like that squirmy feeling). Given how much grease was in there, I was surprised... but as with all these things, I should have checked this while taking it apart, and saved the surprise.
The W1 swing arm assembly looks like this:

It's similar to other swing arms, though the bushings pressed into the swing arm don't appear to be bronze, but some other alloy (still researching it). The brake pedal is on the left and a shaft actually passes through the center of the pivot shaft to a lever that actuates a short cable on the right hand side of the bike. The shaft itself is zinc plated and seems to be a pretty sloppy fit into the pivot shaft bushings from the factory (the finish is not machined, so it must be somewhat loose). If you look on the bottom of the bolt, you can see some wear (it's a bit worse/deeper than it appears in the picture).


Of course, there is similar wear on the other side at the top of the shaft. This appears to correspond to the pressure from the chain... not sure if the chain was poorly adjusted, or whether someone just kept thrashing along bumpy roads under hard acceleration ??? Either way, it's still surprising given how much grease was in there.
There is obvious wear on other parts too.

This one is also surprising, because measuring the bushings, they appear to be relatively straight (i.e. they're not obviously worn, though I don't have the correct sizes, at least they're not oval). I have 2 other swing arms and I'm going to pull them to see if perhaps they might be in better condition. Despite the many, many, online shops that have the W1 parts catalog online with prices (grrr) , most parts are made from unobtanium. So, I have a few options:
[list type=decimal]
[*]Line ream the pressed in bushings, and have the pivot shaft bushing hard chromed and ground to be a reasonable fit.
[*]Turn out some new bushings out of delrin... possibly doing away with the pivot shaft bushings altogether.
[*]Use parts from the other swing arms
[/list]
Thoughts? Given that this is a restoration, I'm thinking I should either use parts from another swing arm, or rebuild this one in order to keep it in line with what came from the factory. One way or another, the pivot shaft will get zinc plated and possibly resurfaced.
The W1 swing arm assembly looks like this:
It's similar to other swing arms, though the bushings pressed into the swing arm don't appear to be bronze, but some other alloy (still researching it). The brake pedal is on the left and a shaft actually passes through the center of the pivot shaft to a lever that actuates a short cable on the right hand side of the bike. The shaft itself is zinc plated and seems to be a pretty sloppy fit into the pivot shaft bushings from the factory (the finish is not machined, so it must be somewhat loose). If you look on the bottom of the bolt, you can see some wear (it's a bit worse/deeper than it appears in the picture).
Of course, there is similar wear on the other side at the top of the shaft. This appears to correspond to the pressure from the chain... not sure if the chain was poorly adjusted, or whether someone just kept thrashing along bumpy roads under hard acceleration ??? Either way, it's still surprising given how much grease was in there.
There is obvious wear on other parts too.
This one is also surprising, because measuring the bushings, they appear to be relatively straight (i.e. they're not obviously worn, though I don't have the correct sizes, at least they're not oval). I have 2 other swing arms and I'm going to pull them to see if perhaps they might be in better condition. Despite the many, many, online shops that have the W1 parts catalog online with prices (grrr
) , most parts are made from unobtanium. So, I have a few options:[list type=decimal]
[*]Line ream the pressed in bushings, and have the pivot shaft bushing hard chromed and ground to be a reasonable fit.
[*]Turn out some new bushings out of delrin... possibly doing away with the pivot shaft bushings altogether.
[*]Use parts from the other swing arms
[/list]
Thoughts? Given that this is a restoration, I'm thinking I should either use parts from another swing arm, or rebuild this one in order to keep it in line with what came from the factory. One way or another, the pivot shaft will get zinc plated and possibly resurfaced.
w1neophyte
New Member
I'm probably going to use an original set of steering head races for the restoration project (I have one set that isn't too bad), but I am contemplating putting in tapered roller bearings. I ordered a kit from All Balls (http://www.allballsracing.com/steering/22-1062.html) for the earlier Ducati's, and it looks like a very good match:


The typical heating/cooling treatment should get these into place. The All Balls kits costs around $55 so this seems like a very reasonable replacement to the originals.
BTW. I've been posting links to fairly high resolution images and I was wondering is this is an issue for some folk? From now on I'll probably scale images so they're 640 pixels wide, which should cut down on the file size a lot.
w1neophyte
New Member
So what do people think: for a restoration, is it better to stick with the original bearings/bushings, or shall I move to tapered rollers, and possibly delrin bushes? Stay original, or make it "better"?
650hardtail
Been Around the Block
go for the improvements ( never be seen ) cause the improvements could save your ass
w1neophyte
New Member
Yes, I guess it's what the A10 could have been. I am looking forward to building a cafe out of one of these... They should look good, and the motors seem well suited to performance mods.
I should have another update within the next week.
I should have another update within the next week.
w1neophyte
New Member
So, the zinc plating on the parts associated with the steering head was completed. The parts started out looking like this:

After plating, they look like this:

I wasn't going for a perfect finish, so I didn't spend a lot of time polishing the parts before plating. That said, they all have a decent layer of zinc, and look far better than before, though you can see a little anode shadowing on the larger parts.
The process was pretty simple. First I did a rough wire brush/wheel, and then dipped the steel parts into phosphoric acid (Etch and Prep from Home Depot, or Naval Jelly).

You could also use Muriatic acid, but it's nasty stuff and has a bad habit of rusting everything within 6 feet of an open bottle. I guess you could also use other rust killers like Evaporust, though phosphoric acid leaves a layer or iron phosphate behind which is a good thing... helps to prevent corrosion and zinc sticks to it well. Even though it's fairly dilute, you do not want to leave soft iron (bolts, cast iron) in the solution for too long as it will slowly but surely convert the entire piece into iron phosphate... I left a 10mm bolt in there for a week by accident, and it was uniformly shrunk down to about 3mm.
Once the rust was removed, the parts were washed in baking soda/water, then washed in distilled water and left in it until plating. when ready for plating, the parts were washed in acetone, dried, hung from copper wire, and then placed into the electrolyte solution.

I'm using the Epsom Salts and vinegar electrolyte, along with glucose and Sweet and Lo for a brightener. I'll probably experiment with zinc chlorate and zinc sulphate in the future, but again, I wasn't going for the super bright look, just something roughly like the original bright zinc. I had the anode and cathode connected to my lab power supply... it has variable and fixed voltage supplies, and can supply up to 1A.


I had to experiment a bit to get the amperage down to a low enough level: on small parts this was down to about 0.5V and around 100mA. Over the years I've found that you're better going for a lower amperage, even if it takes more time. You end up with a more uniform layer of zinc, and it tends to be brighter. After a period of time, the parts will look dull and grey:

At this point it's usually a good idea to take them out and "card" them... give them a rough polish with a stainless brush, scotchbrite, and then maybe steel wool... the more careful you are, the better the parts will come out in terms of smoothness and brightness. I did a rough carding... no steel wool, because I was just looking for a good layer of zinc, not perfection. After carding, the parts go back in, and you rinse and repeat until you have enough zinc on the parts. After a final carding, here is how some of the bits came out:


Once the bits were done, I started looking at putting the tapered roller bearings in. I started cleaning out the mating surfaces for the bearings, and I found this:

There was a small lip in there where it seems someone did a poor job of replacing the bearings in the past. There was other scouring in there too... I cleaned it up, put the race into the freezer, and then pressed them into the head using a home-made puller/press.


Again, these are tapered roller bearings for the earlier Ducati's and they seem to fit fine, though the fit was a bit looser than I'd like... I'm pretty sure that's caused by the bodged job that someone did before. I'm tempted to drift them back out and put a drop of loctite on there just to be safe (thoughts?).
I hope to get the steering stem etc. dry assembled tomorrow to verify the fit, but right now it looks good. I hope to turn out some new bits for the swingarm next week so I can get that back together.
After plating, they look like this:
I wasn't going for a perfect finish, so I didn't spend a lot of time polishing the parts before plating. That said, they all have a decent layer of zinc, and look far better than before, though you can see a little anode shadowing on the larger parts.
The process was pretty simple. First I did a rough wire brush/wheel, and then dipped the steel parts into phosphoric acid (Etch and Prep from Home Depot, or Naval Jelly).
You could also use Muriatic acid, but it's nasty stuff and has a bad habit of rusting everything within 6 feet of an open bottle. I guess you could also use other rust killers like Evaporust, though phosphoric acid leaves a layer or iron phosphate behind which is a good thing... helps to prevent corrosion and zinc sticks to it well. Even though it's fairly dilute, you do not want to leave soft iron (bolts, cast iron) in the solution for too long as it will slowly but surely convert the entire piece into iron phosphate... I left a 10mm bolt in there for a week by accident, and it was uniformly shrunk down to about 3mm.
Once the rust was removed, the parts were washed in baking soda/water, then washed in distilled water and left in it until plating. when ready for plating, the parts were washed in acetone, dried, hung from copper wire, and then placed into the electrolyte solution.
I'm using the Epsom Salts and vinegar electrolyte, along with glucose and Sweet and Lo for a brightener. I'll probably experiment with zinc chlorate and zinc sulphate in the future, but again, I wasn't going for the super bright look, just something roughly like the original bright zinc. I had the anode and cathode connected to my lab power supply... it has variable and fixed voltage supplies, and can supply up to 1A.
I had to experiment a bit to get the amperage down to a low enough level: on small parts this was down to about 0.5V and around 100mA. Over the years I've found that you're better going for a lower amperage, even if it takes more time. You end up with a more uniform layer of zinc, and it tends to be brighter. After a period of time, the parts will look dull and grey:
At this point it's usually a good idea to take them out and "card" them... give them a rough polish with a stainless brush, scotchbrite, and then maybe steel wool... the more careful you are, the better the parts will come out in terms of smoothness and brightness. I did a rough carding... no steel wool, because I was just looking for a good layer of zinc, not perfection. After carding, the parts go back in, and you rinse and repeat until you have enough zinc on the parts. After a final carding, here is how some of the bits came out:
Once the bits were done, I started looking at putting the tapered roller bearings in. I started cleaning out the mating surfaces for the bearings, and I found this:
There was a small lip in there where it seems someone did a poor job of replacing the bearings in the past. There was other scouring in there too... I cleaned it up, put the race into the freezer, and then pressed them into the head using a home-made puller/press.
Again, these are tapered roller bearings for the earlier Ducati's and they seem to fit fine, though the fit was a bit looser than I'd like... I'm pretty sure that's caused by the bodged job that someone did before. I'm tempted to drift them back out and put a drop of loctite on there just to be safe (thoughts?).
I hope to get the steering stem etc. dry assembled tomorrow to verify the fit, but right now it looks good. I hope to turn out some new bits for the swingarm next week so I can get that back together.
w1neophyte
New Member
It took a while to find somewhere locally that had loctite 603 or 609... but the local Grainger did. I needed it because of the damage done earlier to the steering head... I figure it's better to be safe than sorry with these things. After getting my hand on some loctite I inserted the tapered roller bearings.

Also onto the stem, after packing the bearings with grease.

Added the nicely plated nut and dust cap (in addition to the All Balls seals).


Added the top triple tree

Then I finally added the steering damper, with all the nicely plated bits in it.


It looks like some adjustment will be needed to get all the friction plans to line up well, but I'll leave that until final assembly. For now, this is good enough.
I started to work on machining some delrin pivot shaft sleeves for the swing arm. After thinking about it, I decided to line ream the existing bushings to make sure they're perfectly round and aligned, and to then turn out some sleeves for the swing arm. They'll be a slight interference fit onto the pivot shaft.
Also onto the stem, after packing the bearings with grease.
Added the nicely plated nut and dust cap (in addition to the All Balls seals).
Added the top triple tree
Then I finally added the steering damper, with all the nicely plated bits in it.
It looks like some adjustment will be needed to get all the friction plans to line up well, but I'll leave that until final assembly. For now, this is good enough.
I started to work on machining some delrin pivot shaft sleeves for the swing arm. After thinking about it, I decided to line ream the existing bushings to make sure they're perfectly round and aligned, and to then turn out some sleeves for the swing arm. They'll be a slight interference fit onto the pivot shaft.
w1neophyte
New Member
Been a while since my last post... seems things always take longer than you'd like and there just is never enough time in a day. I have been busy on the bikes though. I think I mentioned that the swing arm bushings were pretty worn, and that the original design was suspect at best. I had originally planned to turn out some Delrin bushings for the swing arm, but ended up turning out some new steel replacement parts instead.... so, the swing arm has been line-reamed, the pivot polished, and new bushings turned out for it.
Before

After... and now there is no slop there at all.

Turning these out on my crappy little lathe took a while... delrin would have been a lot easier. I need to figure out whether to paint or zinc plate the ends of the pivot, but once it's finished, the swing arm will be done.
Before
After... and now there is no slop there at all.
Turning these out on my crappy little lathe took a while... delrin would have been a lot easier. I need to figure out whether to paint or zinc plate the ends of the pivot, but once it's finished, the swing arm will be done.


