1968 CB 350 Restoration / Upgrade

I may give it another round with the vinegar and dry wall screws. I still have the vinegar from last week. It did remove a lot of the rust. Just not enough. I's rather not apply one of the tank lines, as there's really no going back.

Frame is being repaired at the weld shop. Tires fork seals and bearings are also being replaced.
 
Just got the frame back from the shop. The hole in the frame is fixed, and the peg bar mount is now straight. Looks like I'm going to need a new peg bar.
Anyone have a '68 350 peg bar they want to get rid of?
 
jakeZ70 said:
Just got the frame back from the shop. The hole in the frame is fixed, and the peg bar mount is now straight. Looks like I'm going to need a new peg bar.
Anyone have a '68 350 peg bar they want to get rid of?

This is the part that goes under the frame that the rider pegs attach to, right? I might have a couple of those - let me check when I get home. Not sure what year it's off of, but it would be off a 350.
 
Thanks. Yes. It's part 17 in the diagram. I'm not sure if these are the same for all years of the 350.

http://www.bikebandit.com/houseofmotorcycles/1968-honda-cb350/o/m9109?WT.mc_id=2678499&WT.srch=1&gclid=CO_Z05zChLkCFQ6f4AoduD4AeA#sch392781
 
So I tried a second round of apple cider vinegar to try and remove the remaining rust. The tank was looking good, but not good enough, so the plan was to do a round of electrolysis. I filled up the tank and discovered a couple of pin holes on the underside of the tank. I'm thinking it's time to bring it to a radiator repair shop to get it repaired an lined propperly. I've done quite a bit of looking around for a new tank, but they are really pricey, or complete junk.

I just need to get the badges off. Any pointers? They look like they snap on and off. Is that the case? I've seen other people mention a trick using dental floss?
 
A little more progress. The frame is cleaned up and painted. I spent a couple of weeks looking for a replacement tank. Everything out there seems to be in about the same condition. I dropped it off at the radiator shop yesterday to be done professionally. I know I'm going to get gouged on it, but it'll be done right.
Other than that just getting the engine ready to drop back in the frame. Lots of polishing and cleanup ahead.
 

Attachments

  • cb_350_polish.jpg
    cb_350_polish.jpg
    394.3 KB · Views: 275
Wow......purdy..................I likey shiny motorcycle parts.
 
Small update. The front and rear ends are back together. Most everything else is ordered, painted, polished, or de-rusted, and waiting to be dropped onto the frame. I'm still struggling with the tank. I picked up some silver solder, and I'm going to have a go at fixing the two pinholes that I've found. After that, I think I'm going to go with the Caswell tank liner. http://www.caswellplating.com/restoration-aids/epoxy-gas-tank-sealer.html
It looks to be the best option for a tank that has had substantial rust on the inside. That is unless I find a decent replacement tank on Ebay in the meantime. They seem to be pretty few and far between.
 

Attachments

  • 1968_CB_350_frame.jpg
    1968_CB_350_frame.jpg
    638.3 KB · Views: 270
Re: 1968 CB 350 Restoration / Upgrade - It's Rolling

A little more progress.
I ended up painting the fenders. The chrome was too far gone. I tried going for that Honda gray/silver paint that they used on their early fenders. I think it's close. Maybe a little on the light side.
I'll be dropping the wiring harness in next followed by the engine, bars and controls.
 

Attachments

  • cb350_roller.jpg
    cb350_roller.jpg
    566.3 KB · Views: 304
I'm getting ready to mount the engine, and I'm having trouble figuring out where these spacers go. Since the one with the red arrow is called "collar, engine side" I assume it goes on the inside of the frame. The problem is I have two of these, but I only see one in the diagram. Do I need two, and do they both go inside the frame, or do I have an extra?. This isn't something that I want to figure out while holding the engine in place. Unfortunately the engine was out of the bike when I got it, and all of the screws, nuts and bolts were in a coffee can, so I'm figuring it out as I go.
 

Attachments

  • 350EngineMounts.jpg
    350EngineMounts.jpg
    115.5 KB · Views: 306
Yes, only one collar is used and its put between the frame and the engine. I can get a picture if you want, let me know. Don't throw out the other collar it may be used elsewhere.
 
No need for the picture, but thanks for the info!

I've done a bunch of searching on DTT. It seems like the best way to install the engine is by laying it on its right side, and positioning the frame on to it, then bolting it in.
When I installed my 175 engine, I just lifted it into place, but I'm thinking the 350 engine will be a little too unwieldy to do that.
 
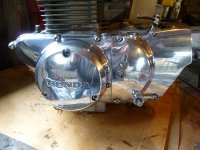
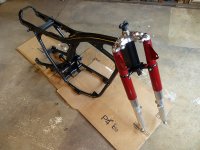
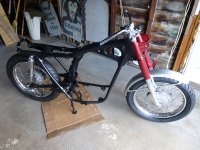
I'm finally getting back to this build. The engine is in, the bars are wired and bolted on. The wiring harness is just about finished. I'll post pics of all that soon.

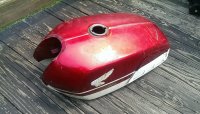
Now I'm back with more tank questions. I purchased another one last year. The good news is the inside is relatively rust free. There are a few spots that I can see on the bottom of the inside where the welds are, and a little spotty rust in the center below the cap, but that's about it. I'm assuming it would be safe to leave it as is, and not use a lining kit.

My main problem is the front. What I thought to be a scratch in the paint turned out to be a bend in the metal that runs across the top seam. I filled it up with some two cycle fuel to keep rust away after using Metal Rescue (which actually worked pretty well believe it or not), and when I turned it upside down, I discovered there is a tiny leak. Probably going to have to use compressed air and soap to find it.

So the question is, do I us a MAP gas torch to heat this up, and try to straighten it out, or is that going to open a whole other can of worms? Will the top seam separate, and possibly the edge weld on the front as well? I'm thinking that's where the small leak may be coming from, or possibly the top seam. Should I just take this to a welding shop and have them flatten it out and seal the leak?
 

Attachments

  • tank2.jpg
    tank2.jpg
    446.6 KB · Views: 285
  • tank1.jpg
    tank1.jpg
    426 KB · Views: 291
It has been ages since I last posted anything on this project. I got caught up in a big push to get everything put back together, and neglected to post anything that was up to date. Today was the first really warm day of spring, so I started thinking about it again. It was a harsh winter here in New England. This is a pic from last fall. It's running, but there a few last bugs to sort out. The battery isn't charging unfortunately. Everything is working properly after I charge the batter on a trickle charger, but it slowly drains when running on the road. I thought it was the the stator, so I replaced it, but that didn't seem to do the trick. That's first on the list to figure out. The front end is also bouncing a bit when I hit 50-60 mph. I'm hoping that's a simple balance, or truing fix. We'll see. Other than that I need to clean up the side covers, and add the tank badges, and it's done. For a while anyway.
 

Attachments

  • 1968 CB350.jpg
    1968 CB350.jpg
    1.6 MB · Views: 297
Thanks. I'm happy with how it turned out considering what I started with. I know this charging issue is going to be a pain to figure out though. I found this write up. Hopefully it will help.
http://www.dotheton.com/forum/index.php?topic=48646.0
 
Back
Top Bottom