Follow along with the video below to see how to install our site as a web app on your home screen.
Note: This feature currently requires accessing the site using the built-in Safari browser.
We noticed you are blocking ads. DO THE TON only works with community supporters. Most are active members of the site with small businesses. Please consider disabling your ad blocking tool and checking out the businesses that help keep our site up and free.
Pretty busy on the work front lately so a bit slow with the updates these last couple weeks.
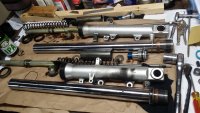
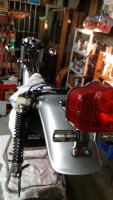
I've been making progress when time allows. Broke down the R6 forks and serviced & polished to give them the look I'm after.
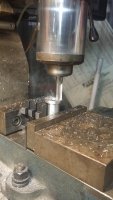
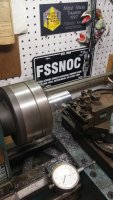
Also had a chance to mill down the stock R6 front axle from 22 mm to 20 mm
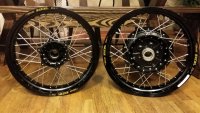
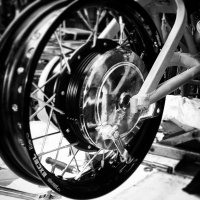
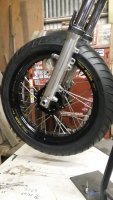
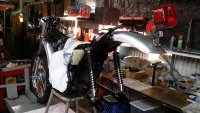
I was also pretty exited about the wheels that came back from Buchanans. These were both 17x3.5 Excels laced to virago hubs. I chose this set up as it provided the best performance tire options.
I did some initial fitting of the rear wheel this last week so I could take measurements for rear axle modification. I'm pretty stoked with the way these wheels are looking.
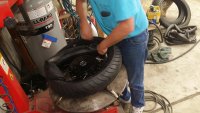
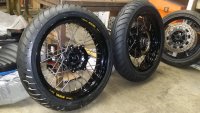
I plan to make up a front center wheel bearing spacer this weekend so I can install the bearings and mock up the front wheel for final wheel spacer measurements. In the meantime I had some Avon AM26 rubber mounted up thanks to the help of my friend Robert. I didnt trust myself to mount the tires w/o scratching up the new rims so i hand over my man-card and let Robert do the deed. Went with a 120/70 and 140/70 to get started but I've got lots of room to go bigger in the back yard.
Were those predrilled hoops? I was under the impression that they'd be drilled at the wrong angle to spoke to a big rear hub like that. I've been wanting to go with a 3.5 and 4.25 set for my hubs but I didn't think it'd work.
Well its been slow going these last couple "whateva's" but I'm back in the saddle and ready to ride this bull 8 seconds to the finish line.
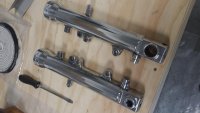
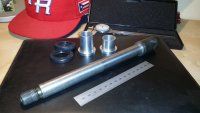
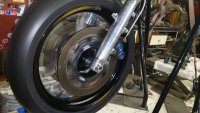
Last update I was able to get the custom wheels mounted on the skewers so I could measure up spacing for custom wheel spacers, caliper spacers and modify the existing axles.
With the help of EricB and his masterful machining skillz we were able to get the front end dialed in with all required custom spacers to center the front wheel and brake calipers. Bridgeports n' German lathes oh my!
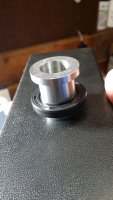
After a bit of trial and error I was able to come up with some spacers to match up with off the shelf seals.
The spacer set fit the seals and skewer like a glove...
Together with some custom caliper spacing to bring the calipers in board 3mm and mate with the rotors we now have a perfectly functioning front wheel assembly. That only took 3-4 weeks.....Woohoo!!
In the meantime, while working on my own bike, Ive got to watch a fellow motorhead with his own build at Robert's shop. This is Roger's TS250 enduro restoration looking sa'weet! More on this build later
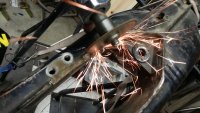
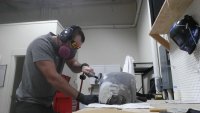
With a lot of the little bits of engineering completed I can move on to painting components. Before any paint, the parts need to be cleaned up so I ground down the main frame tabs that were no longer needed.
Then toss it in the blast cab to scrub off that weathered 33 yr old paint to reveal some ancient Japanese steel.
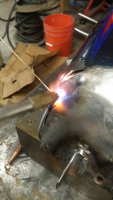
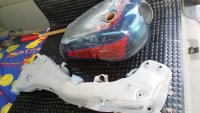
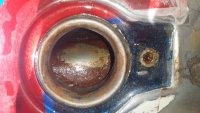
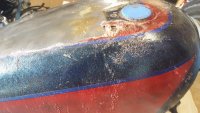
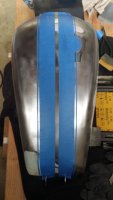
In the background (of the 2nd pic) you can see that we've done a bit of work on the tank as well. Story behind that is that we had completed the initial mods but we're faced with an unexpected split in the factory sheet and had to take a few steps back. Metal was too thin to weld so Robert dug deep into his midevil tricks and broke out the brass brazing tools. Street cred fo'sho!
Heh, yeah that tight bend at the back of tank is getting a couple lifts of bondo love plus some Caswell insurance inside. Guarantee it'll be good to go when we're done with it.
I appreciate the kind words from everyone. No seriously!
It's been a fun project so far that I've learned a few things along the way. When things get a bit slow with project details you guys bring the extra motivation with the feedback. I dig it!.....and I dig that others dig it.
The last few weeks have been fun making progress on the bike and the light at the end of the tunnel is beginning to emerge. Both Robert and Eric (friends of mine) have played a big roll in supporting the effort and it's been awesome to be able to share this experience with them.
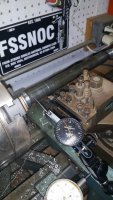
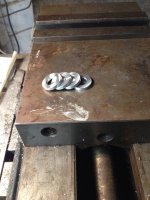
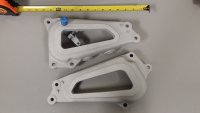
A few more minor pieces needed to be machined up so I called on Eric who turned out these simple caliper spacers to replace the stacked washers I used on the initial fitment of the front wheel and brakes.
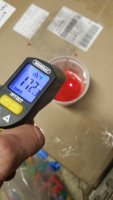
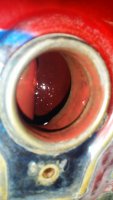
With most of the fabrication in the tailwind it was time to get moving on the prep & paint for all the parts. I started with the tank and spent the better part of a weekend cleaning the inside surface of any rust. I started with a handful of tech screws and bolts then shook it til my arms fell off. Then filled it with about 3 gal of vinegar and let it chemically etch the surface for about 24hrs. After that the surface rust just wiped away with little effort revealing an almost brand new surface.
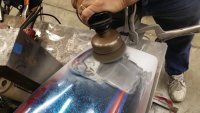
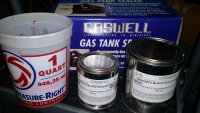
With the fresh metal surface mechanically and chemically conditioned it was time for a protective epoxy coating to double down on fuel barriers. A little 'dragons blood' from Caswell is just what the doctor ordered.
Had about 10 mins of working time to cap off and roll the tank around to get the coating distributed evenly. Went off without a hitch and I was very pleased with the end result. As with any 2 part epoxy there's always an exothermic reaction. Within 30 mins the excess that I poured out of the tank was warm enough to burn your biscuits.
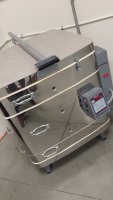
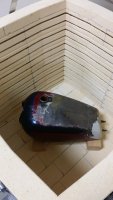
The Caswell directions give you the option of 36 hr cure at ambient or for best results to bake at 140F for 4hrs. So into the kiln she went. The resulting coating is tough as nails!
With the tank inside completed it was time to get the exterior stripped for primer and body work. I initially began with some paint stripper but it just made a mess and wasn't very effective on the base primer which I'd guess was some kind of 2k epoxy primer (tough stuff). In the end I resorted to carefully attacking the paint with various wire brush attachments which made quick work of it without damaging the metal.
Now with the paint out of the way I could start playing around with layout ideas for the tank.
Since the project is already WAY over budget (shhh, don't tell my wife ??? ) I've decided to paint the structural components instead of powder coating. Doing so will allow me to easily service and/or mod parts if I decide to do so later. Ever tried that with powder coated parts?
For the main frame I used a 2k epoxy primer from Spraymax to provide the best foundation for professional grade enamel paint.
Few more pics of misc parts to prep just for dexterity.
This site uses cookies to help personalise content, tailor your experience and to keep you logged in if you register.
By continuing to use this site, you are consenting to our use of cookies.