Unfinished Business

Been busy since the frame came back, working out where various tabs and brackets need to go, where the pegs should be mounted, making lockstops etc. All the frame welding is done now, hopefully I haven't overlooked anything, and now the dry build can continue. Engine and gearbox went back in, and I fitted my old racing exhaust, though it needs some new springs to hold it all together. I wasn't happy with the rear caliper bracket, so a new one will need to be made, while the drive side hub of the rear wheel still needs to be narrowed a few more mm to get the chain alignment spot on.

While I'm waiting for that machining to be done, I've got plenty to keep me busy.. clean up all the welds, make a seat base and make a mounting plate for the rear brake master cylinder and lever. Also need to repaint the oil tank, it was all going so well, until I sprayed on just one more coat.. yep looked great. Until I returned a few hours later to find the paint had sagged, shouldn't have added that last coat :-[
 

Attachments

  • ELB12740 001.JPG
    ELB12740 001.JPG
    232.6 KB · Views: 372
  • ELB12740 002.JPG
    ELB12740 002.JPG
    207.6 KB · Views: 372
  • ELB12740 008.JPG
    ELB12740 008.JPG
    230.9 KB · Views: 392
  • 002.JPG
    002.JPG
    193.5 KB · Views: 367
There aren't that many aftermarket parts which have the quality to justify their price, Pingel being one of the exceptions. I've been saving this fuel tap for this project..
 

Attachments

  • 007.JPG
    007.JPG
    199.6 KB · Views: 365
  • 009.JPG
    009.JPG
    187.5 KB · Views: 361
With the frame welding finished, the dry build can continue back home. Made a bracket to mount the rectifier and bottle for the air shifter, they are fitted a bit higher than I'd prefer, but need to leave room for the oil filter which will be mounted off the front motor mounts.
 

Attachments

  • 004.JPG
    004.JPG
    245.1 KB · Views: 374
Had one of those days when nothing seems to go right, spent hours making a bracket only to drill a mounting hole in the wrong place, meant it was only good for the scrap bin. Oh well, got it done in the end.

Made a simple card template of the seat base, and had Geoff the welder make it for me in mild steel plate for £20. Wasn't worth me doing it myself, he can do in ten minutes what would take me an hour or more. I was looking online for some suitable seat foam, which all seemed expensive for a small sheet of foam. Luckily I mentioned it to a mate, who happened to have some I could have. Think there's enough lol..

Next I started on the rear brake mount. Had a piece of 10mm alloy plate, which was a couple of mm too short, but didn't want to buy a bigger piece, so it would have to do. Having drilled the two mounting holes, it now needs to be shaped and drilled to take the master cylinder. Then the peg / lever need to be bushed so it will pivot when the peg is bolted to the alloy plate.

Finally while I wait for the yokes to be finished, at least the risers are done. They need to be polished, as will the yokes, but that can wait till the dry build is complete.
 

Attachments

  • 007.JPG
    007.JPG
    172.7 KB · Views: 368
  • 010.JPG
    010.JPG
    201.9 KB · Views: 356
  • 001.JPG
    001.JPG
    220.3 KB · Views: 616
  • 001.JPG
    001.JPG
    208.6 KB · Views: 360
  • 002.JPG
    002.JPG
    169.8 KB · Views: 372
With the frame paint dry, I wrapped it in yesterdays newspaper to protect it from being scratched when the engine went back in. I wasn't looking forward to lifting the engine into the frame, its 85kg and I have a sprained wrist that's still on the mend. It was gonna hurt :'(
 

Attachments

  • 007.JPG
    007.JPG
    235.7 KB · Views: 357
I wasn't wrong, it did bloody hurt, but the engine went in ok and the frame paint remained unscathed.

Next job was to fit the oil tank, but not before my orange peel paintwork has been improved with plenty of elbow grease and cutting polish. Got half of it done before teatime. I'll finish it tomorrow.
 

Attachments

  • 010.JPG
    010.JPG
    176.7 KB · Views: 351
  • 008.JPG
    008.JPG
    200.9 KB · Views: 353
Once the oil tank was polished back on the bike, the gearbox could go back in too, hopefully for the last time. After that there's been a few smaller jobs to be getting on with.

Finish the rear brake mount and make a rose jointed pushrod (just a stainless bolt with its end machined down, though it still needs a bush making so the lever pivots).

Spray the seat unit with undercoat and order the Ducati Red paint to match the tank.

Make a Mark 2 rear caliper bracket and torque arm.

Make a start on polishing some of the alloy brackets, risers etc

Bought some drag bars.. Renthal alloy in satin black, they were a cancelled order at my local bike shop so couldn't say no when they're half price.

Ordered a throttle online, came from Bangkok of all places, it arrived 4 days later.
 

Attachments

  • 003.JPG
    003.JPG
    193.2 KB · Views: 363
  • 010.JPG
    010.JPG
    167.7 KB · Views: 369
  • 009.JPG
    009.JPG
    187.6 KB · Views: 364
  • 014.JPG
    014.JPG
    142.7 KB · Views: 563
I was quite pleased with the paint and lacquer on the seat unit, turned out better than I'd hoped, using just rattle cans. It looked even better after it had been polished, though not for long :(

I was rushing to get it done and back on the bike, five minutes later it all went wrong.. :mad:

After I calmed down, nothing for it but to start again, beginning with many coats of filler primer..
 

Attachments

  • 003.JPG
    003.JPG
    174.1 KB · Views: 817
  • 001.JPG
    001.JPG
    161.9 KB · Views: 754
  • 007.JPG
    007.JPG
    158.6 KB · Views: 370
At least the primary went on ok, though I need away of locking up the pulleys so the retaining nuts can be torqued up correctly. You can buy a tool to do this, which I don't have, so will probably have to make one.
 

Attachments

  • 004.JPG
    004.JPG
    254.5 KB · Views: 363
Got the yokes back for a test fitting. The old HD steering stem we used must be the most modified in history. Its been hollowed out to lighten it, had a billet collar on its base so it fits the bottom yoke and has a completely different way of adjustment. All that and it still isn't quite right. That's the problem with having the bike in one garage and the lathe in another across town. Not a big problem, just needs a small spacer making and it'll fine.

The risers look too tall on the bike, and they probably are. That's because they were made before I could sit on the bike and check the riding position. Rather than wait, we made the risers an inch or two longer, knowing that it will be an easy job to mill them down to whatever length will be ideal
 

Attachments

  • 008.JPG
    008.JPG
    209.8 KB · Views: 366
Another week over, where does the time go?

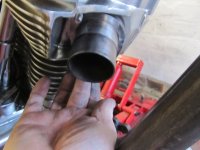
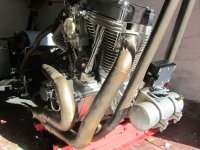
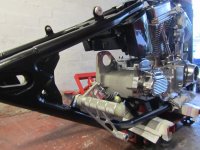
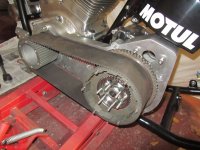
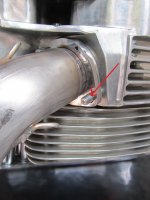
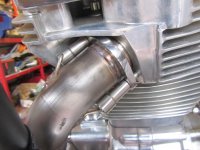
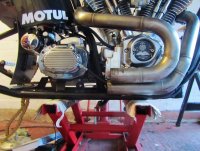
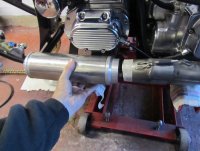
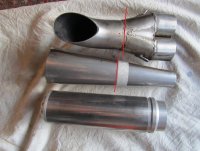
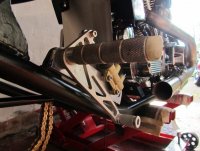
The exhaust system has been giving me a few problems. Basically it doesn't fit the engine. It should, as it came off a similar big inch Evo engine, but it doesn't. Mainly because the heads of this aftermarket engine seem to have deeper fins, which means the springs I use to hold the downpipes together wont fit.

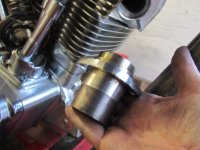
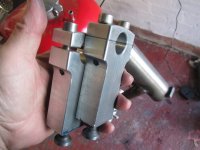
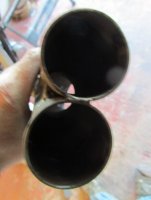
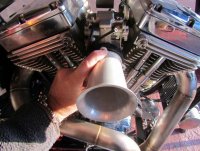
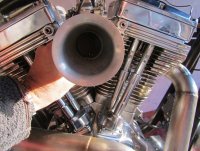
Instead I had the short exhaust 'headers' welded onto the downpipes, no need for springs anymore. But still they wouldn't fit. These headers are 2 inch diameter instead of the OE 1 3/4 inch, which means I had to machine the collets a little, this leaves less room for the nuts which fasten the collets to the head. Don't remember it being such a problem on the old bike, but on this one there's not enough room around the exhaust studs to tighten the nuts holding it all together.

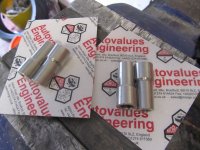
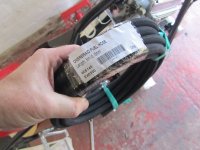
The solution is to use a special narrow type of nut, I've seen them before, but I didn't know what they are called (since found out they are called sleeve nuts). They are long hex nuts, with a thread at one end and a socket head at the other, so they can be tightened with an allen key. Closest I've found to what's needed are special head nuts from Triumph T140, they are 5/16 inch thread, but don't know if UNC or UNF, be perfect if they were UNF... later found out they are, so ordered them from Morgo the Triumph specialists.

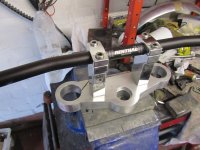
The bars are 29 inches wide, about standard these days, but they looked like beech bars on the bike, so I chopped an inch off each end. I would've preferred to narrow them even more, but that can cause problems finding space for brake banjo bolts and clutch cables.

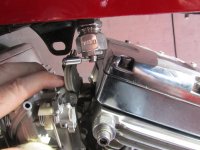
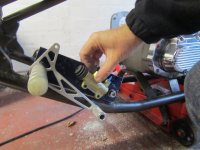
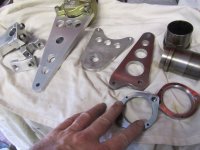
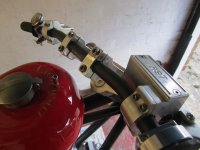
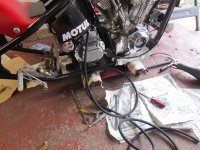
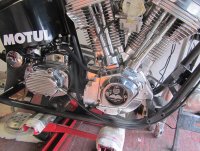
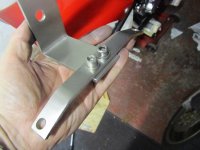
Fitted the air shifter ram and the oil filter mount this week, the latter needed machining to clear the frame tubes, pity as it was chromed, but needs must.

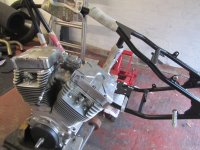
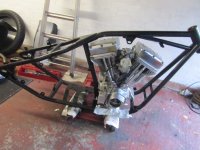
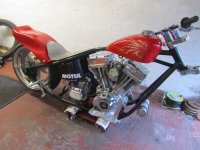
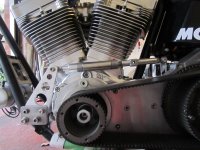
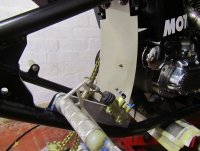
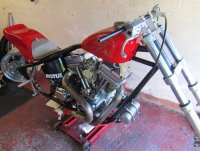
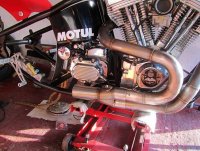
This is what the bike looks like today, going ok, except no front wheel or forks. The forks are still attached to another bike which is getting a new front end, so I'm just waiting for that to happen before I can get my hands on the forks I need. The rear wheel has had its hubs narrowed to align the front and rear sprockets. The front wheel is still a week or two away from being built.

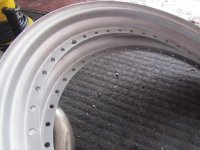
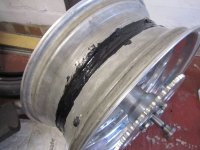
I've done my bit by sorting out the rims which were cut out of an old Astralite wheel. They were originally anodised black, then sometime in the last couple of decades they were painted gold. Don't know what with, but its good stuff, I found it very difficult to remove.

After an hour of faffing about with the rims, I took them to a local machine shop who have a blasting cabinet. I asked how much to bead blast the two half rims ? The owner (Who I knew slightly), replied we're too busy this week, but the cabinets over there, you can do it yourself if you want. Couldn't refuse .. and an hour later the rims were looking much better. Cost me nothing except some promised biscuits next time I'm passing. I was surprised how fine the glass beads were they use, it felt closer to flour than sand I'd used before. But it worked ok and left a smooth finish ready to be polished.
 

Attachments

  • 005.JPG
    005.JPG
    183 KB · Views: 354
  • 003.JPG
    003.JPG
    163.8 KB · Views: 357
  • 010.JPG
    010.JPG
    181.9 KB · Views: 361
  • 009.JPG
    009.JPG
    239.9 KB · Views: 340
  • 017a.jpg
    017a.jpg
    163.7 KB · Views: 9,935
Bevelheadmhr said:
Probably too new for Stafford, and the logistics will be a problem for me.

I'm also trying to get Chumley [ "Cholmondeley Pageant of Speed" ] sorted out [ June ].

BTW - those sleeve nuts - racking my brains to remember which Japanese / German bike I've seen them on !

CBH fasteners in Redditch might be another good source.
 
That's close to me, been before a few years ago, looks to have grown a lot since http://www.cpop.co.uk/
 
As for the socket / sleeve nuts for the exhaust, I'm told some Yamahas used them, i.e early R6. Got 4 stainless ones from Morgo the Triumph oil pump company, not cheap but they are stainless and do the job, so I'm happy.

Made a lot of progress last few days, and been given some useful stuff too :)

Over braided hose arrived, so could get on and make up the oil lines. Need to pay attention as its easy to get them mixed up (the are no markers or id on the oil tank etc).. I've seen it done, result being one seized newly rebuilt Harley.. thankfully not mine.
 

Attachments

  • 009.JPG
    009.JPG
    188.8 KB · Views: 335
  • 011.JPG
    011.JPG
    196.9 KB · Views: 327
  • 003.JPG
    003.JPG
    169.3 KB · Views: 325
  • 006.JPG
    006.JPG
    189 KB · Views: 3,038
  • 008.JPG
    008.JPG
    189.7 KB · Views: 3,433
The split rim rear wheel leaked like a sieve, used bathroom sealant to make it airtight.. went for quantity over quality .. Better not leak after this..! I'll get the tyre re fitted soon.

Made a rear splash guard in stainless, the fuse box can live here too.

Downpipes are on at last, they sit slightly differently from the old bike, so will need to modify the collector or make another. The old exhaust collector could do with a tad more silencing, some tracks have a 104 db noise limit. This exhaust probably exceeds that at idle.
 

Attachments

  • 004.JPG
    004.JPG
    110.6 KB · Views: 4,963
  • 005.JPG
    005.JPG
    192.7 KB · Views: 3,986
  • 012.JPG
    012.JPG
    180.3 KB · Views: 302
  • 010.JPG
    010.JPG
    144 KB · Views: 3,965
  • 004.JPG
    004.JPG
    188.1 KB · Views: 305
Finally got my hands on the ZXR750 forks off the other project bike and they went straight in the yokes without any problems. I had a mint Brembo 4 pot goldline caliper which happened to fit these forks perfectly, or at least they looked like they did. But turns out the mounting holes are 1.5mm different. Bloody typical. Still want to use the Brembo as it matches the rear, so will need to make a bracket.
 

Attachments

  • 003a.jpg
    003a.jpg
    206.8 KB · Views: 5,006
The rear wheel is being a pita, whatever I try it still leaks. The tyre has been off and on five times this week as we try different sealants, all to no avail. May have to get the joints between the rims and centre seam welded as a last resort.

On a brighter note I was given a nice set of discs taken from a GSXR750 K7 for free, which have 310mm front discs, just what I needed to work with the forks I'm using. They were take off parts when a customer upgraded to some fancy Galfer discs at my local bike shop, he didn't want the old discs (strange as they are in good condition), so they were given to me, as they knew I was after a 310mm disc.

Made a rear caliper torque arm out of a donated steering rod from a Go kart, had to cut it down a few cm, but apart from that it went straight on, even had the correct sized rose joints already.

Next job was to make a top motor mount, last one I bought was a fancy billet one which cost around £150. This one is made from high grade 5mm stainless, and cost a tenner, as I had Geoff the welder cut out the metal and bend it accurately for me. It'll will also be used to hold the coil when that turns up, and the choke cable. Still needs a bit of fettling to make it look pretty, but overall its ok.

The exhaust collector needed work as it sat differently than on the old bike so its mounting point was angled wrong. Some tracks have noise limits, which I'm sure this exhaust would exceed massively. Therefore I'd been thinking about adding a silencer, though space is limited, so not sure how much quieter it would be using a small silencer, while not strangling the engine. I cut the old collector in half and tried a few options..
 

Attachments

  • 010.JPG
    010.JPG
    182.7 KB · Views: 317
  • 008.JPG
    008.JPG
    183.1 KB · Views: 307
  • 005.JPG
    005.JPG
    165.5 KB · Views: 320
  • 012.JPG
    012.JPG
    188.9 KB · Views: 292
After looking at lots of options, including race bike 'stubbies', I decided that if it was too loud for Elvington, then that's their loss, so it got a new straight through collector. Toes may get toastie when I brake.. :)

At the other end of the engine, I dug out my trusty S&S velocity stack to use, needs an adaptor making to fit the Mikuni carb, which is in progress now.

Waiting for some parts to arrive.. coil, tacho, new blank rear sprocket from Renthal. When all that arrives the wiring can be done, by which time hopefully the front end will be ready too.
 

Attachments

  • 006.JPG
    006.JPG
    193.3 KB · Views: 1,135
  • 009.JPG
    009.JPG
    189.8 KB · Views: 289
  • 017.JPG
    017.JPG
    196.2 KB · Views: 314
  • 018.JPG
    018.JPG
    194.2 KB · Views: 1,176
Back
Top Bottom