Follow along with the video below to see how to install our site as a web app on your home screen.
Note: This feature currently requires accessing the site using the built-in Safari browser.
We noticed you are blocking ads. DO THE TON only works with community supporters. Most are active members of the site with small businesses. Please consider disabling your ad blocking tool and checking out the businesses that help keep our site up and free.
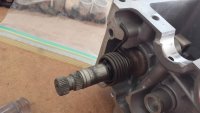
Here's my first dry run on the bottom end. Didn't get the kicker in or the shifter, just looking at how things fit. And I had to put the needle bearings back in place. What a PITA when they come off the end!
Learning as I go, sorry for the slowness of this all. Getting a Plastigage for measuring the crank bearings so for now it's all just finding how it all fits.
I've seen it done both ways, I just found it easier in the top case. Just do it the way you find simplest.
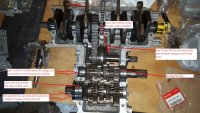
You'll see once you get the shift forks fitted in the cases, that they just flop around, so it can be a bit painful trying to get them to line up. You'll also be having to feed the rods, and the cam chain through the top case at the same time - an extra set of hands would probably make it easy though. Plus you have to be able to get at the crank bolts on the bottom of the cases to torque them.
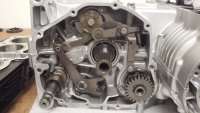
Here's a couple of pics of the kicker mechanism if you need 'em.
That's very helpful on the kicker! I didn't try to put it in, but pics help a ton! Thanks!! The only reason I'll do it in the bottom end, is because I can follow along in the manual Once together I'm sure I'll agree that the top end might have been better! haha
I installed everything into the bottom case and then placed the top case on it. I felt that it was the easiest method when I ran through it. But definitely figure out what works best for you and stick with that.
That kickstarter is somewhat annoying to install. I remember messing with the degree of the spring retaining hook on the outside of the case. Here's some more photos for reference...
I'm still a bit terrified...ha! I just haven't had the time I'd like to pour into it. Might have some in the upcoming couple of days. I'm aiming for as much info as possible since there's a lot of us out there that have done quite a bit, but haven't gone into the lower end before. It's not as daunting as I know I've made it in my head.
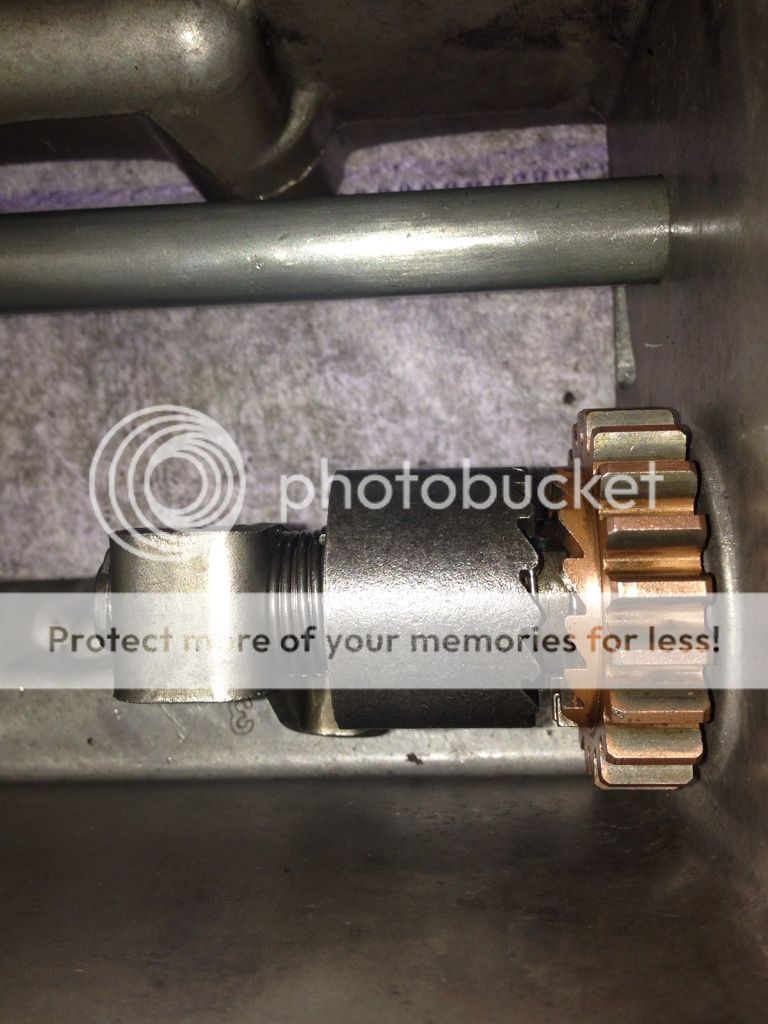
I am rebuilding a 78cb550 im just curious is it necessary to remove the stator rotor before closing the case back up? the bolt on mine seems to be seized
I am rebuilding a 78cb550 im just curious is it necessary to remove the stator rotor before closing the case back up? the bolt on mine seems to be seized
Short answer is NO. Longer answer is YES. haha. I needed to pull it so I could replace the seal that's behind it. So Personally if it was mine, I would do it. Your best bet is an impact gun. You'd be surprised how much you will use it and even more surprised with how much stuff comes of SOOOOO much easier. The main thing is that you would need one person holding the rotor, and one with a large breaker bar to loosen that screw. It results in swearing and when it DOES break loose, you'll probably hit your friend with the breaker bar....the Impact gun will loosen it without spinning the crank (Unless it's REALLY stuck) but that's rare in my opinion. I've had my eyes on this one : http://www.amazon.com/AIRCAT-1150-Killer-Torque-2-Inch/dp/B007WQQ90A
But I need a lift table before I get spendy tools that are just better than what I already have.
No problem. It's worth it's weight in gold if you ask me. Just remember not to try to impact a philips head screw on....strips them right out! ha! (but if it's a nice head you CAN back them out with the impact, amazing I tell ya)
This site uses cookies to help personalise content, tailor your experience and to keep you logged in if you register.
By continuing to use this site, you are consenting to our use of cookies.


") Once together I'm sure I'll agree that the top end might have been better! haha
Once together I'm sure I'll agree that the top end might have been better! haha