1973 Honda 350F Project

tranqjones

Creativus ex Machina
Project Began: November 2010
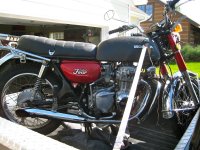
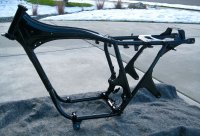
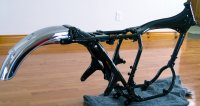
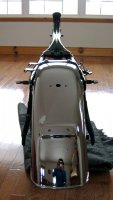
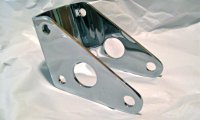
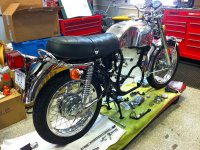
The 350F was found in a barn in Montana.
Cost of the bike: $800

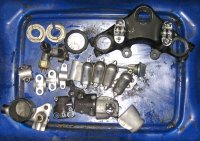
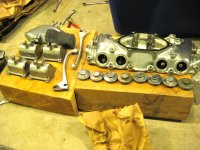
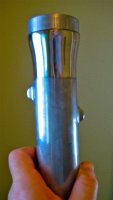
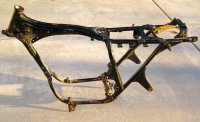
I'm putting a photo of the bike up from the day I picked it up. It was in surprisingly okay condition, only 8000 miles. The project is on its last few hours, so you won't have to wait long for additional photos.
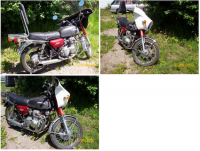
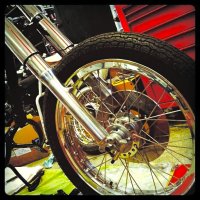
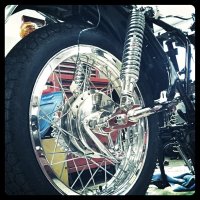
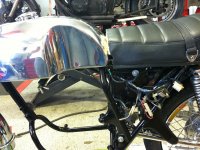
 

Attachments

  • CafeRacer.JPG
    CafeRacer.JPG
    379.1 KB · Views: 240
In this post, photos of the bike as it appeared on Craigslist.
I began pulling things off the bike while it was still sitting in the back of my truck.

Once in the garage, a total strip down of the entire bike began.
 

Attachments

  • CLpost.png
    CLpost.png
    450.7 KB · Views: 230
  • IMG_2539.JPG
    IMG_2539.JPG
    262.2 KB · Views: 225
  • IMG_2549.JPG
    IMG_2549.JPG
    201.8 KB · Views: 199
Organization, man! Everything came off the frame so it could be powder coated. Every part on the bike got put in a bag or bin, labeled, organized, and ready to be cleaned one bolt at a time, bag by bag.
 

Attachments

  • IMG_2593.JPG
    IMG_2593.JPG
    326.9 KB · Views: 193
  • IMG_2590.JPG
    IMG_2590.JPG
    255.9 KB · Views: 220
  • IMG_2584.JPG
    IMG_2584.JPG
    232 KB · Views: 218
Looking forward to seeing the rest of the pics - keep them coming!
 
The MAJOR to do list:
  • Clean and polish all the aluminum. It was in rough shape. That included stripping the paint off parts that would look 100 times better polished... like the switches.
  • Send the engine off to be bead blasted and re painted.
  • New Chrome. I decided to re do the chrome on the rear fender, change the swing arm from black to chrome, chrome the front motor mount, headlight rim, rear tail light tree, stabilizer bar, tensioners, exhaust flanges, and the entire front fork covers (upper and lower) as I was certain I wouldn't be able to duplicate the original matador metal flake red. I also have a fetish for shiny things.
  • Replace all the light lenses which were faded and scratched.
  • Whatever bolts were rusted, replace. Everything else, hand sanded.
  • Search for a new gas tank and petcock.
  • The fork tubes were rusted and those needed replacing.
  • Little aesthetic touches would be determined as the project progressed.
 

Attachments

  • IMG_2604.JPG
    IMG_2604.JPG
    120.1 KB · Views: 199
  • IMG_2589.JPG
    IMG_2589.JPG
    228 KB · Views: 197
  • IMG_2588.jpg
    IMG_2588.jpg
    169.2 KB · Views: 224
Polishing is worth it. Period.
 

Attachments

  • IMG_2848.jpg
    IMG_2848.jpg
    253.2 KB · Views: 212
  • IMG_2629.JPG
    IMG_2629.JPG
    148.4 KB · Views: 213
  • IMG_2630.JPG
    IMG_2630.JPG
    198.6 KB · Views: 224
Incase you're wondering, most all of the polishing was done using two grades of Nuvite and various polishing attachments on a dremel, as well as a lot of pre sanding with 600, 1500, and 2000 grit sandpaper on the parts that had a lot of surface scratching.
 
The powdercoated frame. Before and after.
 

Attachments

  • IMG_2583.JPG
    IMG_2583.JPG
    220.7 KB · Views: 204
  • IMG_2621.JPG
    IMG_2621.JPG
    223.8 KB · Views: 209
Hey what attachement did you use on your dremel? I didn't think the dremel would cut it, I got one just sitting here
 
The key dremel attachments for polishing aluminum:

The sanding buffs are brilliant if the surface is rough. They make 3 different grit buffs... coarse all the way to I think 340 grit which is the finer. Start with the coarse and take down scratches and imperfections. Then smooth over with the 340. This buffs are ideal for getting in tight corners on small parts.

Finish sanding with 600 - 1500 - 2000 grit sandpaper.

Then do the actual polishing again with the dremel using the white felt buffing attachments - they come 6 to a package. They key with that is the compound. After a lot of research, Nuvite is pretty universally recognized as the best compound. Start with the Grade G6 and then finish with the Grade S.

I did some of the bigger pieces on an 8" buffing wheel using nuvite, but still found the dremel did a better job.

Tons of work, but great results.
 
The chrome:

Chroming was done by Brown's Plating in Kentucky. They did a GREAT job and had primo customer service. I decided to dip the swing arm and the motor mount along with re chroming anything that had 40 years of noticeable wear. Even though the mount and swing arm are separated by the engine, they make a clear line/sweep from front to back that I thought would look great with a chrome accent.

I also found a set of custom bronze bushings for the swing arm. The stock bushings are awful. These should make a notable performance upgrade, eliminating any excess play in the swing arm.

Also in this post, the rear fender with fresh chrome.
 

Attachments

  • IMG_3012.JPG
    IMG_3012.JPG
    151.1 KB · Views: 196
  • IMG_3011.jpg
    IMG_3011.jpg
    158.2 KB · Views: 196
  • IMG_2759.JPG
    IMG_2759.JPG
    155.7 KB · Views: 192
  • IMG_2758.JPG
    IMG_2758.JPG
    187.4 KB · Views: 201
Beautiful, can't wait to see more. I'm going to give your polishing method a try on my CB360 motor.
 
Wheels. To me this was an important detail because the stock Honda wheels are cheap and on this bike, they were pretty beat up. Not worth fixing.

Vintage integrity was important to me though and crazy wheels that don't match that ideal didn't seem right. I went with Akront-Morad flanged aluminum rims that I ordered from the U.K. at Disco Volante Moto.

http://www.discovolantemoto.co.uk/wheels/akront-morad-flanged-aluminium-rims/prod_147.html

Sizing:
2.50 x 18" in the rear (an inch difference on a 3.50 tire is the max you would want to go)
1.85 x 18" in the front

Spokes are not worth cheaping out on at this point either. I went with all stainless, single butted in the front, plain parallel in the rear - per the original specs on the Honda factory rims.

Howard Davies at Disco Volante was incredibly helpful in sorting out the spokes details by the way. I sent photos and measurements at his request to make sure we were getting the little details right. If you order rims like this, you want to have exact measurements of front hub and rear brake sizes, spoke pattern, and I also did spoke diameter to make sure the gauge was spot on. You get one shot to drill the rims at the correct angles, so details are super important.

Photos show original wheels, and the Akront-Morad upgrade fresh out of the box.
 

Attachments

  • IMG_2884.JPG
    IMG_2884.JPG
    116.7 KB · Views: 193
  • IMG_0041.JPG
    IMG_0041.JPG
    195.3 KB · Views: 211
The fun details...

Since the tank is the centerpiece of any bike, I decided to go custom. After scouring the web for what was available, my favorite tank was one made by Sean at Roc City Cafe Racers in Rochester, NY.

http://www.roccitycafe.com/item.php?path=store/ayztank,

It was even better than I imagined when I opened the box. Sean does AMAZING work. 5 stars!

Sean also makes a custom headlight bucket for this bike that caught my eye so I ordered one of those too. It's a much cleaner, sleeker, more dramatic look than the small stock bucket, without being a crazy departure. Vintage integrity, still trying to maintain that on most of the bike. Again, I love the original aesthetics of the 350F and wanted to stay close to that.

http://www.roccitycafe.com/item.php?path=store/bucket,

Photos of the unpainted bucket with a re chromed ring, the tank straight out of the box, and a peek at the tank as I was seeing how it looked on the frame. The fit on everything Sean did was perfect by the way.
 

Attachments

  • IMG_3028.JPG
    IMG_3028.JPG
    187.8 KB · Views: 206
  • IMG_3020.JPG
    IMG_3020.JPG
    160.1 KB · Views: 199
  • IMG_2761.JPG
    IMG_2761.JPG
    152.4 KB · Views: 192
You chose well working with Sean! I'm planning on having him make me a tank for my SR500 at some point....
 
Sean rocks. I have nothing but great things to say about his work and he's a great guy.

On the polishing notes... feel free to shoot me a note if you have questions. That most difficult part is stripping away the clear coat so the aluminum is clean. What a pain. Once you get down to smooth aluminum though, the actual polishing isn't so bad.
 
With everything cleaned, polished, chromed, laced... then comes the fun. Putting it together and seeing progress.

In these photos, you can see the difference laying down chrome on the front fork covers made vs. repainting. Super clean. In the rear, same deal. The chrome swing arm sharpens everything up. For shocks, I went with a set made for a cb750. They're an inch and a quarter longer than stock shocks made for a 350F... but the fittings are all the same. I was worried it might raise the back up too much, but once on the bike everything looked great.

The tank was a little longer than stock as well, which meant trimming the seat pan and reupholstering.
 

Attachments

  • IMG_0052.JPG
    IMG_0052.JPG
    172.8 KB · Views: 198
  • IMG_0056.JPG
    IMG_0056.JPG
    174.7 KB · Views: 222
  • IMG_0057.jpg
    IMG_0057.jpg
    252.1 KB · Views: 196
  • IMG_0059.jpg
    IMG_0059.jpg
    330.6 KB · Views: 227
Next, dropping the engine back in. These photos were taken with my cell phone.
 

Attachments

  • IMG_0102.JPG
    IMG_0102.JPG
    232.4 KB · Views: 215
  • IMG_0103.JPG
    IMG_0103.JPG
    274.6 KB · Views: 217
A dremel with a sanding buff (or puff) took everything right off. I think the dremel part numbers for the abrasive buffs are 511 and 512E.
Then sanding using 600 - 1500 - 2000 grit sandpaper. 0000 steel wool was also helpful for getting in hard to reach places.
Then polishing using Nuvite Grade G6 followed by Grade S.
 
Back
Top Bottom