We noticed you are blocking ads. DO THE TON only works with community supporters. Most are active members of the site with small businesses. Please consider disabling your ad blocking tool and checking out the businesses that help keep our site up and free.
You are using an out of date browser. It may not display this or other websites correctly.
You should upgrade or use an alternative browser.
You should upgrade or use an alternative browser.
Re: Bigsam302's 76 CB750F w/GSXR Forks: Project Helen – She Lives!!!
- Thread starter Bigsam302
- Start date
Bigsam302
Been Around the Block
Re: Bigsam302's 76 CB750F w/GSXR Forks: Project Helen - Project back on track
Thanks guys, I appreciate it! I wish that I had more to report. Things are pretty slow. I'm hoping to get the chain mounted and brake lines installed. I had to replace the inner tube on my rear tire. I think it got pinched when it was installed. I noticed that it had a slow leak, so I just dropped the rear wheel off this morning to have it replaced. I'll keep you posted.
Sam
Bigsherm said:Holy CRAP, Sam!
Very nice, the best quality everywhere you look!
-Sherm
Thanks guys, I appreciate it! I wish that I had more to report. Things are pretty slow. I'm hoping to get the chain mounted and brake lines installed. I had to replace the inner tube on my rear tire. I think it got pinched when it was installed. I noticed that it had a slow leak, so I just dropped the rear wheel off this morning to have it replaced. I'll keep you posted.
Sam
Bigsam302
Been Around the Block
Re: Bigsam302's 76 CB750F w/GSXR Forks: Project Helen - Project back on track
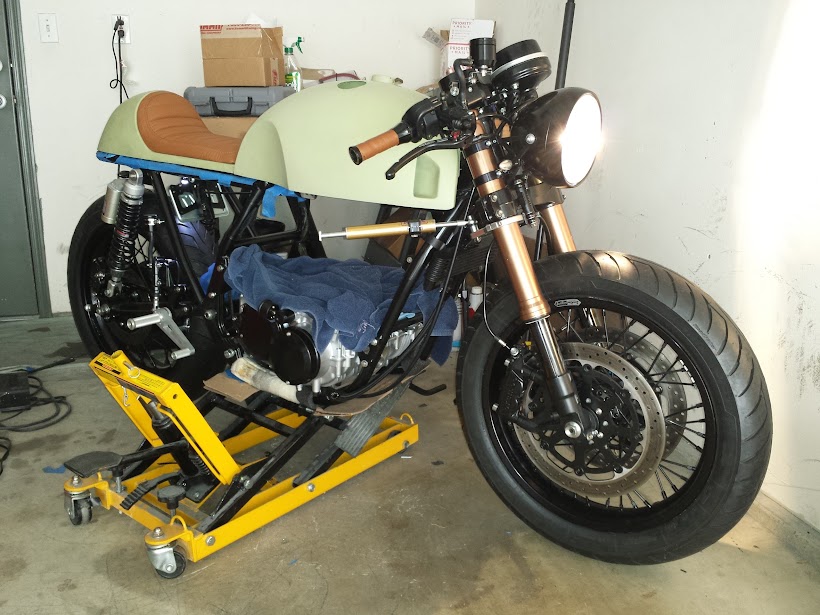
It has been awhile since my last post, but I have been steadily working along on my bike. I am still waiting for Cycle X to get their 915cc kits in so I can finish my engine work. In the meantime I have decided to tackle my brakes, wiring, clutch, etc.
I do have to say that this project has truly tested every bit of my patience and has worked my very last nerve. As much planning as I have put into this project, nothing has been going according to plan.
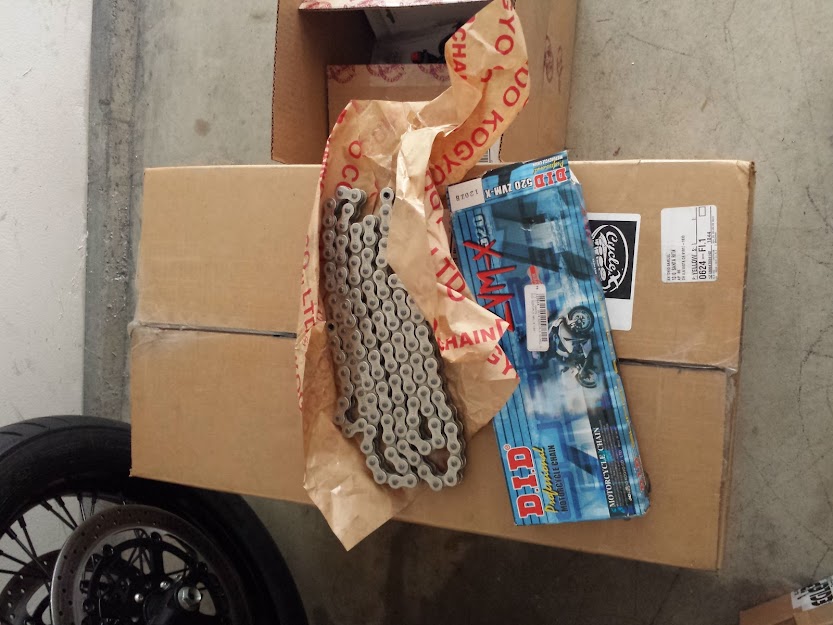
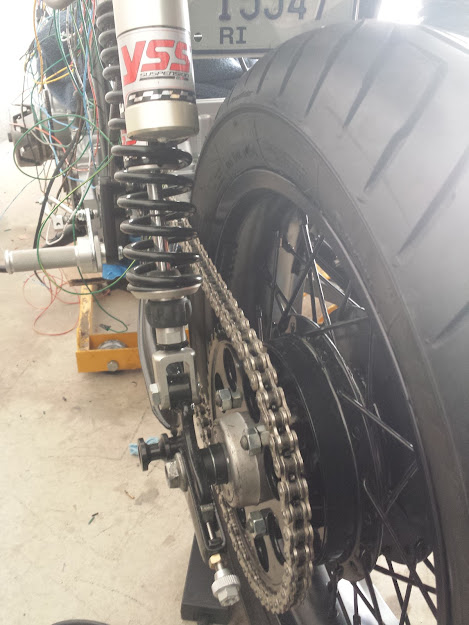
The first thing that I started on was installing my chain. I ordered Cycle X’s 525 chain conversion a couple of years ago, so I was excited to finally see it on my bike. I purchased a DID chain and installed it. It came out great. I also installed my set of Joker Machine axle adjusters.
It has been awhile since my last post, but I have been steadily working along on my bike. I am still waiting for Cycle X to get their 915cc kits in so I can finish my engine work. In the meantime I have decided to tackle my brakes, wiring, clutch, etc.
I do have to say that this project has truly tested every bit of my patience and has worked my very last nerve. As much planning as I have put into this project, nothing has been going according to plan.
The first thing that I started on was installing my chain. I ordered Cycle X’s 525 chain conversion a couple of years ago, so I was excited to finally see it on my bike. I purchased a DID chain and installed it. It came out great. I also installed my set of Joker Machine axle adjusters.
Bigsam302
Been Around the Block
Re: Bigsam302's 76 CB750F w/GSXR Forks: Project Helen - Project back on track
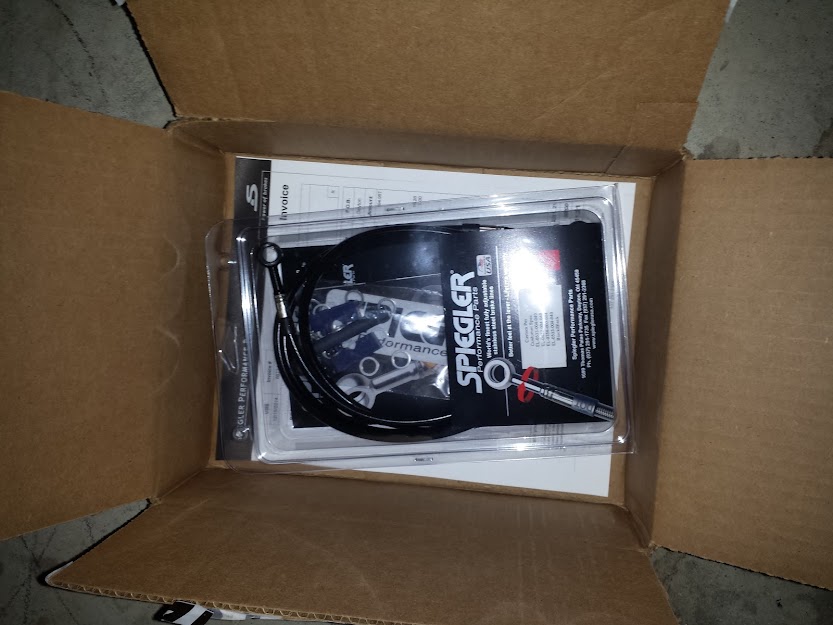
Next, I decided to work on my brakes. This is where my first headache started. I ordered a set of custom brake lines from Spiegler and the look amazing. I got black lines with matching fittings to go with the theme of my bike.
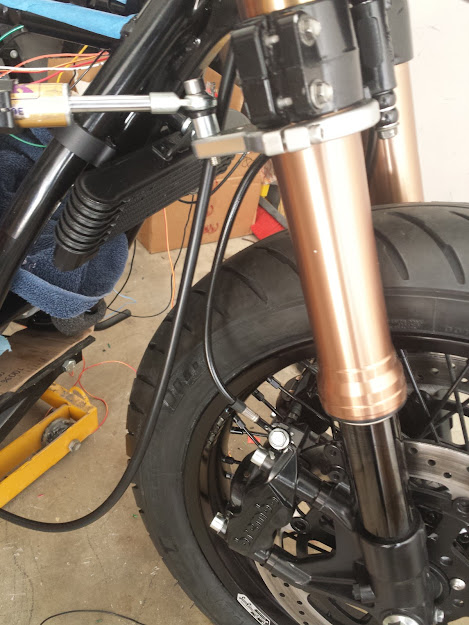
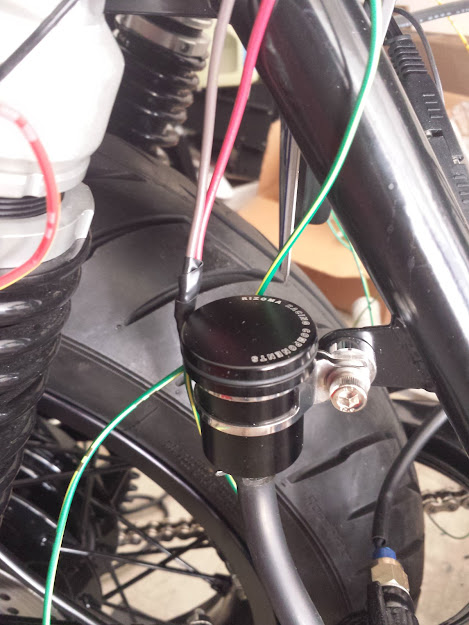
To finish off my brake system, I ordered a front and rear brake reservoir from Rizoma. They also look gorgeous
Everything went together very easy and I like the way that they turned out. My problems started when I tried to add fluid and bleed the brake system. The rear brakes were the easiest and they work like a charm. I ran into issues when I tried to run a spring activated brake like switch. I thought that I had found the perfect match. Since my rearset brackets are from an 02 GSXR-750, I figured that it would be a good match.
I installed the switch and wired it. It worked as designed for about 5 tries and then stopped working (I was pissed!). After doing a little research, I decided to go with an hydraulic brake light switch. Since I had my rearset brackets off the bike, I decided to replace the rearset arm with a straight version and a rubber brake pedal. I love the way it turned out.
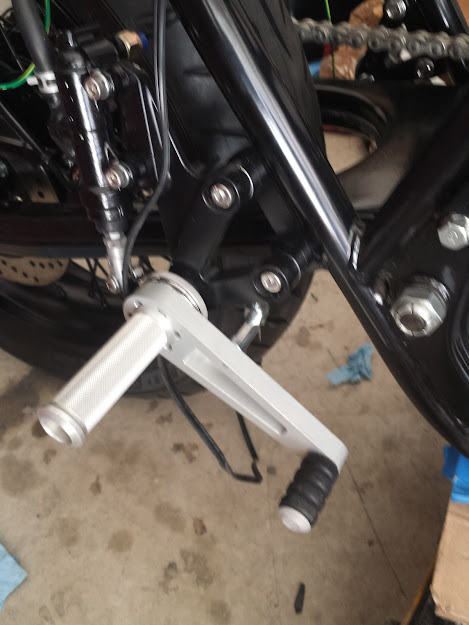
This setup worked like a charm!
The front brakes were the next source of my frustration. I could not get the front brakes to bleed for nothing in the world. After hours of cursing and trying to force brake fluid through the system, I figured out that the master cylinder was bad. I ordered another off of ebay and as soon as I pumped fluid through it, everything worked like it was suppose to.
Next, I go to wire up the front brake light switch and noticed that it constantly stayed on. I checked my wiring and found the problem. Everything worked like it was suppose to, with the exception of the cheap brake levers that I bought on ebay. The lever never made contact with the OEM switch. Even though these were supposed to be direct replacements, they were just cheap Chinese copies. Luckily, when I ordered the new master cylinder it came with an OEM lever. I installed it, and what do you know, it worked like a charm.
Next, I decided to work on my brakes. This is where my first headache started. I ordered a set of custom brake lines from Spiegler and the look amazing. I got black lines with matching fittings to go with the theme of my bike.
To finish off my brake system, I ordered a front and rear brake reservoir from Rizoma. They also look gorgeous
Everything went together very easy and I like the way that they turned out. My problems started when I tried to add fluid and bleed the brake system. The rear brakes were the easiest and they work like a charm. I ran into issues when I tried to run a spring activated brake like switch. I thought that I had found the perfect match. Since my rearset brackets are from an 02 GSXR-750, I figured that it would be a good match.
I installed the switch and wired it. It worked as designed for about 5 tries and then stopped working (I was pissed!). After doing a little research, I decided to go with an hydraulic brake light switch. Since I had my rearset brackets off the bike, I decided to replace the rearset arm with a straight version and a rubber brake pedal. I love the way it turned out.
This setup worked like a charm!
The front brakes were the next source of my frustration. I could not get the front brakes to bleed for nothing in the world. After hours of cursing and trying to force brake fluid through the system, I figured out that the master cylinder was bad. I ordered another off of ebay and as soon as I pumped fluid through it, everything worked like it was suppose to.
Next, I go to wire up the front brake light switch and noticed that it constantly stayed on. I checked my wiring and found the problem. Everything worked like it was suppose to, with the exception of the cheap brake levers that I bought on ebay. The lever never made contact with the OEM switch. Even though these were supposed to be direct replacements, they were just cheap Chinese copies. Luckily, when I ordered the new master cylinder it came with an OEM lever. I installed it, and what do you know, it worked like a charm.
Bigsam302
Been Around the Block
Re: Bigsam302's 76 CB750F w/GSXR Forks: Project Helen - Project back on track
I decided to tackle my clutch next. I read the service manual, read Hondaman’s book, and watched youtube videos, but I could not get the clutch to disengage for nothing in the world. I looked at diagrams and had everything together like it was supposed to. After 4 tries of taking the clutch basket out and replacing it, I finally broke the clutch plate. This actually turned out to be a good thing.
In 76 and newer models (I think), Honda designed a double steel plate that is supposed to quiet down the clutch. I didn’t have one, so I went back to ebay and ordered a new clutch plate and clutch basket. I found one for about $30.
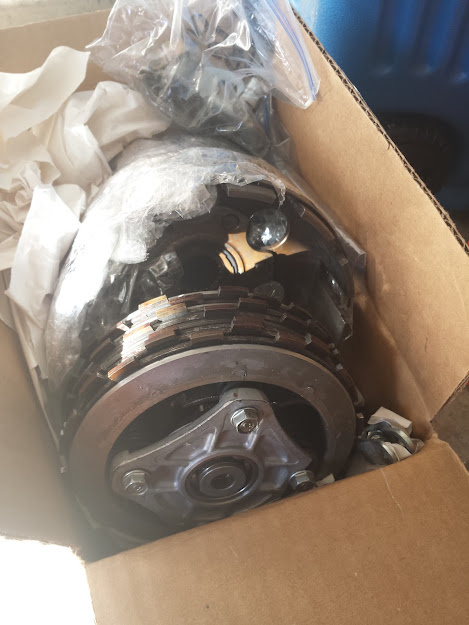
Once I installed the new double-steel plate, I reinstalled my clutch basket and guess what? It still didn’t work. I went through the roof. I was so pissed off and frustrated with this bike. After a few days I came back down to my garage and pulled the clutch basket again. Since I had an extra clutch basket, I decided to compare both of them to find out where I was going wrong. Then a light bulb when off! The new clutch basket that I had ordered was a little bigger than the one I originally took off of my bike. So I used the new basket, put my clutch back together and it worked! Calj737 got a good laugh out of it when I was talking to him on the phone.
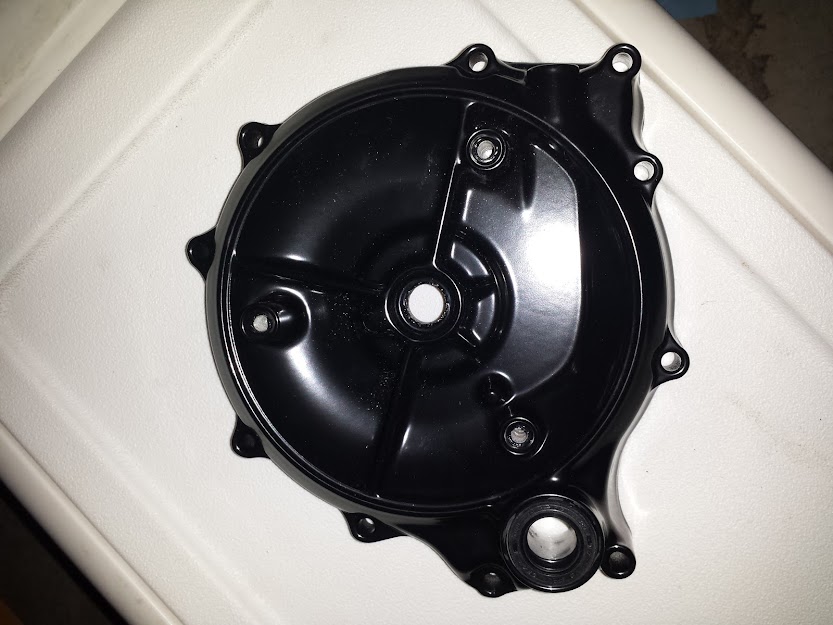
I had my clutch basket cover powdercoated with the rest of the covers on my bike. They are the exact same color as the rest of the frame
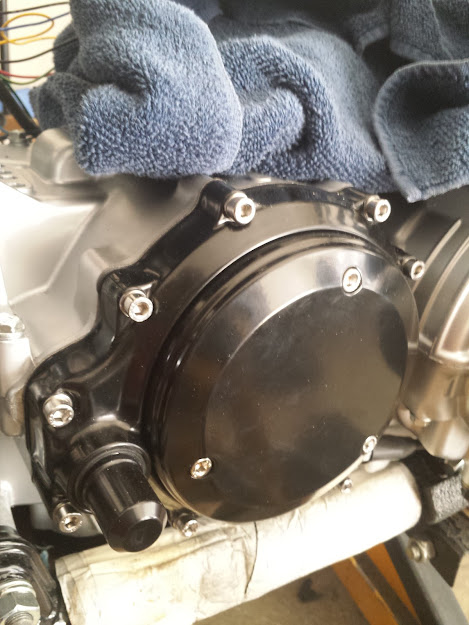
I also had the outer clutch cover from Joker Machine powdercoated the same color. The kick-start shaft cover is also a nice touch!
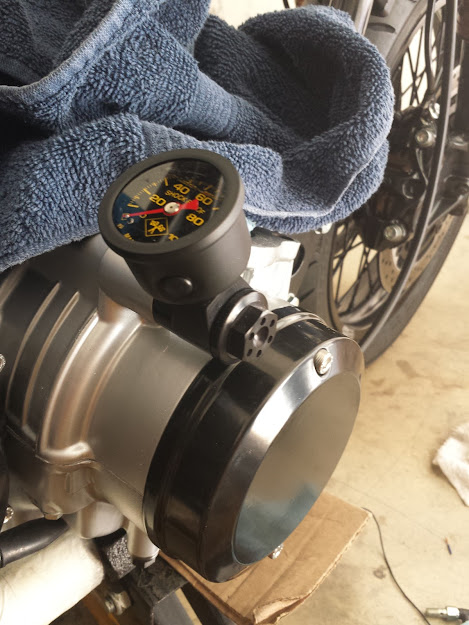
I also installed a oil pressure gauge with a Joker Machine bracket. The points cover is also from Joker Machine and is powdercoated as well. It is currently only sitting there. I’m waiting for my Dyna 2000 ignition to arrive.
I decided to tackle my clutch next. I read the service manual, read Hondaman’s book, and watched youtube videos, but I could not get the clutch to disengage for nothing in the world. I looked at diagrams and had everything together like it was supposed to. After 4 tries of taking the clutch basket out and replacing it, I finally broke the clutch plate. This actually turned out to be a good thing.
In 76 and newer models (I think), Honda designed a double steel plate that is supposed to quiet down the clutch. I didn’t have one, so I went back to ebay and ordered a new clutch plate and clutch basket. I found one for about $30.
Once I installed the new double-steel plate, I reinstalled my clutch basket and guess what? It still didn’t work. I went through the roof. I was so pissed off and frustrated with this bike. After a few days I came back down to my garage and pulled the clutch basket again. Since I had an extra clutch basket, I decided to compare both of them to find out where I was going wrong. Then a light bulb when off! The new clutch basket that I had ordered was a little bigger than the one I originally took off of my bike. So I used the new basket, put my clutch back together and it worked! Calj737 got a good laugh out of it when I was talking to him on the phone.
I had my clutch basket cover powdercoated with the rest of the covers on my bike. They are the exact same color as the rest of the frame
I also had the outer clutch cover from Joker Machine powdercoated the same color. The kick-start shaft cover is also a nice touch!
I also installed a oil pressure gauge with a Joker Machine bracket. The points cover is also from Joker Machine and is powdercoated as well. It is currently only sitting there. I’m waiting for my Dyna 2000 ignition to arrive.
Bigsam302
Been Around the Block
Re: Bigsam302's 76 CB750F w/GSXR Forks: Project Helen - Project back on track
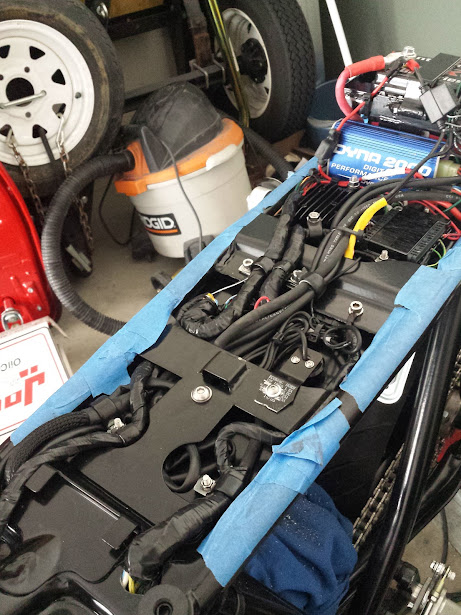
I’ve also taken the time to start working on the wiring. Right now I’m just doing a dry fit. After I get it all worked out, I’ll solder all the connections and neatly clean up my harness.
I started with a Antigravity Battery, Motogadget M-unit, and a new Rick’s Motorsports’ REC/REG. It took some work, but I got them to install neatly into the Benjie’s tail section. After many headaches and finally contacting Cal, I was able to get everything to work as it should.

Don’t mind the mess. It will be cleaned up when I get everything finished.
This is a quick connector from the battery that is neatly tucked behind my license plate in the bracket. This way I can charge my battery without having to remove my seat.

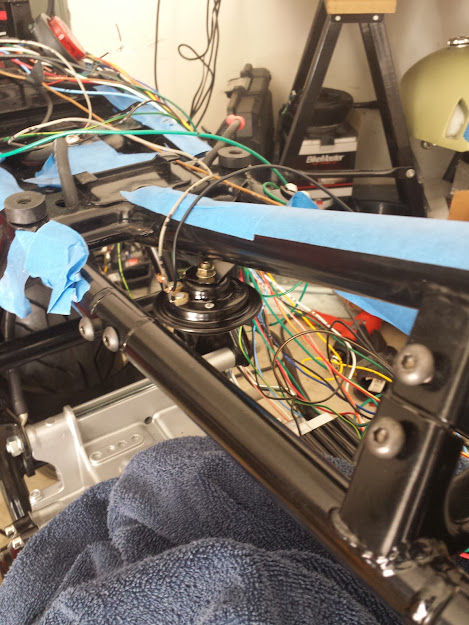
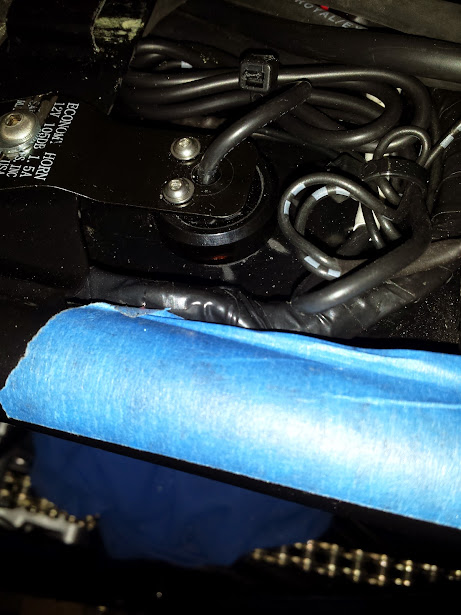
If you look closely, I mounted the horn in between the frame. It fits nicely under the tank and out of sight.

Wires are everywhere! But, like I said, it will be cleaned up after its all sorted out. After looking at all of these wires, I’m seriously considering ordering a Motogadget M-Button.
Like I said, everything is working as it should. The brake light, headlight, turnsignals, horn and the starter. I have the M-unit setup with the exception of the alarm, but I’m not going to start messing with that until I get my bike finished.
Check this out!
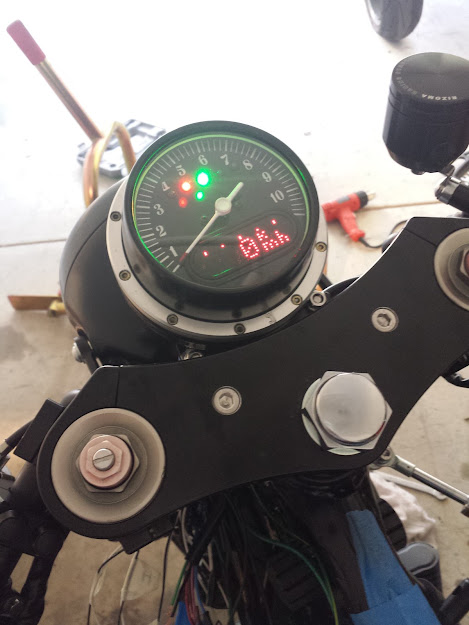
My gauge is gorgeous and it works like a charm. All the idiot lights work like they are supposed to. I have the neutral and oil pressure lights working. I am very happy with the way it turned out.
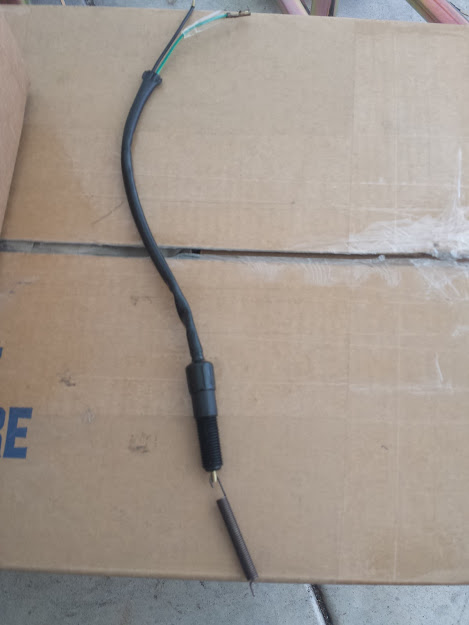
I do have one question about the kill switch (maybe Cal can answer this), on these old bikes does the kill switch disable the starter like on modern bikes or does it just disable the ignition switch? When I was messing around with it, the switch did not stop the starter from turning over, but it killed everything that I had plugged into the AUX port on the M-unit. Is that it’s only function, to prevent the ignition from starting the bike?
Here is my starter cover. As with the rest, it is from Joker Machine and is powdercoated.
The only thing that I’m waiting on is my Dyna 2000 ignition and I will finish up the wiring. I still need to connect the alternator wires and the Regulator/Rectifier. Then I can move onto soldering everything up.
I’ve also taken the time to start working on the wiring. Right now I’m just doing a dry fit. After I get it all worked out, I’ll solder all the connections and neatly clean up my harness.
I started with a Antigravity Battery, Motogadget M-unit, and a new Rick’s Motorsports’ REC/REG. It took some work, but I got them to install neatly into the Benjie’s tail section. After many headaches and finally contacting Cal, I was able to get everything to work as it should.
Don’t mind the mess. It will be cleaned up when I get everything finished.
This is a quick connector from the battery that is neatly tucked behind my license plate in the bracket. This way I can charge my battery without having to remove my seat.
If you look closely, I mounted the horn in between the frame. It fits nicely under the tank and out of sight.
Wires are everywhere! But, like I said, it will be cleaned up after its all sorted out. After looking at all of these wires, I’m seriously considering ordering a Motogadget M-Button.
Like I said, everything is working as it should. The brake light, headlight, turnsignals, horn and the starter. I have the M-unit setup with the exception of the alarm, but I’m not going to start messing with that until I get my bike finished.
Check this out!
My gauge is gorgeous and it works like a charm. All the idiot lights work like they are supposed to. I have the neutral and oil pressure lights working. I am very happy with the way it turned out.
I do have one question about the kill switch (maybe Cal can answer this), on these old bikes does the kill switch disable the starter like on modern bikes or does it just disable the ignition switch? When I was messing around with it, the switch did not stop the starter from turning over, but it killed everything that I had plugged into the AUX port on the M-unit. Is that it’s only function, to prevent the ignition from starting the bike?
Here is my starter cover. As with the rest, it is from Joker Machine and is powdercoated.
The only thing that I’m waiting on is my Dyna 2000 ignition and I will finish up the wiring. I still need to connect the alternator wires and the Regulator/Rectifier. Then I can move onto soldering everything up.
Bigsam302
Been Around the Block
Re: Bigsam302's 76 CB750F w/GSXR Forks: Project Helen - Project back on track
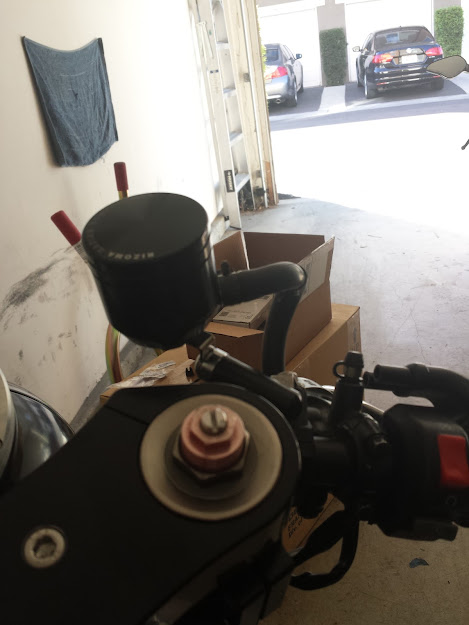
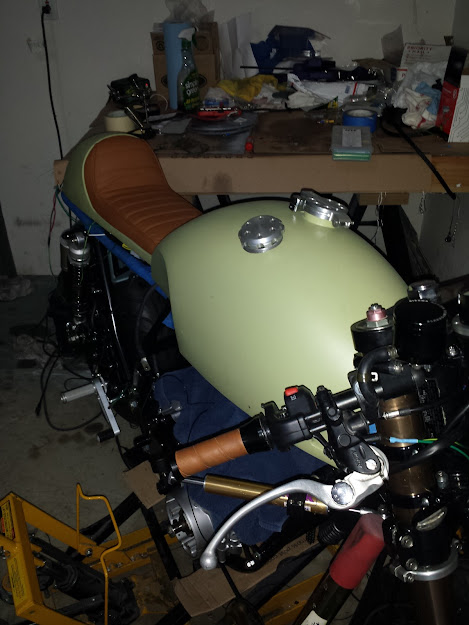
My last update for now is about my grips and seat.
I was not 100% satisfied with my previous grips. I didn’t like the holes in them and I really didn’t like the color. I wanted something a little darker. So, I decided to go with another leather and I like this much better.
Old
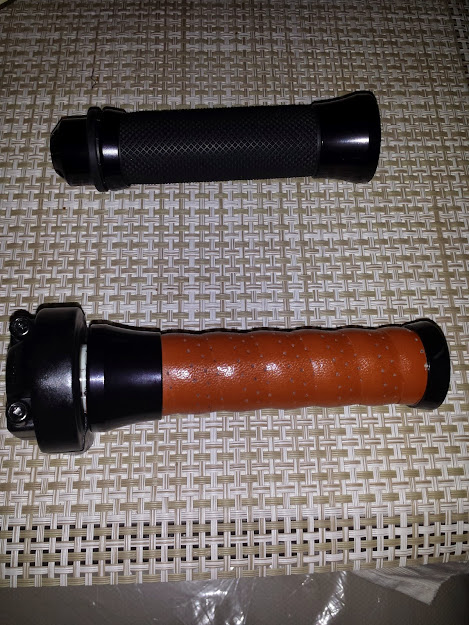
New
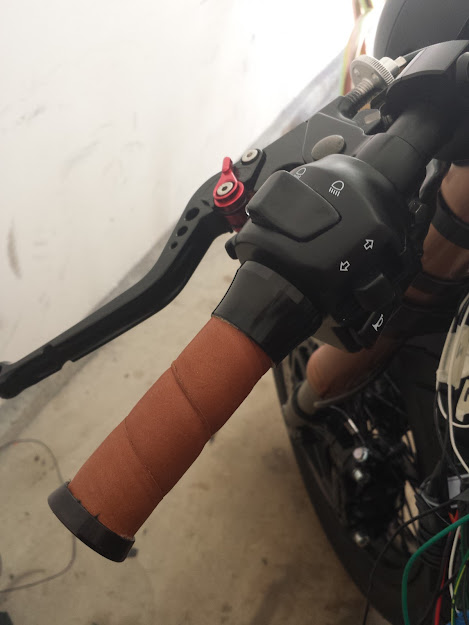
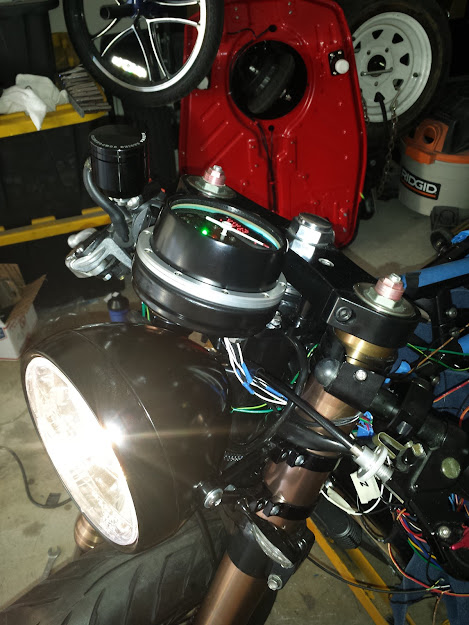
I also had an issue with the original headlight switch, so I upgraded it with this version. I was having all sorts of issues with my headlight and I couldn’t get it to work correctly. After I installed this switch everything worked just fine. In the picture you will also notice my cheap clutch lever that will be replaced when my new VORTEX levers arrive. You can barely see the M-switch that I installed. The top button is used to change my speedo menus and the bottom button I am using as my config switch for my M-Unit.
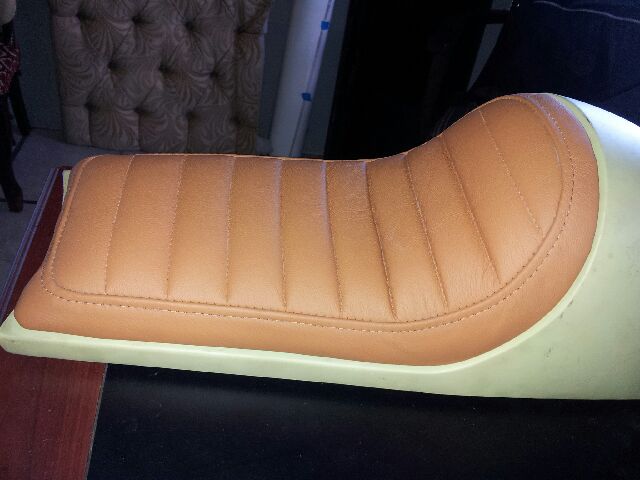
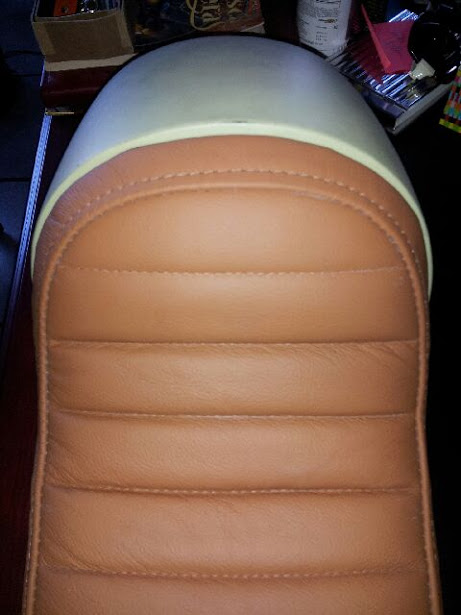
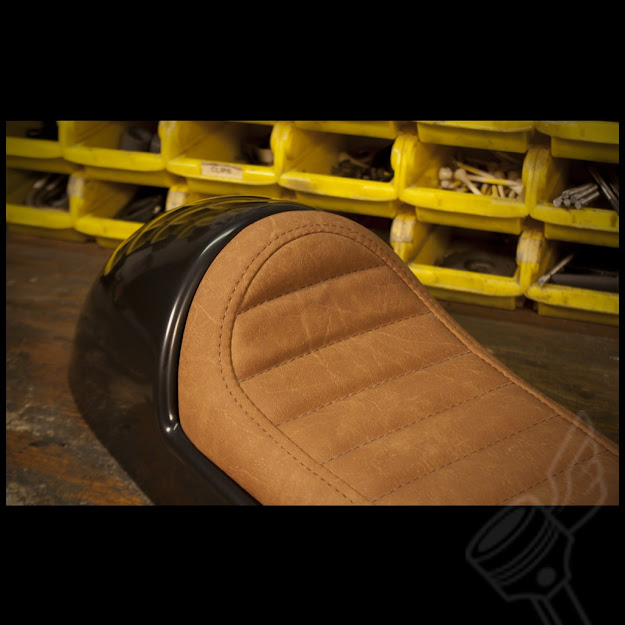
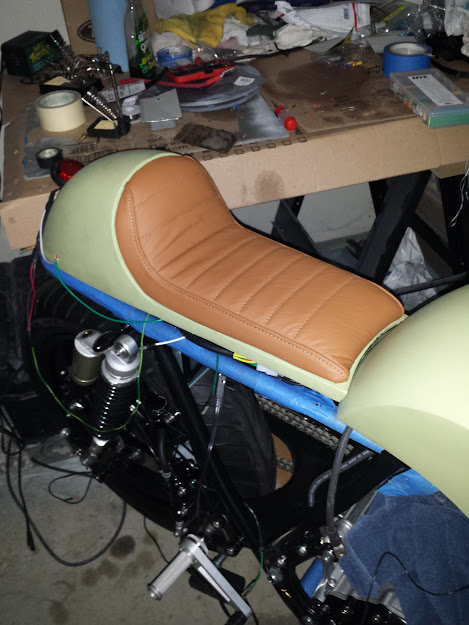
As I mentioned, I got my seat redone to match my grips. I’m a little on the fence about it.
I wanted something like this:
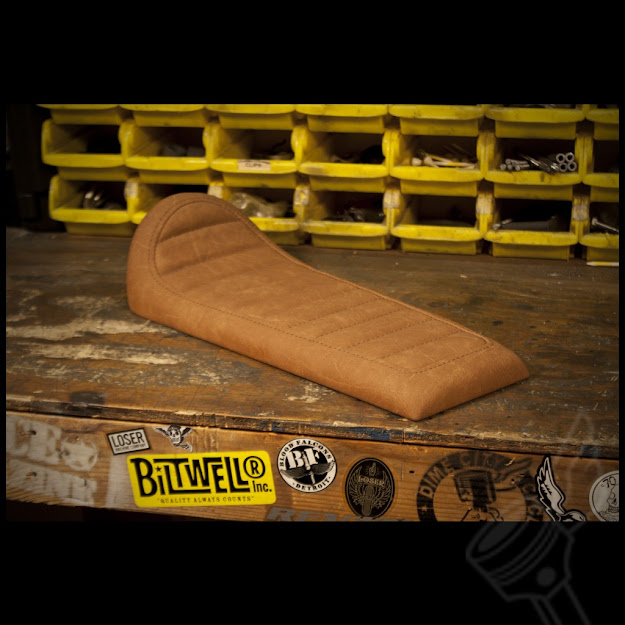
But I got this instead
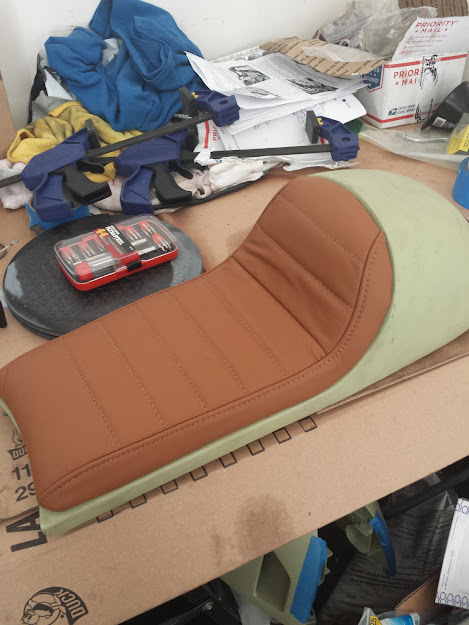
This is not what I wanted. When I took the picture to the guy who did it, he said that it would be no problem at all. But when I went to pick it up, he made all of these excuses about why he couldn’t get it to turn out like the picture. I was so pissed and he knew it. So he only ended up charging me $50 for the job. I bought the leather myself from a local shop here in San Diego.
After seeing the seat on my bike, it actually doesn’t look bad. BUT, it is not what I wanted or the look that I was going for. Because of this, I’m on the fence and I am debating on whether or not to leave it or to go somewhere else and have it done over.
Well, that’s all that I have for now. I’ll keep the updates coming. I hope to have my oil hoses for my oil cooler next week and I will focus on installing that.
My last update for now is about my grips and seat.
I was not 100% satisfied with my previous grips. I didn’t like the holes in them and I really didn’t like the color. I wanted something a little darker. So, I decided to go with another leather and I like this much better.
Old
New
I also had an issue with the original headlight switch, so I upgraded it with this version. I was having all sorts of issues with my headlight and I couldn’t get it to work correctly. After I installed this switch everything worked just fine. In the picture you will also notice my cheap clutch lever that will be replaced when my new VORTEX levers arrive. You can barely see the M-switch that I installed. The top button is used to change my speedo menus and the bottom button I am using as my config switch for my M-Unit.
As I mentioned, I got my seat redone to match my grips. I’m a little on the fence about it.
I wanted something like this:
But I got this instead
This is not what I wanted. When I took the picture to the guy who did it, he said that it would be no problem at all. But when I went to pick it up, he made all of these excuses about why he couldn’t get it to turn out like the picture. I was so pissed and he knew it. So he only ended up charging me $50 for the job. I bought the leather myself from a local shop here in San Diego.
After seeing the seat on my bike, it actually doesn’t look bad. BUT, it is not what I wanted or the look that I was going for. Because of this, I’m on the fence and I am debating on whether or not to leave it or to go somewhere else and have it done over.
Well, that’s all that I have for now. I’ll keep the updates coming. I hope to have my oil hoses for my oil cooler next week and I will focus on installing that.
Bigsam302
Been Around the Block
Re: Bigsam302's 76 CB750F w/GSXR Forks: Project Helen - Project back on track
Although I haven’t updated my build thread in a few months, I haven’t disappeared or stopped working on my bike. It is not going as fast as I would have liked. It also looks like I am not going to meet my build completion date of May. It is going to take me another month or two to finish it. The good news is that my block and cylinder head is off getting machined. I hope to have it back by the end of the month. Unfortunately, I have had a few setbacks. My tank and oil tank ending up being a big problem. The tank and seat combo is obviously a custom build, and I am completely aware that sometimes it is going to a little work to get it to fit like you want it. I mentioned earlier that I had to have it moved forward and up a little just to get the look that I was looking for. What I didn’t expect is spending extra money correcting issues that I shouldn’t have had to do in the first place. I spent over $1200 for this combo and the quality of work was crappy. Let me explain.
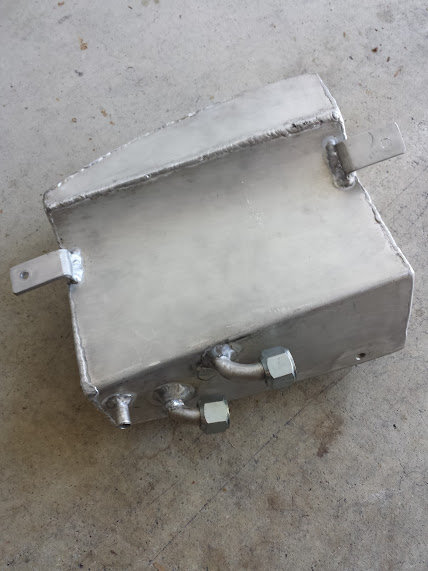
Here is the view of the bottom of my tank.
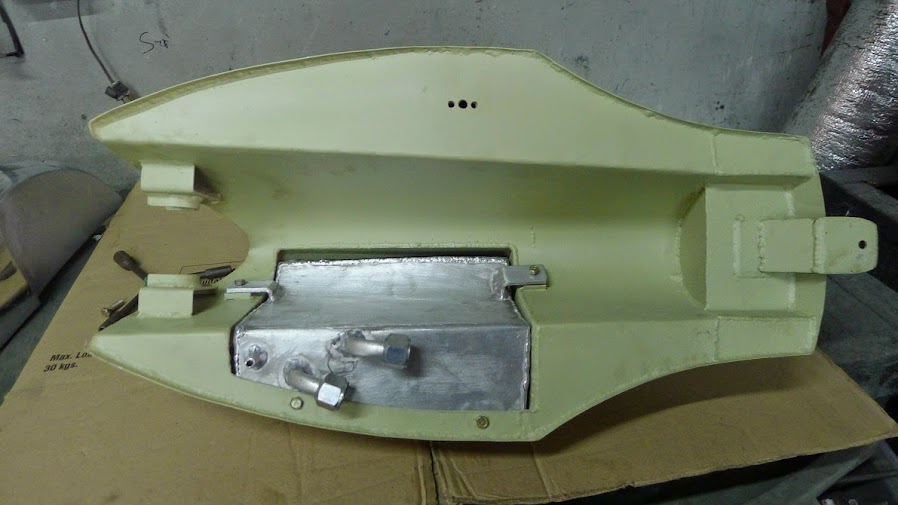
If you look at the top of the tank you will find holes for the fuel petcock. The problem is that when I ordered this thank I requested that it be made to fit a 76 CB750 setup. This tank is designed for the older style petcock. Now this may not seem like a big issue, but it is for me. For one, this was not what I wanted, and two, I wanted the option to run an aftermarket fuel petcock. Not a big deal, since the tank is all steel and has not been painted yet, I decided to take it to my welding buddy and get him to weld in a new plate so I can run an adapter and my new Pingel fuel petcock.
While my tank was at my buddy’s shop, he noticed that the welds on the oil tank were kind of crappy. We removed it and performed a pressure test. I am so glad that we did! The oil tank had about 8 pin-holes in it. I was pissed. So he re-welded the spots and cleaned up all the welds. Again, for the money I paid for this setup, I should not have had to worry about this.
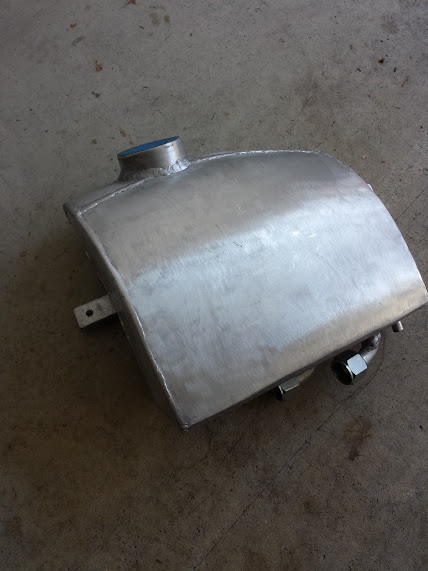
Now that the oil tank is corrected, I’m going to paint it black after I get the rest of the tank and seat painted.
Now for the other bad news. A few days later my buddy called and asked me to come to his shop. He had finished making the new fuel adapter plate, but he refused to cut into my tank. He asked me if I had ever looked inside the tank before, and I said, “no.” He was afraid to do any welding or cutting on my tank because he was worried about it catching on fire. He shined a flashlight into my tank and again, I was pissed. Before then, I had never looked inside the tank. It was new, it already had been lined, and it had never had any fuel in it. I rubbed my finger in it as far as I could reach and it felt smooth, so I had never questioned the quality of work on it. My buddy also suggested that I get the tank pressure tested. This I agreed with, due to the problems that I had with the oil tank.
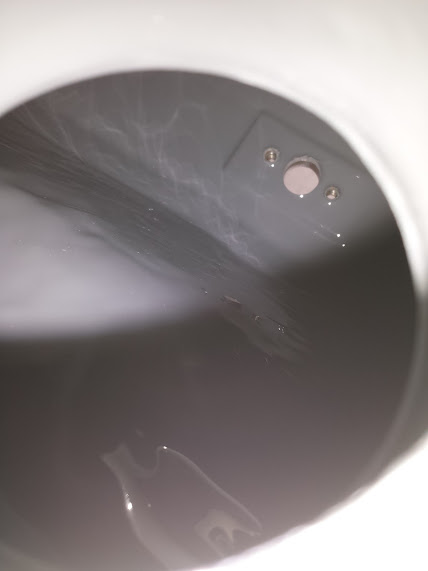
Take a look at the photo below and see what I saw.
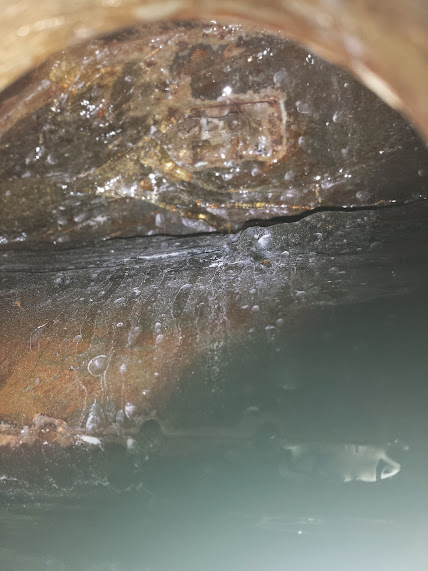
What this photo shows is a new tank that was rusty on the inside and then coved with tank liner. I ended up having to send my tank to a company in Los Angeles that specialized in restoring and relining gas tanks called Gas Tank Lining Advantage. The owner of the shop called me and said that it was going to take a lot longer for them to get finished with my tank. He informed me of the crappy job that was done on it. Apparently, my “new” gas tank was coated with one kit, and it was not smooth on the inside, so the used another kit to try to smooth it out. What I ended up with, was a tank that had over an inch of liner in it and to make things worst, the plate where the fuel petcock goes was covered with about 2 inches of liner. I would have had to drill the openings just so I could get fuel to drain into the petcock. Again, I am so pissed about it!
Although I haven’t updated my build thread in a few months, I haven’t disappeared or stopped working on my bike. It is not going as fast as I would have liked. It also looks like I am not going to meet my build completion date of May. It is going to take me another month or two to finish it. The good news is that my block and cylinder head is off getting machined. I hope to have it back by the end of the month. Unfortunately, I have had a few setbacks. My tank and oil tank ending up being a big problem. The tank and seat combo is obviously a custom build, and I am completely aware that sometimes it is going to a little work to get it to fit like you want it. I mentioned earlier that I had to have it moved forward and up a little just to get the look that I was looking for. What I didn’t expect is spending extra money correcting issues that I shouldn’t have had to do in the first place. I spent over $1200 for this combo and the quality of work was crappy. Let me explain.
Here is the view of the bottom of my tank.
If you look at the top of the tank you will find holes for the fuel petcock. The problem is that when I ordered this thank I requested that it be made to fit a 76 CB750 setup. This tank is designed for the older style petcock. Now this may not seem like a big issue, but it is for me. For one, this was not what I wanted, and two, I wanted the option to run an aftermarket fuel petcock. Not a big deal, since the tank is all steel and has not been painted yet, I decided to take it to my welding buddy and get him to weld in a new plate so I can run an adapter and my new Pingel fuel petcock.
While my tank was at my buddy’s shop, he noticed that the welds on the oil tank were kind of crappy. We removed it and performed a pressure test. I am so glad that we did! The oil tank had about 8 pin-holes in it. I was pissed. So he re-welded the spots and cleaned up all the welds. Again, for the money I paid for this setup, I should not have had to worry about this.
Now that the oil tank is corrected, I’m going to paint it black after I get the rest of the tank and seat painted.
Now for the other bad news. A few days later my buddy called and asked me to come to his shop. He had finished making the new fuel adapter plate, but he refused to cut into my tank. He asked me if I had ever looked inside the tank before, and I said, “no.” He was afraid to do any welding or cutting on my tank because he was worried about it catching on fire. He shined a flashlight into my tank and again, I was pissed. Before then, I had never looked inside the tank. It was new, it already had been lined, and it had never had any fuel in it. I rubbed my finger in it as far as I could reach and it felt smooth, so I had never questioned the quality of work on it. My buddy also suggested that I get the tank pressure tested. This I agreed with, due to the problems that I had with the oil tank.
Take a look at the photo below and see what I saw.
What this photo shows is a new tank that was rusty on the inside and then coved with tank liner. I ended up having to send my tank to a company in Los Angeles that specialized in restoring and relining gas tanks called Gas Tank Lining Advantage. The owner of the shop called me and said that it was going to take a lot longer for them to get finished with my tank. He informed me of the crappy job that was done on it. Apparently, my “new” gas tank was coated with one kit, and it was not smooth on the inside, so the used another kit to try to smooth it out. What I ended up with, was a tank that had over an inch of liner in it and to make things worst, the plate where the fuel petcock goes was covered with about 2 inches of liner. I would have had to drill the openings just so I could get fuel to drain into the petcock. Again, I am so pissed about it!
Bigsam302
Been Around the Block
Re: Bigsam302's 76 CB750F w/GSXR Forks: Project Helen - Project back on track
I finally got my tank back last week and I am completely satisfied with it. GTL Advantage had to drill numerous holes in the bottom of the tank and break up all of that crappy lining They used other chemicals to burn the remaining liner and rust out of the tank. I am so happy that I decided to wait before getting everything painted. It would have been a serious waste of money.
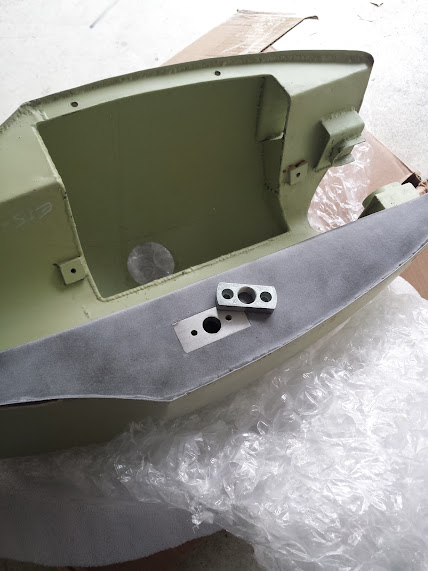
The work they did turned out awesome. Even the plate that my buddy had made was welded into my tank and it accepts the adapter plate for the Pingel petcock. Now I have the options I wanted.
Much better! It is smooth. You can actually see the fuel petcock plate in the picture. It was pressure tested and is good to go!
If there is a bright side to this, I can sleep easier now knowing that my tank is good and guaranteed and the oil tank is solid. I don’t have to worry about it leaking when I go to fill it up.
I finally got my tank back last week and I am completely satisfied with it. GTL Advantage had to drill numerous holes in the bottom of the tank and break up all of that crappy lining They used other chemicals to burn the remaining liner and rust out of the tank. I am so happy that I decided to wait before getting everything painted. It would have been a serious waste of money.
The work they did turned out awesome. Even the plate that my buddy had made was welded into my tank and it accepts the adapter plate for the Pingel petcock. Now I have the options I wanted.
Much better! It is smooth. You can actually see the fuel petcock plate in the picture. It was pressure tested and is good to go!
If there is a bright side to this, I can sleep easier now knowing that my tank is good and guaranteed and the oil tank is solid. I don’t have to worry about it leaking when I go to fill it up.
nerdsports
Active Member
Re: Bigsam302's 76 CB750F w/GSXR Forks: Project Helen - Project back on track
Sucks having to go through all of that because someone else who you trusted with your money has no pride in their work. Stoked to see how well the inside of the tank looks now.
Sucks having to go through all of that because someone else who you trusted with your money has no pride in their work. Stoked to see how well the inside of the tank looks now.
Bigsam302
Been Around the Block
Re: Bigsam302's 76 CB750F w/GSXR Forks: Project Helen - Project back on track
Finnigan,
Good to meet a fellow rider from SD. What kind of issues are you having? Do you know of any good paint shops in the area? What bike are you building.
Sam
Finnigan said:Hey man didn't realize you were in SD also. Having some issues with my Benjies body too but nothing like you're running into.
Finnigan,
Good to meet a fellow rider from SD. What kind of issues are you having? Do you know of any good paint shops in the area? What bike are you building.
Sam
Bigsam302
Been Around the Block
Re: Bigsam302's 76 CB750F w/GSXR Forks: Project Helen - Project back on track
My electrical is done!
I hate to admit it, but the Motogadget M-unit is really worth the money. I’m not very electrically inclined, and this is my first time doing all of my own wiring, but it was a breeze. Once I got my headlight figured out, it was all down hill from there (Thanks for the help Cal)! This is how my wiring use to look
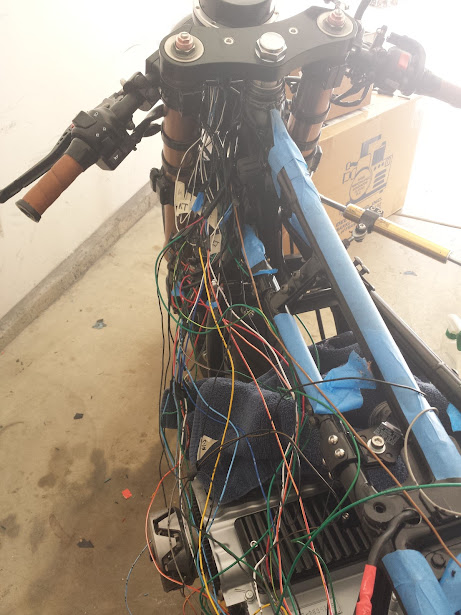
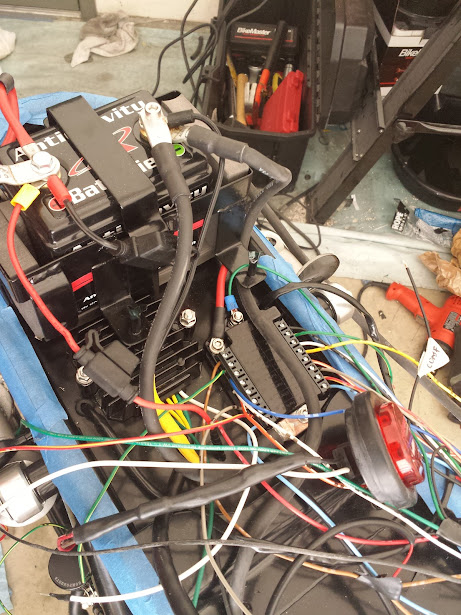
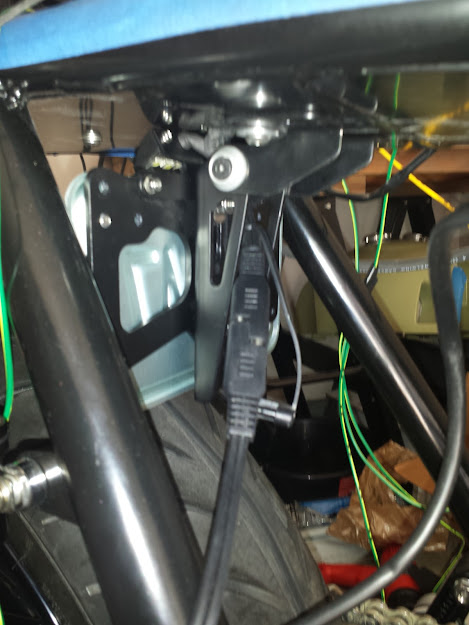
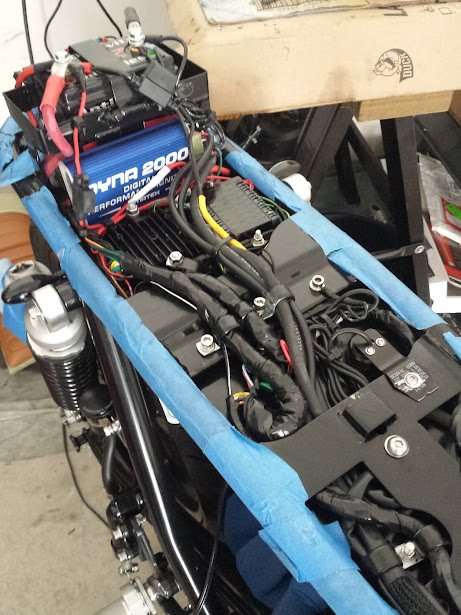
And this is how it looks now. If I had to do it all over again, I would have cut the center framing out and braced it with some 1” pipe. It takes up so much room and made it very tricky running all of my wiring. I probably wouldn’t even have used a battery box. It takes up too much space and even though my battery is small, I could have gone with a smaller-sized battery that puts out the same amount of cranking power. I had to get creative with mounting my Dyna 2000, but it works out fine. I was able to secure everything and none of the wires interfere with the seat. In fact, I still have plenty of room under the seat hump. I am happy with they way everything turned out.
One problem that I have with waiting for my engine parts to come in is that I start getting ideas and start spending money other places (I’m really trying to break that habit). After I finished all the wiring, I decided that I didn’t want to use the traditional ignition switch. I ended up buying a Motogadget M-lock. The M-Lock is pretty cool as well. I can’t knock Motogadget’s products. I did run into one problem with the M-Lock. My bike is all steel and I’m not going to run side covers or any other parts made out of plastic. So I had no place to mount it and the signal will not pass through metal. I ended up mounting the M-lock receiver to an old horn bracket. Then I drilled a 1/2" hole in the bottom of my seat tray. I placed a rubber grommet in the hole. It also acts as a rubber cushion for the m-lock receiver and you cannot see the unit from the underside through the hole. Because it’s rubber, the signal passes through it with no problem. So now I have a cool custom feature and all I have to do is run the key up under my seat to cut the bike on/off.
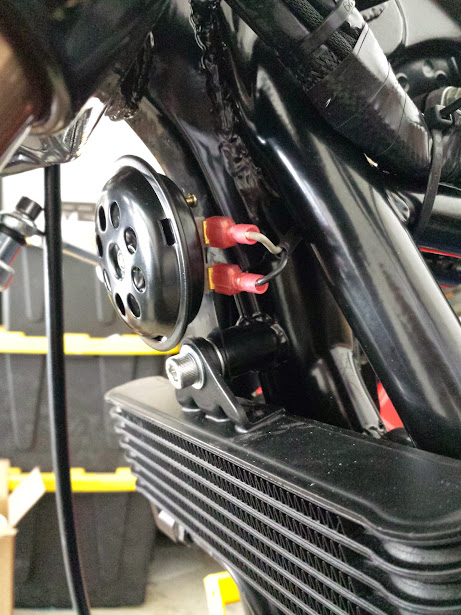
The last thing I did was move my horn. I had it between the frame, but I was worried about interference with the carburetor. Luckily I was able to mount it over my oil cooler.
My electrical is done!
I hate to admit it, but the Motogadget M-unit is really worth the money. I’m not very electrically inclined, and this is my first time doing all of my own wiring, but it was a breeze. Once I got my headlight figured out, it was all down hill from there (Thanks for the help Cal)! This is how my wiring use to look
And this is how it looks now. If I had to do it all over again, I would have cut the center framing out and braced it with some 1” pipe. It takes up so much room and made it very tricky running all of my wiring. I probably wouldn’t even have used a battery box. It takes up too much space and even though my battery is small, I could have gone with a smaller-sized battery that puts out the same amount of cranking power. I had to get creative with mounting my Dyna 2000, but it works out fine. I was able to secure everything and none of the wires interfere with the seat. In fact, I still have plenty of room under the seat hump. I am happy with they way everything turned out.
One problem that I have with waiting for my engine parts to come in is that I start getting ideas and start spending money other places (I’m really trying to break that habit). After I finished all the wiring, I decided that I didn’t want to use the traditional ignition switch. I ended up buying a Motogadget M-lock. The M-Lock is pretty cool as well. I can’t knock Motogadget’s products. I did run into one problem with the M-Lock. My bike is all steel and I’m not going to run side covers or any other parts made out of plastic. So I had no place to mount it and the signal will not pass through metal. I ended up mounting the M-lock receiver to an old horn bracket. Then I drilled a 1/2" hole in the bottom of my seat tray. I placed a rubber grommet in the hole. It also acts as a rubber cushion for the m-lock receiver and you cannot see the unit from the underside through the hole. Because it’s rubber, the signal passes through it with no problem. So now I have a cool custom feature and all I have to do is run the key up under my seat to cut the bike on/off.
The last thing I did was move my horn. I had it between the frame, but I was worried about interference with the carburetor. Luckily I was able to mount it over my oil cooler.