1975 CL360 Build

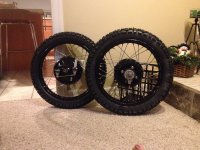
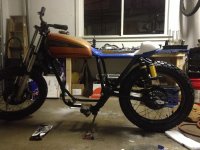
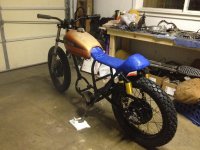
I decided to mount my own tires. ....after realizing the task at hand, I decided a beer was a necessary tool for this job. So I grabbed one. Beer one made it through the front tire. Then came the rear tire. Stronger. Thicker. Ugh. Grabbed some whiskey. Jameson. On the rocks. It was rough. But it was completed. Couple scratches. Couple times debating how much I wanted to just pay somebody to do it but it's done now and I learned from experience. I'll true them tomorrow.
 

Attachments

  • image.jpg
    image.jpg
    2 MB · Views: 309
I've pinched enough tubes that I just pay the local shop. Good you got them on without a hitch.
 
deviant said:
I've pinched enough tubes that I just pay the local shop. Good you got them on without a hitch.

I think next time I'll pay somebody to do it. I was terrified of getting the tire on then realizing I had a hole in a tube or something. I aired them up last night and they are still at they and psi as last night so I'll call it a success!
 
A couple things I've found that aid considerably in mounting tires:
Wheel lube (lots of discussions about this but I just bought some from an auto parts store; should last me a goood, long time).
Rim protectors I made from cutting up a polyethylene water jug (milk, windshield washer fluid, or antifreeze containers also work).
Warming up the tire so it is more flexible.
 
I was absolutely terrified of doing the seat since it seemed pretty difficult, but it worked out pretty damn well! I'm super satisfied with how it turned out! A few gin and tonics gave me the courage to go for it!

I used four 1 inch tall pieces of foam. I didn't have any adhesive so I pretty much just held the pieces together really tight and did it extremely carefully. The mess was massive.

It's in the garage and hopefully it hardens the way it's supposed to.
 

Attachments

  • image.jpg
    image.jpg
    1.7 MB · Views: 327
  • image.jpg
    image.jpg
    1.6 MB · Views: 311
  • image.jpg
    image.jpg
    1.8 MB · Views: 327
  • image.jpg
    image.jpg
    1.8 MB · Views: 324
  • image.jpg
    image.jpg
    1.8 MB · Views: 305
Looking good, I'm working on a brat-tracker thing too. I have the same tires, they aren't on yet but they look good on yours!
 
Cleaned the motor completely out, and painted it!
I'm getting ready to order some parts to pretty much get the whole motor built. At the moment I only really need gaskets. Anybody have any recommendations of what else I may need to build this? I need a new ignition set as well. Ebay seems to have all the good deals at the moment. Let me know if you think I need anything else! Also, when putting the gaskets on, do I need to add anything to them?

Thanks for all the help! It's so close!
 

Attachments

  • image.jpg
    image.jpg
    1.6 MB · Views: 320
  • image.jpg
    image.jpg
    1 MB · Views: 300
  • image.jpg
    image.jpg
    1.1 MB · Views: 314
It's been a long couple weeks. My girlfriend took off work for a couple weekends so I had to be a good boyfriend and go do couple things and what not. BUT NOW, I had this whole weekend to do stuff! Yes!

I put the crankcase together and put the pistons on. Went to put the cylinders on and realized I need a ring compressor, so I decided to mess with the valves and realized I need a valve compressor. So I ordered those tools and now I'm kind of at a stand still until those tools get here. My whole bike is together and just waiting for the motor!

I wrapped the exhaust and put the mufflers on the pipes. It looks rad!

In the process of waiting for parts, I decided to get online and look for some deals, came across a sweet little Suzuki TS125! 100 bucks! Clean title! So I brought that home too. It's got good compression, just needs cleaned up! Seen on the left side of this picture. I have too many projects going on at once!
 

Attachments

  • image.jpg
    image.jpg
    201.8 KB · Views: 301
Just trouble checking before I put these jugs on. The arrow on the piston is pointing forward. Correct?
 

Attachments

  • image.jpg
    image.jpg
    1.7 MB · Views: 303
Motor is in. Waiting for top end to show up so I can mount that. But it's coming along!
 

Attachments

  • image.jpg
    image.jpg
    1 MB · Views: 296
Scored a CB gas tank instead of the CL. It looks soooo much better than the CL one. Still debating on if I want to keep the seat I made or go full on brat style. Also picked up an antigravity battery to see how well it works.

I was putting the jugs on and broke a piston ring....which sucked. But I found two Pistons and rings for an insanely good price. Those just arrived today so I can put them all on tomorrow! ....with a ring compressor this time.
 

Attachments

  • image.jpg
    image.jpg
    1.1 MB · Views: 314
  • image.jpg
    image.jpg
    1.7 MB · Views: 289
Mounted exhaust and started grinding down the gas tank to give it a bare metal finish. Then all it needs is wired up!!
 

Attachments

  • image.jpg
    image.jpg
    1.4 MB · Views: 282
  • image.jpg
    image.jpg
    1.8 MB · Views: 298
Instead of filing the find I decided to paint them. Built a battery box last night.
 

Attachments

  • image.jpg
    image.jpg
    1.5 MB · Views: 301
  • image.jpg
    image.jpg
    1.6 MB · Views: 301
Back
Top Bottom