
We noticed you are blocking ads. DO THE TON only works with community supporters. Most are active members of the site with small businesses. Please consider disabling your ad blocking tool and checking out the businesses that help keep our site up and free.
You are using an out of date browser. It may not display this or other websites correctly.
You should upgrade or use an alternative browser.
You should upgrade or use an alternative browser.
CB350, homemade.
- Thread starter 1chrisb
- Start date
dawino6260
New Member
Paint guns a paint gun... aint too much in em to go wrong -- I have a cheapoid Harbor Freight one (HVLP) that I actually do a better job with than the 300 dollar Devilbiss (HVLP) -- Dont pick based on brand -- Pick based on what is the most comfortable in your personal hand -- you are the one who has to use it and your personal comfort handling it determines the outcome of your work -1chrisb said:I'm also open to suggestions on HVLP paint guns. I don't want to spend TOO much on it, but I don't want to get a piece of crap either.
Go to several places - handle several, pick the one that feels most comfortable to you -- dont just blindly order one on faith that it worked for someone else -- an artist is only as good as his favorite brush (or in this case paint gun)
Re: Re: CB350, homemade.
I disagree with this comment. I have used all kinds. Sometimes the most expensive ones aren't justified, but my iwata Spanish the crap out of my hf and craftsman guns. There are all kinds of contributing factors at play such as atomizers, needles, curculators, air passage centralization, etc. I'm not saying go and buy the most expensive one, but you do get what you pay for. Summit Racing has a great deal on a Devilbiss combo with a detail gun and a volume gun in hvlp for $150.
dawino6260 said:Paint guns a paint gun... aint too much in em to go wrong -- I have a cheapoid Harbor Freight one (HVLP) that I actually do a better job with than the 300 dollar Devilbiss (HVLP) -- Dont pick based on brand -- Pick based on what is the most comfortable in your personal hand -- you are the one who has to use it and your personal comfort handling it determines the outcome of your work -
Go to several places - handle several, pick the one that feels most comfortable to you -- dont just blindly order one on faith that it worked for someone else -- an artist is only as good as his favorite brush (or in this case paint gun)
I disagree with this comment. I have used all kinds. Sometimes the most expensive ones aren't justified, but my iwata Spanish the crap out of my hf and craftsman guns. There are all kinds of contributing factors at play such as atomizers, needles, curculators, air passage centralization, etc. I'm not saying go and buy the most expensive one, but you do get what you pay for. Summit Racing has a great deal on a Devilbiss combo with a detail gun and a volume gun in hvlp for $150.
Fox
I've still got those patches...
1chrisb said:No, no, don't worry. That's going to be a secondary process. I'll make the tubes separately, then cut the holes out of the bump and glass them in. I figure that will be easier than trying to do it all at once.
Gotcha. Any chance you could post a few pictures of glassing in the tubes? I'm thinking trying my hand at integrating the brake light I have. with the brake light I have. Who knows, maybe with all that overtime, I'll actually end up trying it before you!
M
metropolitanhighrise
Guest
What kind of primer did you use on the frame, and what paint are you going to go with. Frame paint is my next, next step!
I haven't primed yet, that's just bare steel. That is soon on my to do list...get the frame and swingarm painted, and new bushings and bearings installed. Then I'll be a lot closer to having a roller. Got some major work done on the tank mold last night, I'll upload pictures later, as I'm at work for the morning. Next steps are to rebuild the forks and clean up the lowers, start fiberglassing, and I suppose another parts order is about due. Also need to clean up the wheels and see about getting my triple tree made.
Fox
I've still got those patches...
1chrisb said:Fox: I will if I remember man! I need to order the rest of my fiberglass materials TODAY. Been putting it off too long!
'preciate. Sorry to be askin' all these things of you, but could you post your materials/where you got them?
Stoked to see that tank rendering btw.
The mold is made out of the floral foam bricks you can get at any hobby/craft store. I got them at Hobby Lobby for $4/6 blocks. They're stuck together with spray adhesive, then I covered it with foil using the spray adhesive, so that the resin doesn't soak into the foam.
Got a question for those that have made their own tank. I've got the outside about done as far as carving goes. I was planning on making the tank in two pieces, bottom/tunnel, and top/sides. Will it work to carve the tunnel out of the foam and use one mold for both pieces, or should I make a separate mold to lay the glass on?
Got a question for those that have made their own tank. I've got the outside about done as far as carving goes. I was planning on making the tank in two pieces, bottom/tunnel, and top/sides. Will it work to carve the tunnel out of the foam and use one mold for both pieces, or should I make a separate mold to lay the glass on?
frankenbike
www.fb-stuff.com
I know a guy that did the complete tank in one shot with fiberglass. The foam was supposed to be melted out with acetone....buuuut, didnt work out so well.
#1 Even if you use some decent epoxy for your fiberglass, it can still get eaten up by the chemicals that you would need to burn out the styrene "mold" from the inside of the tank.
#2 If you do it in 2 parts you can use the actual frame tunnel on a stock tank as your mold..then just epoxy your custom tank top to a stock fitting tunnel.
#3 Caswell makes the only tank liner that I would ever put into a fiberglass tank. I have seen both POR15 and KREEM FAIL FAIL FAIL.
#4 Be 100% with the work that you put into anything that is flammable and that close to your crotch.
Big-D
Been Around the Block
frankenstuff said:#4 Be 100% with the work that you put into anything that is flammable and that close to your crotch.
This may be the single best piece of advice ever given haha
Thanks for the +1 on the Caswell liner. I'll be sure to get that stuff. Also, I never planned on doing it all in one shot. I think I'm going to drill a hole in the fiberglass for the filler bung, so that will require access to the inside to glass against that. And I'm going to make my own tunnel no matter what.  It may be easier to use an existing tank, but if I wanted easy, I wouldn't be making my own. I want a close fit, the stock tank seems to leave lots of extra room between tunnel and frame. Also, the tunnel will need to be longer, as I'm extending the tank all the way up against the fork tube.
It may be easier to use an existing tank, but if I wanted easy, I wouldn't be making my own. I want a close fit, the stock tank seems to leave lots of extra room between tunnel and frame. Also, the tunnel will need to be longer, as I'm extending the tank all the way up against the fork tube.One thing I would recommend is at a bare minimum, epoxy resin for a tank. Vinylester resin should be even better (I have no experience with the stuff). The Caswell liner will protect just fine, but if you happen to miss a spot with the liner (and it's definitely possible as you can't see the entire inside of the tank when complete...) your polyester resin won't last long at all. Most epoxies should hold up well against ethanol. Vinylester holds up even better, but I've only seen examples of vinylester being exposed to race fuel, so you should look into that. A great resource that you can lose a few days reading up about this stuff is the Composites Central forum: compositescentral.com
Definitely search around there a lot before starting.
Good luck!
Definitely search around there a lot before starting.
Good luck!
dawino6260
New Member
I've always had good luck using West system to make tanks... Horrible luck with polyester resins -- never last more than a couple of years versus the West stuff I've still got a bike out there with no spiderwebbing after 10 years and the guy has about 80k miles on it
Time to give the fine readers of DTT a say in my build. I'm having a hard time deciding between colors and options, so I'm giving you all some weight in the decision-making process. I have the leather I'm going to use for the seat, and plan on color matching to them so everything matches. I have a dark gray leather that will be the main color, and two colors of orange, one of which will be the one I use for the stripe/accent color. I really like the color of the darker orange, and the more contrasting texture, but it's a lot thicker than the gray, so I might have problems with sewing stripes in with a french seam. The other orange is alright, and matches thickness much better, but I like the color of the other better. Have a look at the picture and please vote.
After you make that decision, I'm trying to decide if I should paint the frame orange or gray, as the only orange I have planned so far is the stripe you can see on the renderings, as well as some accents here and there. Feel free to leave comments with your vote, such as if I should paint certain parts orange and other parts gray.
All the colors together
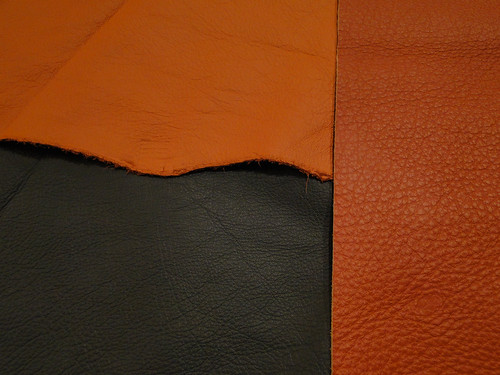
DSC00050.jpg by cb_eric22, on Flickr
Close up of textures
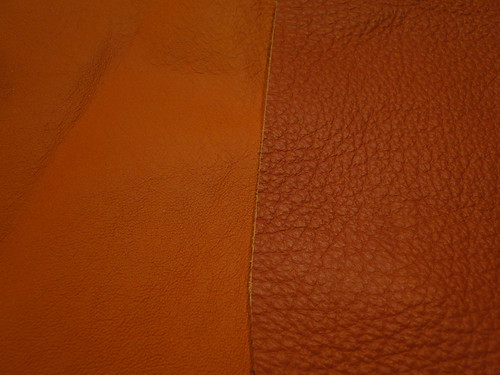
DSC00046.jpg by cb_eric22, on Flickr
Gray leather
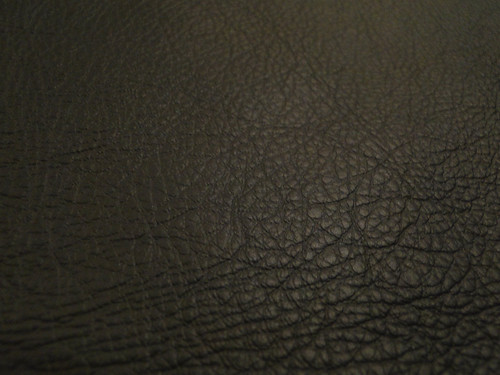
DSC00052.jpg by cb_eric22, on Flickr
I can't guarantee these pictures are an accurate recreation of the true color, but it should be close enough. The lighter orange is the thinner one, the darker orange is thicker.
After you make that decision, I'm trying to decide if I should paint the frame orange or gray, as the only orange I have planned so far is the stripe you can see on the renderings, as well as some accents here and there. Feel free to leave comments with your vote, such as if I should paint certain parts orange and other parts gray.
All the colors together
DSC00050.jpg by cb_eric22, on Flickr
Close up of textures
DSC00046.jpg by cb_eric22, on Flickr
Gray leather
DSC00052.jpg by cb_eric22, on Flickr
I can't guarantee these pictures are an accurate recreation of the true color, but it should be close enough. The lighter orange is the thinner one, the darker orange is thicker.


