
Hello everyone! This is kinda after project actually because I'm already done with the bike but I thought I would post it anyway. I've been a long time lurker of this forum and learned a great deal! Absolutely amazing people on here, very helpful and knowledgeable. I pretty much didn't need to ask any questions or start new threads, I mean every question or problem I had, I would search on here and find the solution right away through reading other people's posts. The forum is a goldmine for newbies like me.
Recently bought a 1970 Honda CL175 for dirt cheap from a guy who has a shop in baltimore and was going to restore it for his daughter but she lost interest. Wasn't running but ran the season before (of course). This was going to be a small in town city scrambler type of bike and I didn't have much cash to spend on it. Here it is the day I bought it:

It was in alright shape, nothing some elbow grease and some tools couldn't take care of. So here were the bad:
- No title, last time it was registered was in 1985, it actually had the registration card from MD.
- Spark plug threads were stripped
- muffler had rust holes
- fork seals were shot
- rear shocks shot
- carbs clogged up
- some electrical issues
- throttle cable snapped
- clutch cable bad, clutch adjuster fixing piece broken
- rusted rims, i think it had some water in the tires for a while, the rust was only on one side of the rims
- clogged petcock
- rusted seat pan
- broken headlight
- rusted controls
...etc...etc, the usual old bike problems, but these were the majors
Started taking it apart and trying to get it started at least.

Found out there was no battery tray.

First order of business, cleaned out the carbs. I actually bought an ultra sonic cleaner from harbor freight. Worked pretty well but not nearly as good as I thought it would. Overall not worth the money.


BTW I think these carbs came from a CB175 they were 21mm, and CL175 manual called for 22mm.
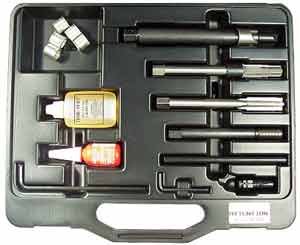
Next up were the stripped spark plug threads. I read a bunch of stuff about which kit to use and ended up with TIMECERT spark plug thread repair kit. Kinda expensive at about $130 but IMHO it is well worth it. I've used helicoil before a bunch of times and TIMECERT is way better I think, especially for something as important as spark plugs. The instructions were pretty simple. I was worried about small shavings getting into the cylinder, but I used some grease that caught most of it and then blew it out with a compressor. Seemed to work pretty well.
Then I measured the compression of both cylinders, both came out to be 130-135psi. The manual called for 142psi as normal. So, I thought it was close enough and decided not to do the top end.


BTW the compression test kit from Harbor Freight is terrible, I read a bunch of complaints about it. The hoses are too soft I think and kept reading 35psi, which scared the crap out of me initially but I went and bought craftsman compression test kit from sears and it worked fine. So stay away from HF test kits.
Anyway I got the bike started and it ran pretty good but still needed some fine tuning because it had no air filters and exhaust was leaking somewhere. But at least I knew it ran!
Bought a bunch of parts from DCC and continued to disassemble.


Then I got the rear swing arm stretched about 2.5 inches. I didn't want a huge stretch but I felt like the bike overall was a little too short for me as far as the stance. So I thought a little stretch will make it look just right.
So here it is with the stretch

And Here is the difference:

I really like the fat tires, scrambler look. Did some research and reached a conclusion that I would need to put on wider rims in order to run wider tires. I decided to go with Dunlop k70 tires because I got a killer deal from a local parts guy. I ended up getting 18x4.00 rear and 19x.3.25 front tires. I knew the fat tires were going to rob some power, acceleration, and top speed. But again this was going to be my in-town cruiser to and from work in downtown traffic so I wasn't too worried about it.
So, I went with MikesXS rims, 2.15x18 rear, and 2.15x19 front. I was worried if they would fit the CL175 hub and spokes but they turned out fine. Here is the thread I started about it:
http://www.dotheton.com/forum/index.php?topic=46649.0
So here are the pics of the wheel build:


I used dial gauge and a wheel stand from Harbor Freight to true the rims and it worked out great. The tolerances specified on the manual were pretty generous already but I ended up truing it even more. It took a looooong time to do this, definitely requires a lot of patience.
Cleaned up the frame next. Just used some steam cleaner and some degreaser to take off all intergalactic crud that was on there. I was very surprised how the original paint was still in good shape and decided not to spend any money on painting.


Rebuilt the forks next. This was a bit of a challenge because of the stubborn old fork seals that were stuck in. I ended up using a method I read here, which was filling it with water then using a hydraulic jack stand pinning it under something to push the seals out. Worked like a charm! Debated whether I should use tranny fluid or fork fluid. Ended up using w15 modern fluid. Seems to work fine, except I hear a lot of slushing when the forks compress. Not sure if thats good or bad.

Then I finally got a roller. Had to come up with something for the rear brake rod. Ended up making it from a piece of metal rod. Also mounted the tank to see what it would look like.


Then I cut the rear fender up. Stripped all the paint off and clear coated it. Did the same thing to the gas tank. But decided to leave the paint around the honda badge, mainly because I was lazy but also cuz it kinda looked cool.


Then I cut up my exhaust, muffler was in bad shape had rust inside it. Luckily the pipes were ok. I saw on here the DIY baffles someone had made. Thought that was awesome, so off I went to home depot and got some copper pipe. Made the baffles and tested them out. Actually sounded really good! Not sure about performance. Probably made it worse.


I found some stock airfilters on ebay for cheap and decided to go that route because I current jetting seemed pretty close to stock. I think they worked out pretty well, it pulls nicely, and seems to work with the exhaust well. At least in my opinion. Painted and reconditioned small bits and pieces like headlight. Installed DCC turn signals. Used one of the old giant turn signals and turned them into a stop light. Had to gut the internals out and replace them with some generic stop light guts I got from Autozone for $10, worked perfectly. I will paint the lens with a red tint. Reassembled everything and here she is minus the seat:


Experimented with this seat from biltwell but it just looked terrible and wasn't sure how I was going to mount it. Then ended up going with a biltwell sportster seat from lowbrow customs. It worked perfectly. I had to make a small tab to mount the front part to the frame, but the rear mounted on to the fender so it was easy.

Oh and also, I had the hardest time finding this little guy! The damn exhaust crush gasket. Anywhere I looked I found copper ones that were supposedly replaced the previous part number but were too large. Ended up getting the right ones on ebay but they were not copper, more like fiberglass. After installing them the bike ran like clock work.

And here she is as it sits right now!


OH BTW I live in an apartment and did all this in my underground garage hehe. I ride it to work everyday, and its a blast in city traffic! Absolutely perfect for the city!
Recently bought a 1970 Honda CL175 for dirt cheap from a guy who has a shop in baltimore and was going to restore it for his daughter but she lost interest. Wasn't running but ran the season before (of course). This was going to be a small in town city scrambler type of bike and I didn't have much cash to spend on it. Here it is the day I bought it:
It was in alright shape, nothing some elbow grease and some tools couldn't take care of. So here were the bad:
- No title, last time it was registered was in 1985, it actually had the registration card from MD.
- Spark plug threads were stripped
- muffler had rust holes
- fork seals were shot
- rear shocks shot
- carbs clogged up
- some electrical issues
- throttle cable snapped
- clutch cable bad, clutch adjuster fixing piece broken
- rusted rims, i think it had some water in the tires for a while, the rust was only on one side of the rims
- clogged petcock
- rusted seat pan
- broken headlight
- rusted controls
...etc...etc, the usual old bike problems, but these were the majors
Started taking it apart and trying to get it started at least.
Found out there was no battery tray.
First order of business, cleaned out the carbs. I actually bought an ultra sonic cleaner from harbor freight. Worked pretty well but not nearly as good as I thought it would. Overall not worth the money.
BTW I think these carbs came from a CB175 they were 21mm, and CL175 manual called for 22mm.
Next up were the stripped spark plug threads. I read a bunch of stuff about which kit to use and ended up with TIMECERT spark plug thread repair kit. Kinda expensive at about $130 but IMHO it is well worth it. I've used helicoil before a bunch of times and TIMECERT is way better I think, especially for something as important as spark plugs. The instructions were pretty simple. I was worried about small shavings getting into the cylinder, but I used some grease that caught most of it and then blew it out with a compressor. Seemed to work pretty well.
Then I measured the compression of both cylinders, both came out to be 130-135psi. The manual called for 142psi as normal. So, I thought it was close enough and decided not to do the top end.
BTW the compression test kit from Harbor Freight is terrible, I read a bunch of complaints about it. The hoses are too soft I think and kept reading 35psi, which scared the crap out of me initially but I went and bought craftsman compression test kit from sears and it worked fine. So stay away from HF test kits.
Anyway I got the bike started and it ran pretty good but still needed some fine tuning because it had no air filters and exhaust was leaking somewhere. But at least I knew it ran!
Bought a bunch of parts from DCC and continued to disassemble.
Then I got the rear swing arm stretched about 2.5 inches. I didn't want a huge stretch but I felt like the bike overall was a little too short for me as far as the stance. So I thought a little stretch will make it look just right.
So here it is with the stretch
And Here is the difference:
I really like the fat tires, scrambler look. Did some research and reached a conclusion that I would need to put on wider rims in order to run wider tires. I decided to go with Dunlop k70 tires because I got a killer deal from a local parts guy. I ended up getting 18x4.00 rear and 19x.3.25 front tires. I knew the fat tires were going to rob some power, acceleration, and top speed. But again this was going to be my in-town cruiser to and from work in downtown traffic so I wasn't too worried about it.
So, I went with MikesXS rims, 2.15x18 rear, and 2.15x19 front. I was worried if they would fit the CL175 hub and spokes but they turned out fine. Here is the thread I started about it:
http://www.dotheton.com/forum/index.php?topic=46649.0
So here are the pics of the wheel build:
I used dial gauge and a wheel stand from Harbor Freight to true the rims and it worked out great. The tolerances specified on the manual were pretty generous already but I ended up truing it even more. It took a looooong time to do this, definitely requires a lot of patience.
Cleaned up the frame next. Just used some steam cleaner and some degreaser to take off all intergalactic crud that was on there. I was very surprised how the original paint was still in good shape and decided not to spend any money on painting.
Rebuilt the forks next. This was a bit of a challenge because of the stubborn old fork seals that were stuck in. I ended up using a method I read here, which was filling it with water then using a hydraulic jack stand pinning it under something to push the seals out. Worked like a charm! Debated whether I should use tranny fluid or fork fluid. Ended up using w15 modern fluid. Seems to work fine, except I hear a lot of slushing when the forks compress. Not sure if thats good or bad.
Then I finally got a roller. Had to come up with something for the rear brake rod. Ended up making it from a piece of metal rod. Also mounted the tank to see what it would look like.
Then I cut the rear fender up. Stripped all the paint off and clear coated it. Did the same thing to the gas tank. But decided to leave the paint around the honda badge, mainly because I was lazy but also cuz it kinda looked cool.
Then I cut up my exhaust, muffler was in bad shape had rust inside it. Luckily the pipes were ok. I saw on here the DIY baffles someone had made. Thought that was awesome, so off I went to home depot and got some copper pipe. Made the baffles and tested them out. Actually sounded really good! Not sure about performance. Probably made it worse.
I found some stock airfilters on ebay for cheap and decided to go that route because I current jetting seemed pretty close to stock. I think they worked out pretty well, it pulls nicely, and seems to work with the exhaust well. At least in my opinion. Painted and reconditioned small bits and pieces like headlight. Installed DCC turn signals. Used one of the old giant turn signals and turned them into a stop light. Had to gut the internals out and replace them with some generic stop light guts I got from Autozone for $10, worked perfectly. I will paint the lens with a red tint. Reassembled everything and here she is minus the seat:
Experimented with this seat from biltwell but it just looked terrible and wasn't sure how I was going to mount it. Then ended up going with a biltwell sportster seat from lowbrow customs. It worked perfectly. I had to make a small tab to mount the front part to the frame, but the rear mounted on to the fender so it was easy.
Oh and also, I had the hardest time finding this little guy! The damn exhaust crush gasket. Anywhere I looked I found copper ones that were supposedly replaced the previous part number but were too large. Ended up getting the right ones on ebay but they were not copper, more like fiberglass. After installing them the bike ran like clock work.
And here she is as it sits right now!
OH BTW I live in an apartment and did all this in my underground garage hehe. I ride it to work everyday, and its a blast in city traffic! Absolutely perfect for the city!


