
We noticed you are blocking ads. DO THE TON only works with community supporters. Most are active members of the site with small businesses. Please consider disabling your ad blocking tool and checking out the businesses that help keep our site up and free.
You are using an out of date browser. It may not display this or other websites correctly.
You should upgrade or use an alternative browser.
You should upgrade or use an alternative browser.
Welding Gas Tanks
- Thread starter 2_DONE_THE_TON
- Start date
XS750AU said:Finally got some Aluminium flux - shit it is hard to weld Aluminium, without it slumping into a puddle.
Top and bottom are 2.8mm and the middle is 1.4mm thick.
Practice, practice and more practice needed.
Great start! You’ll find that different torch sizes and settings will help. Since the aluminum flows so easily a lot of guys, myself included, prefer a larger tip size but a small feather in the flame as opposed to a completely neutral flame.
Play with your torch settings and keep up the good work.

Ryan Stecken said:Once again I ran into a special project.A friend is modifiyng a good olde CX 500 and wants to clean up his tank fuel cap.
He wants remove the huge stock filler cap and grind off the mountings and just run the turnable filler cap on top.
Problem here is the "indent" around the filler cap which he would like to fill up.
how would you guys go about?
I thought about grinding off and cleaning thouroughly than cutting up a piece of thicker steel and TIG welding it into place to make it sit flush with the tank top...
thanks!
Everyone has suggested a lot of good ways to approach this, but no one mentioned the finishing process... This is not mandatory, but necessary if you want professional results. Even if you don’t use this info, maybe someone will find it interesting.
After you cut out the existing section and weld in your new panel, regardless of method, the top of the tank is going to be distorted. To correct this you need to get a dolly similar to the contour of the tank and apply firm upward pressure below the weld while hammering with a low-crown hammer above. If you’re using a large modern-type filler cap you may get lucky and be able to squeeze your hand in there. Otherwise you’ll have to cut an access hole in the tunnel, which you can just weld up at the end. If you have any very tall weld sections you would carefully knock those down with a file first, otherwise leave the bead as is.
The planishing will do two things:
1. Flatten the weld to the point where no grinding will be needed. Remember, when you grind you remove material and sheet metal is already thin.
2. Compress and stretch the shrunken weld bead. This creates more surface area, and it has to go somewhere. The upward pressure you’re placing on the dolly combined with the momentum of the hammer strike will raise the newly stretched area correcting for the weld distortion.
You would be surprised how hard you may have to hammer on the bead, but be careful not to stretch too much or you’ll end up with a high spot. I prefer to get close with the hammer, and then switch to a slapper to fine tune it.
With practice you can create a filler-free repair. Although that usually isn’t practical. Using this method you can finish the panel to the point where you are satisfied.
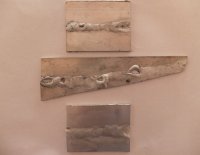
I wish I had some better examples handy, but I've started deleting most pictures after the customer receives the work and gives the "ok". Here is a Honda tank that I recently did some work on. Along with making room for an electric fuel pump, the customer asked me to delete the side emblem mounts which are recessed similar to the fuel cap. These pictures show the weld distortion compared to the origional contour, and then after some hammer/slapper dolly work. I was already putting a lot of time into this tank for the fuel pump so the customer choose not to have me finish it all the way back to orgional contour, but close enough to be blended with minimal filler.
Hope this helps.
Attachments
crazypj
Split personality, I fake being smart
doc_rot said:do the manual specifically state no flux needed? or just not mention it?
From my experience welding stainless with TIG if you do not back purge with argon an oxide crystal structure forms which makes the welds very prone to cracking, even though they may look good on the outside.
Personally I've always found same effect when welding stainless steels (usually no idea of what grade stainless either-shiny, doesn't rust grade
 )
) In my understanding, flux is used to 'clean' material and prevent oxidation although some fluxes will cause major problems if overheated. 'Stick electrodes have a sheild not a flux altough it is often called flux
Pretty surprising there is so much debate about welding but, I guess when your 'something of an expert' .................(been watching wayyyy too much 'Peppa Pig with grandson ;D )
There used to be 'comparison' charts' but majority were from before WWll. In Britain ( and commonwealth) EN numbers were introduced to standardise steels (Emergency Number) And various Aluminium alloys often got the RR (Rolls -Royce) designations or trade / patent names (eg, Duralumin). In the early 1970's, there was a move to standardise to ISO numbers which really screwed everything up (and why you still see a lot of stuff with EN, or SAE specs) I've only seen a few comparison charts and they are all either from material manufacturers or 'hobby machinists' who have accumulated various material date sheets over several years.
XS750AU said:Finally got some Aluminium flux - shit it is hard to weld Aluminium, without it slumping into a puddle.
It's when the blobs splash on the floor things can get 'interesting'
datadavid
Over 1,000 Posts
Do you brush your workpieces off with a s/s brush first? I notice a change in color/sheen when the material reaches welding temp, about when your filler starts to drop off and beads melt onto the base material is the time to back off of the heat.XS750AU said:Finally got some Aluminium flux - shit it is hard to weld Aluminium, without it slumping into a puddle.
Top and bottom are 2.8mm and the middle is 1.4mm thick.
Practice, practice and more practice needed.
crazypj
Split personality, I fake being smart
If you rub some soap near area your welding, (ordinary cheap bar soap) it turns brown around 400f and black when weld area is 'about right'. (soap line about 1/2" from weld line)
You can also use the same 'trick' when annealing aluminium, great wen 'emergency' straightening brake levers, etc)
You can also use the same 'trick' when annealing aluminium, great wen 'emergency' straightening brake levers, etc)
Pete12
Been Around the Block
crazypj said:If you rub some soap near area your welding, (ordinary cheap bar soap) it turns brown around 400f and black when weld area is 'about right'. (soap line about 1/2" from weld line)
You can also use the same 'trick' when annealing aluminium, great wen 'emergency' straightening brake levers, etc)
Same trick with soot - use a low acetylene flame (no oxygen) and hold your piece above it until it has a nice sooty covering. Heat it until all the soot disappears and you are roughly at annealing/welding temperature. Before welding give it a quick clean with the stainless steel wire brush. Has worked perfectly for me for years.
der_nanno
Faster!
Not Ryan, but rocking one too. They are fairly good to be honest. But far off from what modern, fully digital TIGs can do. E.g. Upslope/Downslope only work in automatic mode and not regular 2T welding. As such a footpedal is a must, if you want to do any more serious welding. The older models lack AC-frequency adjustment, which makes their usefulness for aluminium-welding a bit limited.
Be aware that this is just a case of badge-engineering, e.g. the same machine is available as a Vector AC/DC 200, which is considerably cheaper nowadays.
Cheers,
Greg
Be aware that this is just a case of badge-engineering, e.g. the same machine is available as a Vector AC/DC 200, which is considerably cheaper nowadays.
Cheers,
Greg

der_nanno
Faster!
Yup, that's the older version as I have it. Stahlwerk does a newer version in a fancier case, that's what Ryan uses. If funds allow go for that version instead, as it is generally a slightly more refined version.
It seems as these semi-analogue TIGs all run the same mainboard inside, so the actual results should be very closely matched. Also, if you buy one, test the HF-start immediately. These seem to give more than their fair share of trouble.
(I am looking into replacing my Stahlwerk early next year... not sure, if I'll just go with the updated version or something entirely different as in a fully digital TIG - NTP does seem to have an interesting model called AC/DC 210 as that also incorporates various waveform-features... Still, after not welding for three months, I am myself probably the biggest negative contributor to bad TIG-results.)
Addendum: Get a separate plasma cutter. Plasma cutting is dirty and means cleaning the machine when switching between processes. A separate cutter will spare you from that.
crazypj
Split personality, I fake being smart
datadavid said:You are in the u.s right? We only use asme standards on american steels like inconel and the likes, would be nice to find comparation tables between asme and iso norms, cause your fillers are completely unknown here..
LOL, typical American attitude. Orstillia, geography is pretty much ignored by Americans (Australia in case you didn't get the phonetic version
)datadavid
Over 1,000 Posts
Im swedish. They never know where that is!crazypj said:LOL, typical American attitude. Orstillia, geography is pretty much ignored by Americans (Australia in case you didn't get the phonetic version
Skickat från min Pixel via Tapatalk
I had a Swedish pen pal in middle school and high school. It has always been a life goal to visit there.
crazypj
Split personality, I fake being smart
I'm Welsh, was asked if it's in Scandinavia Sorry DD, should have remembered you were not Americandatadavid said:Im swedish. They never know where that is!
Skickat från min Pixel via Tapatalk
datadavid
Over 1,000 Posts
It kind of was scandinavian in the dark ages due to danish "interests", wasnt it?crazypj said:I'm Welsh, was asked if it's in Scandinavia Sorry DD, should have remembered you were not American

Skickat från min Pixel via Tapatalk
datadavid
Over 1,000 Posts
This is s sweden right now.. not very appealing..irk miller said:I had a Swedish pen pal in middle school and high school. It has always been a life goal to visit there.
Skickat från min Pixel via Tapatalk


