Follow along with the video below to see how to install our site as a web app on your home screen.
Note: This feature currently requires accessing the site using the built-in Safari browser.
We noticed you are blocking ads. DO THE TON only works with community supporters. Most are active members of the site with small businesses. Please consider disabling your ad blocking tool and checking out the businesses that help keep our site up and free.
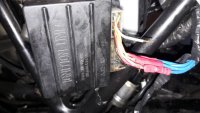
Obviously your charging circuit is dead and it is just running on the battery voltage. From what you describe you need to disconnect all connectors and clean them. Also check the continuity of the wires going to the alternator they are prone to breakage as they leave the alternator cover. Refer earlier post. The regulator is earthed by the black wire from the harness, not the physical attachment to the battery box. Most likely the original regulator is fine, start with connections and continuity.
Well done.
Tim.
Hi Ryan
It really does sound to be running well considering the limited tuning.
Not sure if I have given you the regulator test method before - refer attached.
V2 in the test method refers to the voltage through the alternator energiser coil. Now while it says that if that voltage is no good then replace the regulator. The other point of failure is the green and brown wires into the alternator. I have 3 alternators, 2 of them have broken green or brown wires where enter the alternator cover.
V1 is the regulated voltage from the regulator.
Good luck
Tim
Alternator lead wires were broken on both and had to be soldered back together + a lot of corroded connectors on the left side of the battery box, where acid fumes had been venting on the alternator connecting blocks. And a poorly conceived ground harness made by p.o was reverted to normal function.
Not to mention that positive lead from rectifier went through all the loads before charging the battery, leaving the bike operational, but with a dead battery! Every problem after that i caused myself and can be read about in the build thread i think
Guys,i bit the bullett and got me these BST36's off a Triumph Sprint 900....i little bit over my budget but I had to do it...will try them for now even though data's words on needle wear (keihins are impossible to get round here).
From the outside they look good,one of the vents on the carb top was not plugged off.I guess these should be plugged off?
Gonna take a look on the insides on the weekend.
Am I right that the brown fitting near the float bowls are for the gas and top ones (black plastic) are air vents?
What should I do with them when I run pods?
Ran into a different problem this weekend on my front brakes.Just redid them with fresh seals and new pads.Now the left hand "base plate"which bolts onto the fork bottoms is impossible to get beneath the fork lowers.
Did any of you guys had this issue yet on your XS´s?
Right side was super easy,left side is completely off,is it possible that the fork lowers are bent?
Left hand fork can slide freely on the axle when not clamped down, made the mistake myself of clamping it too close to the wheel, misaligning the fork and rubbing the bolts holding the disc on some part of the brake. Try wiggling the fork out until the disc is in the middle of the bracket holding the brake piston.
Regarding the vent on the carb top: As you kept the stock petcocks, you could get your vacuum from there as well (that's what it's used for on the trumpet). Lower vents have to be open and yes it does make sense to put on the longest hoses you can as dust won't get up the hose as easily.
As far as the brakes are concerned, they rest on a sliding pin and can be slid around, so you can offset them to the left and right.
Hey guys thanks for your comments:
Heres my issue with the left hand side brake assembly.
The black adapter plate has no space between the fork bottom and the brake disk.
I had no problems on the right hand side brake assembly.how can i solve this problem?
Hi Ryan
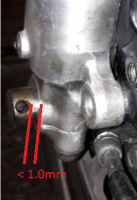
Dave is correct you slide the axle too far out of the fork leg. Dave has done it, I have done it and now you have done it, so you are not alone ;D
Just undo the clamp and at the bottom of the clamp and slide the axle into the fork (refer photo) and clamp and all will be good. Forks are usually bent back, not sideways.
Cheers
Tim.
Hi Ryan
Dave is correct you slide the axle too far out of the fork leg. Dave has done it, I have done it and now you have done it, so you are not alone ;D
Just undo the clamp and at the bottom of the clamp and slide the axle into the fork (refer photo) and clamp and all will be good. Forks are usually bent back, not sideways.
Cheers
Tim.
Right. The left side cap is the last thing you tighten when assembling the front end. Mechanically, the idea is for the axle to tightly clamp all the components - spacers, bearings and the right side fork leg - together making the assembly very rigid. Think of the assembly with just the lower fork legs and the spacers, bearings and axle without the wheel and the rest of the bike. That whole assembly is the moving part of your front suspension and you would like it to be very strong and rigid so it does not twist and flex when you hit bumps. Add a fork brace to the top and you have a pretty strong solid unit. The front wheel just spins on the bearings clamped between the spacers, and is properly located between the legs due to the spacers that register off the right leg. The left leg is free to "float" to its correct position after everything is together after which time you can clamp it down to the axle. This is made this way so that there is less chance of binding up the two legs. The two forks are made parallel by the top and bottom triple trees. If the axle and related parts are not very precise and the left fork leg was part of the clamped up assembly, it would force the fork legs to potentially be too far apart or two close together which would cause the suspension to bind up as it telescopes. In fact, after you have all the front end parts assembled and the axle tightened down, it is a very good idea to bounce the suspension up and down a bit before clamping the left fork leg around the axle. That way it should be in the perfect position for smoothest fork operation. Once it's found its spot, clamp it down and your caliper should be in the correct place.
Thanks guys for your fast support!I will try this as soon as I´m back on the bike!
As for the "new" Mikuni carbs:Starting off with 42´s and 137 mains.Needle Position is 4 counted from the the top,on how many turns of the mixture screws would you guys start out?
This bike drives me crazy,in q positive and negative way....
Investigated yesterday in my missing spark problem yesterday:
Found that the PO connected the stock loom with the igniton box with wobbly cheap connectors....replaced them with new connectors and boom spark on all 3....
Afterwards I popped the mikunis on...the bike started right up and revvs really nicely...
After a few minutes...Cylinder 1 spark gone...had no time to investigate further...maybe you guys have some advice how to procede...
I then followed your advice concerning the brakes...worked nicely...bled them and boom binded up brakes....what could cause this?
Researched and found that there is a tiny hole in the master cylinder which can cause this if dirty.
Looks like the Ignition box was the problem....had my good friend Der_Nanno coming along with two of his ignition boxes and booom strong spark on all three!
"new" box is already on the way!
she runs nicely on the SS carbs!
solved the brake problem too,the axle was not centered...thanks data for clearing this one up!
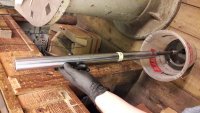
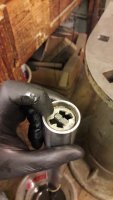
started with opening up the forks..kinda got stuck on the dissassembly, how do I get the inner parts unmounted from the chromes fork stanchions?the manual says I have to push down the "keyed" top!
hope you can help me!
Ryan
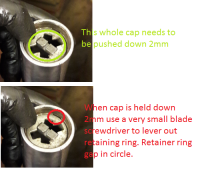
Good progress. I found it easier to disassemble with the forks in the bike. The triple clamps hold the forks really well, otherwise you need a strong vice with good soft faces (preferable with tube diameter hole to match tubes). I used a big screw driver to push down on the cap, while trying to lever out the retainer ring with the other hand - not easy. Impossible to do if you do not have a solid way to hold the fork tube (triple clamp or vice). Once you have done the first, it is much easier for the next.
Good luck
Tim
This site uses cookies to help personalise content, tailor your experience and to keep you logged in if you register.
By continuing to use this site, you are consenting to our use of cookies.


")