1963 Suzuki Colleda Black Betty cafe-ish build

wfo speedracer

Been Around the Block
Not really sure what category this fits into so for now I am going to say cafe racer build, I call he Black Bettyy because shes a dirty girl ! I am making the following disclosure. If you are a Suzuki purist please leave this thread now, I am doing you a favor as nothing but despair and heartache await you if you continue to read this thread, you have been warned

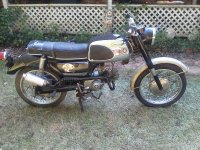
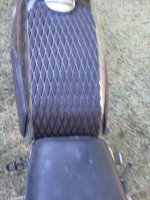
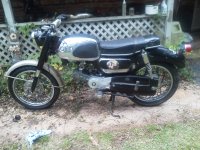
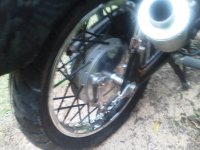
I will be starting off with a 1963 Suzuki Colleda I found on Craigslist for $100, it was more or less a roller with a few extra parts. No engine, no exhaust or carbs but it came with an extra front wheel , front fork assy and seat base. After a brief stint looking for rare 1963 model parts I came to realize that this wasn't worth the time, effort or money it would take to restore it.

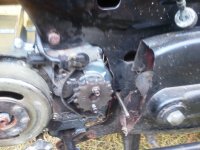
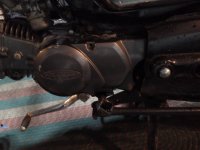
So on to plan B, looking at the frame it closely resembles the early Honda Cub 90 and CL70 frames, I had a dead CT 70 laying around so I pull the engine to see whats what. It looked pretty close but some metal trimming would be involved and I had to drill two more engine mounting holes, no biggie.

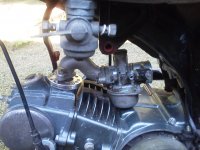
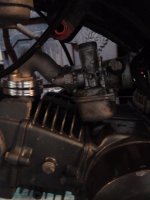
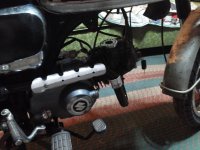
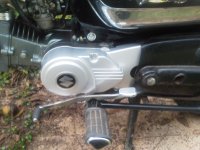
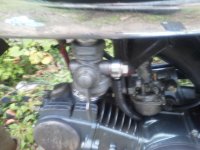
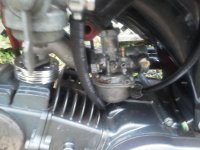
This thing is fairly light but a 70 ain't going to get it so I start looking for an engine, a pit bike comes up on Facebook a couple of hours away, it has the 125 four speed clutch engine which is what I wanted so I go get it. and then abracadabbra we have this.
 

Attachments

  • IMG_20191010_154510.jpg
    IMG_20191010_154510.jpg
    1.6 MB · Views: 252
First up is the front wheel, it came with an extra front wheel, the original one was bent but it had a nice brake backing plate and brakes, so I pulled both wheels apart and laced up the hub to the other rim, original was an 18' other one was a 17'' no biggie, spokes looked nasty so I painted them black , it was still missing the brake linkage which I found on Ebay. This is not the correct brake setup but at least it is period correct , with a few wheel spacers and a quick trim to the brake stay bracket I can make it work .

A new 90/80/17 IRC tire installed up front finishes it off, still waiting on the axle spacers and front brake cable to arrive. Front fender will get pulled and repainted silver then clearcoated.

Next item up was the rear fender and taillight, not sure what was going on there but, some kind of fender had been sliced up and put on the back, again Ebay to the rescue, on the taillight I had a bracket but no taillight, again Ebay.

The bracket didn't fit the fender and the taillight didn't fit the stock bracket so I made it fit and bolted it on, a spray job with Black Rustoleum made it shiny.
 

Attachments

  • IMG_20191010_154621.jpg
    IMG_20191010_154621.jpg
    1 MB · Views: 266
  • IMG_20191010_154527.jpg
    IMG_20191010_154527.jpg
    1.2 MB · Views: 256
Re: 1963 Suzuki Colleda cafe-ish build

Now on to the exhaust, I started to go with a CL70 low pipe but right now this build is on a strict budget so I chopped up the pit bike exhaust and grafted it to a Honda 200 header pipe then used the canister off the pit bike to finish it all up. all in all I think it turned out pretty well. I do still need to fab up a heat shield for the front part.
 

Attachments

  • IMG_20191010_154636.jpg
    IMG_20191010_154636.jpg
    1.3 MB · Views: 216
  • IMG_20191010_154510.jpg
    IMG_20191010_154510.jpg
    1.6 MB · Views: 285
Re: 1963 Suzuki Colleda cafe-ish build

Next up was the footpegs, the stockers were way too wide so I used the footpeg bar off the pit bike to tighten it all up, I found a gearshither that I liked and gave it a nice custom bend, I am using stock pegs off a Virago so there will be some cutting and welding on the bracket to make it work, suprisingly the side stand lays right were it is supposed to and is the correct length.

After replacing the footpeg bar the rear brake lever is all out of sorts, I heated it up with the carbon arc torch and bent it into submission.
 

Attachments

  • IMG_20191010_154636.jpg
    IMG_20191010_154636.jpg
    1.3 MB · Views: 254
  • IMG_20191010_154551.jpg
    IMG_20191010_154551.jpg
    915.4 KB · Views: 224
Re: 1963 Suzuki Colleda cafe-ish build

the sprocket isn't going to line up , after doing some research I ordered a 15mm wider kit for a Z50 this will bring the sprocket into some kind of reasonable alignment, the back sprocket will be replaced by a custom aluminum sprocket from Rebel Gear.
 

Attachments

  • IMG_20191010_154540.jpg
    IMG_20191010_154540.jpg
    902.2 KB · Views: 229
Re: 1963 Suzuki Colleda cafe-ish build

Next up is the carburetor, I used an intake for a Chines carb and reversed it, I will also have to use two rotator plates stacke on top of each other and a plastic intake spacer to get it just right, I only have one rotator plate installed right now, the idea is to use some kind of airbox tube and tuck the filter up into the frame out of sight . more to come on this part.

I did gut all the stock wiring and used the pit bike harness tucking everything nicely inside the frame where the stock coils mounted at.

I also used the pit bike clutch cable , throttle and cable , everything is just the right length to work.
 

Attachments

  • IMG_20191010_154559.jpg
    IMG_20191010_154559.jpg
    941.5 KB · Views: 216
Re: 1963 Suzuki Colleda cafe-ish build

Gas tank and sidecovers, the gas tank looks ok inside with a nice wash with Milkstone remover it should clean up nicely, a newer style petcock will be in order though, tank had some nasty dents in the top, not deep but ugly, I couldn't find a tank pad I liked so I covered most of the top with black Hydroturf diamond pattern.A little contact cement and she was good to go and not damn near as ugly. Missing gas cap found on Ebay, there may be a pattern starting to form here.

For some reason I have two right sidecovers and no left side, I am just going to drill a couple of holes and make it work, no biggie, a new knob was ordered from Ebay.
 

Attachments

  • IMG_20191010_154612.jpg
    IMG_20191010_154612.jpg
    681.8 KB · Views: 218
I did want to say one thing, all of the original parts that I took off will be listed on Ebay so some other poor soul won't have to look as hard for these near to impossible to find parts, maybe they will be of use to somebody somewhere.
 
That is a pretty rad little bike man! I like where you are taking it.. Im in.
 
Thanks guys, the front brake cable came in today so now all of that is sorted, I also welded the footpeg mounts on, I started to do it with the Mig but it ran out of wire so I fired up the big boy and arc welded them on, probably better anyway much better penetration on the weld joints , now I just need a left footpeg.

I am trying to get all the mechanical stuff out of the way before I do seat covers, bars and those sorts of things, once I have it running and driveable I will start on cosmetics but it's never really going to be pretty because of the condition of the chrome on the tank and sidecovers.
 
Heat shield came in, it started off as you see in the first pic, looked kinda sad so I whittled , beat and banged on it till I got something I liked as pictured in the second pic, it's a little too blingy for my tastes, some flat black should tone it down quite nicely though. I do need to weld another nut onto the pipe to secure the front of it. The separate piece I haven't decided on just yet, for now I will leave it but I may revisit that at another time. I wold kinda like to but another piece and tig weld the two together at at angle and grind it down so it's one continuous pieces following the contour of the pipe, we will see.

Magneto cover came in looks like I can make it work with a few mods and another cover cut up as a spacer That gap in the back has to go so I need to figure something out there . Carb rotator is in , I am still waiting on the insulator but I was able to get the carb in a spot where it will be happy.
 

Attachments

  • IMG_20191015_164709.jpg
    IMG_20191015_164709.jpg
    492.2 KB · Views: 217
  • IMG_20191015_164648.jpg
    IMG_20191015_164648.jpg
    570.5 KB · Views: 217
  • IMG_20191015_164634.jpg
    IMG_20191015_164634.jpg
    780.4 KB · Views: 241
  • IMG_20191015_162042.jpg
    IMG_20191015_162042.jpg
    941.6 KB · Views: 219
  • shield.jpg
    shield.jpg
    3 KB · Views: 712
Front wheel spacers came in as did the tap for the front fork leg, everything went smoothly, the fork leg tapped out (pun intended) and the spacers were the perfect length so know the front wheel is centered and secured. I may have to grind down the boss for the brake stay arm a bit but it's not critical at the moment.
 
Rear tire is in as is the tube and today the 15mm wider front sprocket showed up, it was a good call going with the 15 instead of the 7 as it lines up pretty much dead on the money, I also noticed it was a 428 sprocket instead of a 420, I really wanted 520 but nobody makes one for this application, 428 should do nicely.

I am glad it showed up because I was about to order the custom rear sprocket and that would have been a bummer.
I went with IRC tires front and rear a 90/80/17 on the front and a 110/80717 on the rear which is a NR53 and a NR64, they should be fine as this thing isn't gonna break 60 MPH .
 
Rear tire is mounted up, rear rim is cleaned and the spoke covers have been installed, I would have painted the spokes like on the front but this rim was very true and I didn't want to start over, custom rear sprocket was ordered Wednesday and they said they might get it on the UPS truck that day, can't beat the service from Rebel gear thus far !

I am waiting on the sprocket to arrive before sticking it all back together, it is absolutely amazing how easily the rear axle came out on a 56 year old machine, the only issue I had was removing the rear sprocket, the nuts holding it on were staked with a centerpunch in about three places on each nut and they weren't budging, in the end I just ground off part of the nut that was punched and was able to get them off.

I am going from a 525 sprocket to a 428 so with that , leaving the washer off and replacing the nuts with flanged nuts the bolts should be reusable. I also noticed it was missing a right chain adjuster so that has been ordered also.
 
wfo speedracer said:
...can't beat the service from Rebel gear thus far!

+1 Great customer service from Rebel Gear!. I highly recommend them.
 
Yep the sprocket arrived yesterday, I filled out their online form , about 30 minutes later i got a phone call, she said it would probably be on the UPS truck that day, that was Wednesday, Friday afternoon I had it in my hand and it fit perfectly.Another round of parts has been ordered, while the build will not end that soon the ridable stage of this project is rapidly approaching .

Now we come to the big decision,do I want to go with the superbike bars or the clubmans ?
 
Made a bit of progress yesterday , I got the engine mounted solidly, I also sorted out the carb mounting, the rear tire is back on , sprocket is mounted up and the sprocket carrier and rear brake backing plate have been polished up, the rear shocks are mounted, I had to go with CB360 rear shocks but that puts it a bit high for the centerstand to work properly so today is welding day, I plan on getting the left footpeg moved further out and welded on, adding some stock to the bottom of the centerstand to raise it some .

A spacer was made for the magneto cover out of an old cover , with the spacer the new cover will work perfectly and matches up to the enclosed chain guard, however this moves the cover out too far for the shifter to work so to fix that I am cutting off an old shifter and welding it onto the heel toe shifter to move it out, of course that means the footpeg needs to be moved out because now the shifter will hit it on the backside, oh the joys of one off builds !
 
Updating the thread with a few pics, I extended the left footpeg out with a spacer, cut up and rewelded a brand new heel toe shifter and welded some 1/4" stock to the bottom of the centerstand, I do have to weld a nut to the exhaust pipe for the heat shield and then all the welding is done.

The sidecover is done just waiting on the chain to get here to button it all up, as you can see the magneto cover now flows nicely into the enclosed chain guard, a spacer was made out of another cover to get the depth correct , this one small change threw off everything else necessitating changes to the shifter and left footpeg.

I am using the stock petcock with a new banjo fitting added and a brass plug inserted into the front where the other banjo fitting went, today I am cleaning the fuel tank and getting the carb sorted out , also thinking of adding a primer kit and deleting the choke system since it is messed up anyway, it may work or it may not.

I did find a set of superbike bars on my TL 125 tracker build so I will rob them and see how they feel on the bike , my thinking is a set of Daytona bars is what I will end up with, what's on there now are actually Watercraft bars with a crossbar and pad, basically because that"s what I had and I needed to be able to move the bike around.
 

Attachments

  • IMG_20191111_152213.jpg
    IMG_20191111_152213.jpg
    1.2 MB · Views: 208
  • IMG_20191111_151937.jpg
    IMG_20191111_151937.jpg
    790.8 KB · Views: 201
  • IMG_20191111_152229.jpg
    IMG_20191111_152229.jpg
    781.4 KB · Views: 194
  • IMG_20191111_152249.jpg
    IMG_20191111_152249.jpg
    855.6 KB · Views: 210
  • IMG_20191111_152300.jpg
    IMG_20191111_152300.jpg
    846.5 KB · Views: 240
Last edited:
I was able to sort the carb out using some parts off of an power equipment old carb and a conical shaped spring that I cut in two, while I had the choke plate out I was also able to glance inside at the intake to carb mismatch,it was pretty bad so I addressed that with a die grinder and a carbide bit, it should flow nicely now,.

The carb had wood screws holding the float bowl on so I fixed that as well, it is now all properly mounted ready to go.
The tank is soaking with milkstone remover, I was running low on the remover so it's a pretty weak solution, it will take a few days to work from what I have seen thus far. I removed the came cover, polished it up and reinstalled it. Then I removed the top triple tree, that thing gave e a run for my money, blaster , a propane torch and a hammer all got a work out but it's off polished and ready to go back on.
 
Back
Top Bottom