pacomotorstuff
Coast to Coast
Just for shits and giggles, thought I'd show you guys what I finished up for a customer yesterday.
I don't build tanks anymore - by the time I put in my time, labour and use the best materials I can, just doesn't seem to be any money in it but... the guy had something I needed, so...
Aside from rebuilding a 45 year old mould that had been taken from an original alloy tank (you could see the weld seams in the mould from the original), this is the essence of the fabrication.
The top and tunnel were laid up with fiberglass cloth and mat, following a pre-planned ply layup schedule using patterns I had made previously. I used an Isophthalic resin, which has excellent fluid resistance on its own and is at least 25% higher in mechanical properties than the typical resins used in this type of work – it’s used in a lot of industrial storage tanks.
Before bonding the top and tunnel together, the Aircraft Spruce gas cap flange, the venting system fitting, the rear mounting studs and the petcock spigot were bonded in with a mixture of resin and flox. The tank has a ply of “veil” on the inside surface for additional fluid resistance and just before I bonded the pieces together, all internal surfaces were coated with Caswell fuel tank sealer, the seams bonded with Caswell mixed with flox and then the seams had additional plies of fiberglass bonded on with more Caswells with a peel ply overlay – a bit difficult to do, but not any worse than some aircraft projects and resin systems I’ve dealt with. Through a little bit of hocus-pocus, I was able to get the tunnel inside the tank before bonding (think about how you build a boat in a bottle), so most of the seams are in compression and nothing is in shear like most tanks that have an external bonding flange (have a look at the tank tunnel photo and you’ll see what I mean). It’s a lot more robust than it needs to be, but I built it like I was going to use it on one of my own bikes, like every part I build.
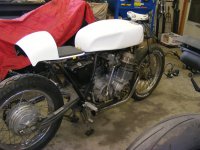
A few things are different from the actual CR750 tank; the customer didn't want the dropped rear sump, nor did he want the vent line "stack" the originals had. Sharp-eyed viewers will probably notice that there are no front tank mounts, as the customer is pondering a change to his original request.
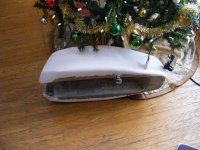
The customer already has a seat he wants to use on his bike, but I sent him the photos of the CR750 seat behind it, because it looks perfect behind the tank. The one photo of the tank under the Xmas tree was done just for the hell of it.
I was up at Rob Bullit's yesterday on other business and he was kind enough to offer up a project bike in his shop, so I could take a couple of photos for the customer.
Have a Very Merry Christmas and a Happy New Year.
Pat
I don't build tanks anymore - by the time I put in my time, labour and use the best materials I can, just doesn't seem to be any money in it but... the guy had something I needed, so...
Aside from rebuilding a 45 year old mould that had been taken from an original alloy tank (you could see the weld seams in the mould from the original), this is the essence of the fabrication.
The top and tunnel were laid up with fiberglass cloth and mat, following a pre-planned ply layup schedule using patterns I had made previously. I used an Isophthalic resin, which has excellent fluid resistance on its own and is at least 25% higher in mechanical properties than the typical resins used in this type of work – it’s used in a lot of industrial storage tanks.
Before bonding the top and tunnel together, the Aircraft Spruce gas cap flange, the venting system fitting, the rear mounting studs and the petcock spigot were bonded in with a mixture of resin and flox. The tank has a ply of “veil” on the inside surface for additional fluid resistance and just before I bonded the pieces together, all internal surfaces were coated with Caswell fuel tank sealer, the seams bonded with Caswell mixed with flox and then the seams had additional plies of fiberglass bonded on with more Caswells with a peel ply overlay – a bit difficult to do, but not any worse than some aircraft projects and resin systems I’ve dealt with. Through a little bit of hocus-pocus, I was able to get the tunnel inside the tank before bonding (think about how you build a boat in a bottle), so most of the seams are in compression and nothing is in shear like most tanks that have an external bonding flange (have a look at the tank tunnel photo and you’ll see what I mean). It’s a lot more robust than it needs to be, but I built it like I was going to use it on one of my own bikes, like every part I build.
A few things are different from the actual CR750 tank; the customer didn't want the dropped rear sump, nor did he want the vent line "stack" the originals had. Sharp-eyed viewers will probably notice that there are no front tank mounts, as the customer is pondering a change to his original request.
The customer already has a seat he wants to use on his bike, but I sent him the photos of the CR750 seat behind it, because it looks perfect behind the tank. The one photo of the tank under the Xmas tree was done just for the hell of it.
I was up at Rob Bullit's yesterday on other business and he was kind enough to offer up a project bike in his shop, so I could take a couple of photos for the customer.
Have a Very Merry Christmas and a Happy New Year.
Pat