We noticed you are blocking ads. DO THE TON only works with community supporters. Most are active members of the site with small businesses. Please consider disabling your ad blocking tool and checking out the businesses that help keep our site up and free.
You are using an out of date browser. It may not display this or other websites correctly.
You should upgrade or use an alternative browser.
You should upgrade or use an alternative browser.
Nuckingfuts Custom Build (XV750 Done!)
- Thread starter Nuckingfuts
- Start date
Nuckingfuts
Been Around the Block
Re: Nuckingfuts Custom Build
I hear ya brother, these old xv's are far from ideal. Sexy but not ideal.
I hear ya brother, these old xv's are far from ideal. Sexy but not ideal.
Nuckingfuts
Been Around the Block
Re: Nuckingfuts Custom Build
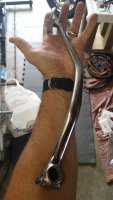
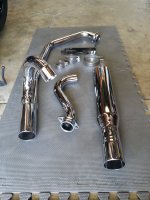
Another component that should have been a slam dunk turned into a bit of a headache. I ordered a 2 into 1 custom header from Mac Performance and had initially received a 3 week lead time and planned around it accordingly. After 10 weeks of excuses my pipes finally arrived.....but they didn't fit.
The flange collars didn't fit the bolt pattern but that was an easy fix with a bit of Dremel work. The major flaw was that the pipe bends didn't match up no matter how much slack I left. In the end I had to send them back to be put back on the jig. After 12 weeks (total) I finally had pipes that I could fit....not perfect, and still short of mine and industry standards, but useable. Lets just say I won't be recommending Mac pipes to anyone in this lifetime.
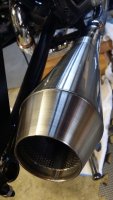
The headers came with a dumpy slip on that truly looks 80s and would be right at home on Don Johnsons hog. But for this build I needed something slim, light and subtle. Lots of great options out there and in the end went with a stainless steel short cone.
Another component that should have been a slam dunk turned into a bit of a headache. I ordered a 2 into 1 custom header from Mac Performance and had initially received a 3 week lead time and planned around it accordingly. After 10 weeks of excuses my pipes finally arrived.....but they didn't fit.
The flange collars didn't fit the bolt pattern but that was an easy fix with a bit of Dremel work. The major flaw was that the pipe bends didn't match up no matter how much slack I left. In the end I had to send them back to be put back on the jig. After 12 weeks (total) I finally had pipes that I could fit....not perfect, and still short of mine and industry standards, but useable. Lets just say I won't be recommending Mac pipes to anyone in this lifetime.
The headers came with a dumpy slip on that truly looks 80s and would be right at home on Don Johnsons hog. But for this build I needed something slim, light and subtle. Lots of great options out there and in the end went with a stainless steel short cone.
Attachments
DohcBikes
Fuck You.
Re: Nuckingfuts Custom Build
All caught up. Excellent attention to detail.
If the pipes are short of your standards, it's a shame to have to use them on such an involved project that you have so much energy invested in.
With any intense project like this one, the first time you get to ride it, you won't care how long it took to build it. Just get it right.
Nuckingfuts
Been Around the Block
Re: Nuckingfuts Custom Build
I hear ya man, the only way is the right way. Though the fitment wasn't perfect, after a few tricks of my own I was able to get them to work. Glad I could too cuz they do look pretty good now that they're mounted. Maybe somewhere down the line I'll try my hand at a custom header from wedges since I don't have access to a bender.
DohcBikes said:All caught up. Excellent attention to detail.
If the pipes are short of your standards, it's a shame to have to use them on such an involved project that you have so much energy invested in.
With any intense project like this one, the first time you get to ride it, you won't care how long it took to build it. Just get it right.
I hear ya man, the only way is the right way. Though the fitment wasn't perfect, after a few tricks of my own I was able to get them to work. Glad I could too cuz they do look pretty good now that they're mounted. Maybe somewhere down the line I'll try my hand at a custom header from wedges since I don't have access to a bender.
Nuckingfuts
Been Around the Block
Re: Nuckingfuts Custom Build
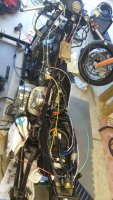
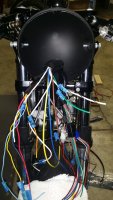
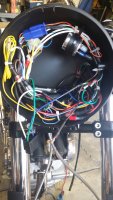
Been trying to get my head around the custom wiring harness and I think I'm good to go. This new harness should remove about 10 lbs of unnecessary wires, relays and electrical tape.
Started on it a few nights ago and it's getting messy in a hurry. Looks like I've got my weekend booked trying to work this out.
Attachments
Nuckingfuts
Been Around the Block
Nuckingfuts
Been Around the Block
Re: Nuckingfuts Custom Build
I'm intrigued by the mighty electron like the next guy but chasing e- currents around rats nests like this gets old fast.
But after 99 hrs and listening to a sharks win I'm just about wrapped up.
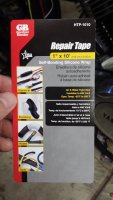
As much as I hate wire loom there were short sections that needed it but I found this high temp loom wrap that should do the trick. Very impressed!
Now I just need to figure out a low profile solution to ground everything. Ideas?
I'm intrigued by the mighty electron like the next guy but chasing e- currents around rats nests like this gets old fast.
But after 99 hrs and listening to a sharks win I'm just about wrapped up.
As much as I hate wire loom there were short sections that needed it but I found this high temp loom wrap that should do the trick. Very impressed!
Now I just need to figure out a low profile solution to ground everything. Ideas?
Attachments
Nuckingfuts
Been Around the Block
Re: Nuckingfuts Custom Build
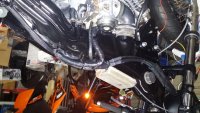
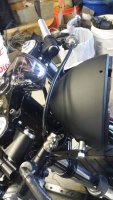
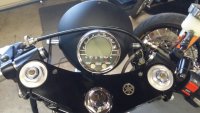
With the 80s ape hangers in the rear view mirror and updated clip ons installed I had to address the cables that now resemble Krazy straws (yes you 80s rug rats remember drinking your jungle juice, tang, and tab through these engineering delights).
The clutch cable was able to be ceatively re-routed to keep a low profile look and still maintain smooth action. Win! I was expecting the need to order a custom clutch cable assembly so this was a nice surprise.
Throttle cable will be another story. Going to call on Motion Pro for a custom cable to mate up with an OEM Yamaha R1 throttle. The stock XV throttle has a 'quickness rate' of 150 degrees of rotation per 55mm of throw which is on the slow side for this day and age. The R1 throttle is about 109 degrees which quickens the throttle rate more to my liking. More to come on that...
Attachments
hooligan998
Been Around the Block
Re: Nuckingfuts Custom Build
Very nice build! Every time I see a Virago build like this, it makes me want to do this to my 98 Virago 1100.
Can't wait to see the finished product!
Very nice build! Every time I see a Virago build like this, it makes me want to do this to my 98 Virago 1100.
Can't wait to see the finished product!
Nuckingfuts
Been Around the Block
Re: Nuckingfuts Custom Build
Thank you sir!
hooligan998 said:Very nice build! Every time I see a Virago build like this, it makes me want to do this to my 98 Virago 1100.
Can't wait to see the finished product!
Thank you sir!
Nuckingfuts
Been Around the Block
Re: Nuckingfuts Custom Build
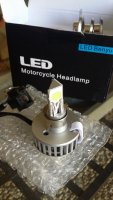
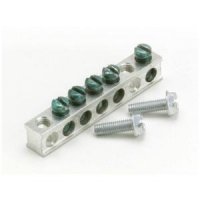
Yeah I like those marine bus bars, I've got a simple bus bar on hand that I was just going to cut down so it's shorter then just shrink wrap it. Wrestling with the small space in a bucket is a pain as I've already got several connectors, blinker relay, and the long LED lamp with fan.
Sonreir said:I'm a fan of these for grounding points.
http://www.ebay.com/itm/231702016737
Yeah I like those marine bus bars, I've got a simple bus bar on hand that I was just going to cut down so it's shorter then just shrink wrap it. Wrestling with the small space in a bucket is a pain as I've already got several connectors, blinker relay, and the long LED lamp with fan.
Nuckingfuts
Been Around the Block
Re: Nuckingfuts Custom Build
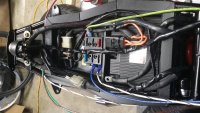
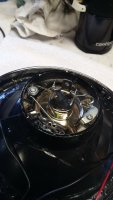
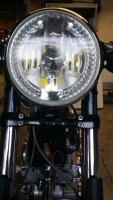
Spent some more time on the wiring tonight after work and was able to organize the bucket with just enough room for the headlight. Lets just say the ocd in me was cringing to get a handle on this mess.
With regards to the central ground, which I had 7 converging in the bucket by design, I went with a simple bus bar like this but cut it down to 4 set screws.
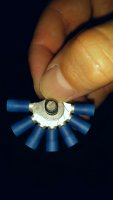
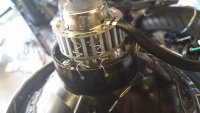
Before I could cap the bucket I had to rig up a way to secure the LED fixture to the reflector housing. This is the standard H4 bulb retainer spring that won't work due to the cooling fan.
I decided to drill some holes in the housing and modify some springs I had lying to hold the LED tight. 3 springs gave plenty of strength but I had room for 5 and figured the extra insurance would give some piece of mind. It's not budging now.
Connected up the leads, checked the clearance and she popped on without a fight. Woohoo!
You can now see the reflection of the phosphor in the headlight which gives it a trippy look from a distance.
Spent some more time on the wiring tonight after work and was able to organize the bucket with just enough room for the headlight. Lets just say the ocd in me was cringing to get a handle on this mess.
With regards to the central ground, which I had 7 converging in the bucket by design, I went with a simple bus bar like this but cut it down to 4 set screws.
Before I could cap the bucket I had to rig up a way to secure the LED fixture to the reflector housing. This is the standard H4 bulb retainer spring that won't work due to the cooling fan.
I decided to drill some holes in the housing and modify some springs I had lying to hold the LED tight. 3 springs gave plenty of strength but I had room for 5 and figured the extra insurance would give some piece of mind. It's not budging now.
Connected up the leads, checked the clearance and she popped on without a fight. Woohoo!
You can now see the reflection of the phosphor in the headlight which gives it a trippy look from a distance.
Attachments
Nuckingfuts
Been Around the Block
Re: Nuckingfuts Custom Build
Good on ya for organizing your wiring in the bucket. I'm quite jealous of the cleanliness. Usually that stuff bothers the crap out of me but I was nearing the end of my patience, so, the wiring on the CB looks like spaghetti and I just shove the headlight in there ;D
Good on ya for organizing your wiring in the bucket. I'm quite jealous of the cleanliness. Usually that stuff bothers the crap out of me but I was nearing the end of my patience, so, the wiring on the CB looks like spaghetti and I just shove the headlight in there ;D
Nuckingfuts
Been Around the Block
Re: Nuckingfuts Custom Build
I hear ya brother, any slight disorder we might have whether ADHD or OCD, these wiring harnesses will evoke a monster within.
adventurco said:Good on ya for organizing your wiring in the bucket. I'm quite jealous of the cleanliness. Usually that stuff bothers the crap out of me but I was nearing the end of my patience, so, the wiring on the CB looks like spaghetti and I just shove the headlight in there ;D
I hear ya brother, any slight disorder we might have whether ADHD or OCD, these wiring harnesses will evoke a monster within.
Re: Nuckingfuts Custom Build
Heard that. I had about 95% of the CB done and was still working on the harness, so I said screw it and left it mostly a mess. I just like to think of it as organized chaos.")
Heard that. I had about 95% of the CB done and was still working on the harness, so I said screw it and left it mostly a mess. I just like to think of it as organized chaos.
Nuckingfuts
Been Around the Block
Re: Nuckingfuts Custom Build
Had some parts arrive from McMaster tonight so I decided to get started on the rear sets while keeping an eye on the ALDS elim game.
Had some parts arrive from McMaster tonight so I decided to get started on the rear sets while keeping an eye on the ALDS elim game.
Parts are 316 S.S. or zinc coated tie rods....oh except for this beauty which looks like Leonardo Da Vinci's OEM lever design that go us out of the Renaissance period. This is the Dirk Diggler of brake levers...
Had some parts arrive from McMaster tonight so I decided to get started on the rear sets while keeping an eye on the ALDS elim game.
Had some parts arrive from McMaster tonight so I decided to get started on the rear sets while keeping an eye on the ALDS elim game.
Parts are 316 S.S. or zinc coated tie rods....oh except for this beauty which looks like Leonardo Da Vinci's OEM lever design that go us out of the Renaissance period. This is the Dirk Diggler of brake levers...