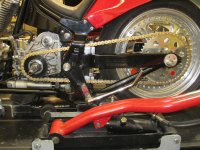
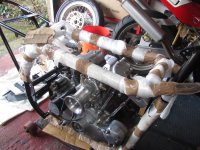
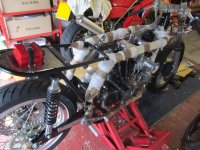
Norton / Harley Ironhead Cafe Project.. Build thread

DrJ said:
And the belt drive just wouldn't look right.

neither of those engines come with a belt drive. If I were going to put an engine in a norton frame, I'd def go with an evo over an ironhead, but that's probably on account of how much my current bike leaks oil.
 
WeberKid said:
neither of those engines come with a belt drive. If I were going to put an engine in a norton frame, I'd def go with an evo over an ironhead, but that's probably on account of how much my current bike leaks oil.

Most 883 and 1200 XLs got belt drive in 1991, and all by 1993, though its not difficult to convert them back to chain drive. Evos would be easier to tune, more powerful and easier to live with for sure.

Back to the bike, I took it apart yesterday, the frame is having a little work done at the welders before it goes to paint. While I'm in the middle of the tedious job of polishing all the alloy parts.. yokes, rear sets, motor mounts... and the tank and stainless exhaust pipes.
 
If your ever looking for an Ironhead belt drive, check out Karata.
I had one on my XLX45, no problems at all. :)

http://www.karata.com/primary.htm

They say out of stock, but you never know, they might have a production run scheduled.
 
Bevelheadmhr said:
Most 883 and 1200 XLs got belt drive in 1991, and all by 1993, though its not difficult to convert them back to chain drive. Evos would be easier to tune, more powerful and easier to live with for sure.

ohhhhh - final drive. sorry - I had an idiot moment.
 
Belt final drive, hmm never considered that, never had one on any of my bikes.
Besides, a good quality chain will last a long time if you look after it, it transmits power more efficiently, and it just looks better IMHO 8)
 
Belts have their place, they last along time normally. I converted my Big Twin Evo to chain drive after this happened for the third time..
 

Attachments

  • belt1a.jpg
    belt1a.jpg
    68.2 KB · Views: 1,097
  • Merch131chainconv 004a.jpg
    Merch131chainconv 004a.jpg
    299.7 KB · Views: 260
Here's a rare pic of yours truly doing some work, polishing the alloy parts, filthy job, hate doing it, but better than paying someone else...

Laid out all the parts that came off the frame, helps not to get anything mixed up..
 

Attachments

  • Ironhead150 009.JPG
    Ironhead150 009.JPG
    257.6 KB · Views: 271
  • Ironhead150 017.JPG
    Ironhead150 017.JPG
    227.3 KB · Views: 277
Finally got the welding completed on the frame (for the rear light and oil tank mounts), and took it to be powder coated today. Should be ready in ten days or so, which should give me the time to finish a few jobs before the final assembly begins. The velocity stack is finished, and it'll stay until I find an air filter that looks right for the bike. Bought an alloy front fender, its just the blade so need to make a some kind of mount/fork brace for it soon.
 

Attachments

  • Ironhead151 002a.jpg
    Ironhead151 002a.jpg
    193.3 KB · Views: 285
Collected my frame from the powder coaters today, as always they did a great job, they specialise in motorbike frames and wheels etc. For me its a half day return trip (traffic is always awful), but its worth the effort. I ended up with my little car full of other peoples parts on each trip, as when they knew I was going I was asked to take their stuff too.

Here's my frame being handed over at the powder coaters..
And a close up of the finish, I'll wrap it in foam / cardboard before trying to lift the engine in, I'd hate to scratch the finish..
 

Attachments

  • Ironhead180 003.JPG
    Ironhead180 003.JPG
    344.1 KB · Views: 262
  • Ironhead180 001.JPG
    Ironhead180 001.JPG
    243.6 KB · Views: 250
Very nice work indeed! This is the kind of build I love to follow. Won't you need a crane to lift the engine in ;)
 
The engine is ridiculously heavy, but I decided not to wait for help to ease it into the frame, instead I wrapped the frame in card and foam, then placed the engine on its side on wooden blocks before dropping the frame carefully over it. Worked out ok, though took ages to fit all the mounting brackets and swing arm due to the thickness of the powder coat. Had to turn down the swing arm spacers a little in the end.

Also had a threaded 'bung' welded into the oil tank for the outlet fitting, saved having to cut a British Cycle thread to match the oil tank and since the bikes got a modern oil filter, there was no need to use the authentic Norton oil filter (just a crude wire mesh) that would normally sit inside the oil tank. We didn't finish tapping the inner thread in the bung for the oil fitting, as there was a small chance it would distort a bit when the bung was welded into the oil tank. Now that's done we can finish cutting the thread.
 

Attachments

  • Ironhead175 001.JPG
    Ironhead175 001.JPG
    299.8 KB · Views: 268
  • Ironhead175 004.JPG
    Ironhead175 004.JPG
    289.8 KB · Views: 258
  • Ironhead175 012.JPG
    Ironhead175 012.JPG
    179.4 KB · Views: 272
Got the oil tank fittings done and the oil tank bolted into the frame. For now I'm using rubber O rings to suspend the tank, not sure how they'll hold up in use, but only one way to find out..

When I came to order the chain, I didn't know how long it needed to be, so I ordered the longest DID in the book. Sure enough it needed a lot of links removing, which isn't a big deal. Then I came to fitting the Rivet link, I struggled to get the damn thing installed, cursing the new chain tool I'd bought specially. Till I noticed the rivet link had '520' stamped in minute writing on its side plate.. no wonder it wouldn't fit, as I'm using a 530 chain..doh! I'll get the correct link on Monday.

I'll also order a new front tyre, the 110 on it now looks a little too wide, so I'll replace it with a 100 Avon instead. This will make the 4 inch wide alloy mudguard work better too. Its just the blade I have, so need to make a mount for it yet.
 

Attachments

  • Ironhead154 005.JPG
    Ironhead154 005.JPG
    411.9 KB · Views: 279
  • Ironhead175 011.JPG
    Ironhead175 011.JPG
    341.6 KB · Views: 260
  • Ironhead175 010.JPG
    Ironhead175 010.JPG
    324.1 KB · Views: 283
  • Ironhead154 010.JPG
    Ironhead154 010.JPG
    328.7 KB · Views: 268
Hi, I read the entire build thus far and it's a beautiful bike and an interesting combination. I loved the raw chromoly look. My question is, why are the rear shocks cantilevered, outboard of the swingarm? Great bike, should be a lot of fun to ride.
Cheers, 50gary
 
50gary said:
Hi, I read the entire build thus far and it's a beautiful bike and an interesting combination. I loved the raw chromoly look. My question is, why are the rear shocks cantilevered, outboard of the swingarm? Mounted this way the bolt strength determines the rigidity of the shock mount. Is it possible to mount the lower shock eye inside of the bracket. Perhaps the rear portion of the swingarm could have been a bit wider? Great bike, should be a lot of fun to ride.
Cheers, 50gary
There is a steel sleeve that goes throughout the shock mount and through the shock eye so the sheer is on the tube and not wholly on the bolt. Stock Sportsters are set up this way also. I was going to say you can mount the master link on the bench but then realized with your frame the chain must be broken to get it off. Mine only requires removing a shock to get the chain off as a whole.
 
xb33bsa said:
beautiful really enjoying this
the oil tank hangs on bungees?

The oil tank mounting caused some head scratching. The mounts at the top our obvious, but how to use the grooved bosses on the lower sides wasn't clear. Original Tritons used rubber loops to pull the oil tank down against the top of the gearbox, with a rubber pad sandwiched between to try absorb the vibes. On the Ace Café Norley they used the same method, but with the oil tank sat on a T piece welded to the rear engine mount. My frame didn't have this T piece, I did Email Norley to ask about this, but got no reply.

So before the frame went for powder coat I had a couple of hooks welded to the inside of the frame, to be used to hang the oil tank via rubber O rings, or some other suitable loop. I prefer my method as it better isolates the tank from engine vibes.

This is how the Ace Café Norley mounted their tank, notice the upright tube supporting the tank from beneath, which my frame doesn't have, and my bike pictured beneath
 

Attachments

  • Acecafe1.jpg
    Acecafe1.jpg
    428.3 KB · Views: 296
  • Ironhead154 014.JPG
    Ironhead154 014.JPG
    208.7 KB · Views: 266
Got a couple more jobs done today, finished the oil filter mount, uses the rear engine/gearbox mounting bolts, and made the rear light bracket in stainless plate.

Also started something I soon wished I hadn't.. the alloy petrol tank had a few light scratches, so decided it needed to be re-polished.. its going to take a lot of elbow grease ..
 

Attachments

  • Ironhead157 001.JPG
    Ironhead157 001.JPG
    307.9 KB · Views: 270
  • Ironhead157 010.JPG
    Ironhead157 010.JPG
    206.2 KB · Views: 273
  • Ironhead155 002.JPG
    Ironhead155 002.JPG
    174.2 KB · Views: 251
Collected the correct sized split link for the chain, and with my shiny new rivet tool the chain went on ok. Though I did have to pause half way through and go off to check on youtube the correct way of using the riveter, it wasn't obvious and it came without instructions.

Also changed the front Avon to a narrower 100 width tyre, the 110 looked good but the general consensus was that it will handle better with the 100. Luckily the 110 tyre fits my Guzzi Café racer so its not going to wasted. With the new tyre on, my next job is to work out how long I want the alloy front mudguard to be and how to mount it

I spent yesterday afternoon at Geoff the welders place, where he let me use his pipe belt sander, it saved me a huge amount of time linishing the welds of the stainless downpipes. They aren't perfect (I was afraid of sanding right through the pipe walls), and still need to be polished but overall I'm happy with the result.

I did hit one problem today, the oil filter mount (which I had been pleased with), just happens to place the oil pipes directly in line with the lower chain run.. should have thought of that beforehand :( it'll have to be changed.
 

Attachments

  • Ironhead158 002.JPG
    Ironhead158 002.JPG
    244 KB · Views: 270
  • Ironhead158 007.JPG
    Ironhead158 007.JPG
    260.3 KB · Views: 871
  • Ironhead161 013a.jpg
    Ironhead161 013a.jpg
    225.3 KB · Views: 847
  • Ironhead161 003.JPG
    Ironhead161 003.JPG
    240.4 KB · Views: 844
Back
Top Bottom