
Redliner
Over 1,000 Posts
Somebody brought a Bomber that has sat for over a decade, so I figure I'd use it as an example to others wanting to put their decrepit ladies back to pavement.

If you've ever reached for the tube of bathtub silicone while assembling a bike, step away before you do more harm.

Even after two days of using the fountain pump to pump diesel through the case, a lot of muck remained. CLEAN it out! These bikes simply don't have filters, so the less loose debris the better. Notice the remains of the cam-chain cushions.

Speaking of a lack of filter, it's crucial you keep the oil slinger clean! I clean mine every other oil change. No need to remove it each time if you do this, since it won't petrify. I've NEVER opened a sitting bike that didn't have THICK rock-hard buildup indicating it had never been cleaned in all of it's 50 years.

Oil is CRUCIAL! You're riding a time-bomb if you aren't inspecting the oil components and checking the top for arrival.
In the particular case of Black Bombers, the oil pumps were warrantied recalls. Check your model for any and all service bulletins and warranties. Get it done!

Replaced early iron pump body with late model aluminum body.

Once the bike starts, be certain you check for arrival at the cam. The bearings will completely melt and fuse without lubrication and nobody will be happy about it. It normally takes about 40 seconds for oil to arrive. Yes, it takes that long every time you start.

Drain, wash and derust the tank! Dirt, water, varnish and loose rust will undue a lot of your work and never let it run right. The galvanization is gone at this point, just put POR15 inside.
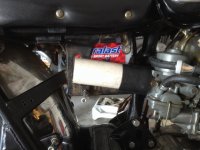
Regardless of the condition of the tank, you need a filter somewhere. Most of the old bikes have lost their screens completely. I use small-engine inline filters with no issue ever reported. I check the bottom of the bowls for sediment and never find any buildup.
Check everything as it's going together. Why skip a step and take a chance that you'll have to take ten steps back? The clutch will sometimes have indentations like this that will cause the disks to bind. I made sure to lightly sand these down just enough to allow free movement. Better than cracking the clutch cover off again.


Plan on replacing every gasket you remove. Also use very very fine Roloc discs to clean and debur all mating surfaces. There is no need for RTV or other gasket makers except when explicitly required, such as joining the crank cases. Don't bother mending old gaskets and using gasket maker, they cost less than the amount of trouble they are.

When using gasket maker, use just a hair. Excess will be squeezed out and mix with the oil or block oil passages.
Clean contact points for electrical and grounded components! I test all grounded components and aim for 0.0Ω. A good ground increases spark and efficiency.


If the battery won't hold a charge (12.8 volts after an hour at least) just replace. You're fighting up-hill using an old battery.
Clip 1/4" off of the ends of your spark plug wires. Both ends, if they are the removable type. The wires simply disintegrate. You need a magnifying glass to see the single wire vs the several strands of the clipped lead.

Inspect your spark plug boots. You need a resistor somewhere in the high tension side or you will burn up your coils. Resistors can either be in the plugs or the boots, one or the other, not both. So if you're using a resistor spark plug, check that the boot has close to 0.0Ω resistance. If you're using resistor boots, check that they are within spec for the coils you're using. Most of the Honda twins used 5k caps.
Save a bit of trouble by just replacing bullets that aren't crimped to the insulator or have no insulator boot. Don't bother using the crap you find at Autozone. These japanese style bullets seem to be the greatest quality. They seal up tight and don't tend to seize.


When checking the ignition system:
1. Leave the spark plugs in the cylinders. You don't want combustible gases coming out or crud going in.
2. You don't have to kick the engine over if it uses points. Just rotate until one of the sets of points is closed and open it manually. Each time it opens it will spark.
3. The easiest way to reliably ground the plugs you're testing with is to use booster cables. Clamp one end to the motor and the other end to a plug.
4. Always use NEW properly gapped plugs to judge spark.
5. If you're using dual-output coils, both plugs must be installed and grounded to test. Use both booster cable clamps.

EVERY grease point needs new grease. The old stuff is likely grime by now. CLEAN then grease.

Check that everything is torqued to spec. Crack the nut or bolt one half turn, then torque it down. It's a good idea to re-torque heads. Always torque in sequence when applicable.
---
I find that most of the vintage riders I come across are putting "premium" gas on their bikes. Just use 87. Costs less, has zero ill effects (no it doesn't "burn cleaner"), and considering the length of the hose and the size of your tank, if you're paying for premium, chances are you're still getting what's left over in the hose from the last customer.
If you notice any knocking, and you WILL notice it if it happens, just go up to the next grade.
Connect hoses to your petcock and watch the stream. Is should be fast without any chugging and solid. If it seems slow, open your tank cap. If that allows it to flow better, clean the vent hole in your cap and test again. You want completely unrestricted flow.
If you catch any oil leaks soon after replacing gaskets, run the engine through a few heat cycles and tighten the bolts. That will normally allow the gaskets to form better.
Don't plug in the horn! Do all of the testing and wiring etc before you test your horn. If they're corroded, they can have a short that will blow fuses or worse. In this case, the horn does not work at all, but it also doesn't short, so I'm leaving it unplugged until we have a replacement.
While doing the basic tuning, check that the stator is putting out sufficient voltage. There are many threads here about how to check it independent of the regulator and rectifier.
If the stator is working properly, I recommend upgrading the regulator/rectifier for several reasons.
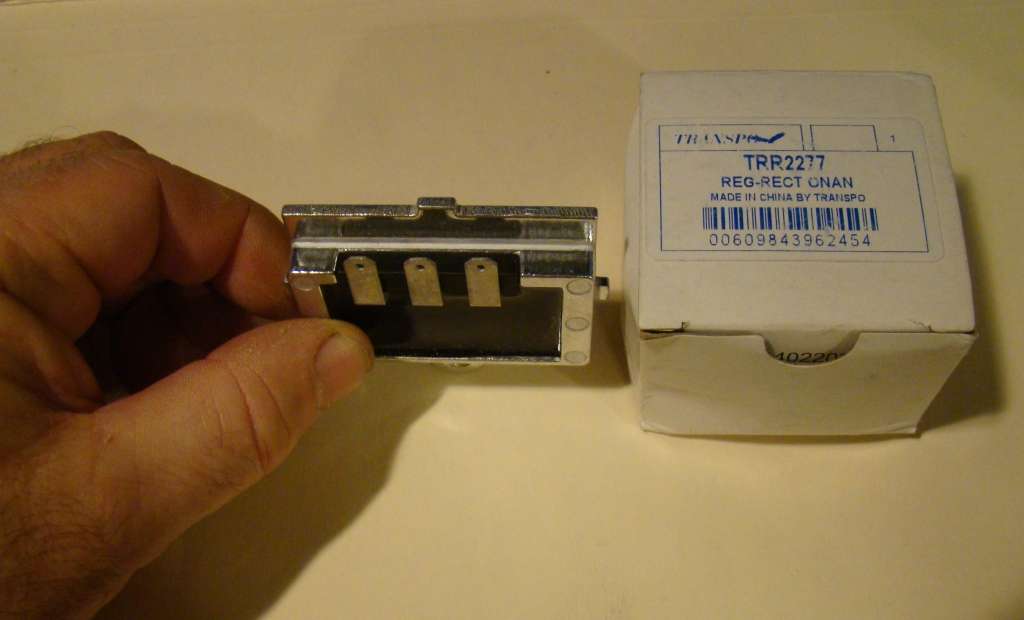
This is an Onan regulator/rectifier; it contains both components. I don't turn anywhere else for reliable and efficient charging.
1. Cheap. Usually $25 online.
2. Safe. They reliably regulate voltage to 14.5v, which is safe for all types of 12v battery including lithium types and AGM.
3. Efficient. Normally your battery is depleting at RPM below about 1,500, but this one maintains 13v+ at the battery even at idle! (assuming your stator is working properly)
4. The stock rectifiers tend to drain your battery while it sits!
You'll notice it has three prongs. Two prongs for the stator wires and one goes to the battery + post to charge it. Ground is supplied through the case. The Honda twins typically have three wires from the stator because they have two sets of coils, one for day and another that is added for night (headlight and tail light) riding. There are plenty of threads about this.

Anything else for the barn queens?

If you've ever reached for the tube of bathtub silicone while assembling a bike, step away before you do more harm.

Even after two days of using the fountain pump to pump diesel through the case, a lot of muck remained. CLEAN it out! These bikes simply don't have filters, so the less loose debris the better. Notice the remains of the cam-chain cushions.

Speaking of a lack of filter, it's crucial you keep the oil slinger clean! I clean mine every other oil change. No need to remove it each time if you do this, since it won't petrify. I've NEVER opened a sitting bike that didn't have THICK rock-hard buildup indicating it had never been cleaned in all of it's 50 years.

Oil is CRUCIAL! You're riding a time-bomb if you aren't inspecting the oil components and checking the top for arrival.
In the particular case of Black Bombers, the oil pumps were warrantied recalls. Check your model for any and all service bulletins and warranties. Get it done!

Replaced early iron pump body with late model aluminum body.

Once the bike starts, be certain you check for arrival at the cam. The bearings will completely melt and fuse without lubrication and nobody will be happy about it. It normally takes about 40 seconds for oil to arrive. Yes, it takes that long every time you start.

Drain, wash and derust the tank! Dirt, water, varnish and loose rust will undue a lot of your work and never let it run right. The galvanization is gone at this point, just put POR15 inside.
Regardless of the condition of the tank, you need a filter somewhere. Most of the old bikes have lost their screens completely. I use small-engine inline filters with no issue ever reported. I check the bottom of the bowls for sediment and never find any buildup.
Check everything as it's going together. Why skip a step and take a chance that you'll have to take ten steps back? The clutch will sometimes have indentations like this that will cause the disks to bind. I made sure to lightly sand these down just enough to allow free movement. Better than cracking the clutch cover off again.


Plan on replacing every gasket you remove. Also use very very fine Roloc discs to clean and debur all mating surfaces. There is no need for RTV or other gasket makers except when explicitly required, such as joining the crank cases. Don't bother mending old gaskets and using gasket maker, they cost less than the amount of trouble they are.

When using gasket maker, use just a hair. Excess will be squeezed out and mix with the oil or block oil passages.
Clean contact points for electrical and grounded components! I test all grounded components and aim for 0.0Ω. A good ground increases spark and efficiency.


If the battery won't hold a charge (12.8 volts after an hour at least) just replace. You're fighting up-hill using an old battery.
Clip 1/4" off of the ends of your spark plug wires. Both ends, if they are the removable type. The wires simply disintegrate. You need a magnifying glass to see the single wire vs the several strands of the clipped lead.

Inspect your spark plug boots. You need a resistor somewhere in the high tension side or you will burn up your coils. Resistors can either be in the plugs or the boots, one or the other, not both. So if you're using a resistor spark plug, check that the boot has close to 0.0Ω resistance. If you're using resistor boots, check that they are within spec for the coils you're using. Most of the Honda twins used 5k caps.
Save a bit of trouble by just replacing bullets that aren't crimped to the insulator or have no insulator boot. Don't bother using the crap you find at Autozone. These japanese style bullets seem to be the greatest quality. They seal up tight and don't tend to seize.


When checking the ignition system:
1. Leave the spark plugs in the cylinders. You don't want combustible gases coming out or crud going in.
2. You don't have to kick the engine over if it uses points. Just rotate until one of the sets of points is closed and open it manually. Each time it opens it will spark.
3. The easiest way to reliably ground the plugs you're testing with is to use booster cables. Clamp one end to the motor and the other end to a plug.
4. Always use NEW properly gapped plugs to judge spark.
5. If you're using dual-output coils, both plugs must be installed and grounded to test. Use both booster cable clamps.

EVERY grease point needs new grease. The old stuff is likely grime by now. CLEAN then grease.

Check that everything is torqued to spec. Crack the nut or bolt one half turn, then torque it down. It's a good idea to re-torque heads. Always torque in sequence when applicable.
---
I find that most of the vintage riders I come across are putting "premium" gas on their bikes. Just use 87. Costs less, has zero ill effects (no it doesn't "burn cleaner"), and considering the length of the hose and the size of your tank, if you're paying for premium, chances are you're still getting what's left over in the hose from the last customer.
If you notice any knocking, and you WILL notice it if it happens, just go up to the next grade.
Connect hoses to your petcock and watch the stream. Is should be fast without any chugging and solid. If it seems slow, open your tank cap. If that allows it to flow better, clean the vent hole in your cap and test again. You want completely unrestricted flow.
If you catch any oil leaks soon after replacing gaskets, run the engine through a few heat cycles and tighten the bolts. That will normally allow the gaskets to form better.
Don't plug in the horn! Do all of the testing and wiring etc before you test your horn. If they're corroded, they can have a short that will blow fuses or worse. In this case, the horn does not work at all, but it also doesn't short, so I'm leaving it unplugged until we have a replacement.
While doing the basic tuning, check that the stator is putting out sufficient voltage. There are many threads here about how to check it independent of the regulator and rectifier.
If the stator is working properly, I recommend upgrading the regulator/rectifier for several reasons.
This is an Onan regulator/rectifier; it contains both components. I don't turn anywhere else for reliable and efficient charging.
1. Cheap. Usually $25 online.
2. Safe. They reliably regulate voltage to 14.5v, which is safe for all types of 12v battery including lithium types and AGM.
3. Efficient. Normally your battery is depleting at RPM below about 1,500, but this one maintains 13v+ at the battery even at idle! (assuming your stator is working properly)
4. The stock rectifiers tend to drain your battery while it sits!
You'll notice it has three prongs. Two prongs for the stator wires and one goes to the battery + post to charge it. Ground is supplied through the case. The Honda twins typically have three wires from the stator because they have two sets of coils, one for day and another that is added for night (headlight and tail light) riding. There are plenty of threads about this.

Anything else for the barn queens?


")


