Triton Build

two wheels of hell

Active Member
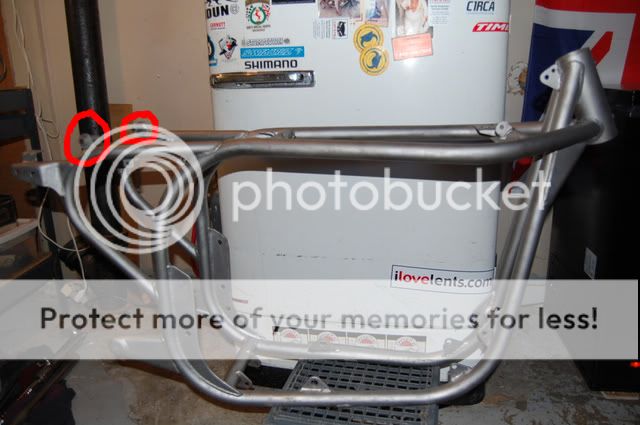
My journey begins with finding a frame located San Diego. I found a listing of BSA parts on Ebay. In it was a lone Norton Featherbed frame and Atlas tank. When he suddenly pulled the listing, I emailed him and asked if he still had the lot and would he be willing to sell the Norton by it self. I left my phone number. About a month later I received a call on a Sunday. I took a few minutes to figure out who the hell this was. He was keeping the BSA parts and leaving town. He needed gas money to get on his way. He made a offer and we reached a agreement. A friend picked it up in a snake infested back yard of classic bike torture. The company I work for is based in LA. They shipped it up to Portland, OR where I live.

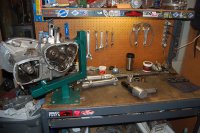
I have made the decision to use a Unit Motor for the bike. I purchased a 71 Bonny motor from a local acquaintance. I believe this is a better, more reliable motor, for my needs and the cost of a Pre Unit is a bit more. Of course it need a total rebuild. I have never done a motor rebuild. I have the factory manual and purchased a DVD as a guide for tips.

This bike will keep me broke and most likely set the wheels of rehab in motion. Some things will be compromised for budget reasons but a simple answer is always available to every question along the way...spend more money. I will try to do within reason because this will be no show bike. It needs to keep a soul.
 
"dat engine", just looking at it makes me all hot and bothered...

wish i had the money to buy some triton/bsa bits....
 
Triumph motors are pretty simple, although a lot different to a Japanese motor.
Ignore any advice you get here unless person has actually built a Triumph engine (I usually do one very 10 yrs or so :D)
Transmission can be a pain, check gear change quadrant for wear/distortion in the slots.
Ignition timing can be a lot of 'fun' otherwise, it's real easy
 
My concern about the build, other than the dollars, has been the transmission and wiring. Thanks for the words of advice! Please chime in along the way. I am far from a expert. The frame is off being blasted. I will be working on the front forks. Would like to do a dry build to get most of the big kinks figured out. Need to set up my bench for a proper motor build. Purchased a motor stand off Ebay a while back. This frame has been sitting a couple of years. Due to $ reasons have not felt I could really make progress till now.
 
two wheels of hell said:
My concern about the build, other than the dollars, has been the transmission and wiring. Thanks for the words of advice! Please chime in along the way. I am far from a expert. The frame is off being blasted. I will be working on the front forks. Would like to do a dry build to get most of the big kinks figured out. Need to set up my bench for a proper motor build. Purchased a motor stand off Ebay a while back. This frame has been sitting a couple of years. Due to $ reasons have not felt I could really make progress till now.

Wiring's not too terrible on a Brit bike, surprisingly easy actually. Just search the net for simplified wiring diagrams. There's a ton out there and wiring everything up really only takes a few hours. I just wired my latest build (T100) with a Sparx ignition, Sparx rec/reg, two-wire alternator and I cheated this time and bought a simplified premade harness from Steadfast. Wiring this all together took a relaxed hour or so. a part is routing and hiding the wires, heh.
 
Can't wait to see more of this project! It seems British bikes are fairly rare, compared to all the Japanese bikes these days. I'm working on a BSA, myself. Good luck and have fun!
 
I've been after a reasonable featherbed frame for years. It looks like you have a good start. Keep us posted.
 
I will call it progress. Got the bench set up with a motor stand. Started to loosen a few bits. Need to pick up a puller for the stator drive gear tomorrow. Pulled one of the fork legs apart. The Atlas fork lowers I had were heavy chrome. I picked up some early Commando lowers over the summer that have the alloy finish. Feels like a couple of pounds difference. I will go with the Commando lowers for this reason. Skimmed around the Wes White Triumph rebuild video when Sunday night football started to look bad.
 

Attachments

  • DSC_0155.JPG
    DSC_0155.JPG
    434.2 KB · Views: 477
mmmm. sexy.

i have a great article from 1971 on the featherbed and nortons success racing i can scan for you if youd like it... really interesting stuff.
 
Rocan, scan away. I always like to see the articles from back in the day. Thanks!

Slice, this is a bit of dedication your friend has. I agree with him that the Unit motor does not look as full in the frame as a pre unit does. And the plates are bulky. I don't know if I could take it that far. Cool that he did but I would want to keep my options open down the road. These frames are so versatile. Who knows what I would want someday down the road. I have a '52 pre unit motor that needs a rebuild. It needs more work than the Unit that I have. I even have a modified big end crank to drop in it. I will probably use it for another project down the road.

Close to splitting the cases on the Unit motor. Cannot get the pinion puller behind the gear. #!@#$#!!! I feel a date with the grinding wheel is coming for that tool. I will get some photos soon.
 
Split the cases on the motor over the weekend. Had some trouble getting the pinion puller behind the gear. I hit the puller pretty hard with a grinding wheel. The pinion puller has 3 prongs that need to get behind the gear. I could not even get one behind. The puller was not left with much meat on the prongs to pull from. What I can tell the timing side had some oil starvation and got a little hot and seized the right side of the motor. Looks like the pinion gear (attached to the crank) was pulled further in, making it even harder to get the puller behind. All good signs that this is the motor to dump money into.

When I finally got the cases split the timing side case is stuck way big mojo on the crank. I think Friday I will be taking it by a friends house that has a hydraulic press. We will get that mother hot and press it out. I had tried to beat it out with first a soft mallet and heat. Then a hard mallet with a hunk of copper with heat. The only thing I gained is some blood coming out of my middle finger nail. Still waiting for the nail to fall off.

The best news is I sold some useless stuff in the basement this week so I will improve my cash situation. Want to stick most of the money into the motor. Need to get the crank balanced, the head rebuilt and purchase pistons and bearings. The wish list is growing. I have dreams of a belt drive and pretty things like a SRM oil feeder. Don't think Santa knows what the hell this stuff is.
 
Awsome. Can't wait to follow this build.
You seem like you've got a pretty good handle on it so far.
My Pop and I have built a few Tritons and learned a few things, the hard way of course.I'm by no means an expert, but I've meet some people that claim to be.

If I might make a few suggestions...

On your frame;
-I know you said you checked for cracks, but check again. Outside in bright daylight. Featherbeds are prone to crack along the welds on the steer tube gussett. hairline cracks can be very difficult to detect with the naked eye.
-Your frame has tabs at the rear for a bolt in cross piece. For extra strenght and less hardwear the vib loose, I'd cut those off and weld in a piece of 3/4 tube b/t the frame rails. Most of the custom gas tanks are abit longer than stock, so you'll prolly have to weld in another cross piece at the rear of the tank to anchor the tank strap.
blastednorton1-1.jpg

-A top engine mount is absolutly critical. The old Norton one can be adapted. But if you just bolt it on, it would mount to the top end with only one bolt, which will sheer off, sure as shit. Or you could weld the old Norton one to a fabbed up piece. OR make a new one piece alloy mount outta 5/16 or 3/8 plate.
- The center, bottom mount. Well, thats debatable. Alot of folks go without with no forseeable harm Me, its there so I use it.
- speaking of engine mounts, on Pops we started with a set of Unity plates. Didn't really like em. They seemed flimsy and we didn't like how they set the engine. So we made our own. Our friend Ian Kennedy at Georgia Cycle Depot is now making sets based on our design.
http://www.georgiacycledepot.net/


On the engine;
z-71's are great! Best rocker boxes. They look like the older ones, cept the have the valve adjustment ports.
- Exhaust adapters- buy the alloy ones and have them welded in.
-The transmissions are a pretty robust unit. When you drain the trans, if theres not too much condensation and If you can click thru all four, i'd leave it. Yeah its gonna leak out the big seal, but that'll just reinforce all the stereotypes about us. Ha! Plus if you crack it open, you'll prolly find some "while your at it" shit that'll get expensive.

On the wiring;
-Wiring is my least favorite part of bikes. So I keep it simple. I recently rewired both my Triton and my BSA for neg. ground. I'm loving the new, super bright LEDs. And with only six wires total, chasing down any future problems should be a little easier.
Heres the diagram I used.

http://www.britcycle.com/Manuals/331NegGrdInst.pdf

Anyway, not that anyone asked, but heres mine. I've since changed the mufflers and a few other minor changes. Its consantly evolving. I'll post some new pics if anyone cares.
dadstriton003.jpg


and heres Pop's before paint.
IMG_19031.jpg


Best of luck. If i can help in any way, parts, advice, confusing misdirection, don't hesitate.
Cheers, Daniel
 
Speedfiend, You have no idea what help you are so far. I have been confused on what to cut off the frame and what to keep. I cut the obvious. I will weld a bar in the back by the seat as described and trim the nubs. I did not get the bar on the bottom of the frame as described. I am on the fence if it should weld another bar or go without....I've got some time to decide during the dry build. Sucks, I already have the Unity plates. If I don't like them I will definitely seek out the shop Georgia. I know about the headstock and will probably fab something when the motor sits in the frame. I am not as organized or together as I might appear. Please continue to do what you just did in your reply. You are the guy I was hoping to see this. What did you do for the kick stand? I know you pretty much have to weld one in place when you do the dry build and figure the lean. Wondering if you used the stock on the frame or purchased something aftermarket. Did you use a Unity tank buckle or something else? This is probably my next purchase to go forward with the frame.

The sun does not shine in Portland this time of year.....I will double check for cracks around the headstock with good artificial light!
 
2 wheels, do you have a genuine Triumph pinion puller or a generic one? The Triumph one I had was a unique design that slipped in there nicely in a way that generics can't match. the 3 legs were almost almost the full circumference so they could get away with being thinner than a normal puller.
 
teazer, I guess I was sold the correct tool. I purchased most of my tools from a UK supplier at the same time. I have a washer behind the pinion but it may not be the correct one. Oddly, the next day a guy posted a ad on craigslist needing help getting the pinion and the cam gears off the same year Triumph motor, a '71. My new slimmer puller fit much easier behind his. Took it off no problem. I don't think this problem is uncommon. Just feel funny hacking on a $70 tool to make it work the first time.
 
That's the correct tool. I think mine needed a small amount of trimming and I was using it on pre-unit motors so there may be different clearance.
 
Back
Top Bottom