
We noticed you are blocking ads. DO THE TON only works with community supporters. Most are active members of the site with small businesses. Please consider disabling your ad blocking tool and checking out the businesses that help keep our site up and free.
You are using an out of date browser. It may not display this or other websites correctly.
You should upgrade or use an alternative browser.
You should upgrade or use an alternative browser.
Ton up SR250: 100mph, 100kg, 30hp
- Thread starter JadusMotorcycleParts
- Start date
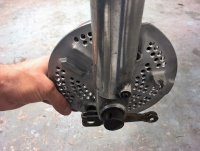
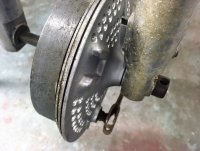
The Jimbonaut said:That looks great. Think I read somewhere that this effect is called drillium which is itself a cool word. Is there any issues with water getting in and affecting the shoes/drum?
Sent from my iPhone using DO THE TON
i've only ever seen "drillium" used in the bicycle world - but I mean really... we just attach spinning explosion powered heat generators to our two wheeled death machines
Sav0r said:Weakening holes is what we always referred to them as in the race car world.
Nice work though, it looks good.
Haha Yes! I have heard that too. Gets pretty dicey if you start drilling up structural sheet metal in a car. People can sometimes miss the fact that the sheet metal itself does a lot for the structural integrity and not just the main structural elements.
I think in this case there will not be too many extreme forces on the parts. The only boss that could be under stress is the brake lever wire perch - but I will be replacing this with an alternative system anyways.
In response to @The Jimbonaut about water... If this was going to be a daily rider I actually wouldn't do this. It was quite a lot of work for very little weight loss and 'looks' and it will let more water and dust in, yes. However, because this is pretty much a purpose built machine, I won't be riding it often and will only be out in the sunshine
") ;D
;DAlso drillium, lol.
sav0r
Coast to Coast
You certainly have to pick and chose which places you weaken.
I've been meaning to model up the brake plate for my RD and then make some configuration for lightening it via CNC. The major benefit there is that I can pick and chose what gets removed and do so in fairly inorganic ways. Hopefully that would result in a lighter piece than just drilling holes but with less weakening. That's the idea anyways, and it's pretty far down on the list of things to do, I may never get to it.
In regards to the water issue, I doubt it's much of an issue. Drum brakes just aren't all that sensitive in my experience. My vintage Formuala Vee is drum brakes on all four corners and the braking character really doesn't change from wet to dry. Now when the axle seals leak it's a totally different story.
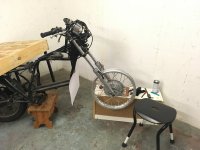
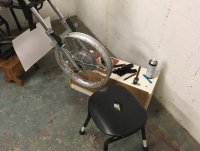
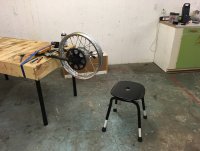
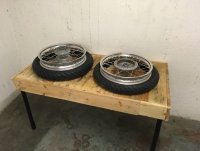
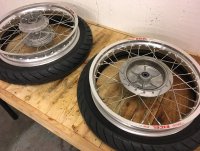
I have slowly chipped away at building up the wheels this week, or I should say truing. I had built the rear wheel last week (but had not trued it) but then I decided to try and build the front wheel and film it. What a nightmare. It's really hard to instruct a complex process! I ended up starting from scratch 3 times and the build itself took about 4 hours hahaha. Then truing took at least an hour per wheel. But it is just a time consuming process. Very rewarding though! I ended up getting both wheels to within 1mm lateral freeplay and 1-1.5mm axial (manual limits are 2mm).
Also, check out my makeshift truing stands! This actually worked out really well because you don't need to measure or think about hub-rim offset, rather you can just measure from the edge of the rim to the forks/swing-arm and adjust it so it is centered.
I'll get a shop to mount the rubber and balance the tyres
Attachments
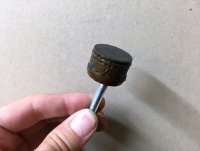
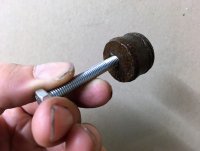
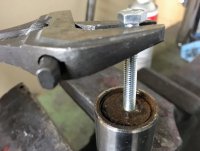
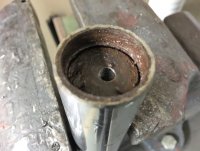
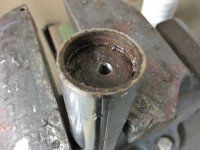
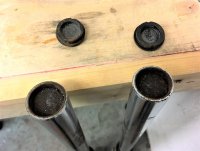
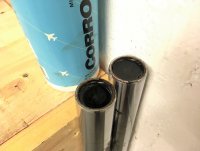
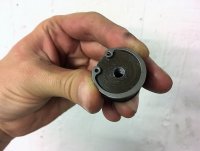
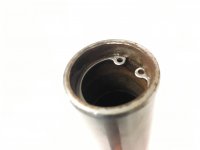
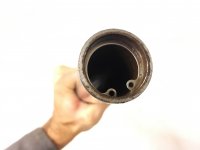
Managed to open up one of the old fork legs tonight. I have done this a few times now and have sworn and grazed knuckles enough that I have found a couple tricks that make the process a bit easier - especially if you don't have an extra set of hands and especially if that damn thing is rusted solid(ish).
Anyway, there is enough depth in the fork cap to drill and tap a hole about 15mm deep, so I do that first. Then I hit the cap a little (downwards) to break it loose. Then I ratchet down a socket on top of that and pry out the metal ring that holds it on place with a micro screwdriver. I hate this damn ring, it is a nightmare to get out. I am already looking at circlip alternatives for my own solution. Then once the ring is removed, you can very carefully release the ratchet - with safety glasses on and no-one else (or thing) to harm in sight. Sometimes it will just pop up, other times (like in this case) it will not - because of the rust build up. This is where the threaded hole comes into play - you can screw in a bolt and bash upwards to get it out. Pang! Be careful ;D
Now I can start experimenting with spring length, spacers, adjusters, emulators etc (all as discussed previously) without disturbing any of my other running SR's or dismantling this project's rolling chassis.
Attachments
-
 SR250_RustedForkCap.JPG248.1 KB · Views: 307
 -
 SR250_RustedFork.JPG255.4 KB · Views: 298
 -
 SR250_ThreadedForkCap.JPG381.7 KB · Views: 300
 -
 SR250_ForkOpening.JPG369.6 KB · Views: 302
 -
 SR250_ForkCapRemoval.JPG380.9 KB · Views: 310
 -
 SR_RustyForkCap.JPG356.7 KB · Views: 288
 -
 SR250RustyFork.JPG366.1 KB · Views: 305
Forgot to mention that I had already soaked the fork caps in penetrating oil for a few days and had applied heat to them with the heat gun a couple of cycles as well - this definitely helps.
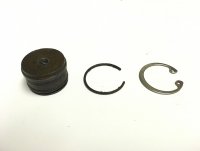
Yeah der_nanno, total pain to work with. I actually just ordered some stainless circlips in the correct dimensions. My only hesitation is that the ring is hardened steel - which is extremely tough. The circlips might be a bit soft for the job? Maybe not, I'll try it out. They may well be just fine - it is just a small line contact to hold it all together I don't think there is enough room for the circlip to deform, rather it will get sandwiched in a good way between the cap and the forks undercut.
Yeah der_nanno, total pain to work with. I actually just ordered some stainless circlips in the correct dimensions. My only hesitation is that the ring is hardened steel - which is extremely tough. The circlips might be a bit soft for the job? Maybe not, I'll try it out. They may well be just fine - it is just a small line contact to hold it all together I don't think there is enough room for the circlip to deform, rather it will get sandwiched in a good way between the cap and the forks undercut.
Attachments
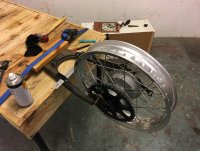
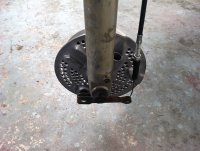
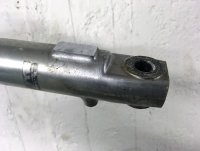
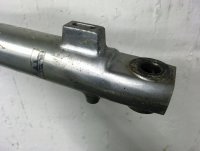
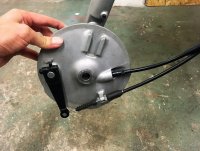
Last night I tried experimenting with the idea of getting the front brake cable to run parallel with the fork leg - so that the lever is at right angles. This removes cable length and bends in the system and 'should' stiffen up the brake feel at least. Whether or not it improves the actual function or not, I don't know. I have another couple tricks up my sleeve for that so we'll see if I can experiment with those too.
This first operation requires rotating the drum housing/pivot arm around the axle. To do this, the locating boss on the fork leg needs to be modified (in this case I cut it right off in order to be able to measure and prototype a solution) and a new bracket/boss will take its place - one that fits in the slot and can be adjusted in angle increments about the center of the axle. Prototypes coming soon...
This first operation requires rotating the drum housing/pivot arm around the axle. To do this, the locating boss on the fork leg needs to be modified (in this case I cut it right off in order to be able to measure and prototype a solution) and a new bracket/boss will take its place - one that fits in the slot and can be adjusted in angle increments about the center of the axle. Prototypes coming soon...
Attachments
-
 SR250_DrumBrakeArmAngleParrallel.JPG356.7 KB · Views: 282
 -
 SR250_BrakeArmAngleMod.JPG342.3 KB · Views: 291
 -
 SR250_DrumBrakeArmAngleMod.JPG346.7 KB · Views: 286
 -
 SR250DrumBrakeForkBoss.JPG275.7 KB · Views: 274
 -
 SR250ForkBrakeLink.JPG248.4 KB · Views: 276
 -
 SR250_DrumBrakeArmAngleStock.JPG387.3 KB · Views: 289
 -
 SR250_BrakeArmAngleStock.JPG412 KB · Views: 295
What's the plan for the cable as the suspension moves? The brake cable could telescope through guides and bend where it needs to go to the lever, but the speedo cable is a pretty straight shot with no place to curve away when the suspension compresses.
jpmobius said:What's the plan for the cable as the suspension moves? The brake cable could telescope through guides and bend where it needs to go to the lever, but the speedo cable is a pretty straight shot with no place to curve away when the suspension compresses.
Yeah exactly, the cable will run through an eyelet - like on early motocross bikes. The speedo cable is however more tricky. If I was keeping it, I would need to create an extra loop somewhere I guess? Or a universal joint? Ahahah
But for this bike it won't matter, I'll be plugging that hole with one of the tach plugs I designed and will use an electronic speedo with a pick up instead - hoping this will be more accurate for speed.
der_nanno
Faster!
JadusMotorcycleParts said:Last night I tried experimenting with the idea of getting the front brake cable to run parallel with the fork leg - so that the lever is at right angles. This removes cable length and bends in the system and 'should' stiffen up the brake feel at least. Whether or not it improves the actual function or not, I don't know.
Regarding your question: This improves the front brake to no end and not only the lever feel, but the actual and measurable performance. But you have to set up the lever so it only hits 90degrees at full pull of the cable. Going over this point will decrease the length of the lever and thus make the brake feel worse again.
(It's a common thing on XT500s to tune the front brake like that and same goes for the rear drums of both my 4-valve xt and my TR1.)
Great thats good to know nanno! The bracket will be a bit adjustable to I am hoping to be able to play with that angle. I always think it's much cooler to improve on something already there with a bit of ingenuity, rather than just swap it out entirely. I think that's the kiwi in me.
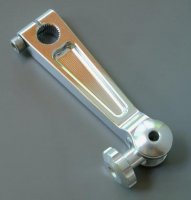
While on this topic, I was thinking of designing a billet lever arm - a bit like the ones for the SR and XT500. But when holding the stock pressed metal one in my hand and looking at it, I just can't imagine a new arm would or could be any stiffer - the stock one has all it's stiffness in the right direction. Plus I don't think there would be any weight savings to speak of. Thoughts?
While on this topic, I was thinking of designing a billet lever arm - a bit like the ones for the SR and XT500. But when holding the stock pressed metal one in my hand and looking at it, I just can't imagine a new arm would or could be any stiffer - the stock one has all it's stiffness in the right direction. Plus I don't think there would be any weight savings to speak of. Thoughts?
Attachments
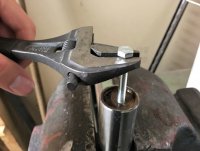
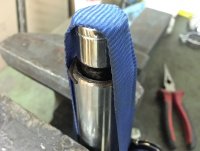
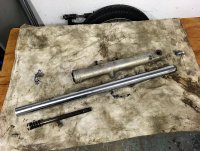
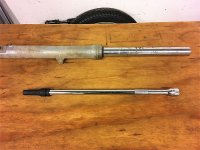
I dismantled the forks this week to get a closer look at the damping rod, spring and circlip groove.
I tested the circlips I ordered and they work a treat. This is definitely what I will be using in the future and will specify with any eventual kit I might develop. Now it would be a one hand job to remove the clip (with circlip pliers of course), instead of 3 hands a lot of swear words.
I tested the circlips I ordered and they work a treat. This is definitely what I will be using in the future and will specify with any eventual kit I might develop. Now it would be a one hand job to remove the clip (with circlip pliers of course), instead of 3 hands a lot of swear words.
Attachments
-
 SR250_ForkCapClip.JPG197.9 KB · Views: 294
 -
 SR250_ForkCapCirclip.JPG185.9 KB · Views: 282
 -
 SR250_ForkCirclip.JPG652.8 KB · Views: 281
 -
 SR250_ForkClip.JPG656.5 KB · Views: 280
 -
 SR250_ForkInternals.JPG509.5 KB · Views: 279
 -
 SR250_ForkRebuild.JPG320.3 KB · Views: 285
 -
 SR250_ForkCapClips.JPG105.2 KB · Views: 286
I think circlips is a great idea! Don't know why they were never used in the first place as they can't cost that much more and would greatly improve assembly/repair times.
Also looking forward to any quantitative measurements on the front brake mods as I cannot imagine that ventilation holes and lever repositioning will beat replacement with a disk brake (and its subsequent improvements on both swept square inches and cooling).
Also looking forward to any quantitative measurements on the front brake mods as I cannot imagine that ventilation holes and lever repositioning will beat replacement with a disk brake (and its subsequent improvements on both swept square inches and cooling).
sav0r
Coast to Coast
I use circlips on all the dampers I build, no threads at all. Makes rebuild like a 10 minute process. The downside I think is that they are a little more finicky and they are more tempting for people to mess with. They also have less shear than a threaded item, but in many cases they are good enough. Machining the grooves is generally much easier.
The way the original clip works, they are basically locked in place by the relief cut in top slug and cannot be easily dislodged. The snap ring you are using isn't locked in place at all. The whole mass of the front end is being held on that snap ring. Having said that, I am currently working on a set of GT 750 forks with exactly the same modification...they have been in service for a very long time with no adverse effects and like you mentioned, they are a heck of a lot easier to get apart!


