
We noticed you are blocking ads. DO THE TON only works with community supporters. Most are active members of the site with small businesses. Please consider disabling your ad blocking tool and checking out the businesses that help keep our site up and free.
You are using an out of date browser. It may not display this or other websites correctly.
You should upgrade or use an alternative browser.
You should upgrade or use an alternative browser.
Ducati Mobster
- Thread starter maxBetteridge
- Start date
maxBetteridge
New Member
45exmayor said:looking at the plate you made for the coil regulator i notced you left the regulator on top under the seat. do you have room to put it under the plate so it gets better air flow and stays cooler. when i had my monster i did that and never had a problem with it.
Thanks for the tip. Is overheating a problem with monster regulators? It was originally on the top side like this and I think the changes I'm planning to make to the seat will only improve the air flow so I'm inclined to leave it as is and see how It goes.
I'll have another think about it though.
maxBetteridge
New Member
Been quite a busy month on the Ducati
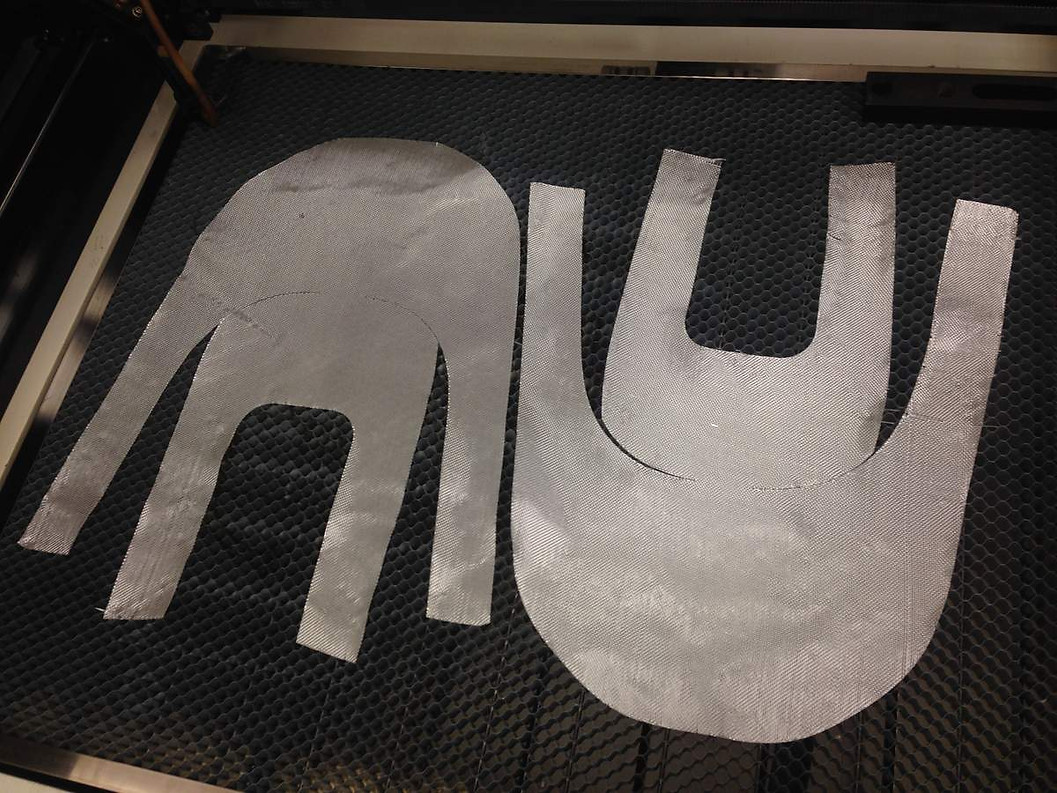
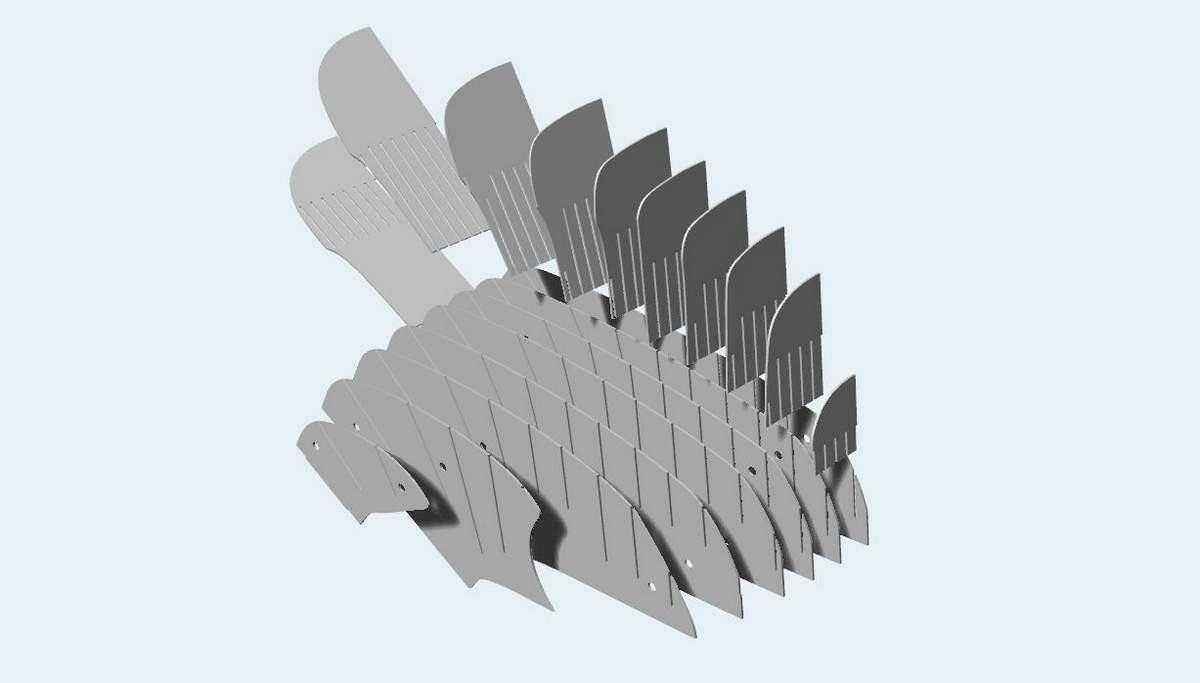
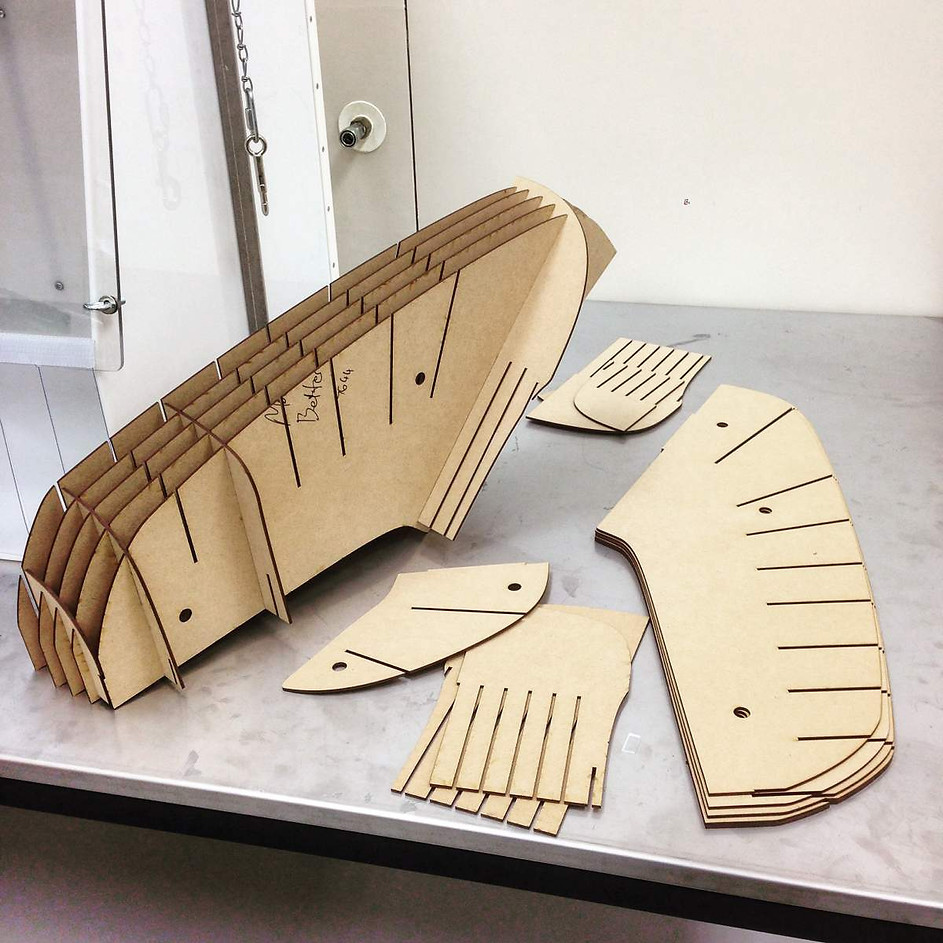
I spent a bit of time redesigning the belly pan mould to include the rollover on the top edge and also finished up the tail mould design. This is what they look like laid out for lasercutting
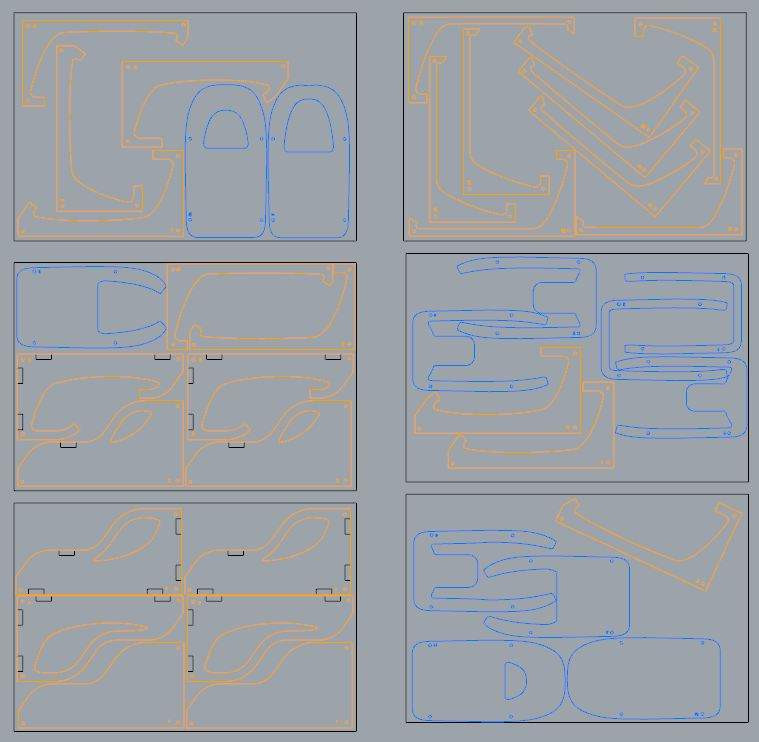
They took two entire sheets of 9mm MDF but here's the result:
I can't figure out how to embed an instagram video on this forum but I made a quick timelapse of the laser cutting")
http://www.pikore.com/m/1248459941728014067_43020050
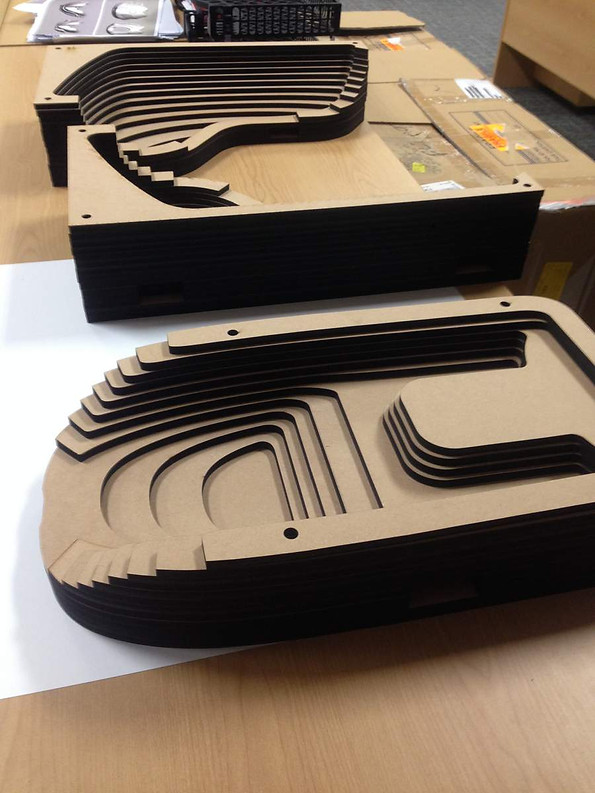
All the layers were stacked and glued and then given a brush with polyester to keep moisture out. They were then given a thick covering in bog and machined in the CNC. I designed the MDF to be at least 2mm below the A-surface but eventually changed my mind and did my finishing cut 1mm deeper than intended because I didn't build up enough bog at the outset. I also allowed 9.3mm between each layer of MDF to allow for a bit of glue thickness but in the end I realised 0.3mm excess was way too much.. Hence why you can see stripes of MDF showing through near the deepest parts on the mould.

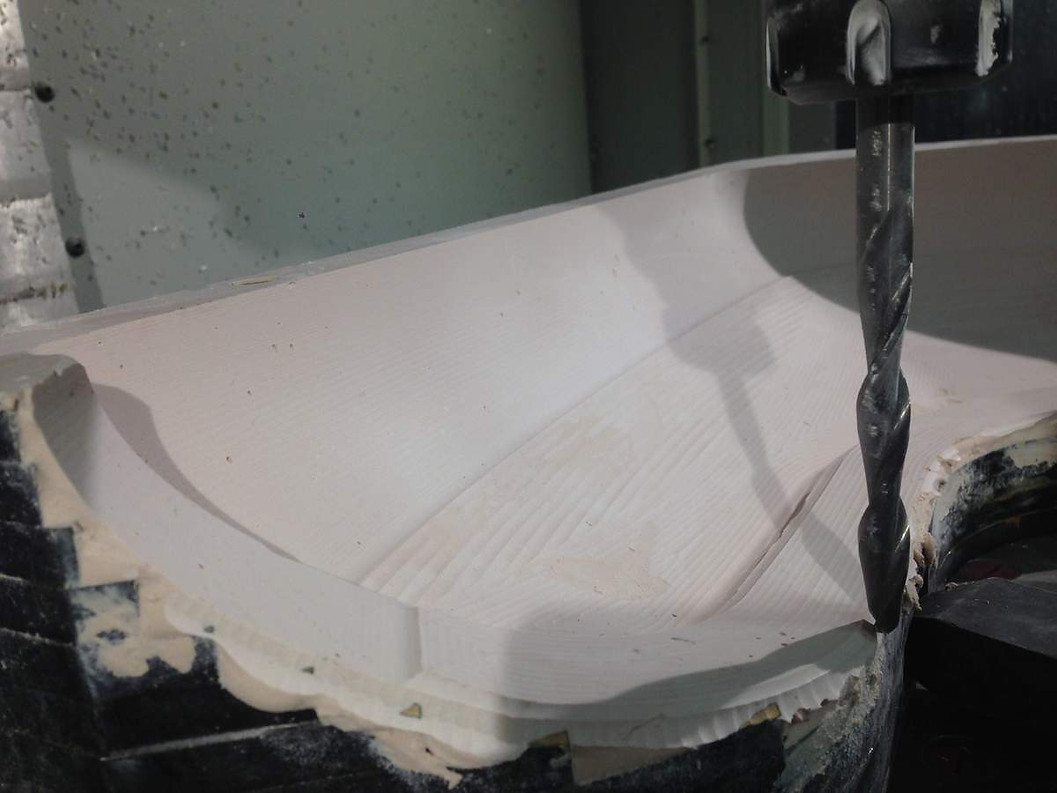
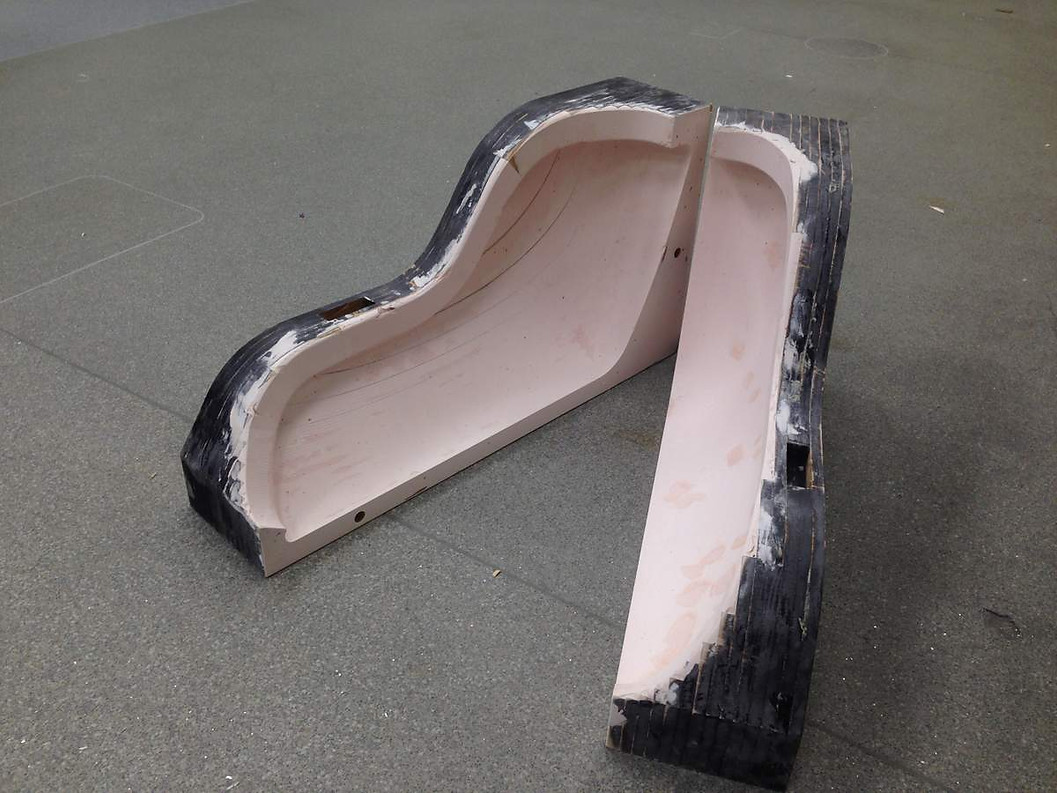
After I got the belly pan halfway done I decided it made more sense to start with the tail mould because being a smaller part and only a single part tool (not split down the center) it'd be easier to start with that one. Same story with this mould except on top of allowing too much thickness for glue I also failed to clamp the mould squarely in the CNC so the MDF shows through quite a lot more on this mould.
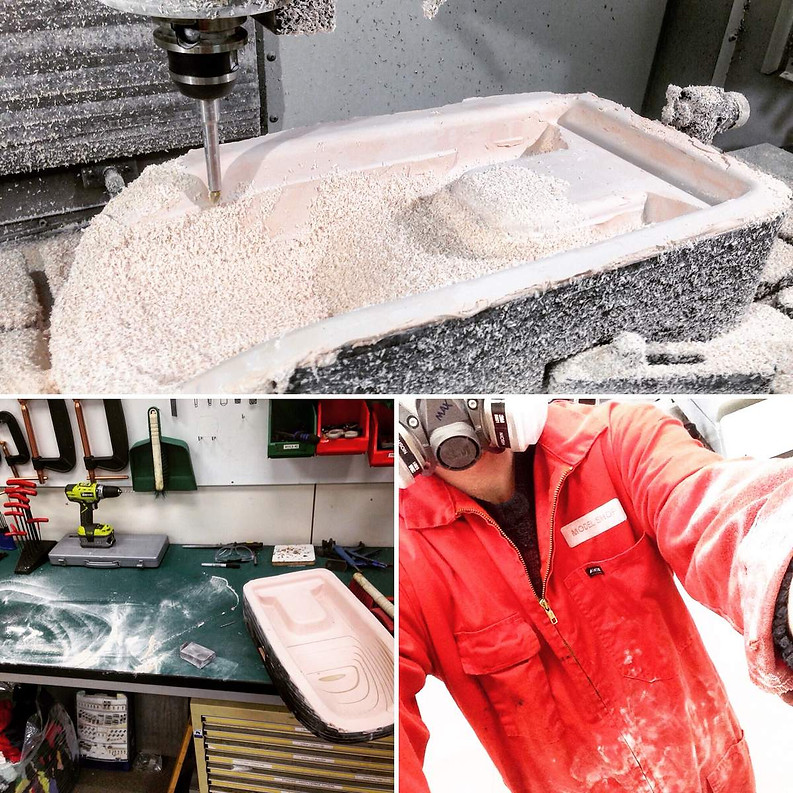
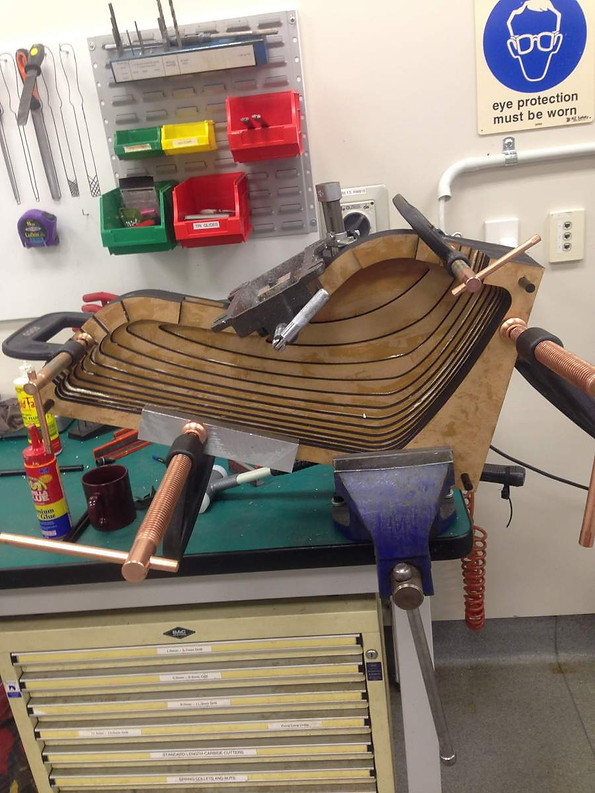
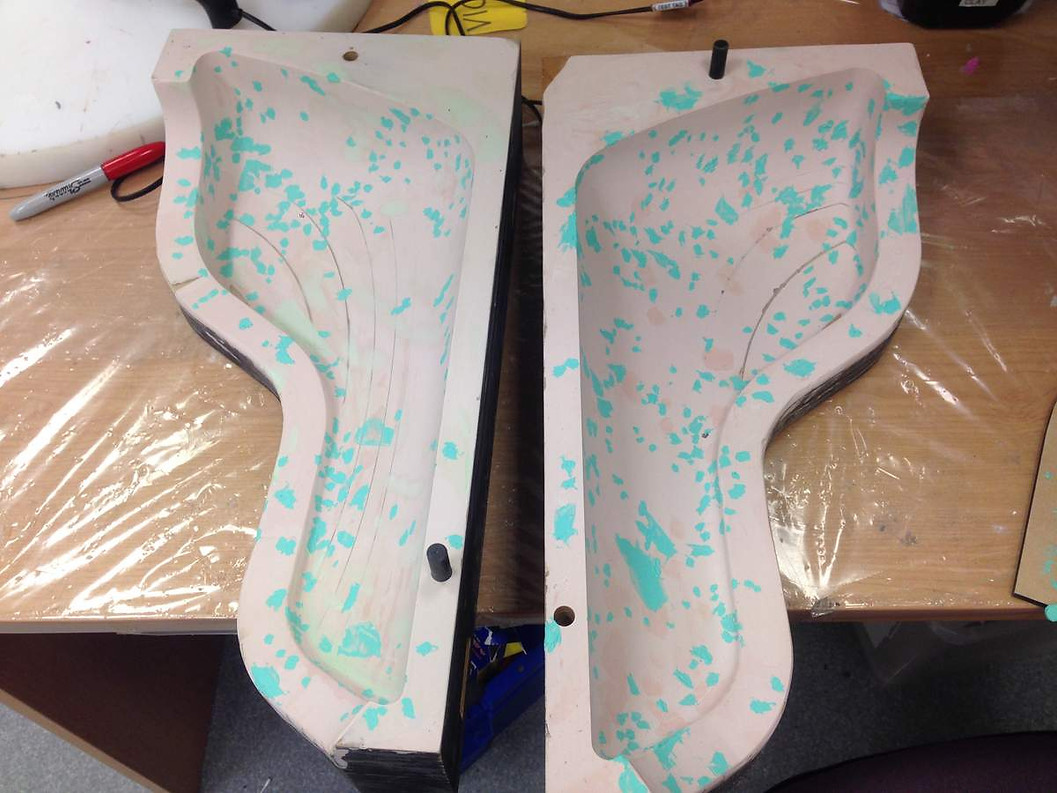
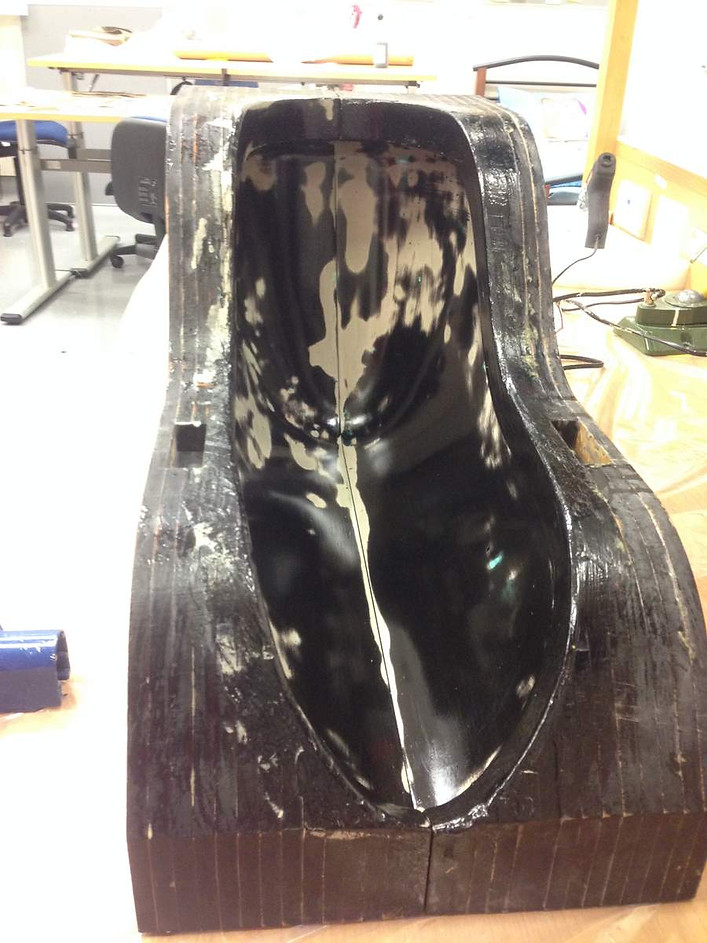
You wouldn't believe the hours of filling and sanding to get to this point:
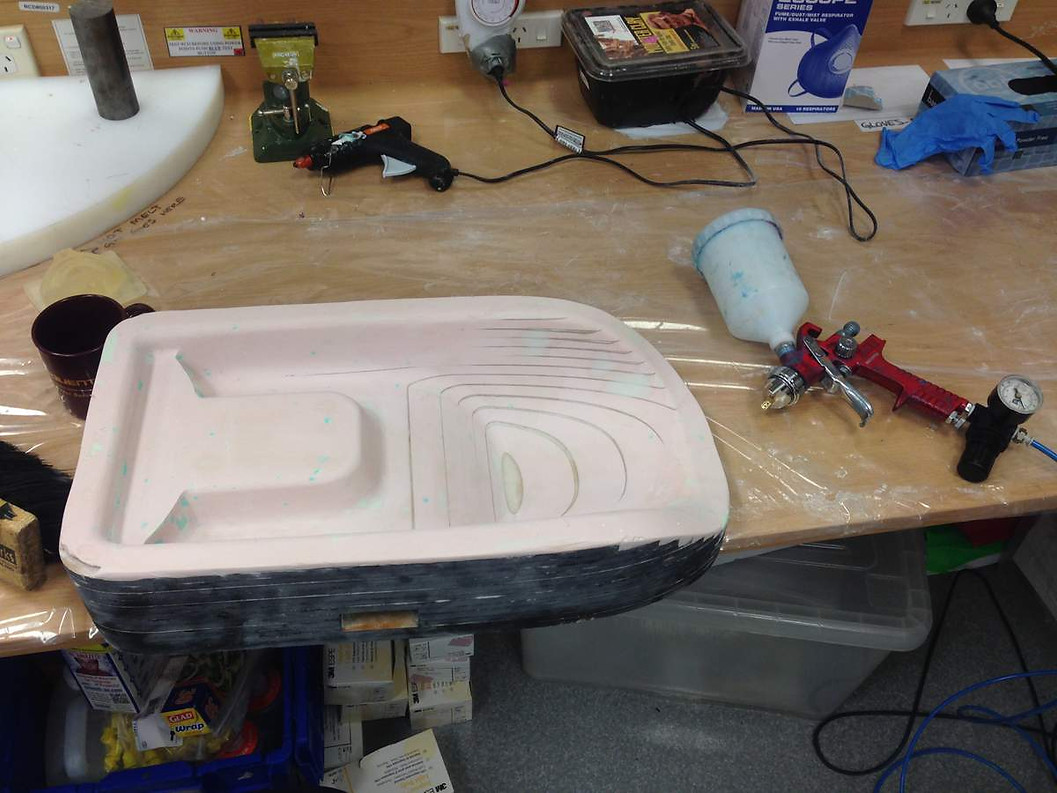
And then the extra hours to sand the gel coat:

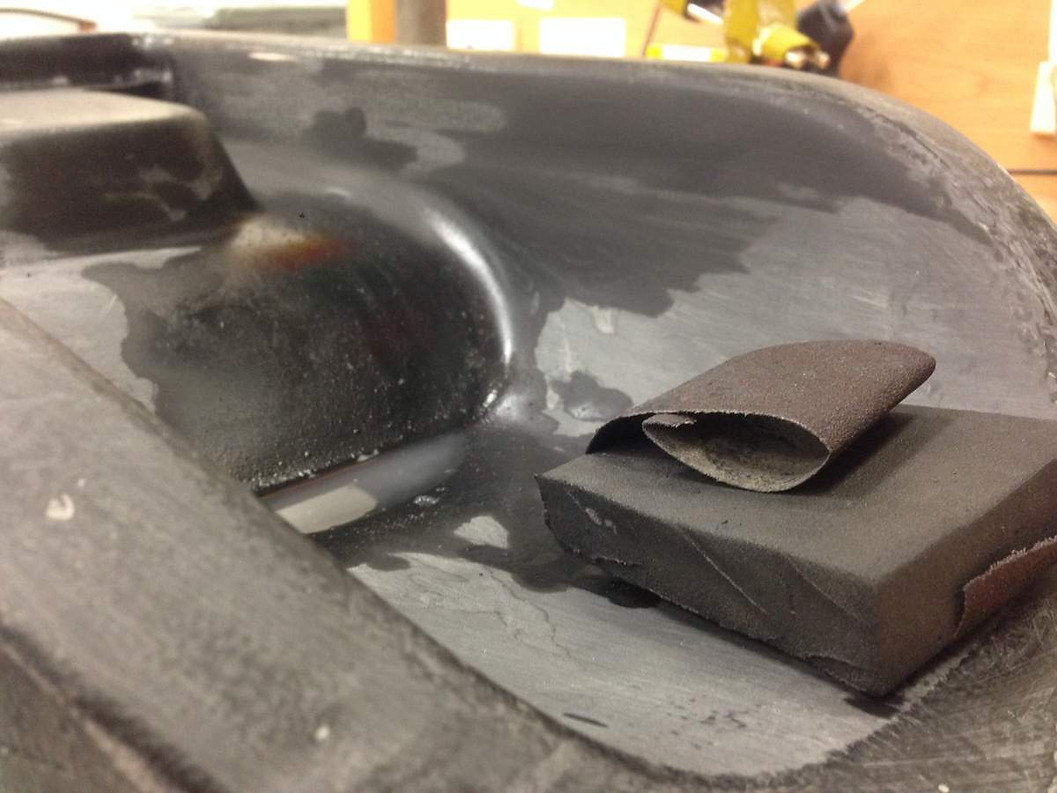
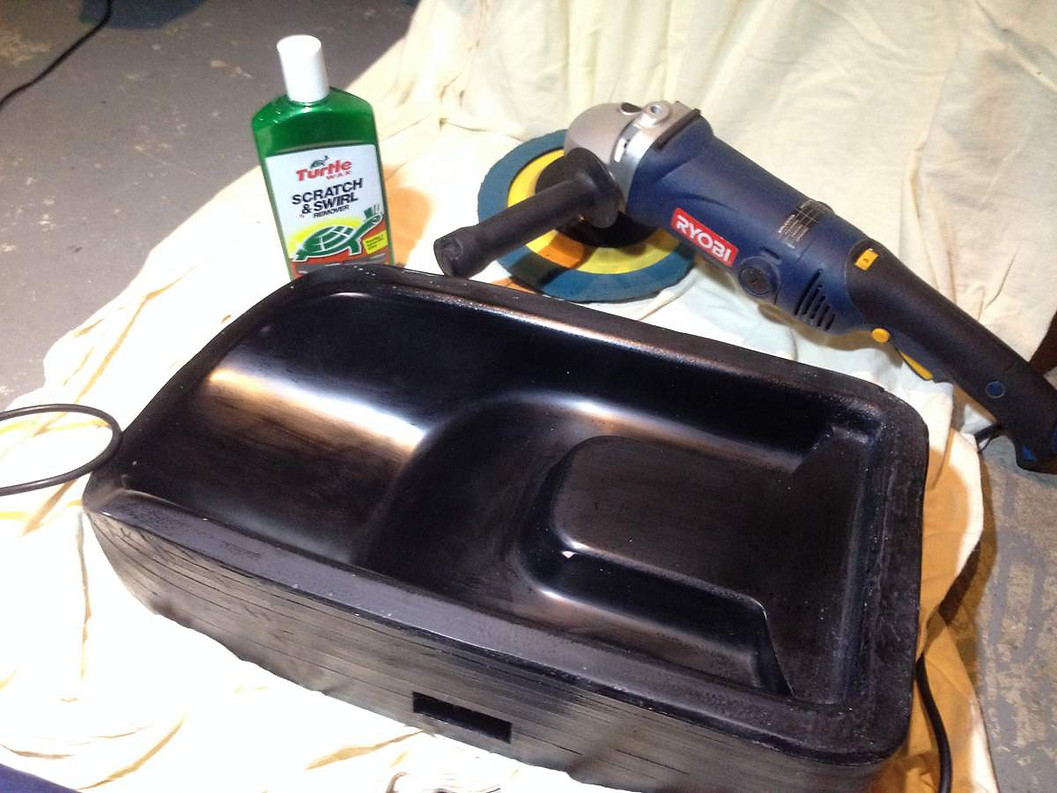
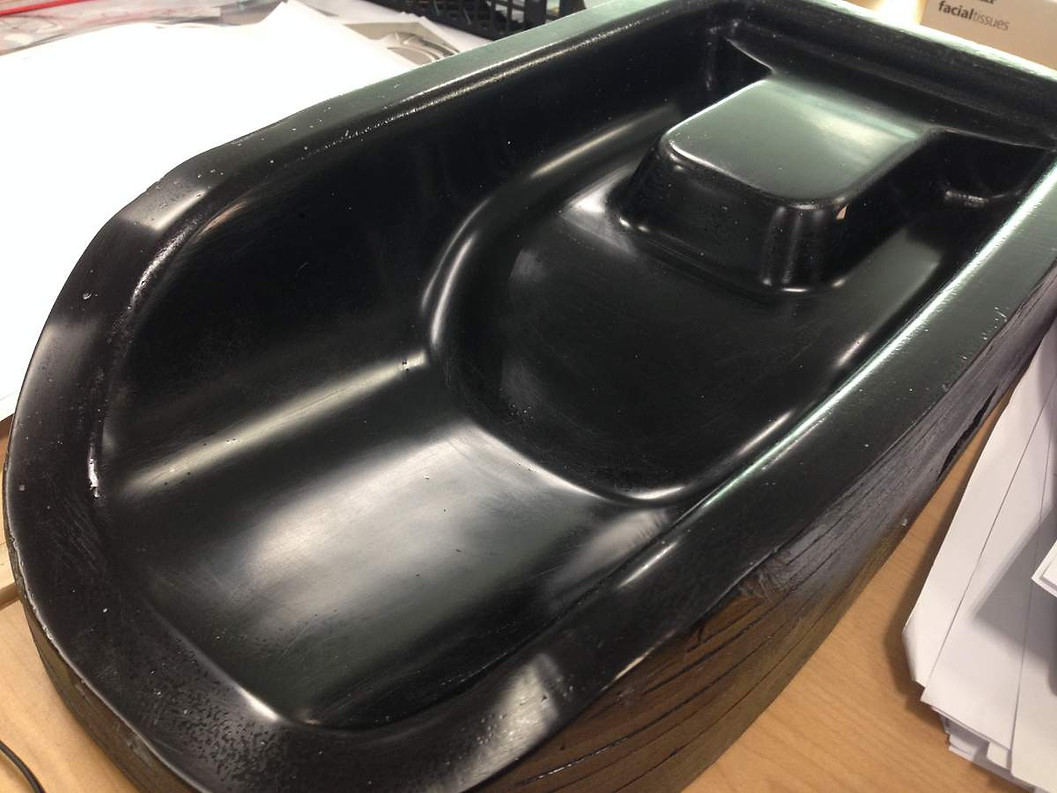
Came out all good in the end though. There's still a lot of imperfections in the mould but considering I'm only going to be pulling a few parts from this mould I figure it'll take less time to just sand the imperfections out of the parts rather than get the tool perfect.
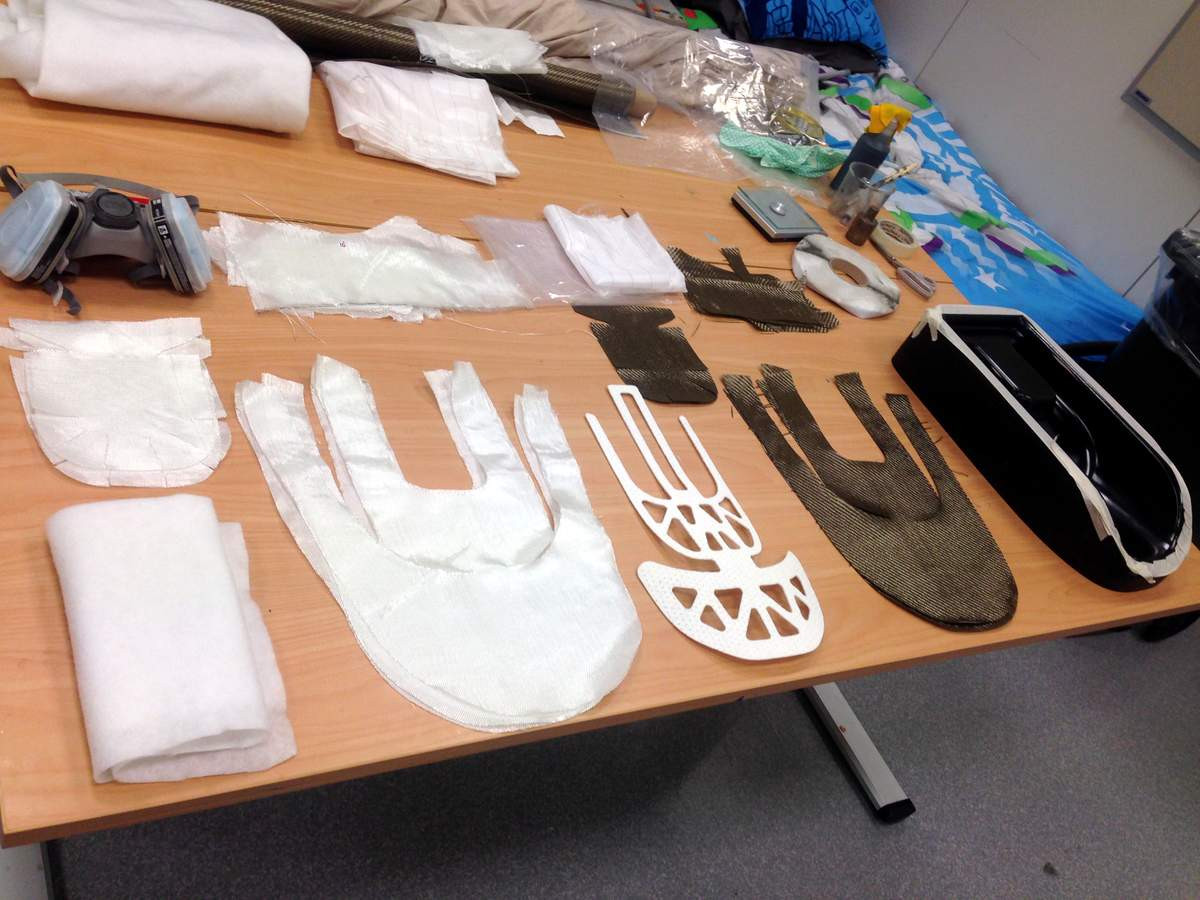
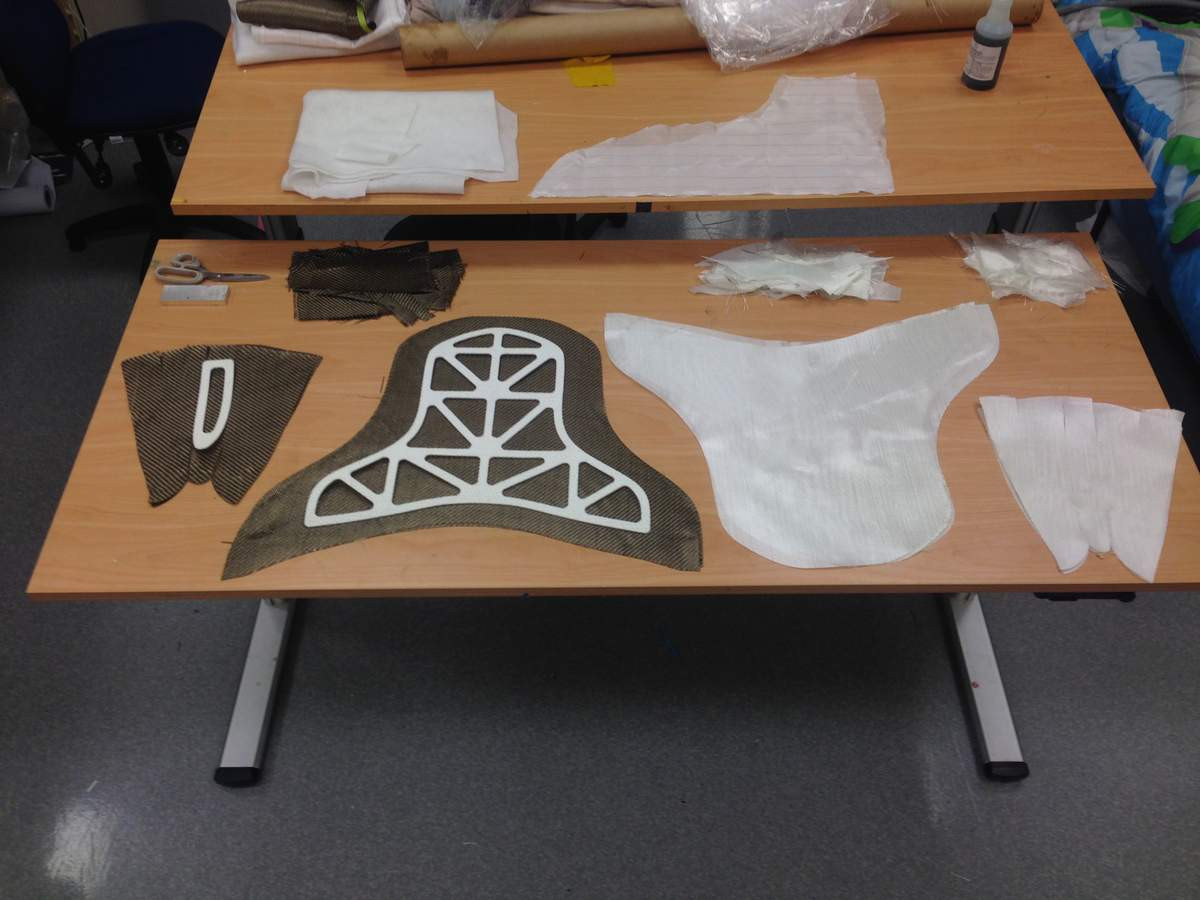
Having the tool CADed was great because I could flatten out my A-surfaces and create patterns to cut the basalt and glass fibre with to fit the mould perfectly:

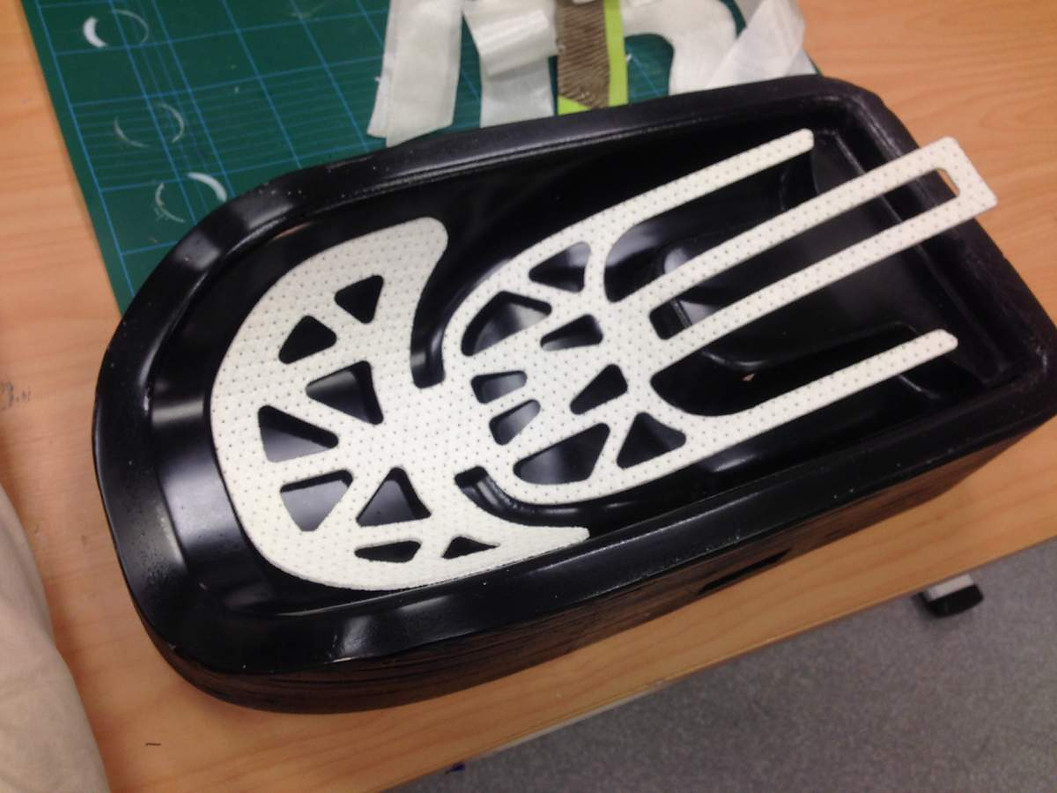
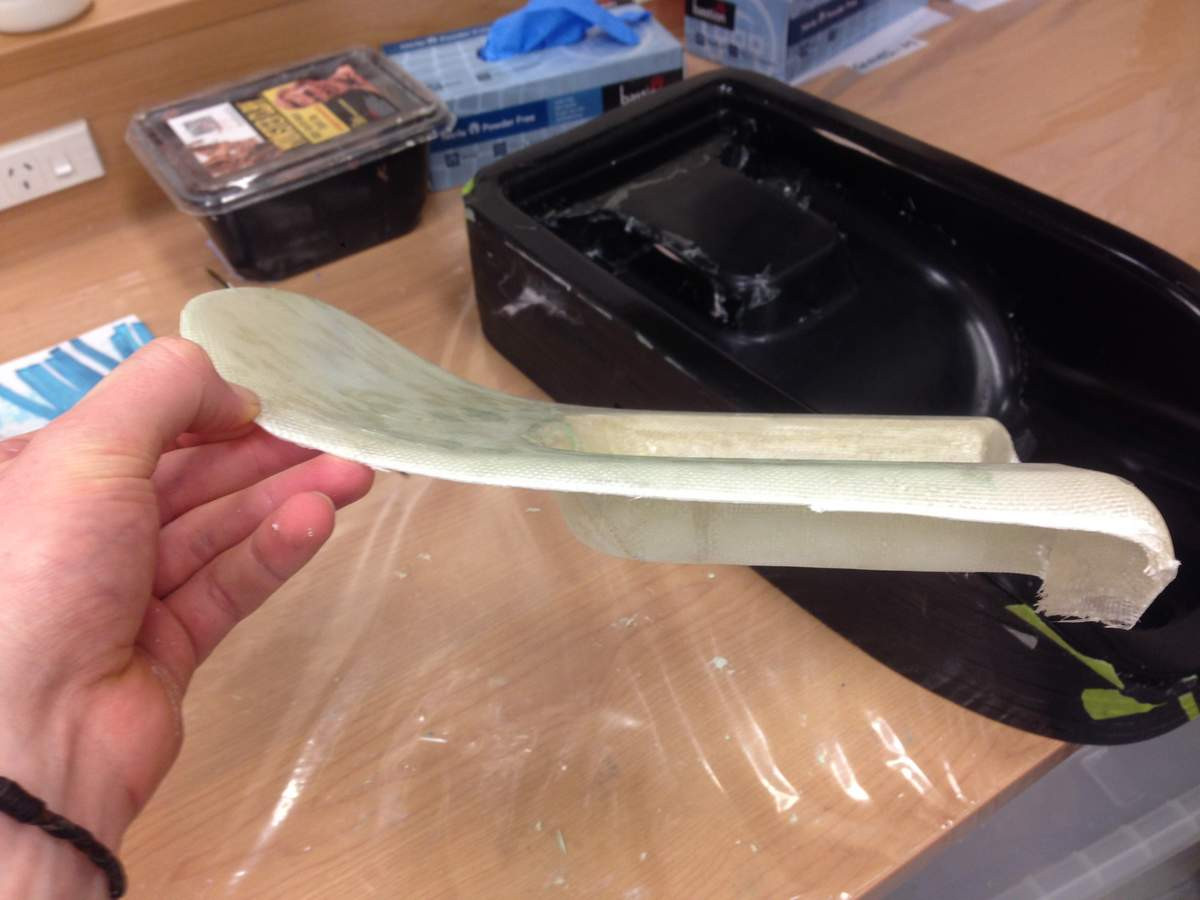
I had read that the laser cutter could cut basalt fibre but until now I hadn't tried it. It works mint! Basalt is quite similar to carbon fibre to cut and you can make a mess of it with scissors. Laser cutting gives you a perfect cut edge and even has the added benefit that it melts and fuses the fibres at the edges so they hold their shape beautifully and don't fray or unravel easily. I just did a small test with basalt, these pics are just cutting and test fitting glass mat:

I did the same thing to cut my core mat which will give the tail a bit of structure (why not put some go-faster-holes in there when you've got a laser cutter)
And another timelapse showing the CNC and some of the prep work
http://www.pikore.com/m/1252743608285581288_43020050
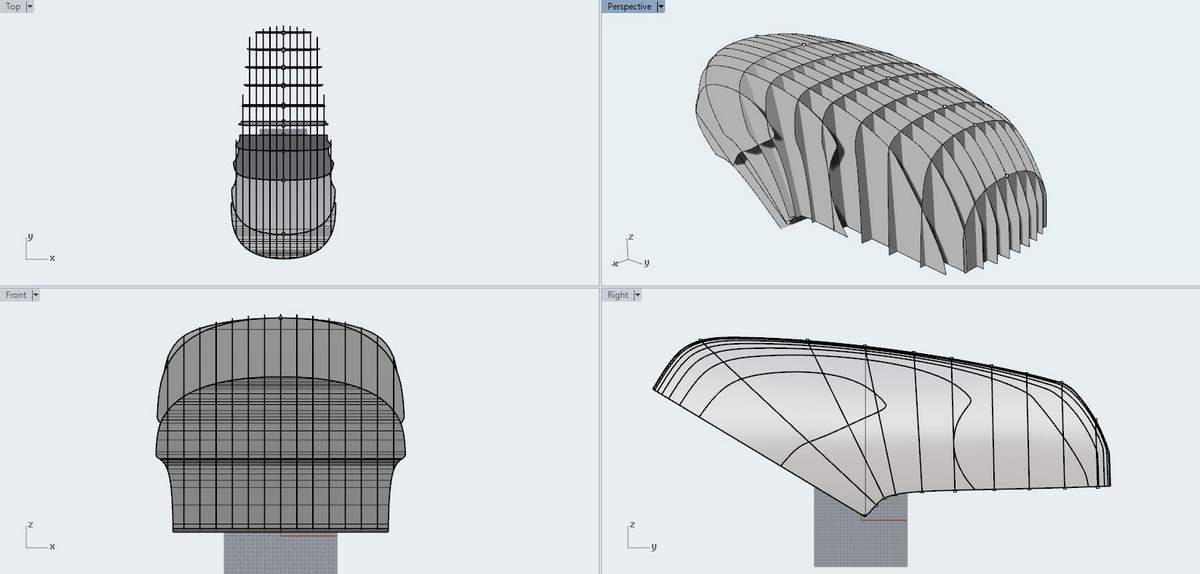
Right now I'm waiting to borrow a vacuum pump from my workmate to finish the tail. In the meantime I finished working on the tank CAD and started on the tank upper. I have modified the tank CAD to bring the front of the tank forward and wrap around the key/ignition barrel. This makes the parts trickier and bigger but I think I would've regretted it if I'd have left it the way it was because it would've just looked lazy!
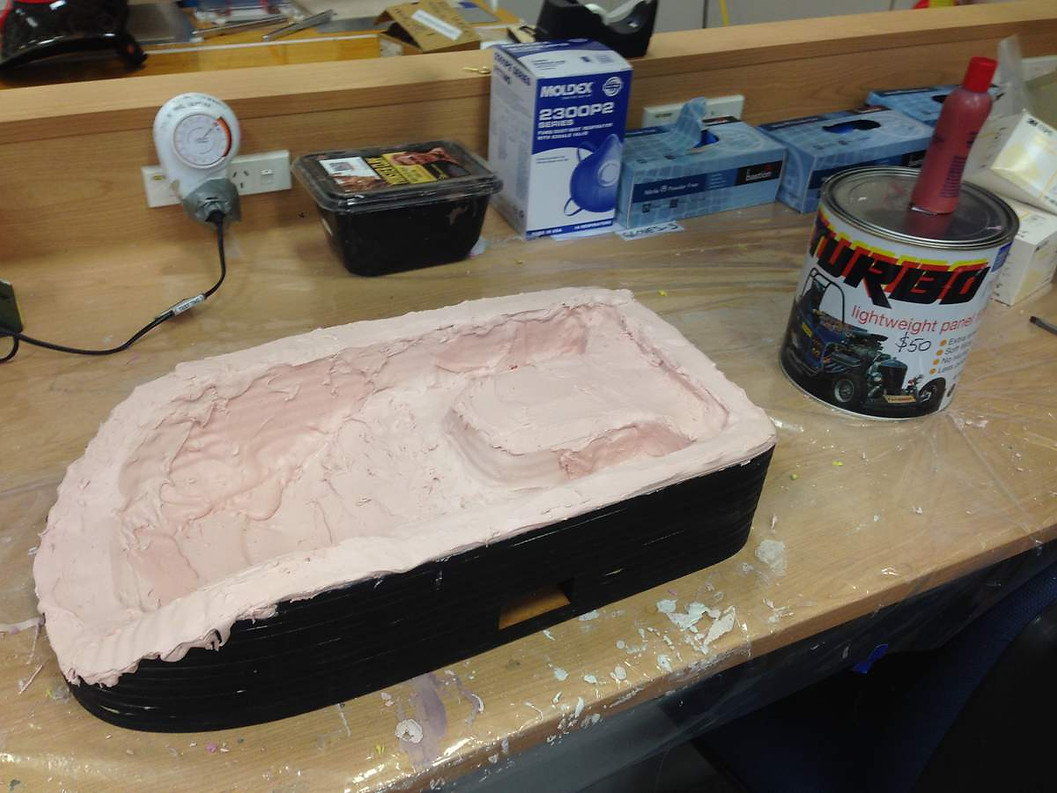
I decided to try a more traditional method for this part. It's almost too big to fit in the CNC and I think this way will work out cheaper and will hopefully be a bit less prep work (at the cost of some accuracy). I am going to laser cut a honeycomb structure and fill the gaps with expanding foam, sand it, bog it, and sand it to make the plugs (one for the LHS and one for the RHS, I will build and prep them together but they will be two separate plugs to make the mould making easy).
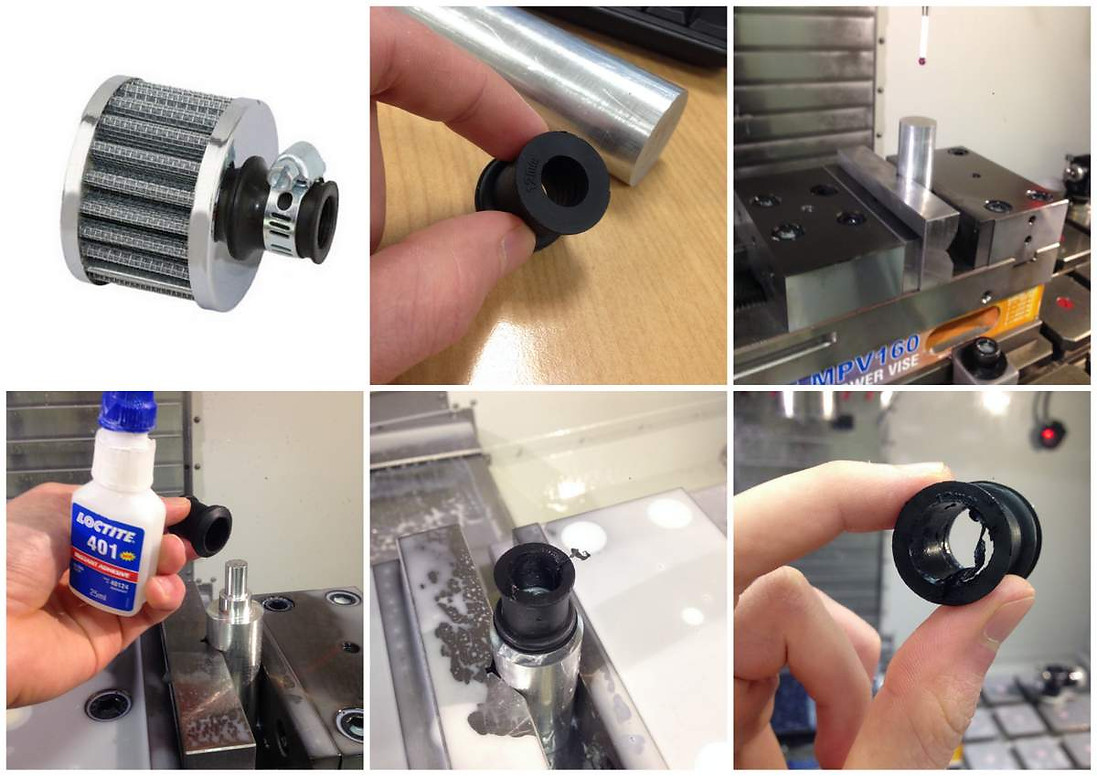
Lastly I had some trouble finding a crankcase breather which would fit so I bought a smaller one and machined the coupling out to make it fit
I'm ambitiously aiming to get this bike ride-able for the Distinguished Gentleman's Ride 2016 which is just over 3 months away.. Let's see how we go....
If anyone's still reading don't forget to follow along on instagram @max_betteridge_design
https://www.instagram.com/max_betteridge_design/
I spent a bit of time redesigning the belly pan mould to include the rollover on the top edge and also finished up the tail mould design. This is what they look like laid out for lasercutting
They took two entire sheets of 9mm MDF but here's the result:
I can't figure out how to embed an instagram video on this forum but I made a quick timelapse of the laser cutting
http://www.pikore.com/m/1248459941728014067_43020050
All the layers were stacked and glued and then given a brush with polyester to keep moisture out. They were then given a thick covering in bog and machined in the CNC. I designed the MDF to be at least 2mm below the A-surface but eventually changed my mind and did my finishing cut 1mm deeper than intended because I didn't build up enough bog at the outset. I also allowed 9.3mm between each layer of MDF to allow for a bit of glue thickness but in the end I realised 0.3mm excess was way too much.. Hence why you can see stripes of MDF showing through near the deepest parts on the mould.
After I got the belly pan halfway done I decided it made more sense to start with the tail mould because being a smaller part and only a single part tool (not split down the center) it'd be easier to start with that one. Same story with this mould except on top of allowing too much thickness for glue I also failed to clamp the mould squarely in the CNC so the MDF shows through quite a lot more on this mould.
You wouldn't believe the hours of filling and sanding to get to this point:
And then the extra hours to sand the gel coat:
Came out all good in the end though. There's still a lot of imperfections in the mould but considering I'm only going to be pulling a few parts from this mould I figure it'll take less time to just sand the imperfections out of the parts rather than get the tool perfect.
Having the tool CADed was great because I could flatten out my A-surfaces and create patterns to cut the basalt and glass fibre with to fit the mould perfectly:
I had read that the laser cutter could cut basalt fibre but until now I hadn't tried it. It works mint! Basalt is quite similar to carbon fibre to cut and you can make a mess of it with scissors. Laser cutting gives you a perfect cut edge and even has the added benefit that it melts and fuses the fibres at the edges so they hold their shape beautifully and don't fray or unravel easily. I just did a small test with basalt, these pics are just cutting and test fitting glass mat:
I did the same thing to cut my core mat which will give the tail a bit of structure (why not put some go-faster-holes in there when you've got a laser cutter)
And another timelapse showing the CNC and some of the prep work
http://www.pikore.com/m/1252743608285581288_43020050
Right now I'm waiting to borrow a vacuum pump from my workmate to finish the tail. In the meantime I finished working on the tank CAD and started on the tank upper. I have modified the tank CAD to bring the front of the tank forward and wrap around the key/ignition barrel. This makes the parts trickier and bigger but I think I would've regretted it if I'd have left it the way it was because it would've just looked lazy!
I decided to try a more traditional method for this part. It's almost too big to fit in the CNC and I think this way will work out cheaper and will hopefully be a bit less prep work (at the cost of some accuracy). I am going to laser cut a honeycomb structure and fill the gaps with expanding foam, sand it, bog it, and sand it to make the plugs (one for the LHS and one for the RHS, I will build and prep them together but they will be two separate plugs to make the mould making easy).
Lastly I had some trouble finding a crankcase breather which would fit so I bought a smaller one and machined the coupling out to make it fit
I'm ambitiously aiming to get this bike ride-able for the Distinguished Gentleman's Ride 2016 which is just over 3 months away.. Let's see how we go....
If anyone's still reading don't forget to follow along on instagram @max_betteridge_design
https://www.instagram.com/max_betteridge_design/
maxBetteridge
New Member
I've just made a few tail parts in the last few days.
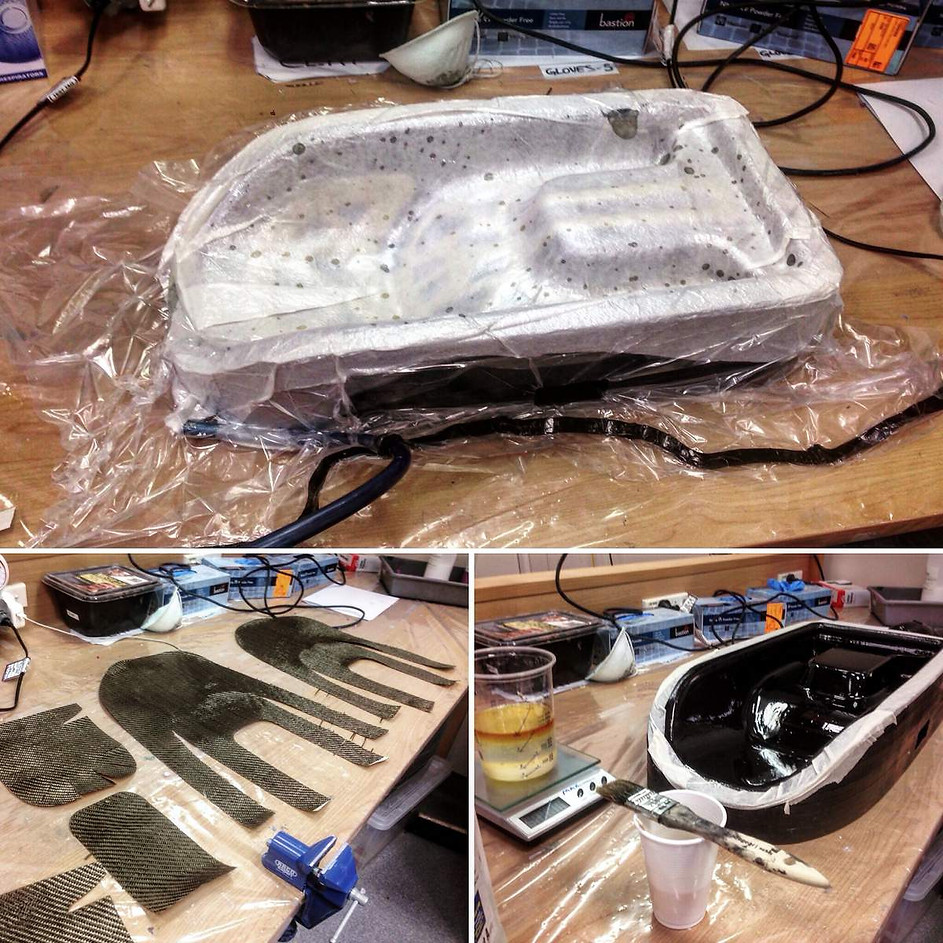
Here's another quick timelapse of the prep and layup:
http://www.pikore.com/m/1279994575313705878_43020050
The prep:
The first part:
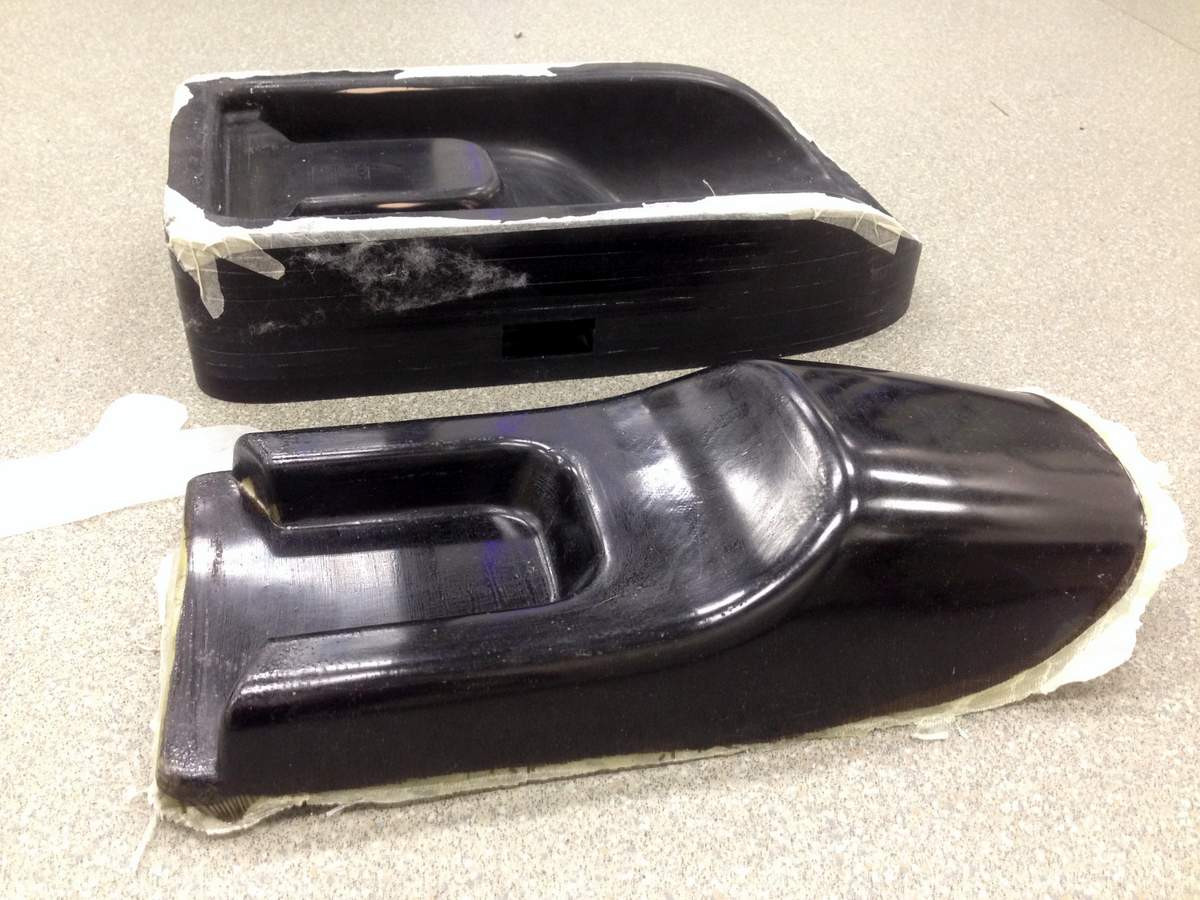
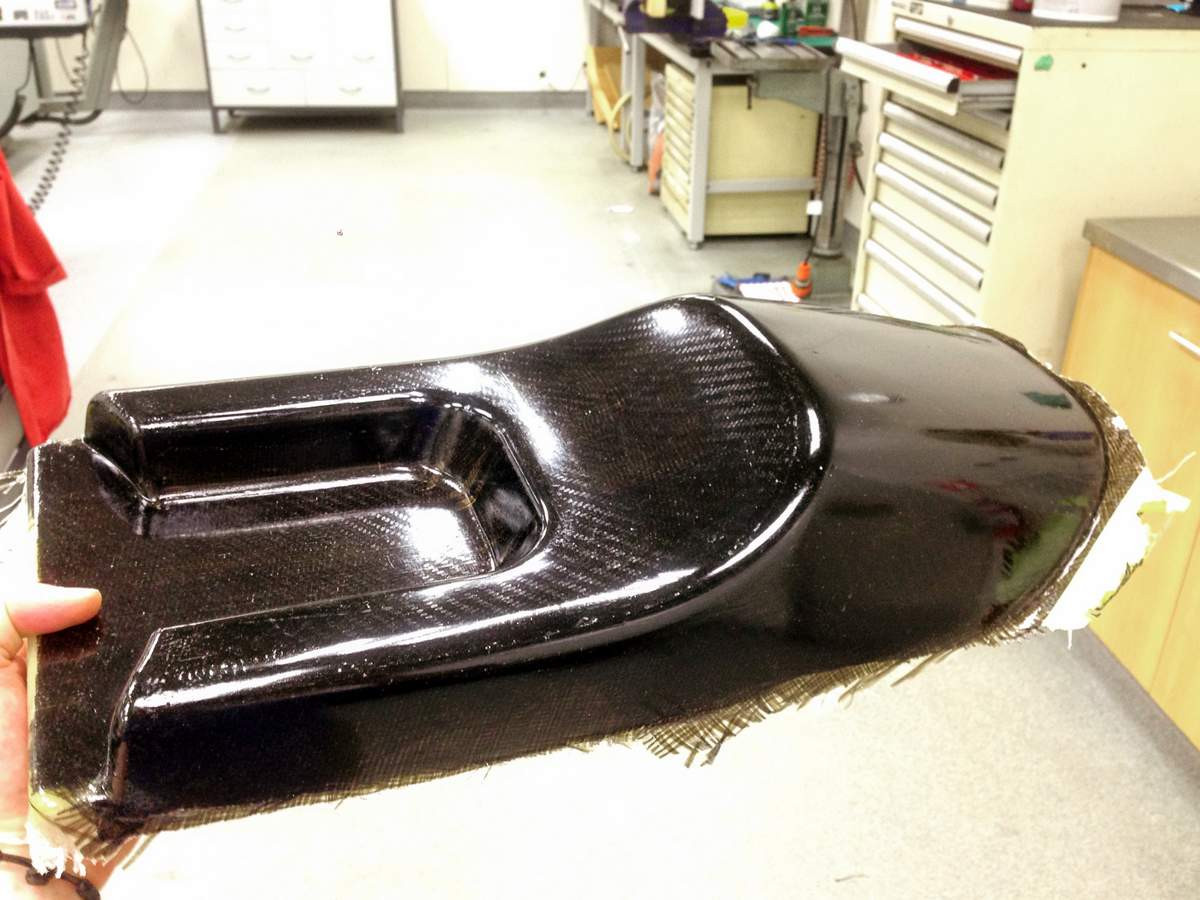
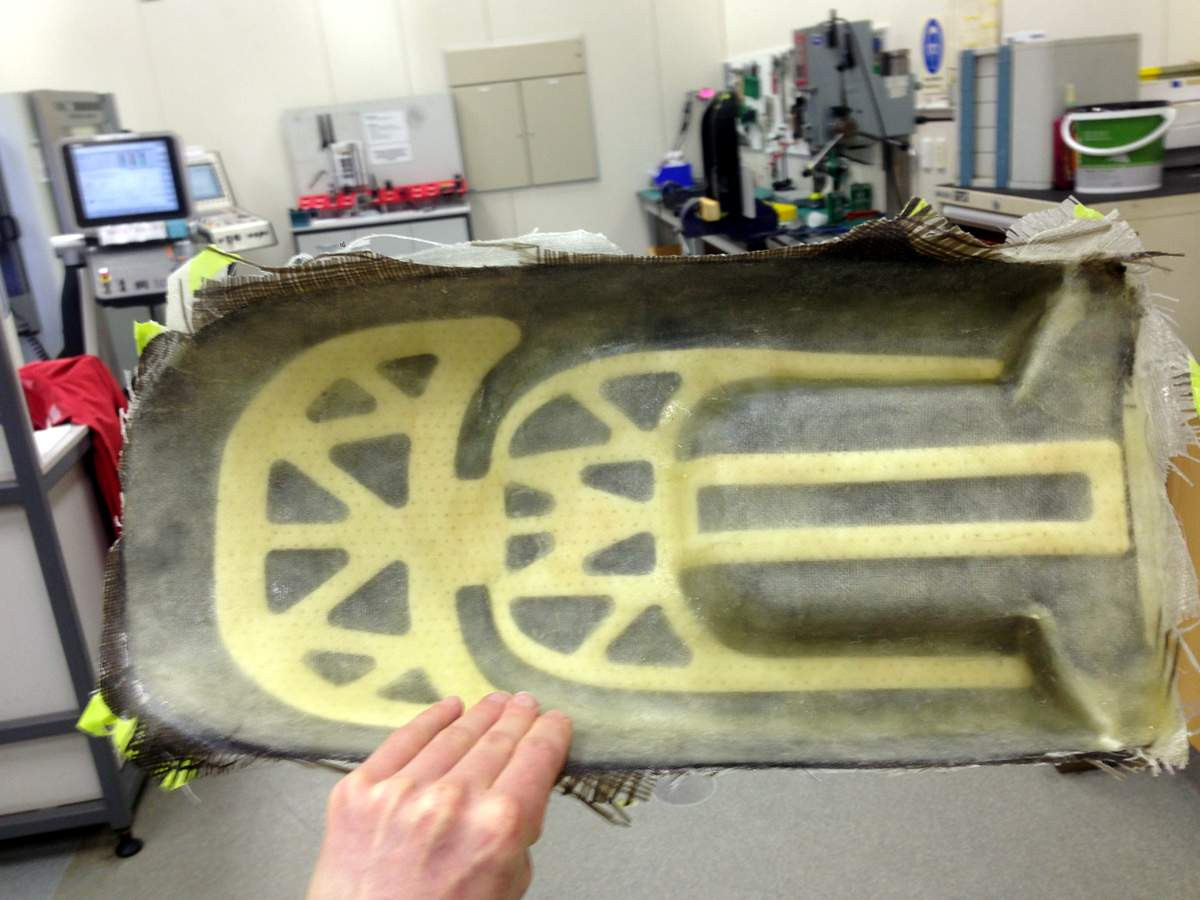
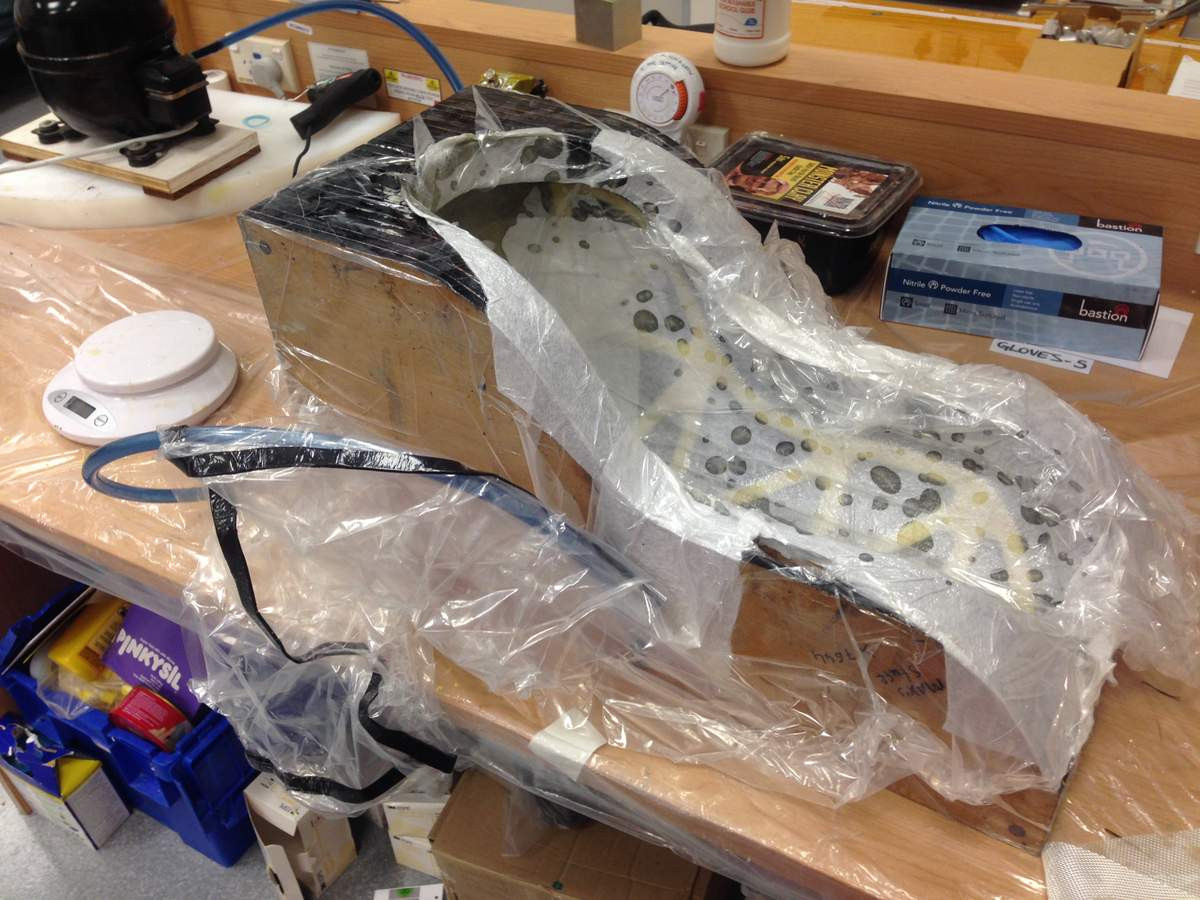
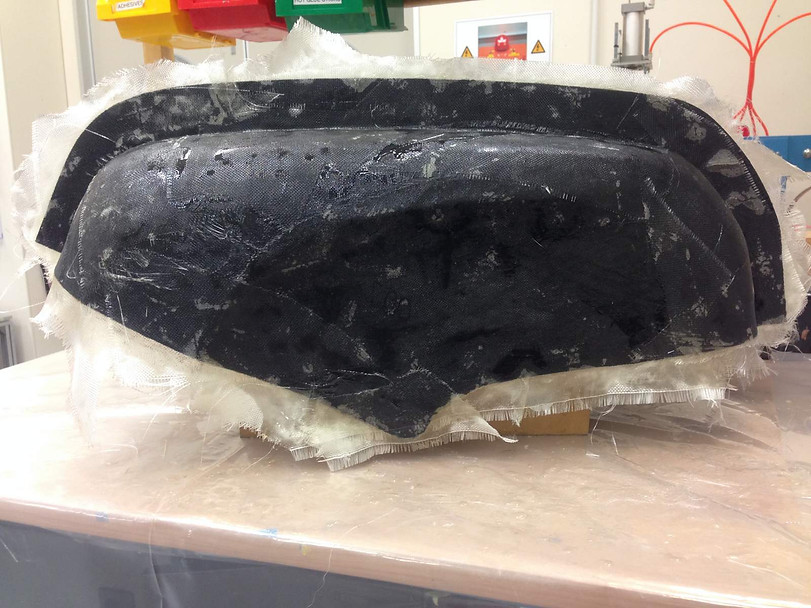
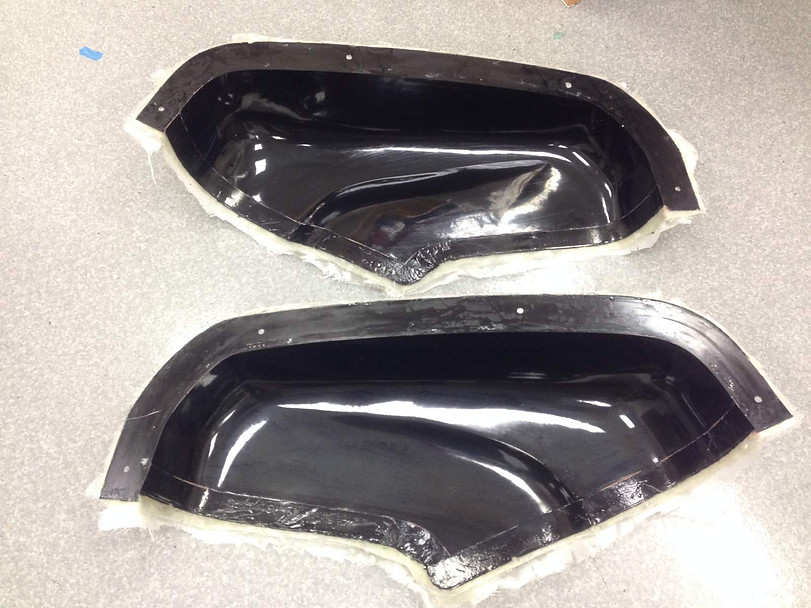
This part has two layers of basalt, 4 layers of glass (plus scraps) and a 3mm foam core mat. It came out really well except was a bitch to demould; took me about an hour and a half and all of my strength just to pull it out of the mould haha. I used about 8 coats of release wax and a coat of release PVA. I realised that the PVA layer was too thin which was probably one of my biggest issues. I also struggled because I could wedge in pieces of plastic sheet around the edges and release it bit by bit around the edge, but I had no way to wedge any plastic in to release any of the surfaces around the bulge in the centre. Also the bleeder sheet I used was not porous enough and I used too much resin so the part was very resin-rich making it heavier than necessary and the weave didn't show through as well as it should.
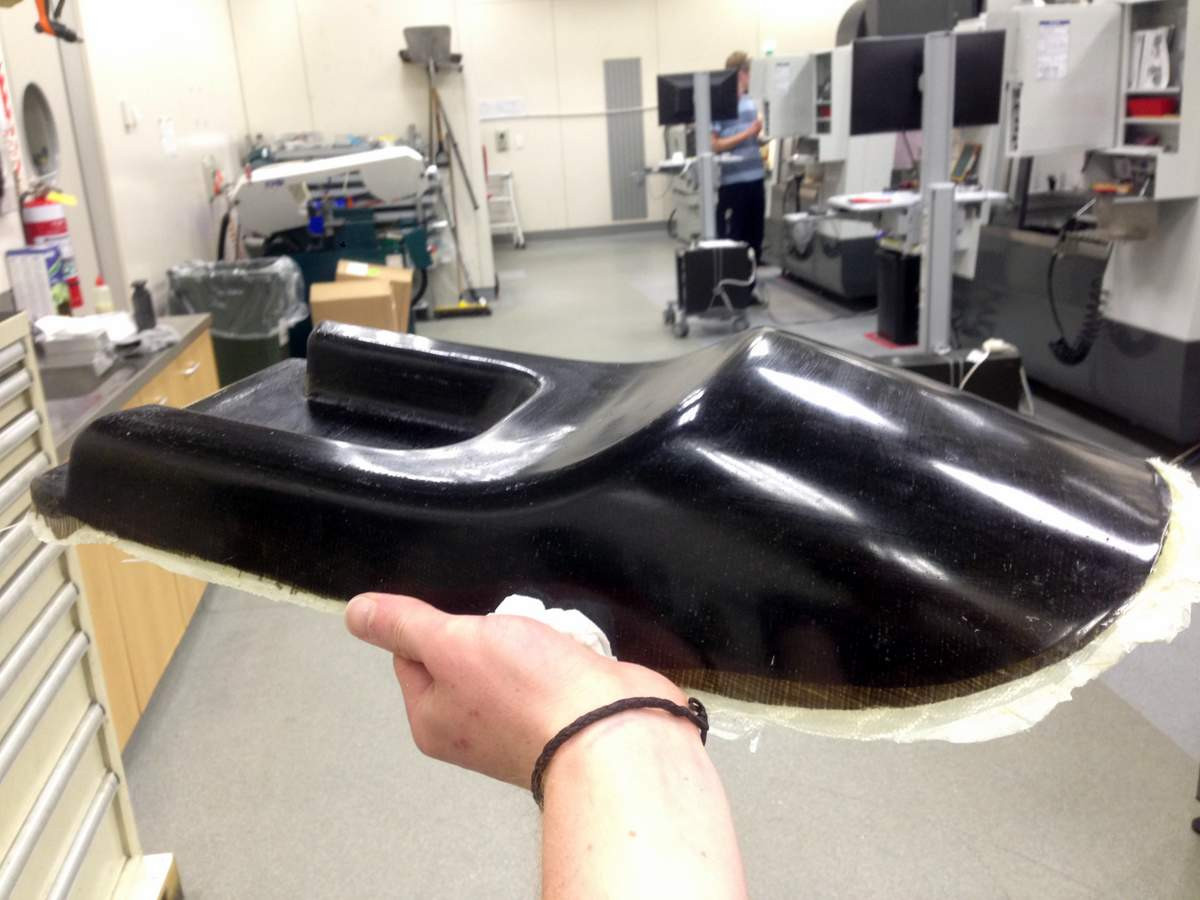
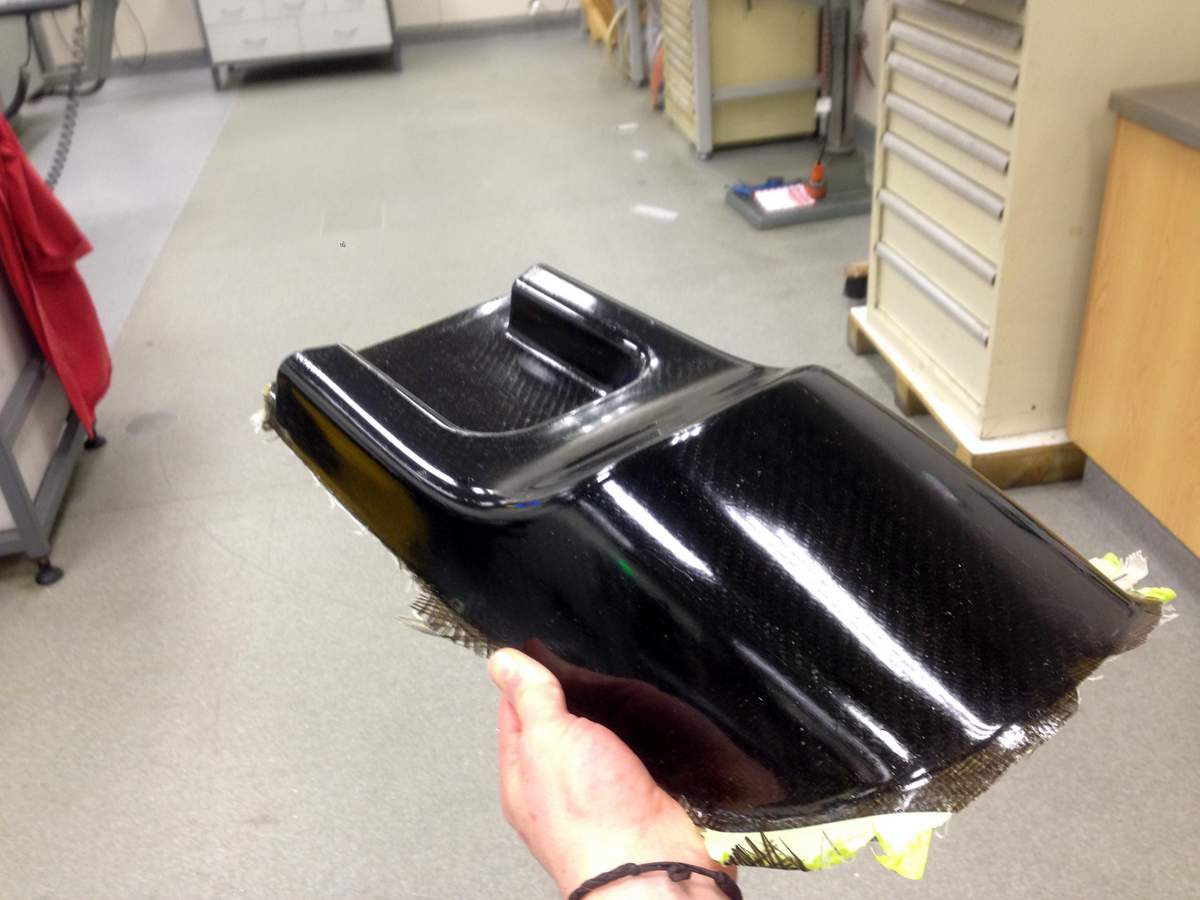
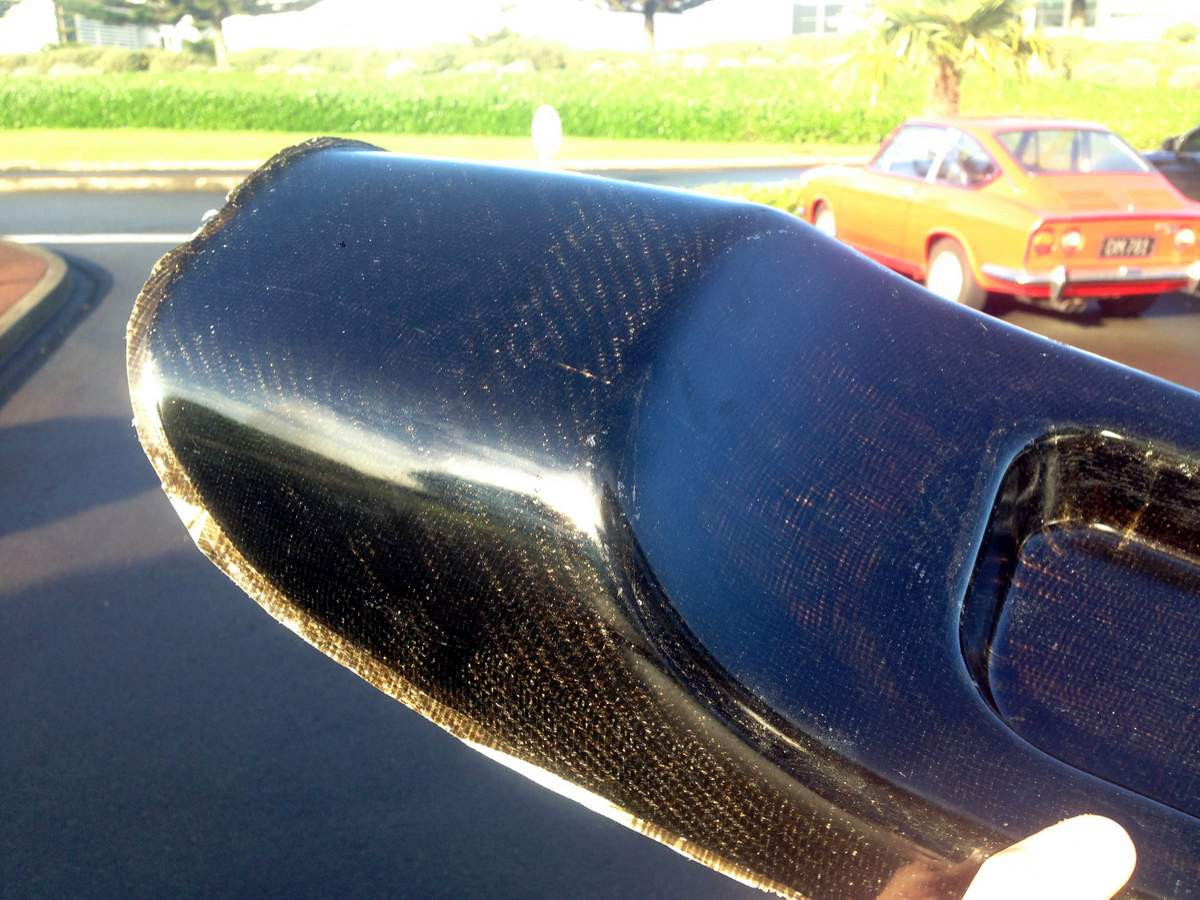
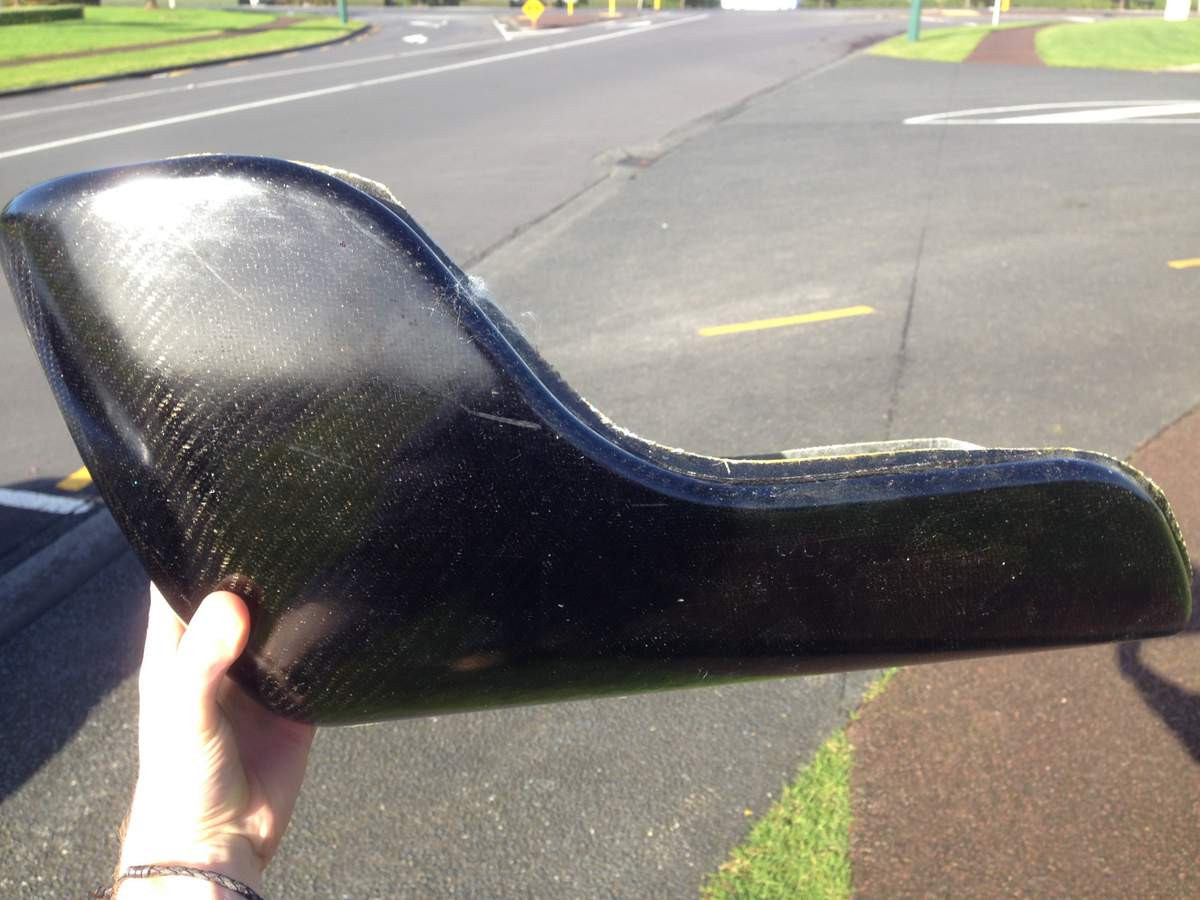
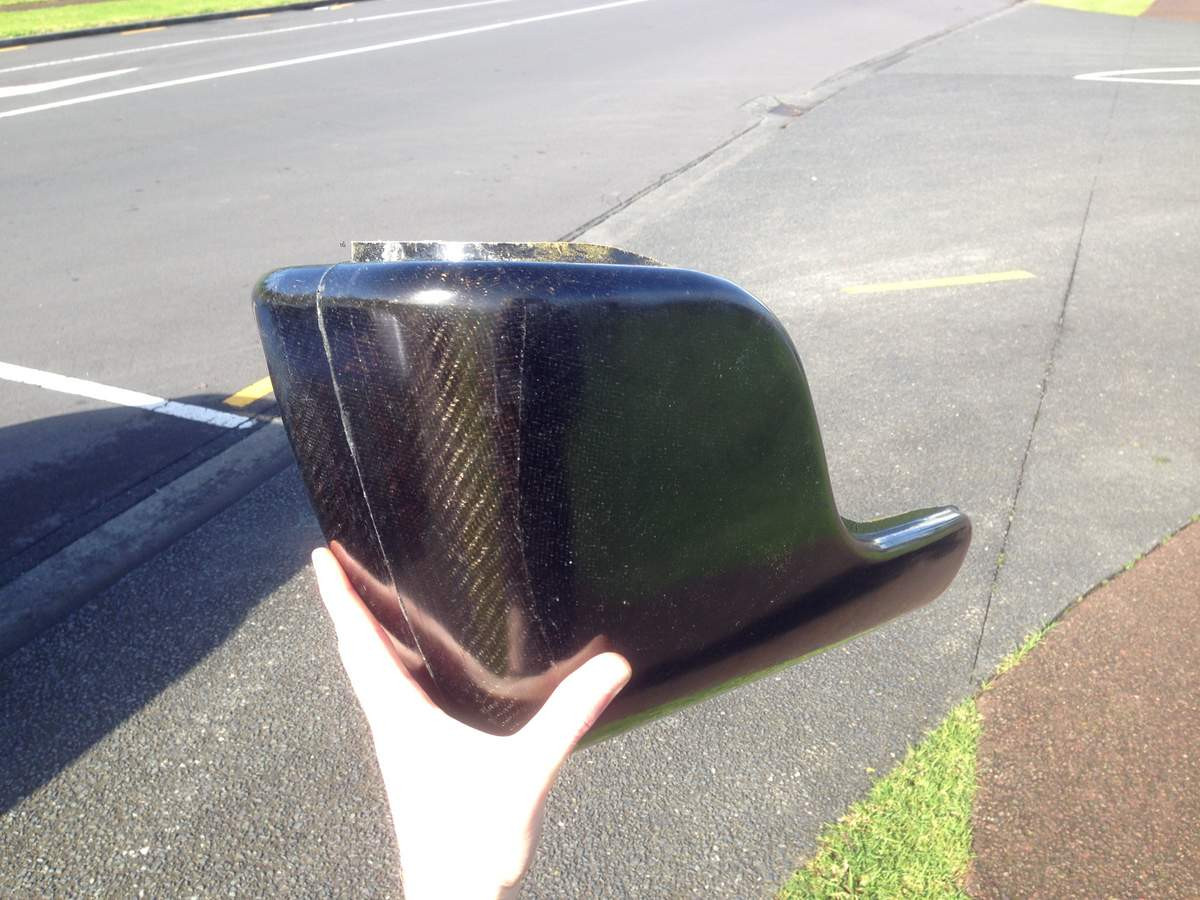
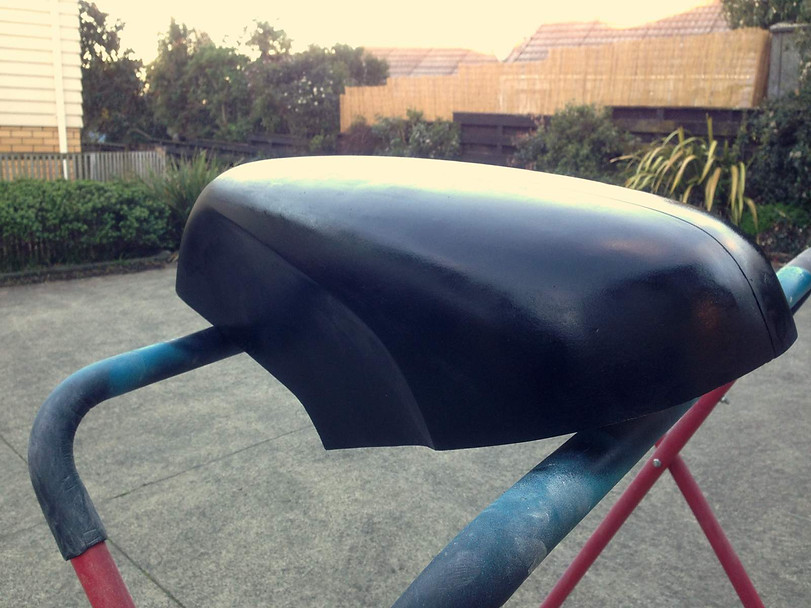
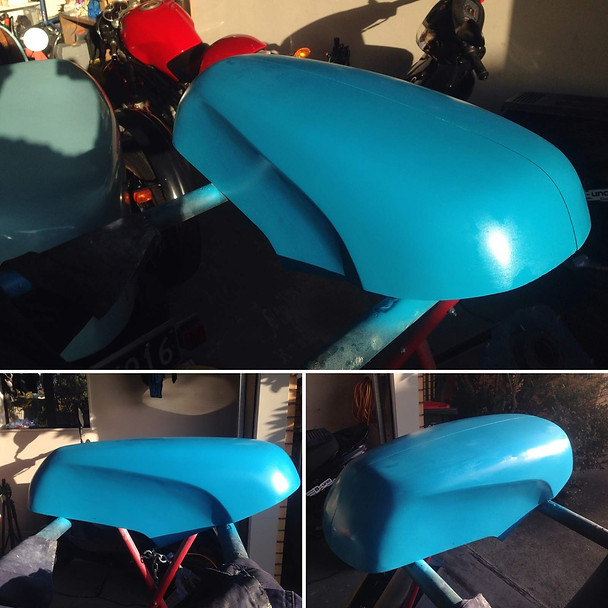
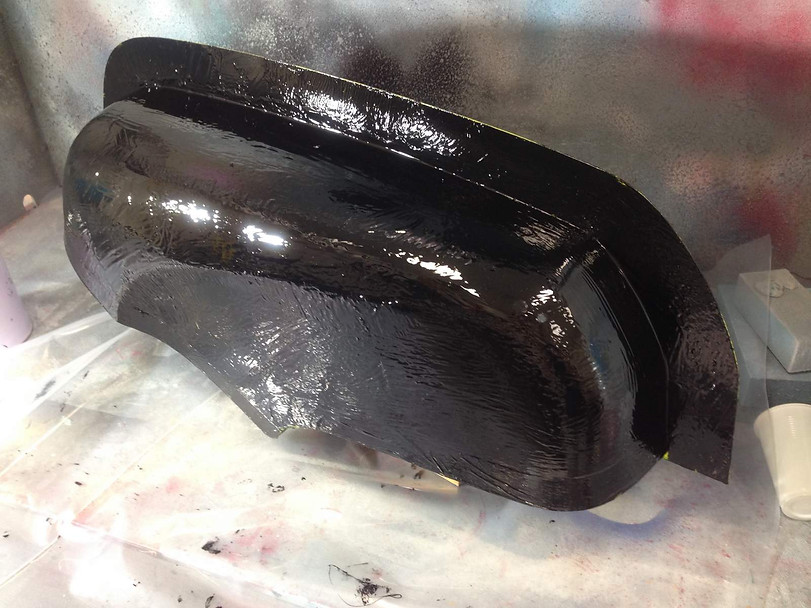
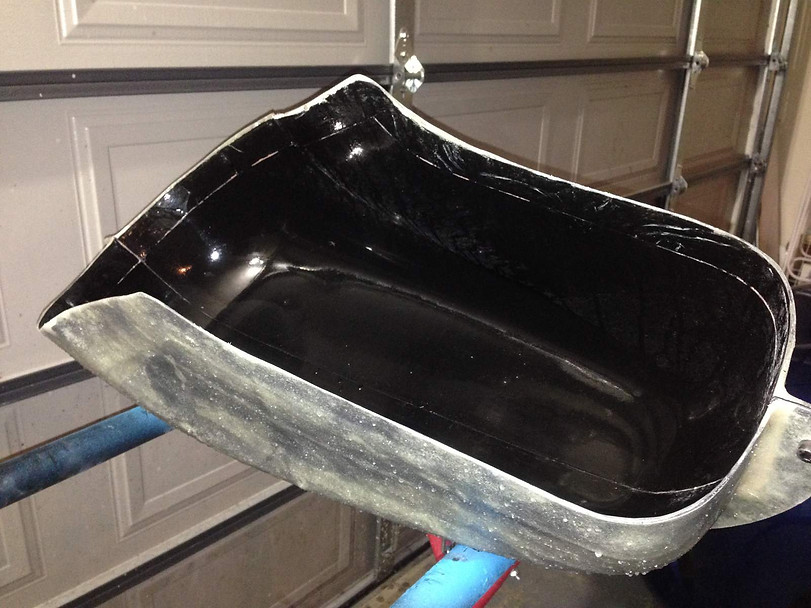
So I made a second part. I put on three more coats of wax and then two coats of PVA and put the PVA on much thicker. I put much larger holes in my bleeder and used 15% less resin. Here is the part fresh out of the mould:
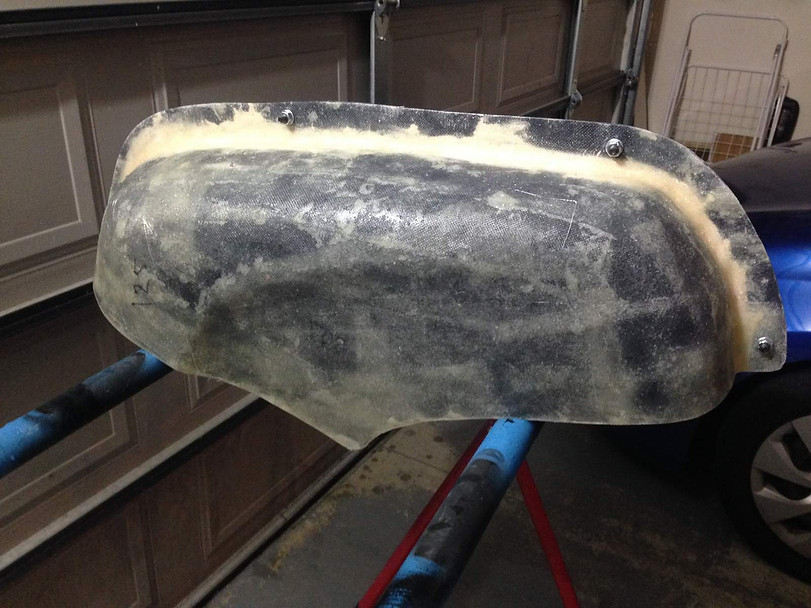
And the underside showing the core mat:
Looks mean in the sunlight so I'm happy
Currently still working on my belly pan mould and the plug for the tank upper. I can also start thinking about the seat cushion and stitching something up.
Falling behind schedule a bit... But I'll keep pushing on.
Here's another quick timelapse of the prep and layup:
http://www.pikore.com/m/1279994575313705878_43020050
The prep:
The first part:
This part has two layers of basalt, 4 layers of glass (plus scraps) and a 3mm foam core mat. It came out really well except was a bitch to demould; took me about an hour and a half and all of my strength just to pull it out of the mould haha. I used about 8 coats of release wax and a coat of release PVA. I realised that the PVA layer was too thin which was probably one of my biggest issues. I also struggled because I could wedge in pieces of plastic sheet around the edges and release it bit by bit around the edge, but I had no way to wedge any plastic in to release any of the surfaces around the bulge in the centre. Also the bleeder sheet I used was not porous enough and I used too much resin so the part was very resin-rich making it heavier than necessary and the weave didn't show through as well as it should.
So I made a second part. I put on three more coats of wax and then two coats of PVA and put the PVA on much thicker. I put much larger holes in my bleeder and used 15% less resin. Here is the part fresh out of the mould:
And the underside showing the core mat:
Looks mean in the sunlight so I'm happy
Currently still working on my belly pan mould and the plug for the tank upper. I can also start thinking about the seat cushion and stitching something up.
Falling behind schedule a bit... But I'll keep pushing on.
maxBetteridge
New Member
Ok, just over a month since my last post. Looking less and less likely that I'm going to hit my September deadline.. but here's where we're at:
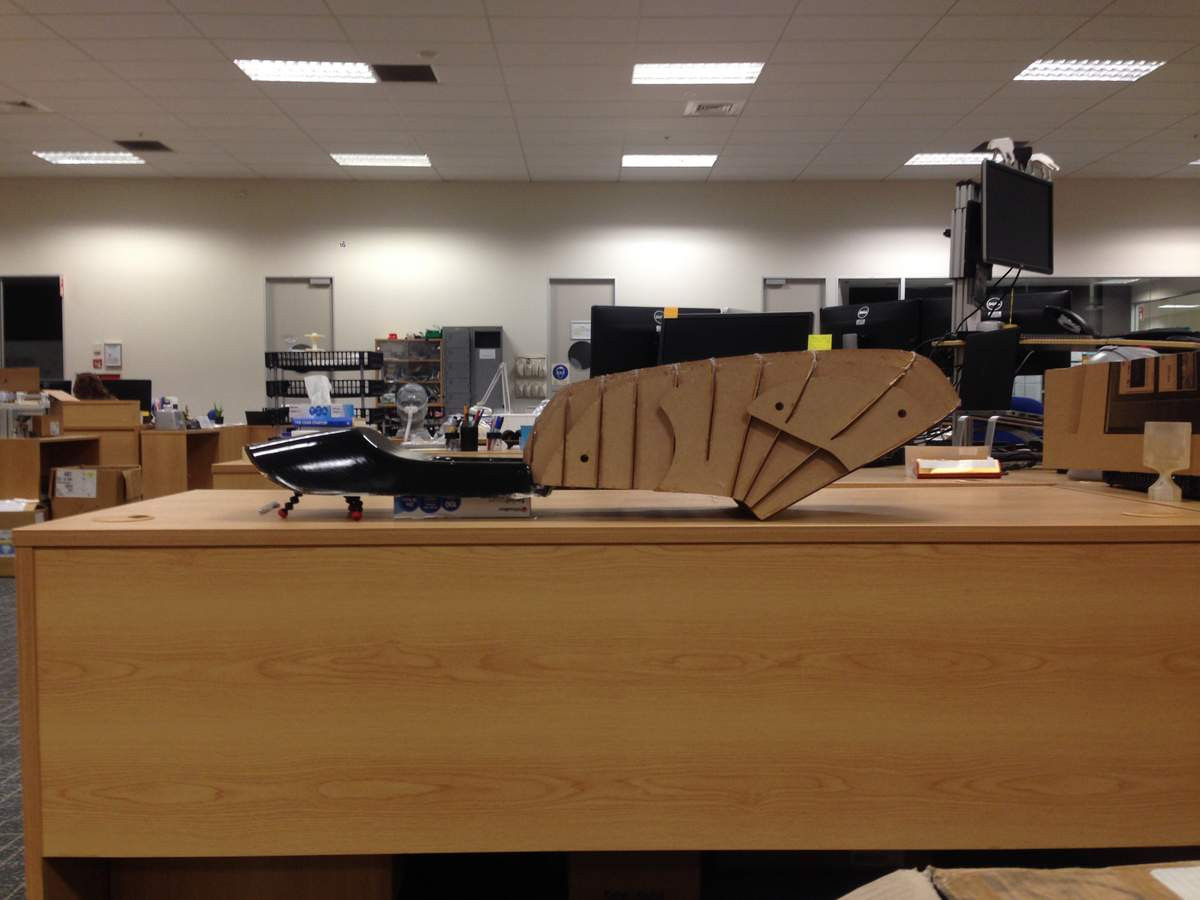
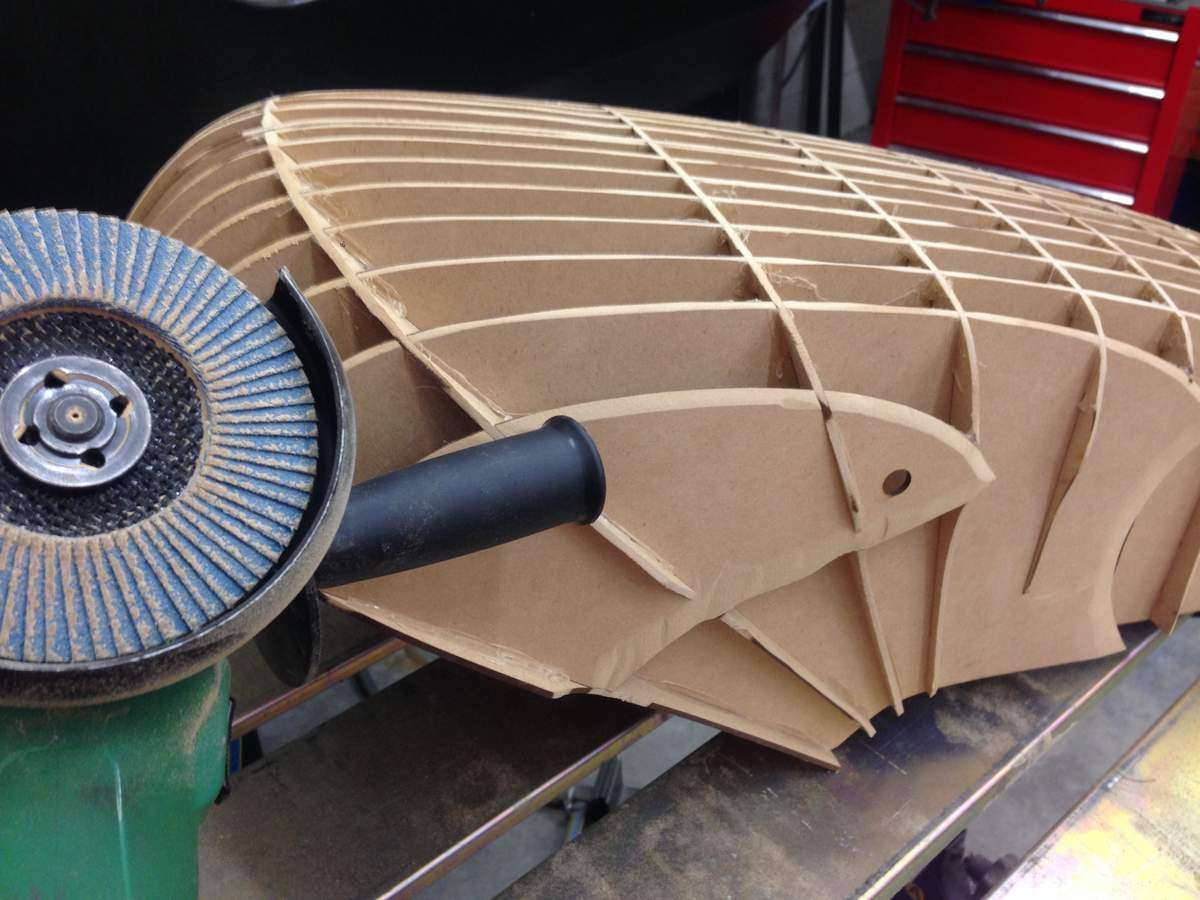
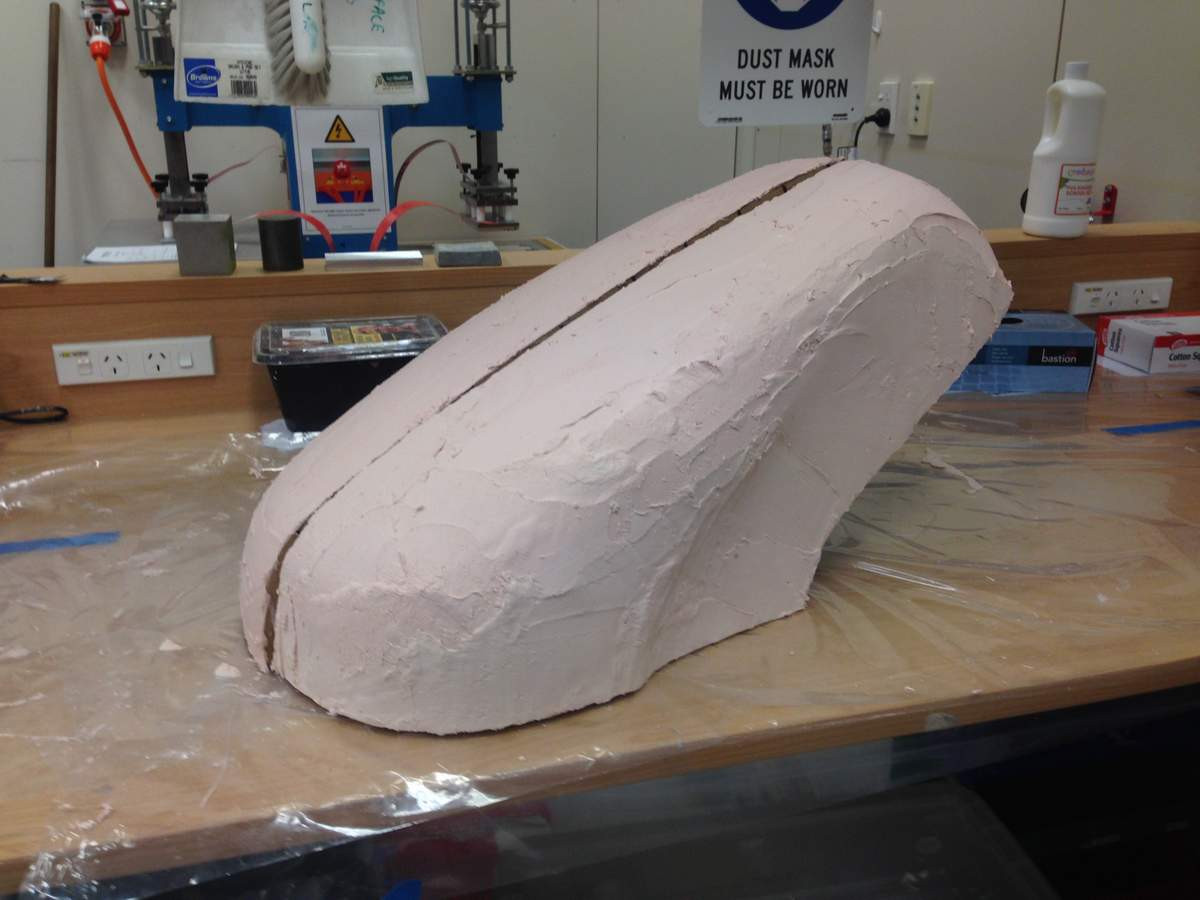
I've been building my tank plug (/form/pattern. Most people think I'm talking about the filler cap when I talk about the 'tank plug'). It's laser cut mdf, filled with expanding foam, one layer of glass, and body filler.
Mocked up with the tail:
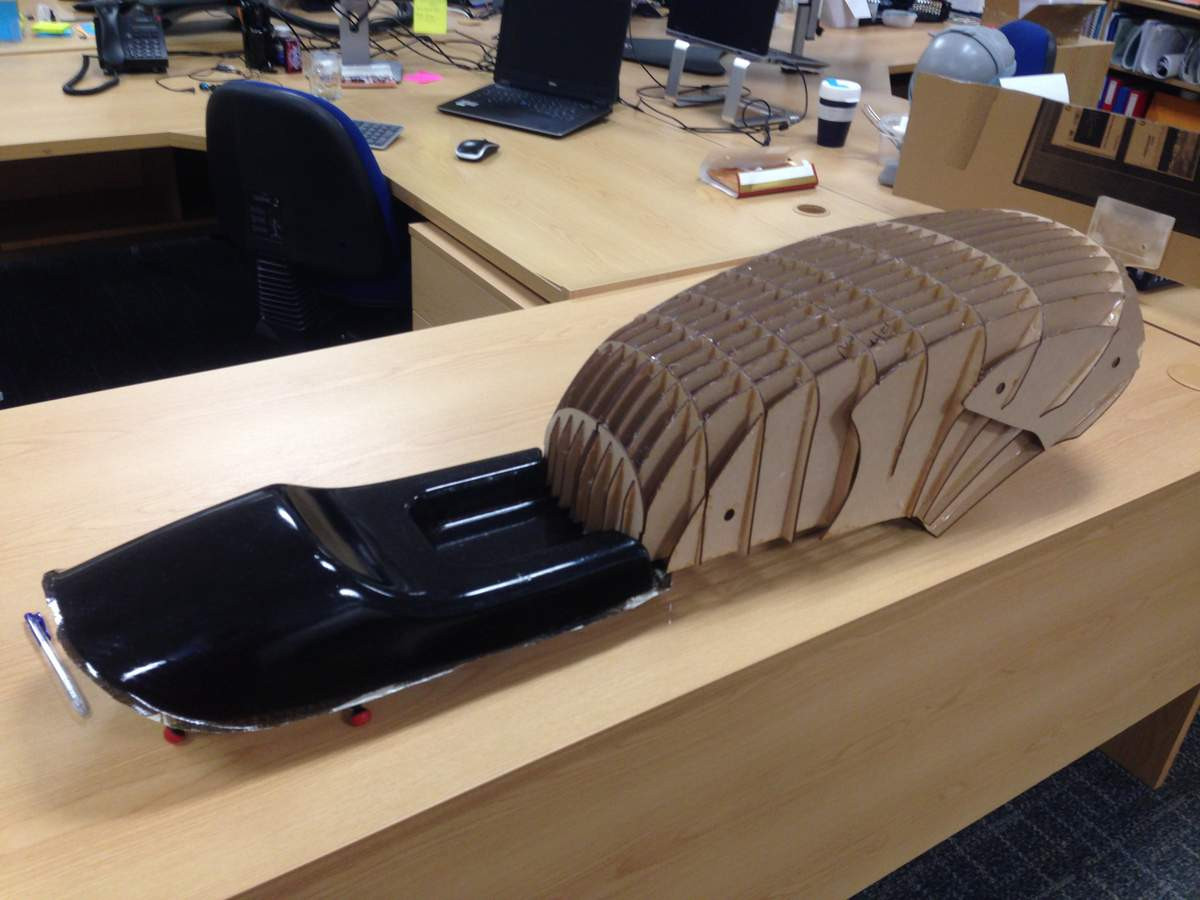
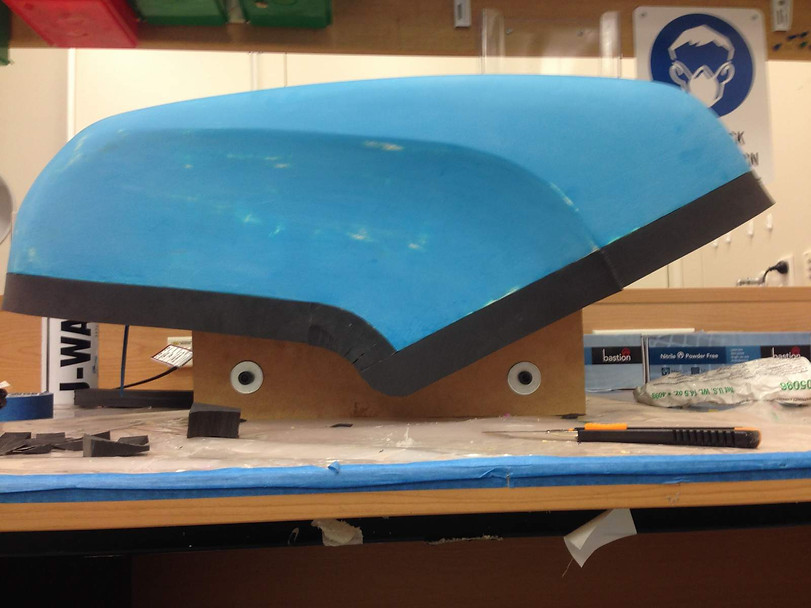
I deliberately made the mdf stick out from the serface of the part in CAD so that I could sand it back like this to get to its true shape. This was probably not a great idea in retrospect; should've made the edge of the MDF sit on and below the surface because sanding it back introduced a bit of guesswork:
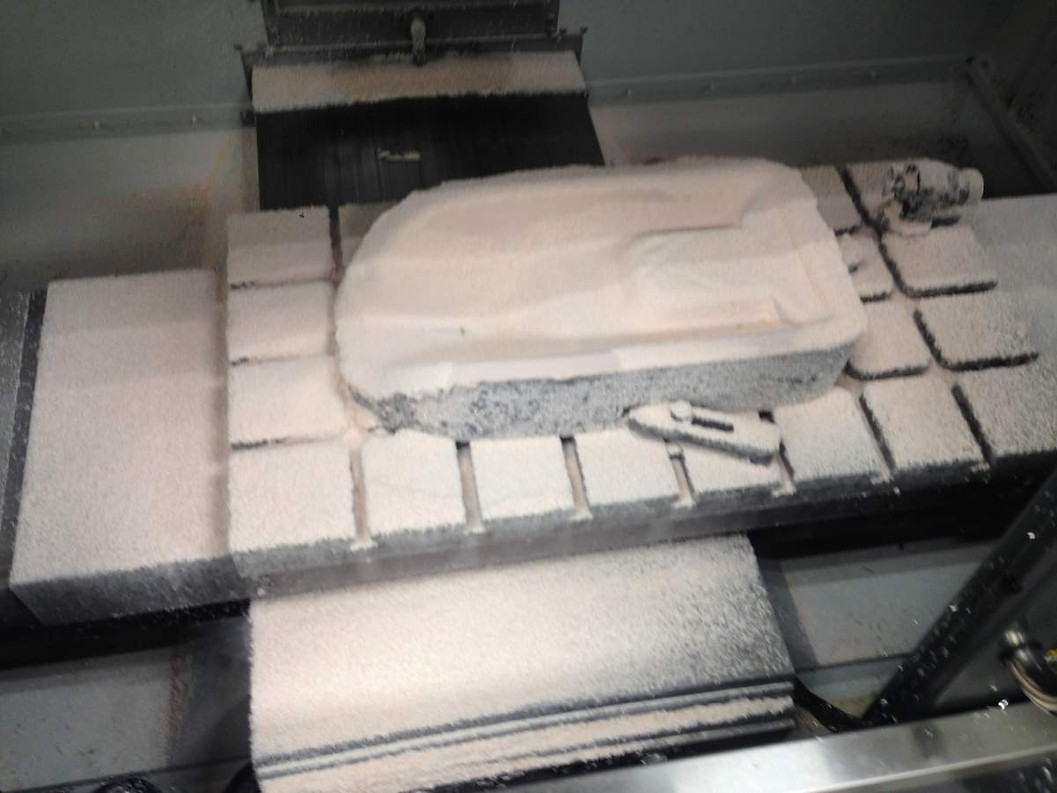
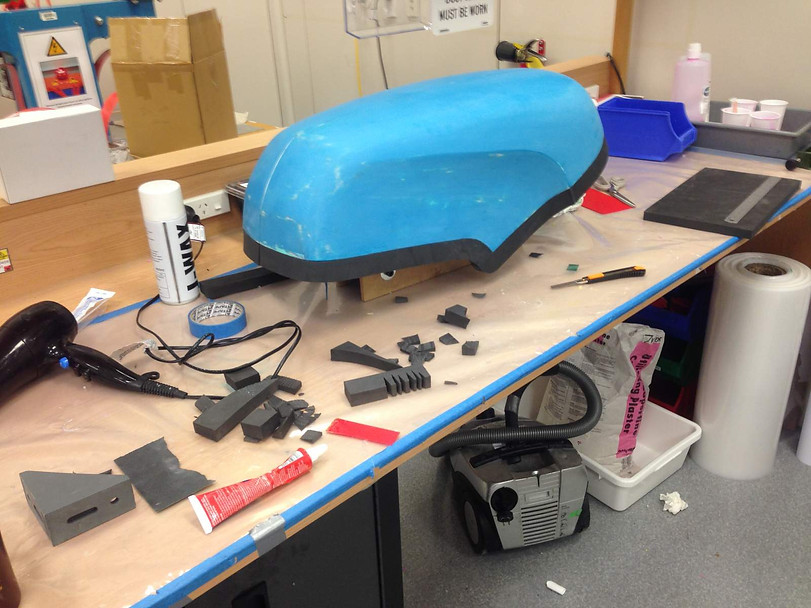
Next step was filling the skeleton with expanding foam and cutting it back to shape. Messy but satisfying:
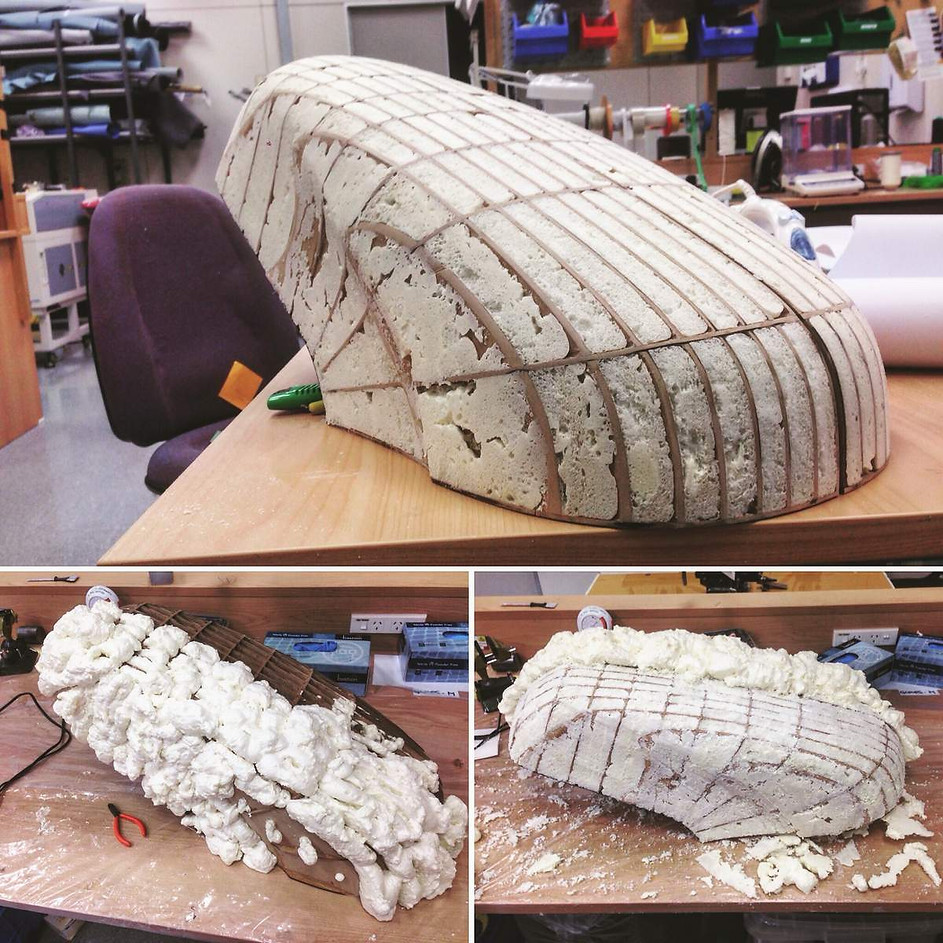
Because I was planning to use bog as the top layer and sand it back to the final shape I needed to add a layer of fibreglass on top of the foam. The idea of this was to create a hard protective layer for sanding. I didn't want to sand the bog and sand through to the foam because the foam is so much softer than the bog it would sand away much faster. The glass was intended to prevent that. I used one layer of 200gsm glass which wasn't really enough, two layers would've been much better. I also used polyester resin; because bog is polyester based this made a strong base for the bog to bond to:
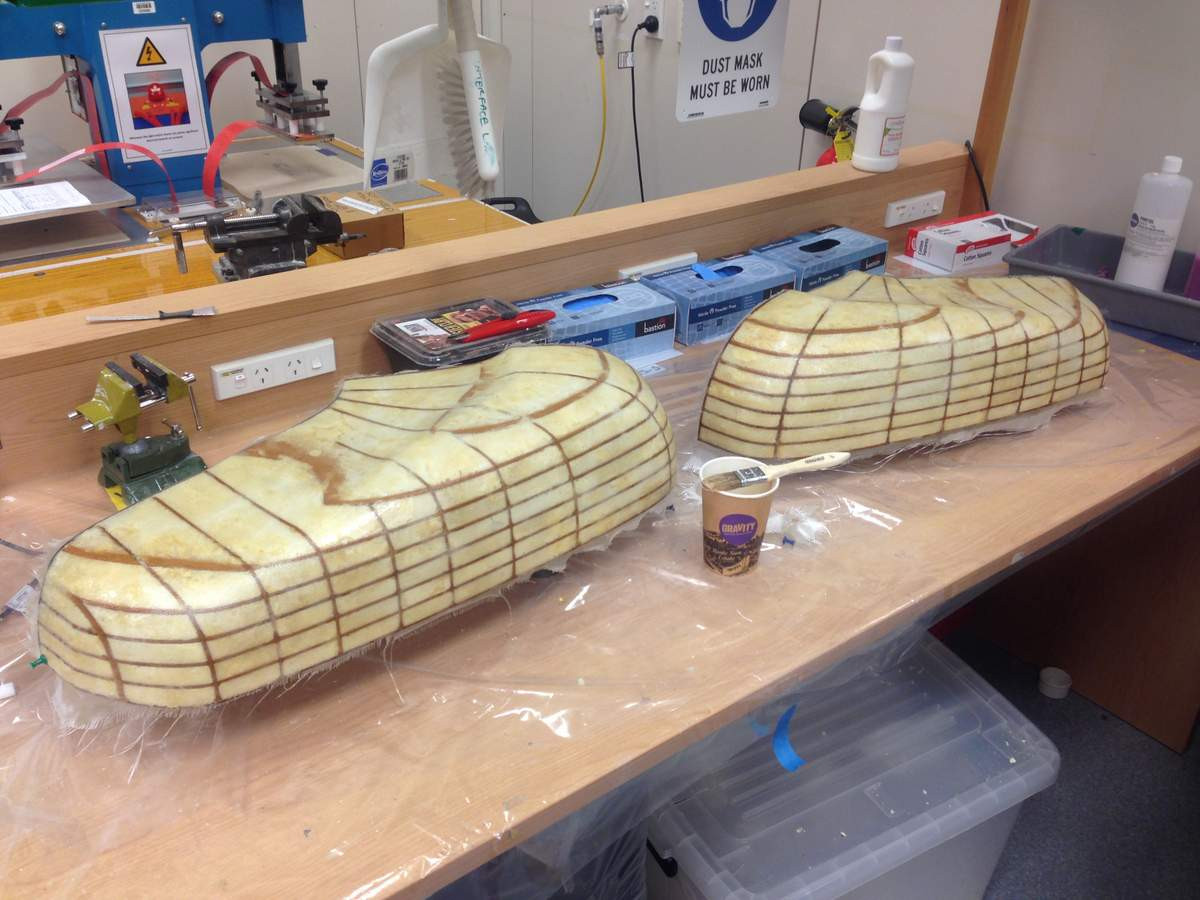

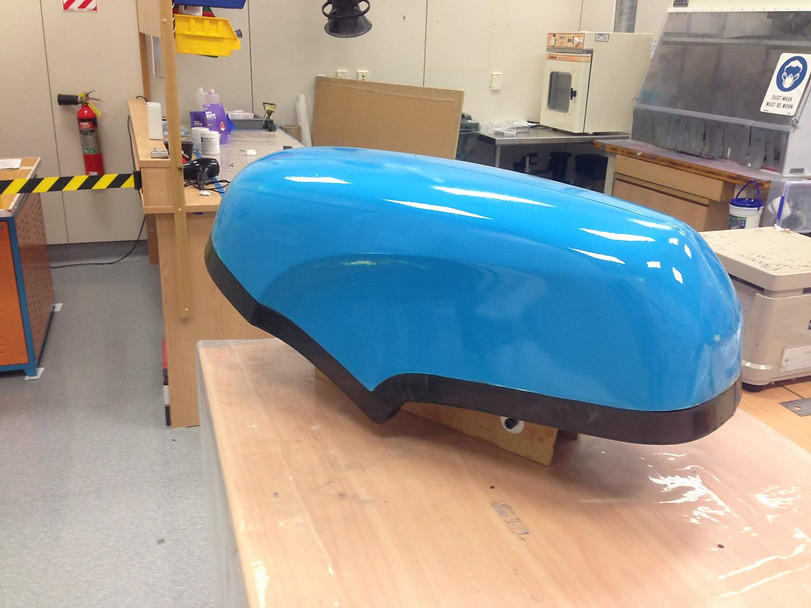
Adding the bog:
And sanding it back:
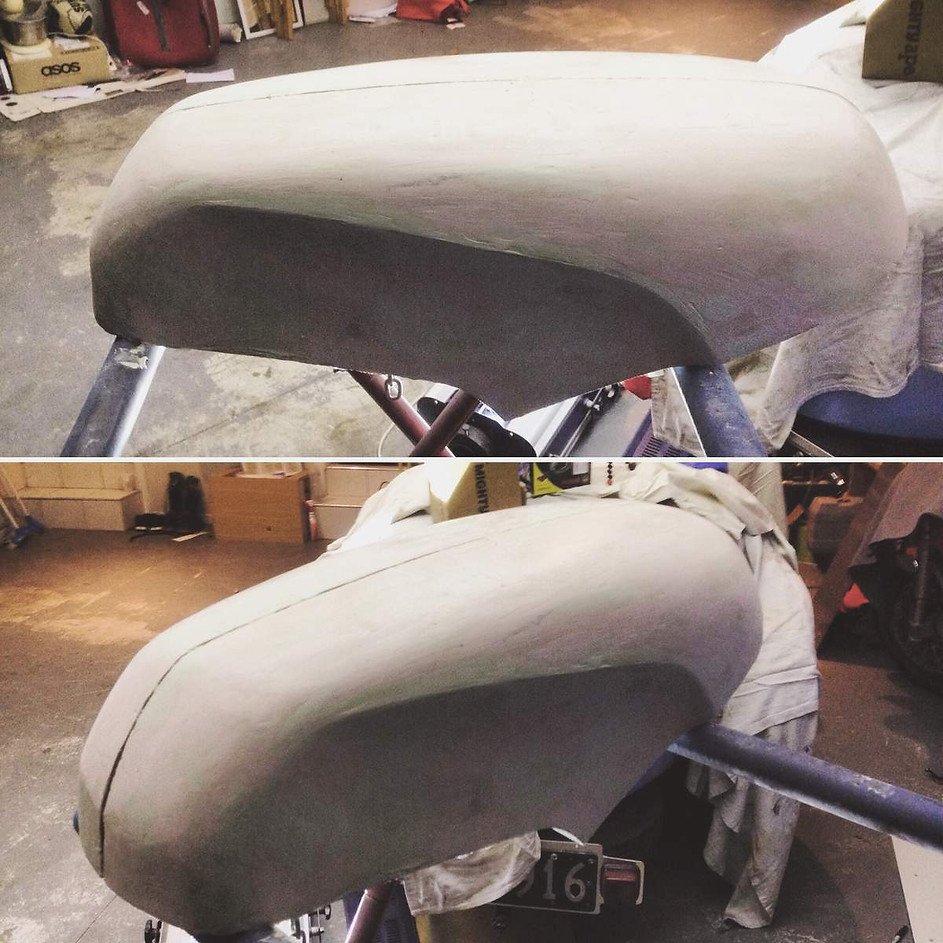
Many many hours summarised in two photographs^^
There's still more work to do on this plug. I think this will be the next thing I work on.
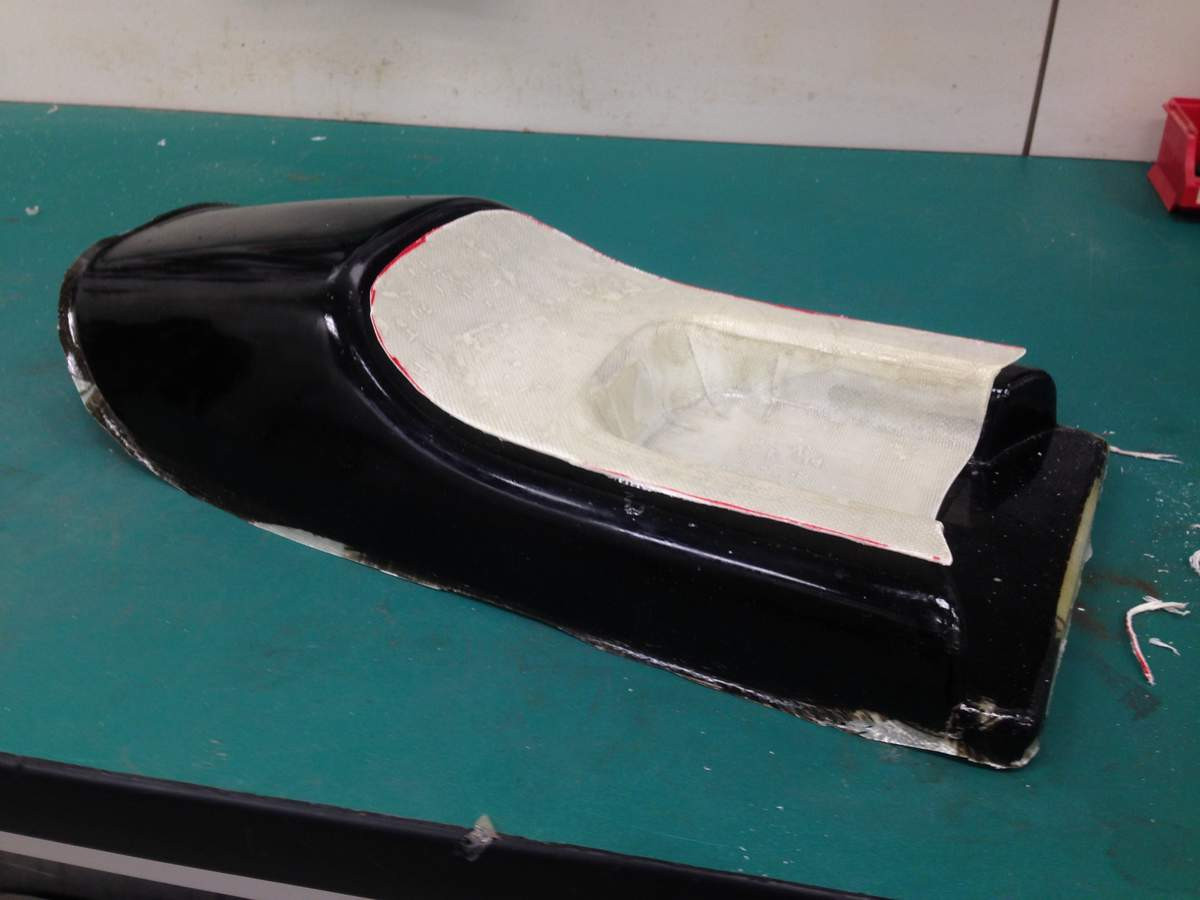
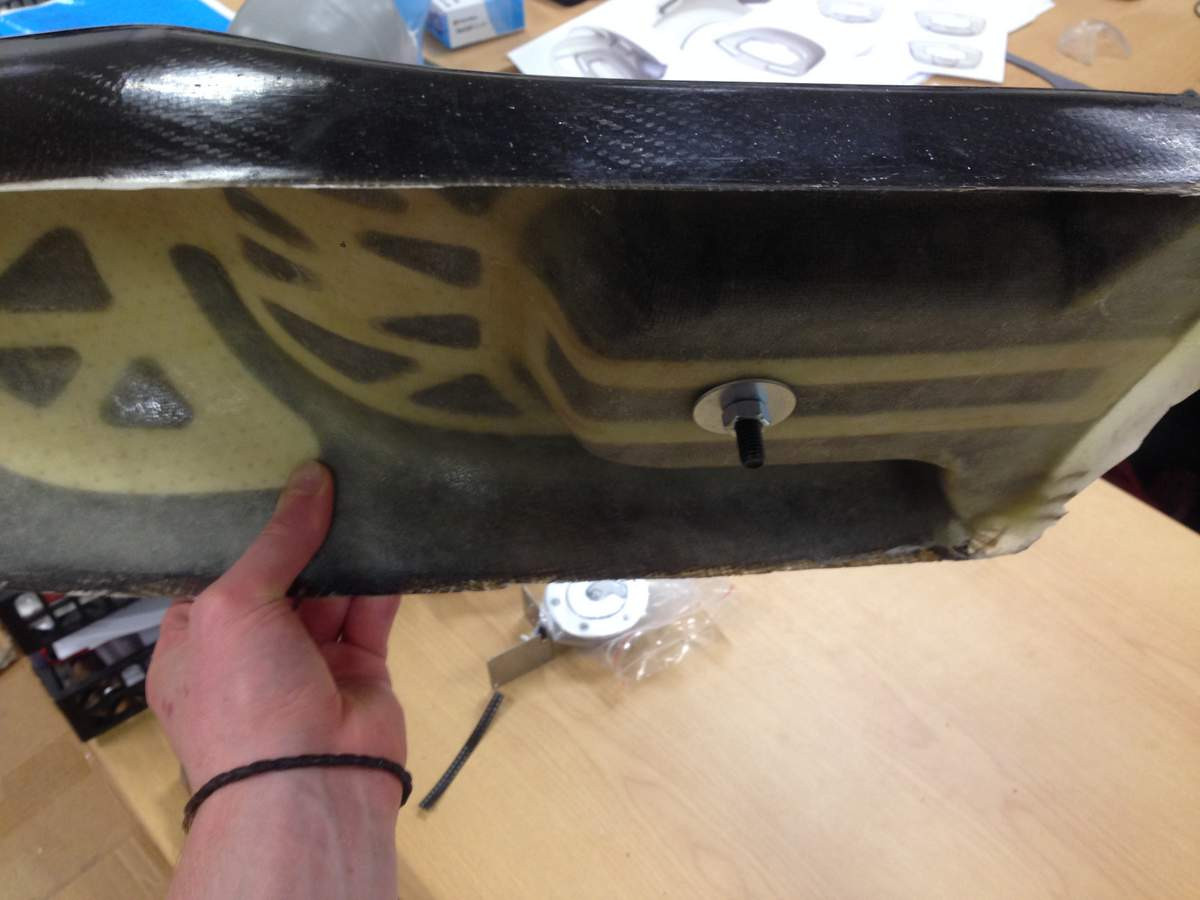
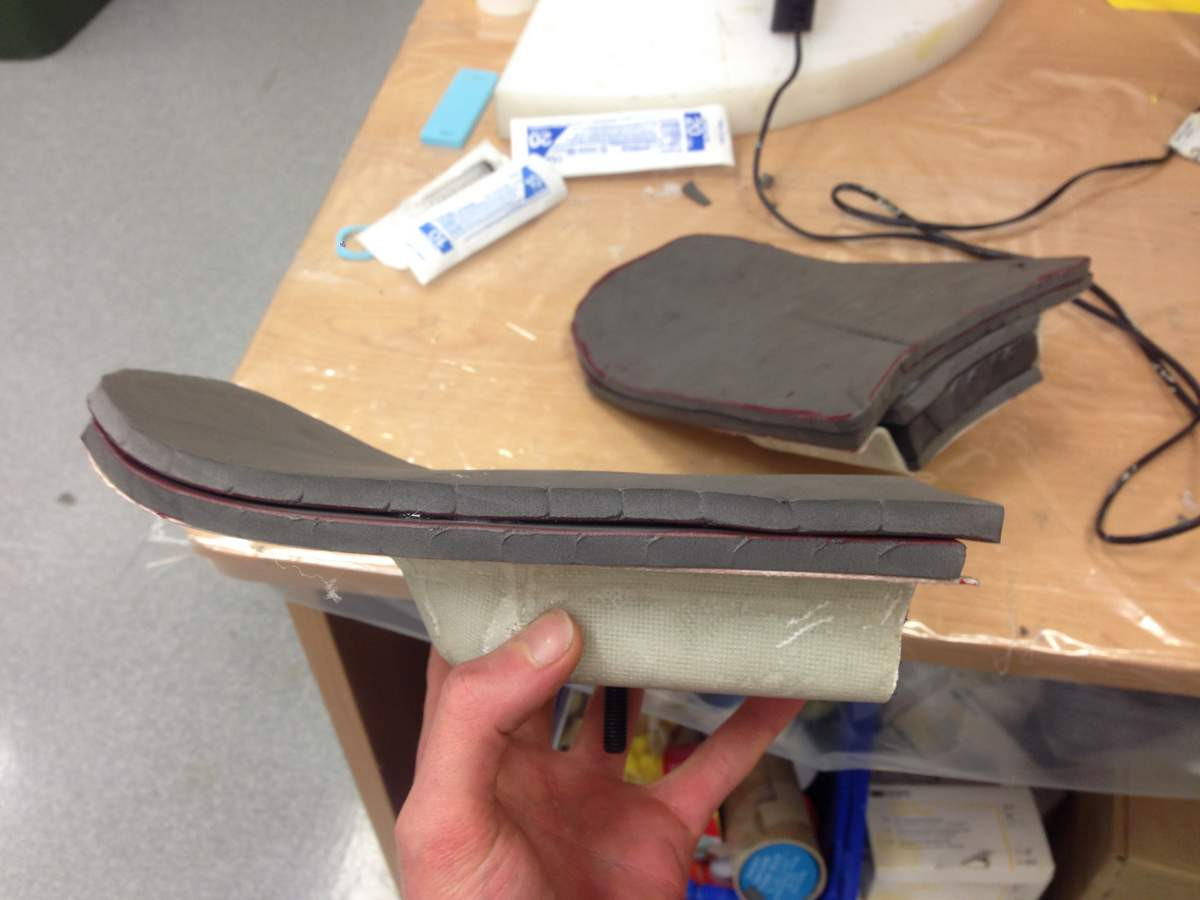
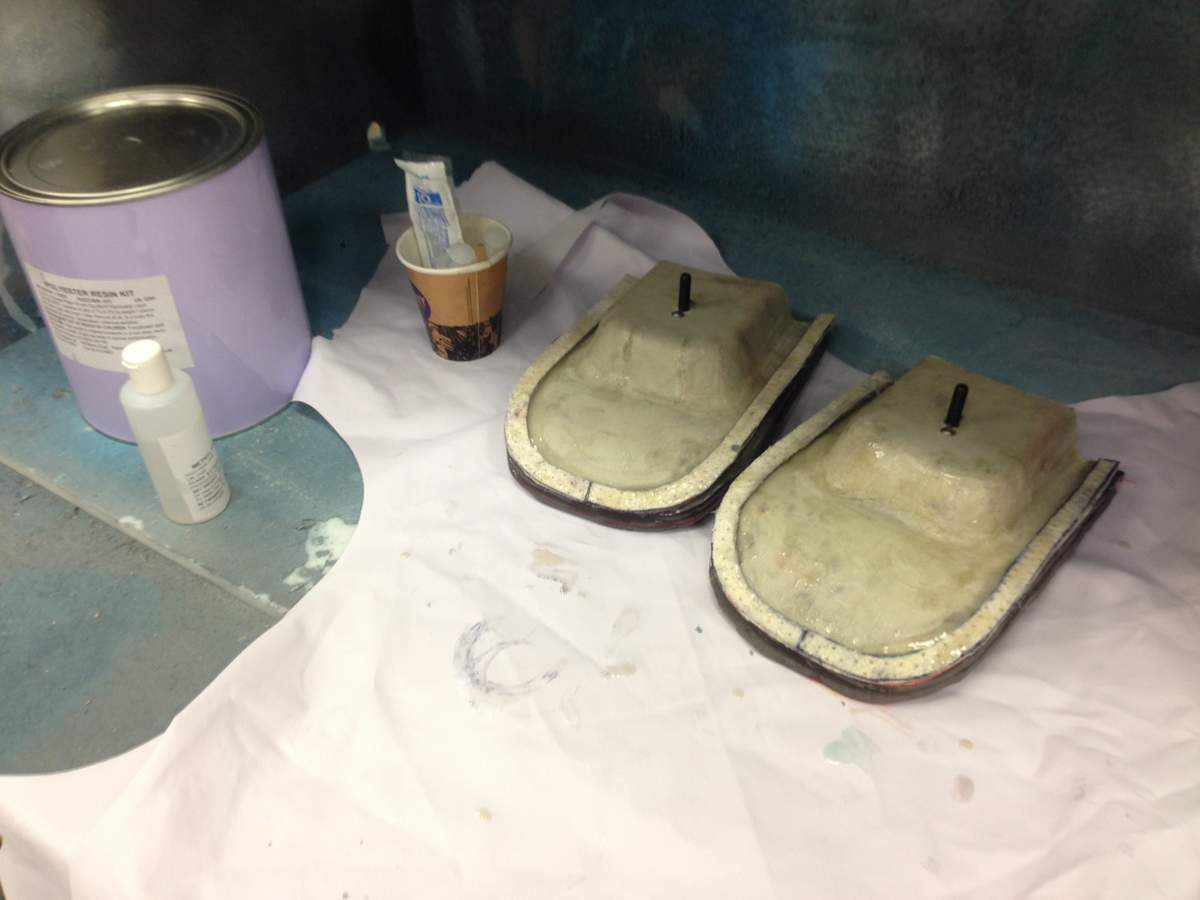
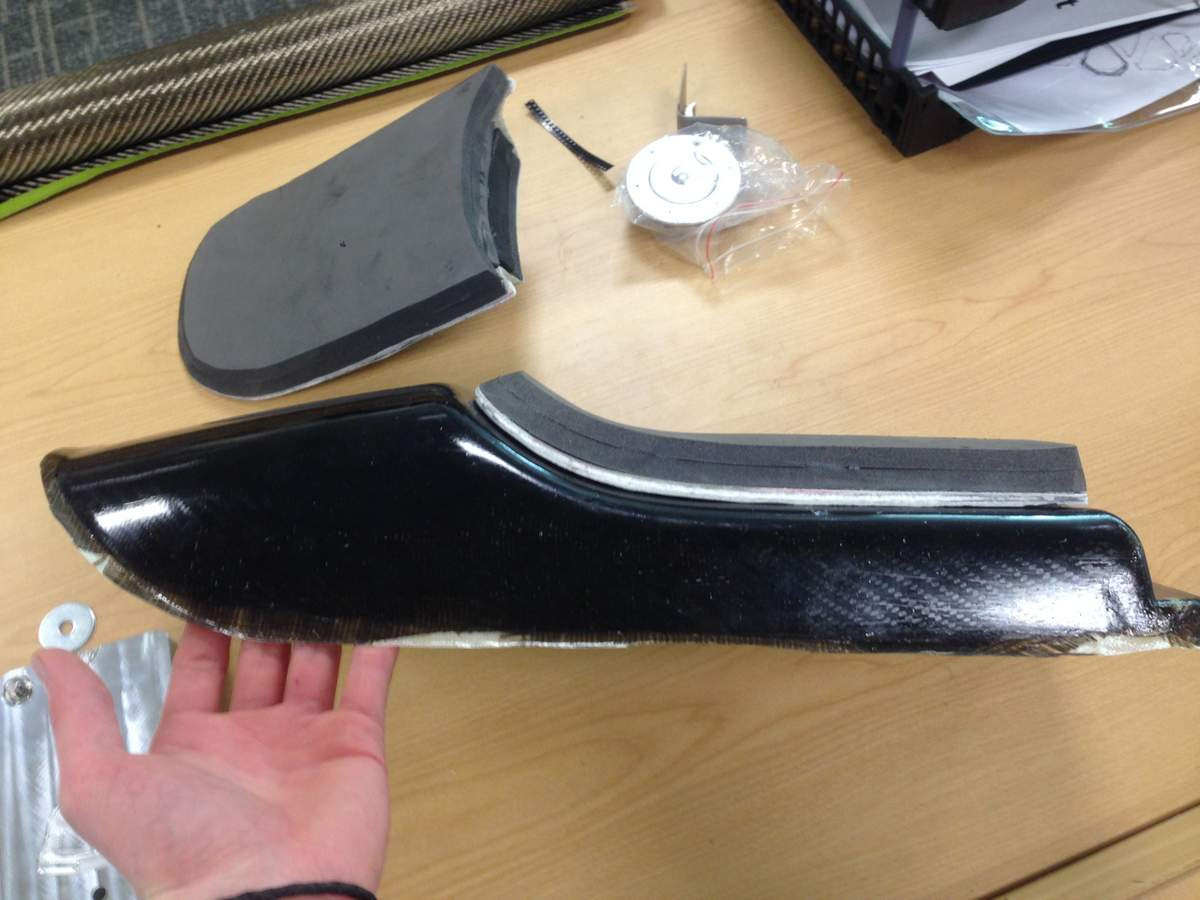
Next is the seat cushion. First I started the fibreglass seat cushion base. This is to attach the foam and upholstery to and will locate into and bolt through the tail part. I used the same mould that I made the tail part with. This was always the plan but actually worked out a whole lot better than I imagined
Laying up the cushion base (no vacuum bag for this layup):

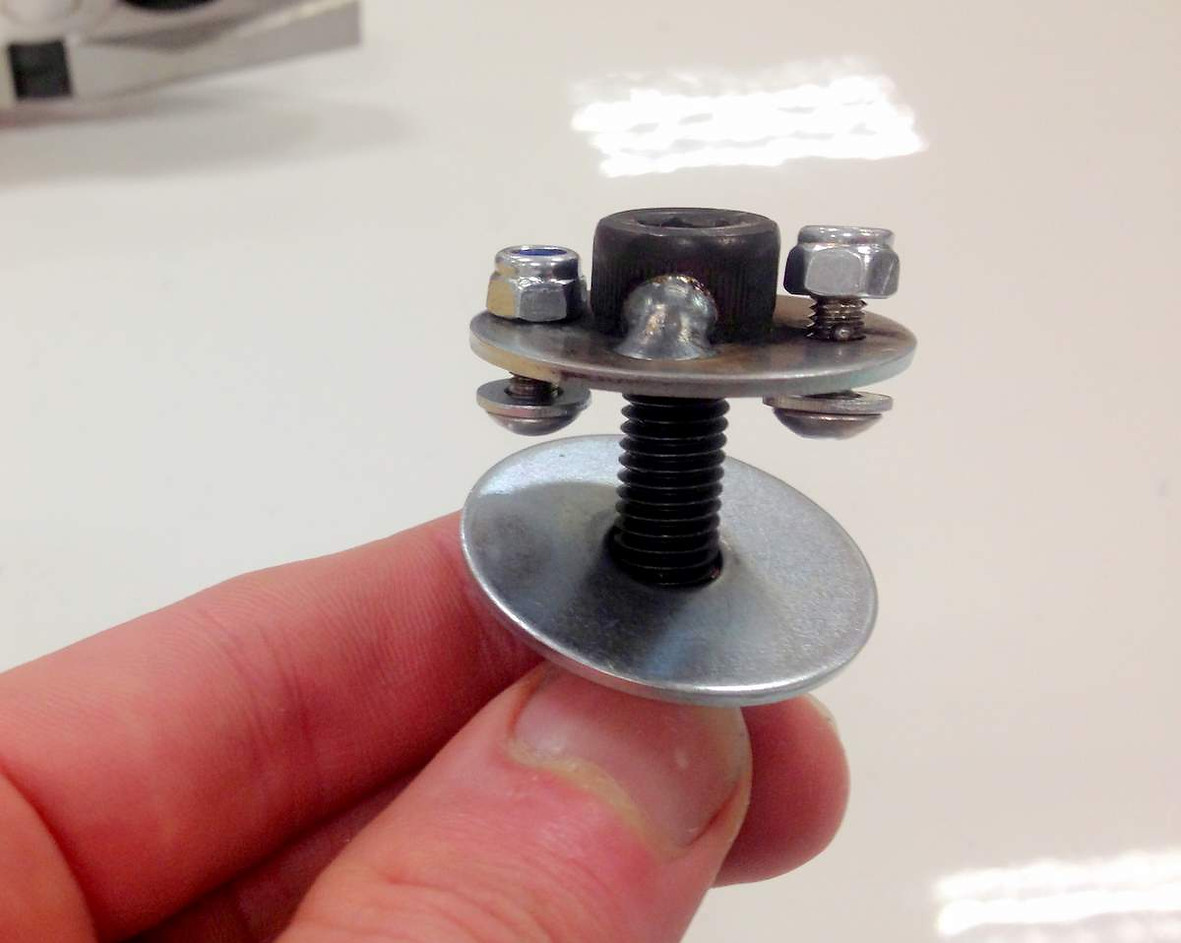
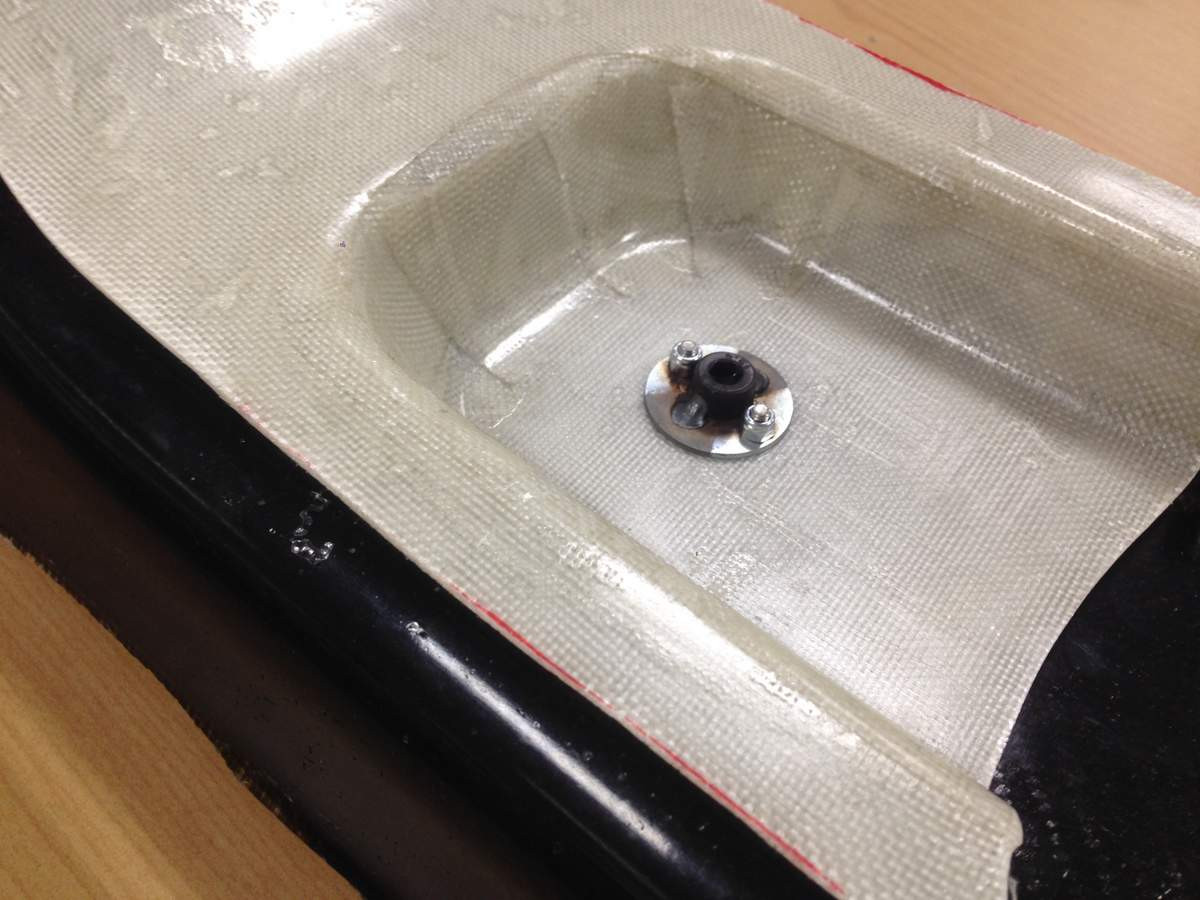
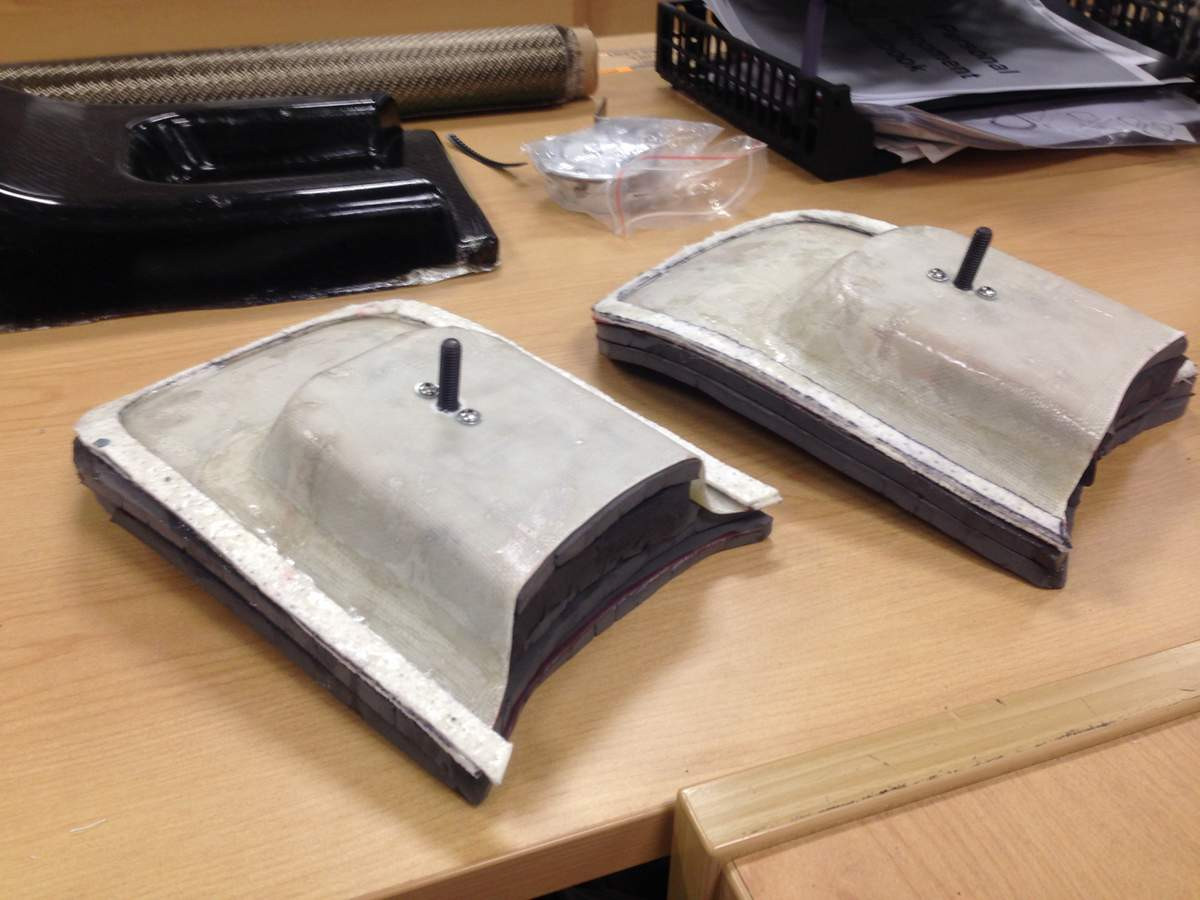
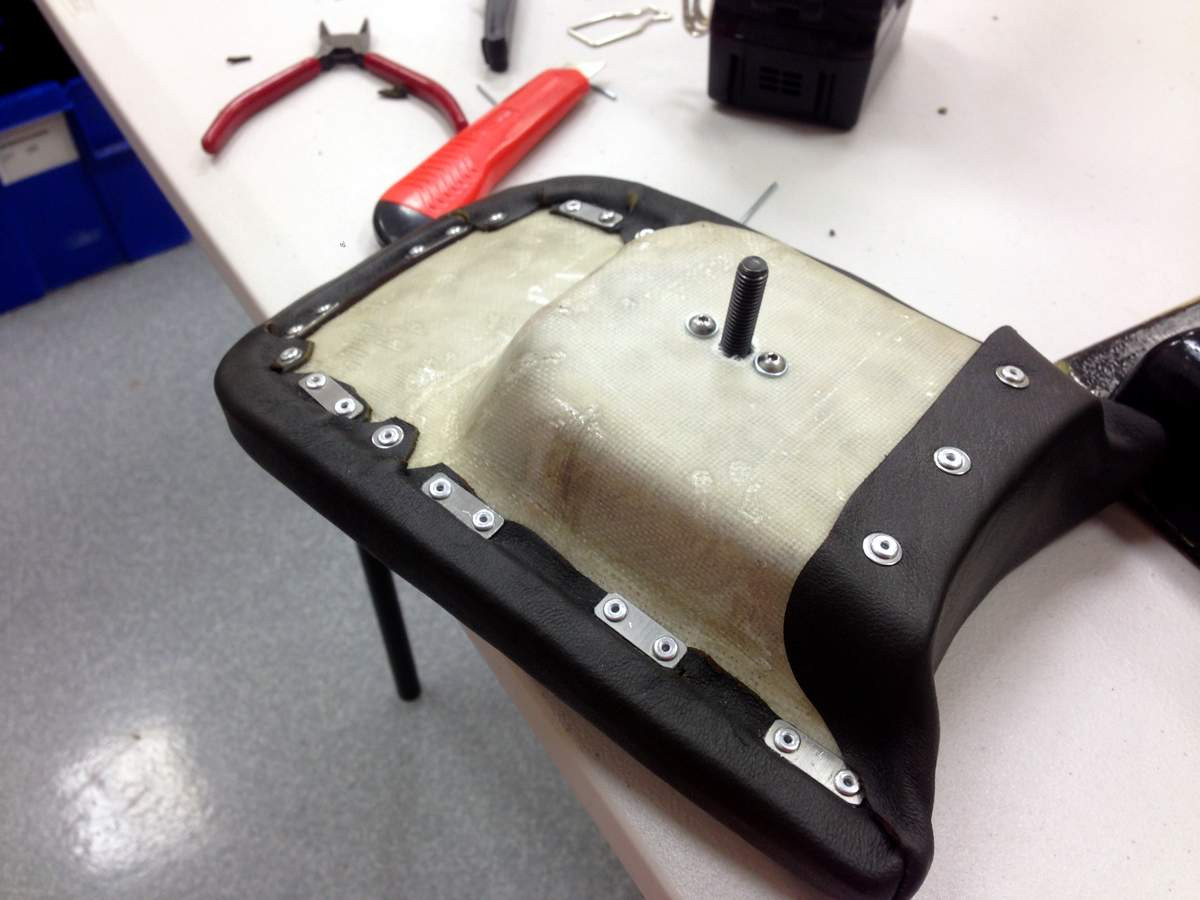
I needed a stud to stick out through the bottom of the seat cushion to bolt the cushion to the tail part:
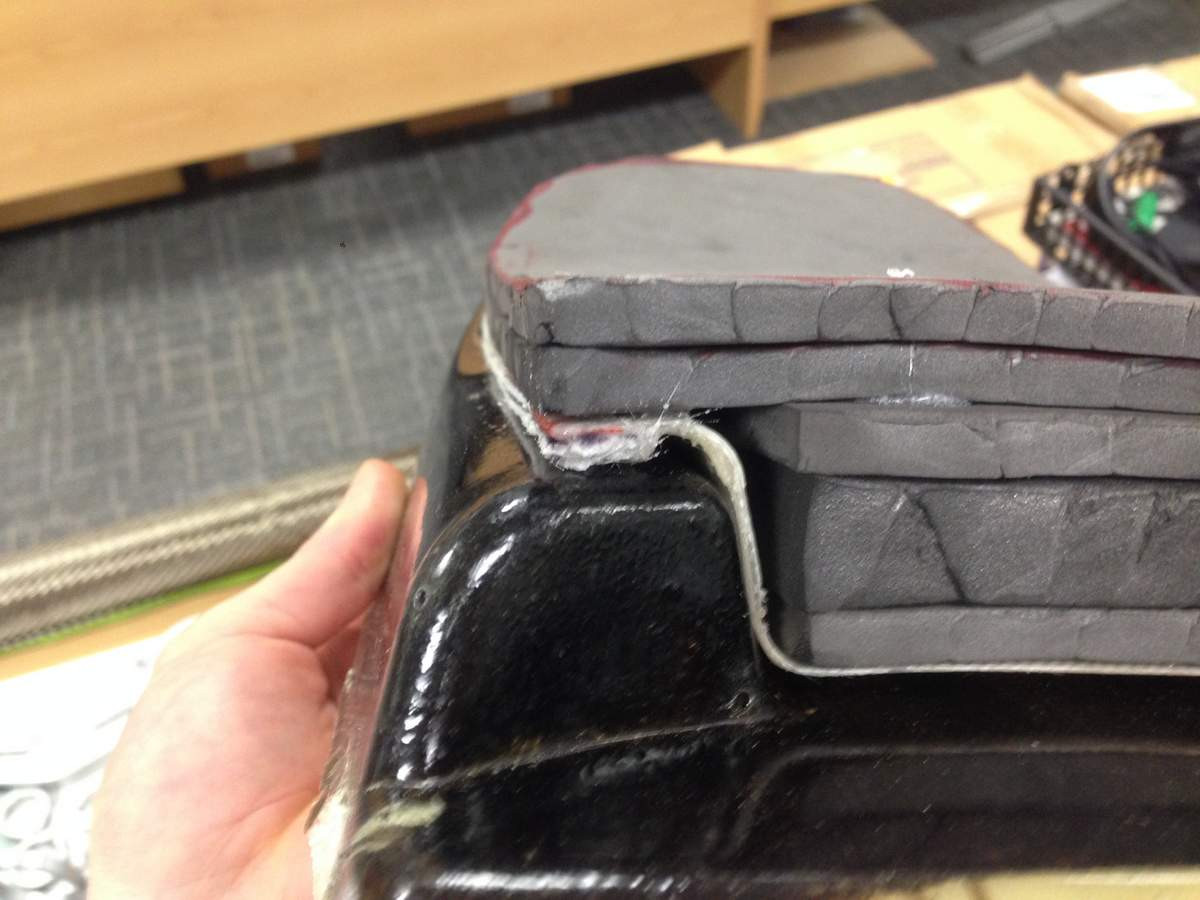
For the foam I hot glued layers of an old yoga mat to the fibreglass and linished it back to make the final shape:
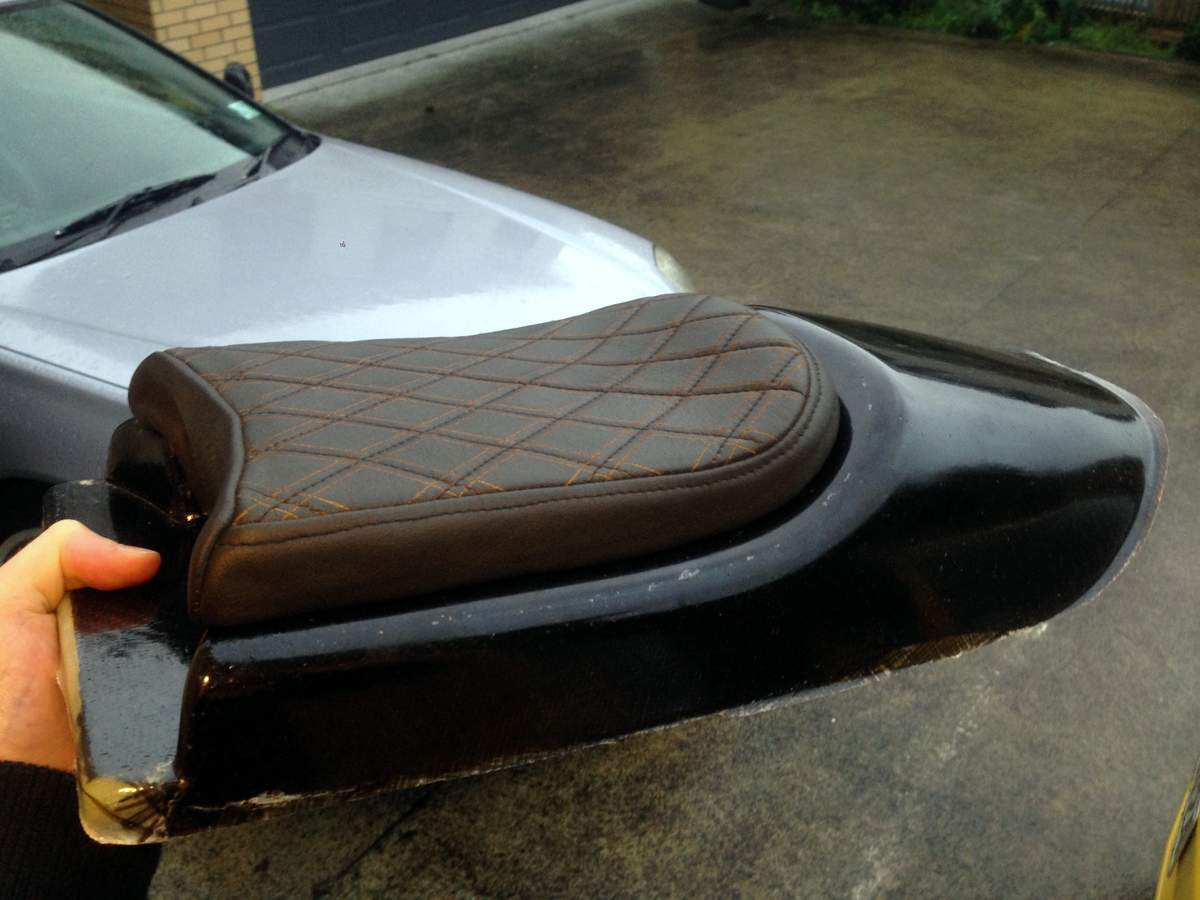
I added a lip around the perimeter of the seat base so that the leather will stretch around this and the fasteners will sit below the level of the lip. This is something I copied from the DeBolex ducati build. I didn't do this on my last build and it made a HUGE difference! The lip itself is just two layers of core mat soaked with resin.
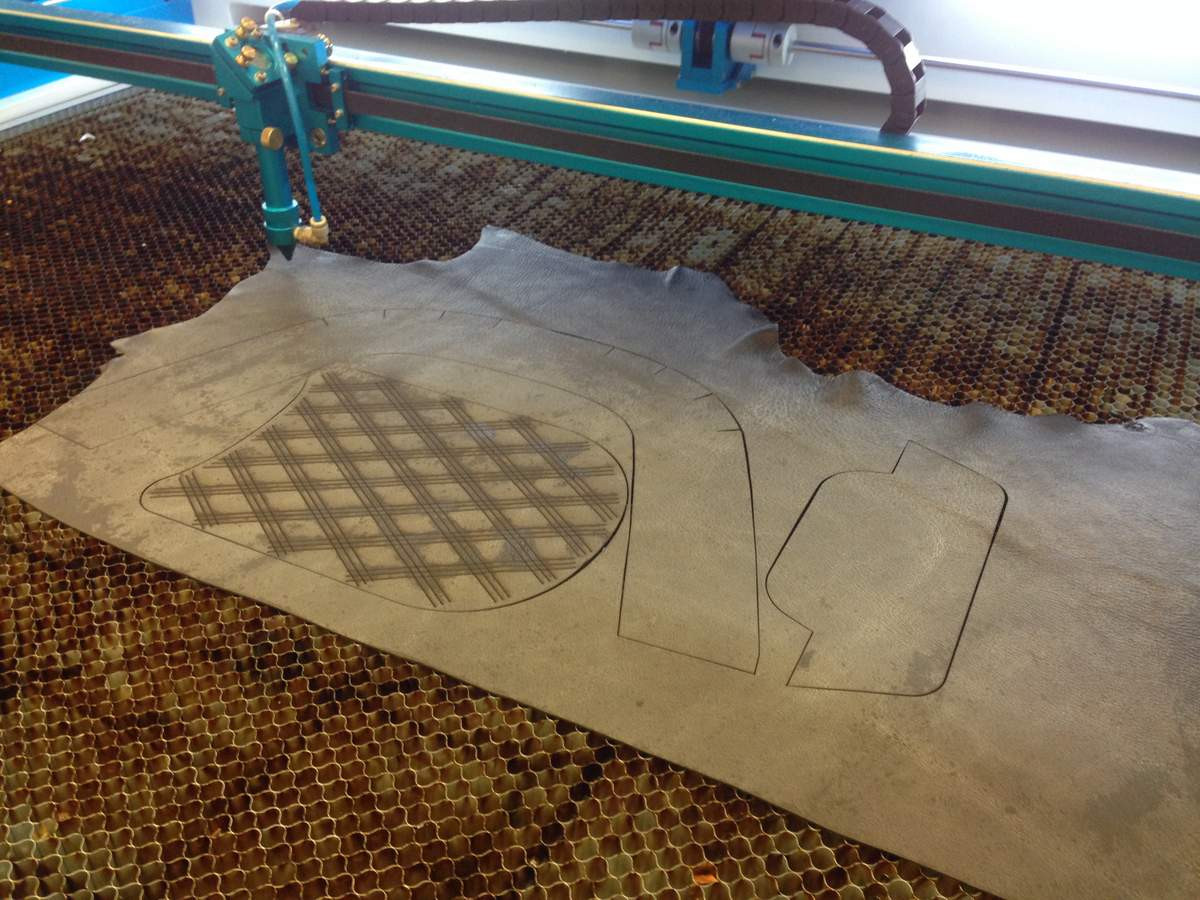
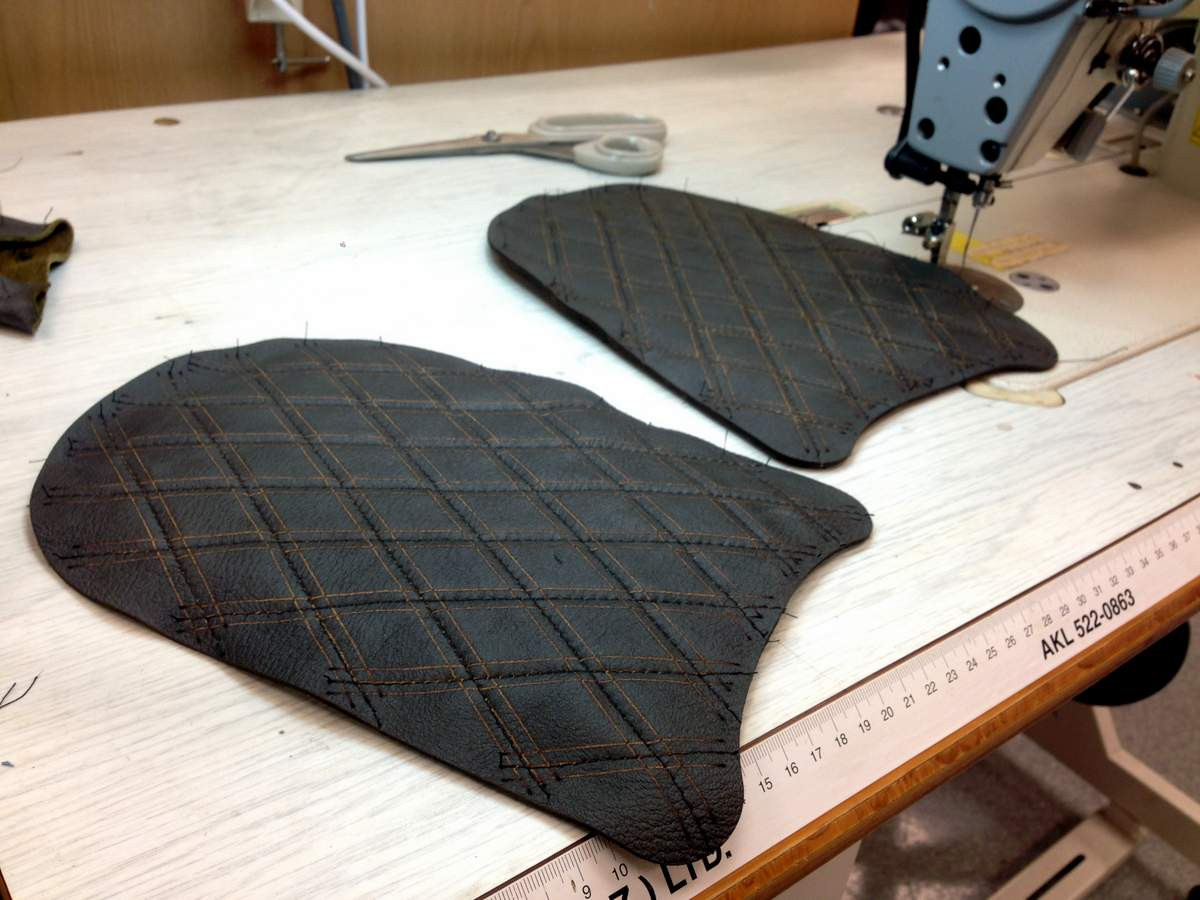
On to the upholstery. I started out with paper patterns to get the rough shape. Then I scanned it and CADed over the template to get the shape for the leather. I made one test cover with fabric, then a test one from leather, then a final one in leather.
Laser cutting the leather:
Stitching the first leather test:
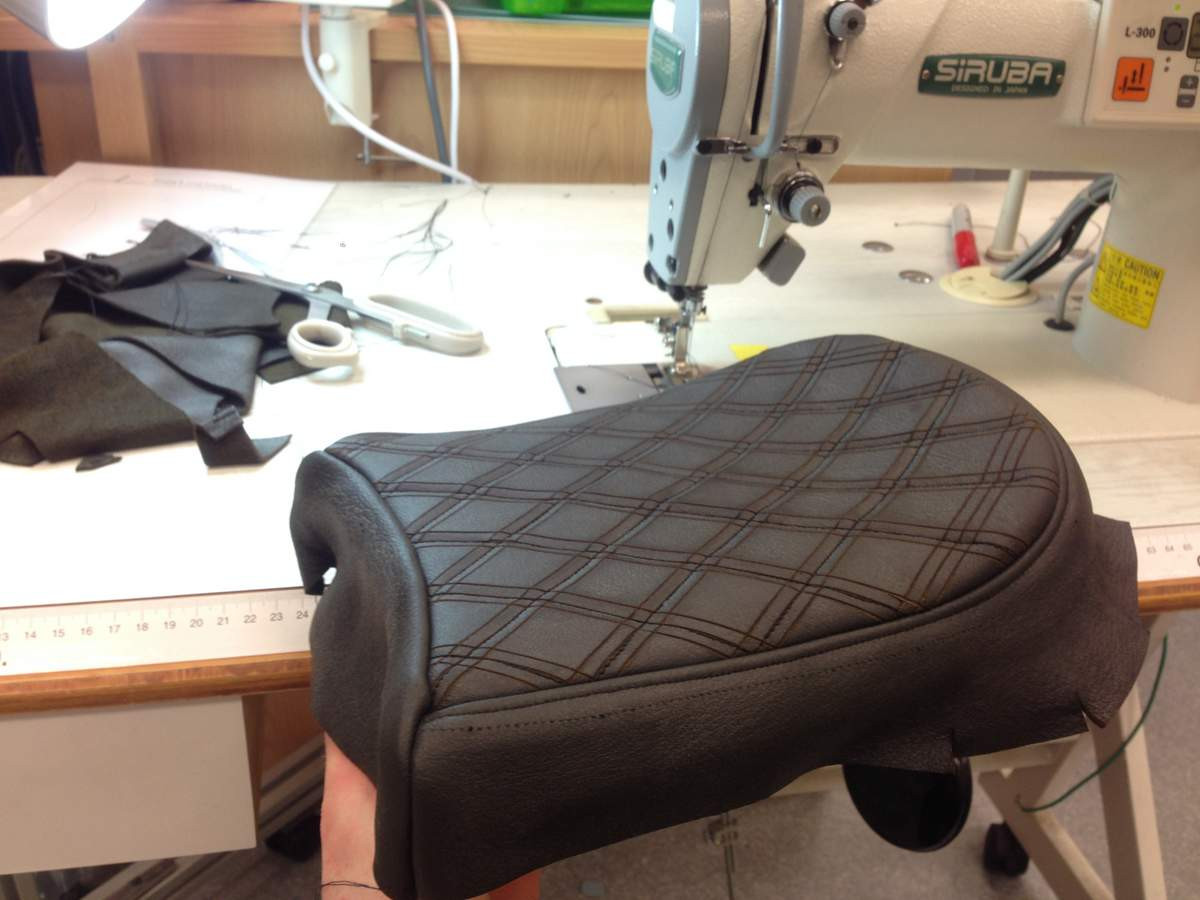
Test fitting:
There were a few things wrong with the test piece so made a few changes before stitching up the final seat cover:
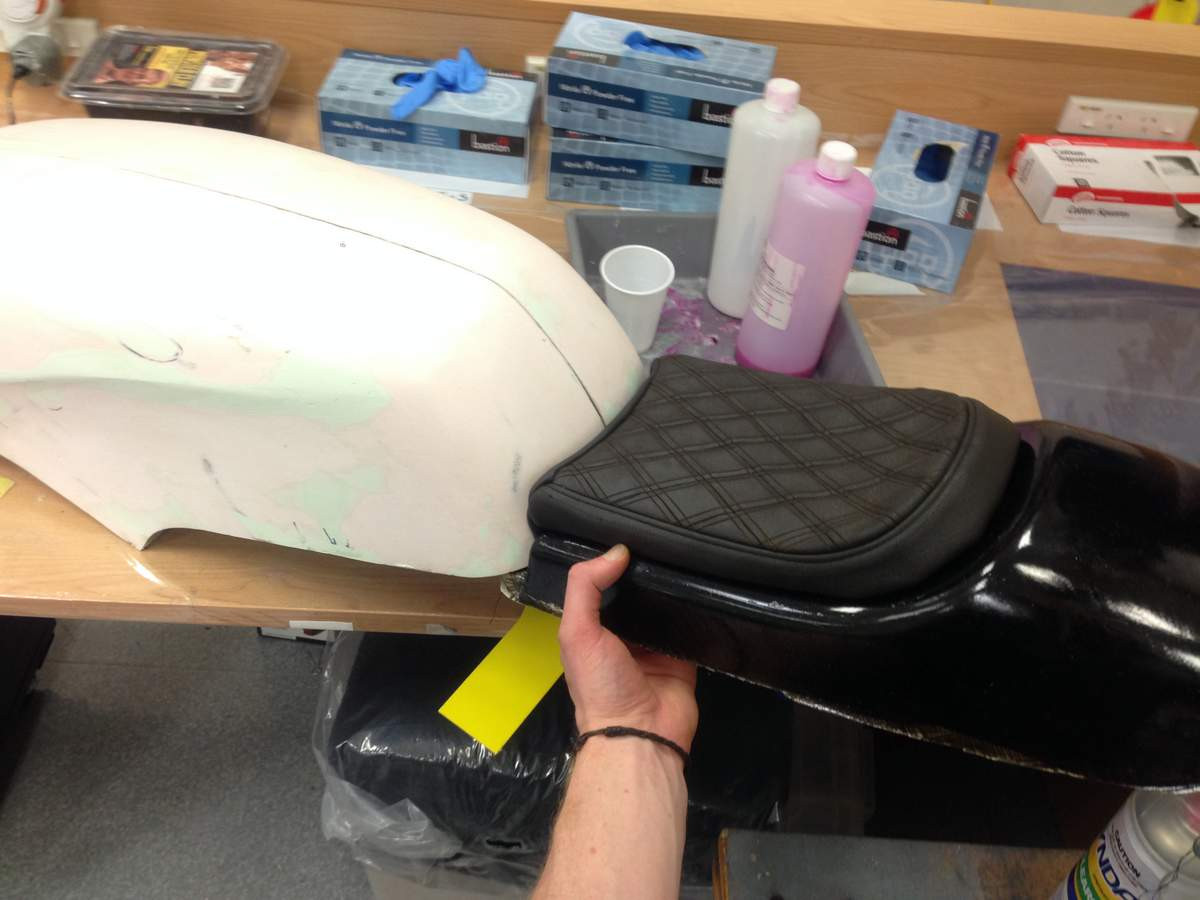
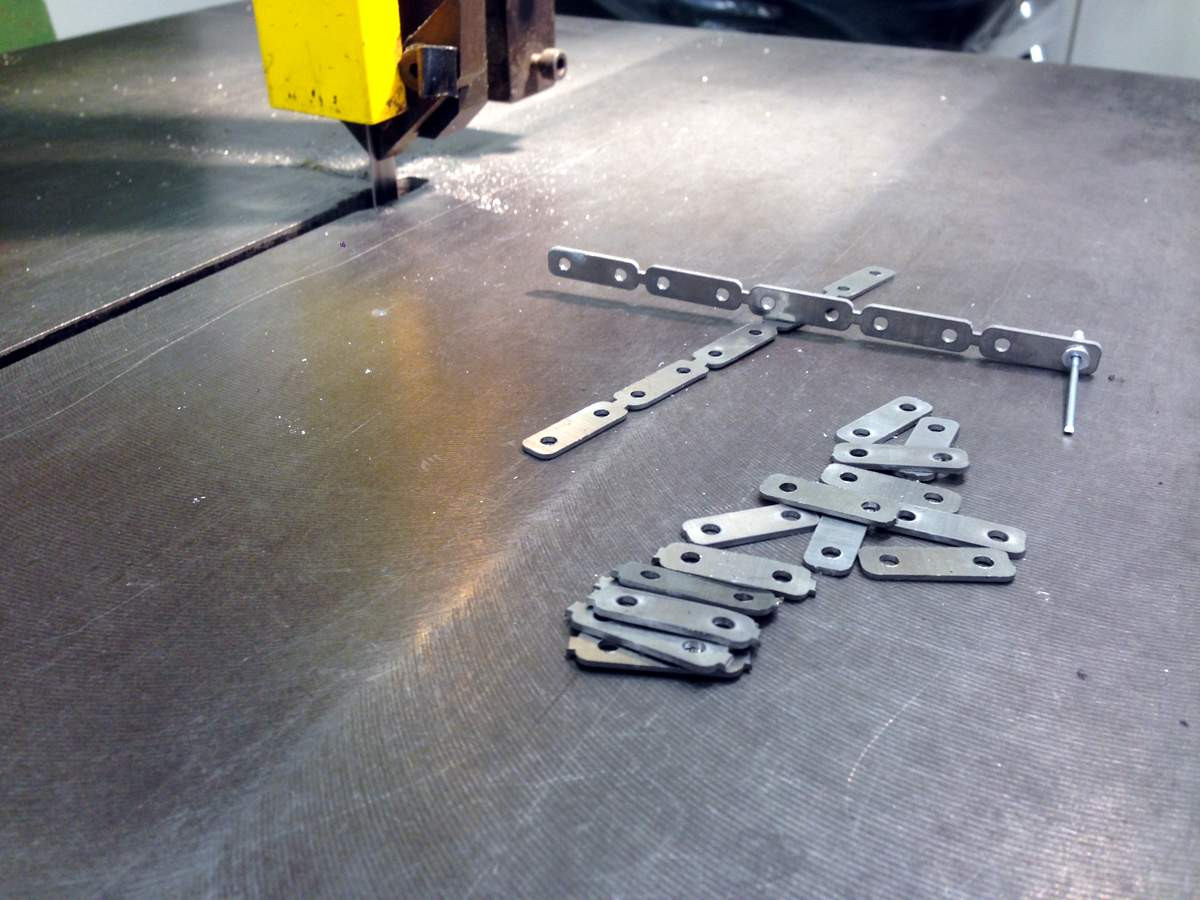
We got a waterjet cutter at work so I decided to make some custom washers for attaching the upholstery. Don't ask me why... Again copying the DeBolex bike:
Note the fasteners sitting sub-flush:
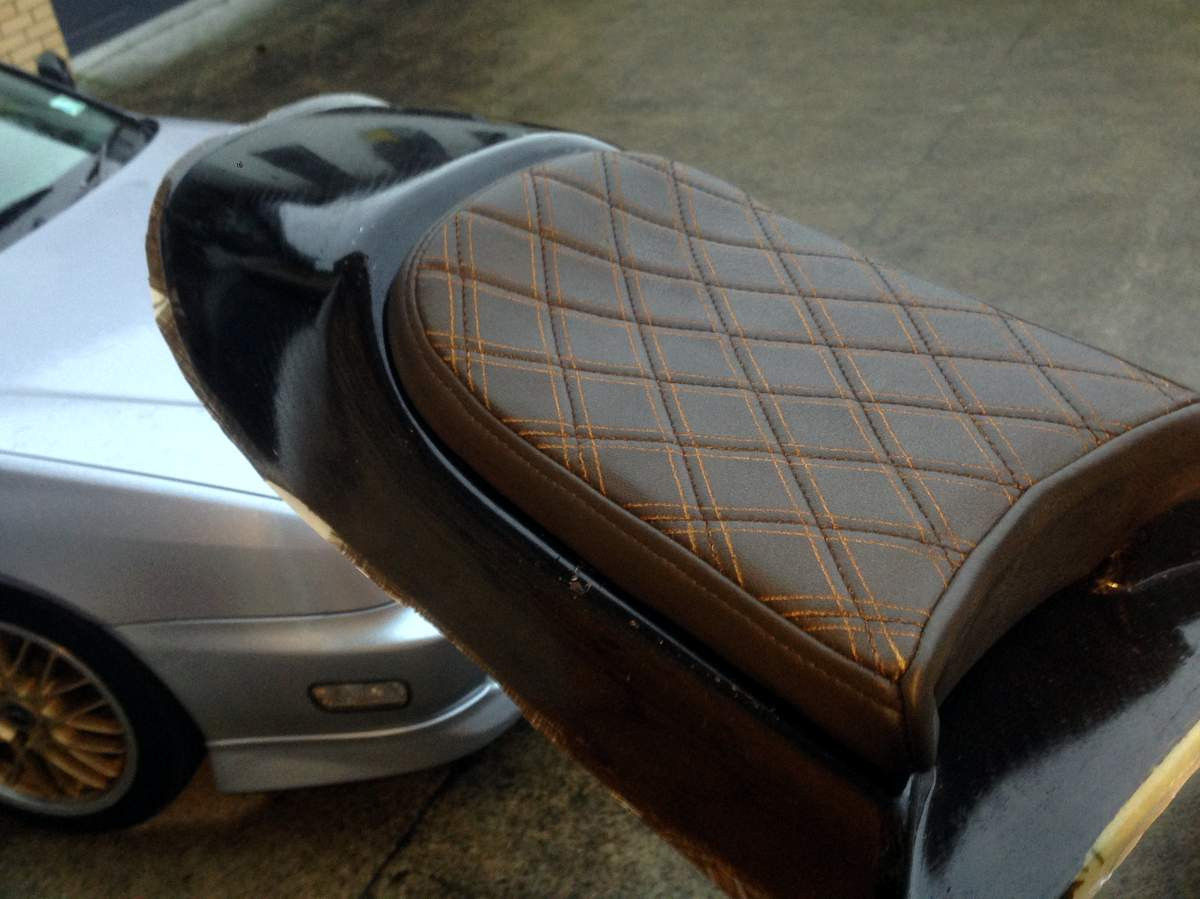
Fitted and finished:
Also made a captive nut ring to screw my fuel filler cap into when I fit it to the tank. These were cut on the waterjet cutter and I'll tap the holes soon:

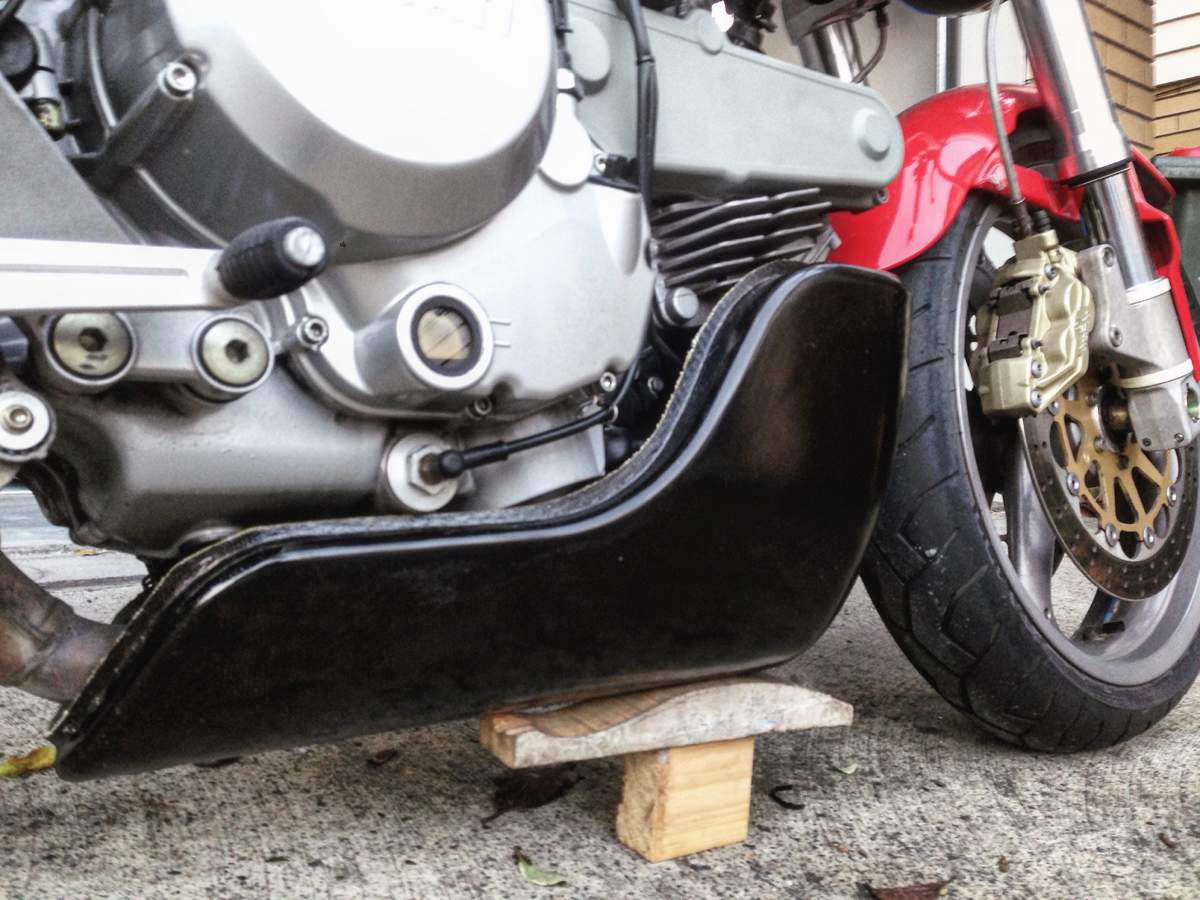
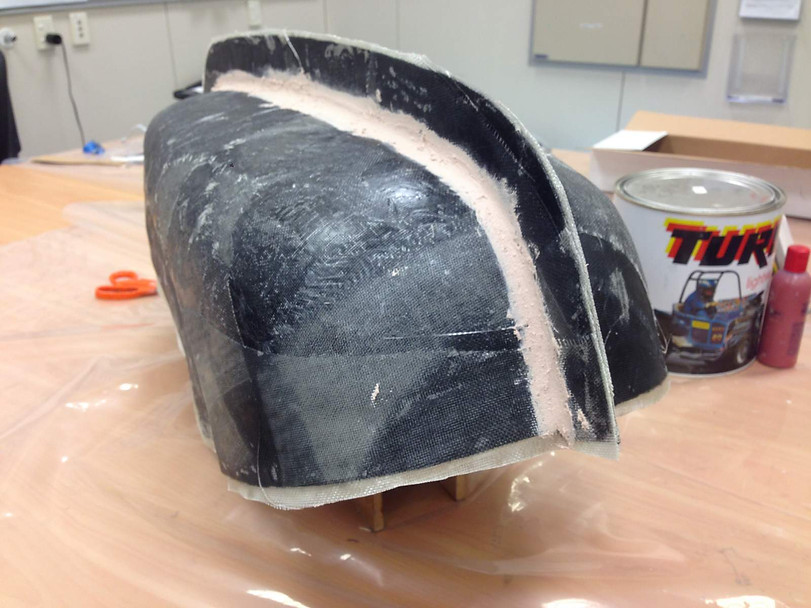
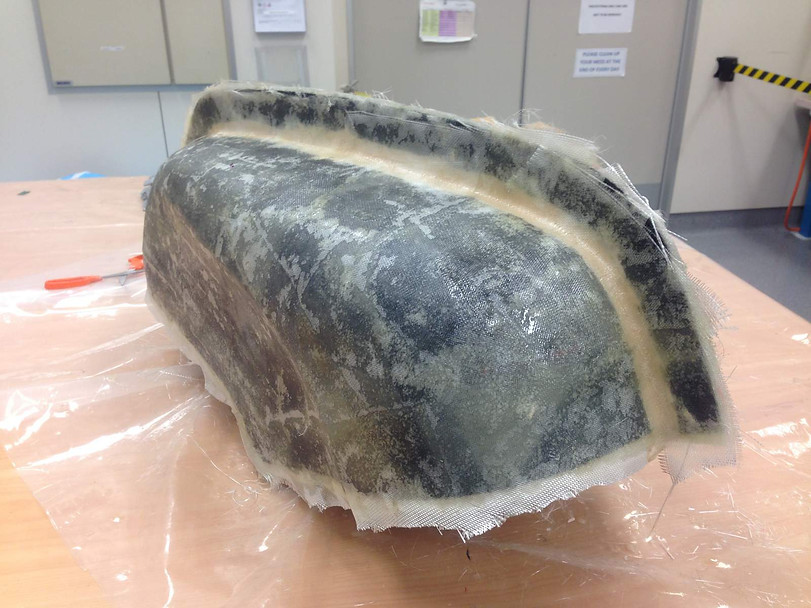
Next is the belly pan. 2 layers of basalt fibre and three layer of glass with a foam core. Took almost an entire day just to prep the materials and mould this part >.< Not to mention prepping the mould which took days and days...:
Lastly a few mockups with the parts on the bike (all the parts still need trimming and finishing):
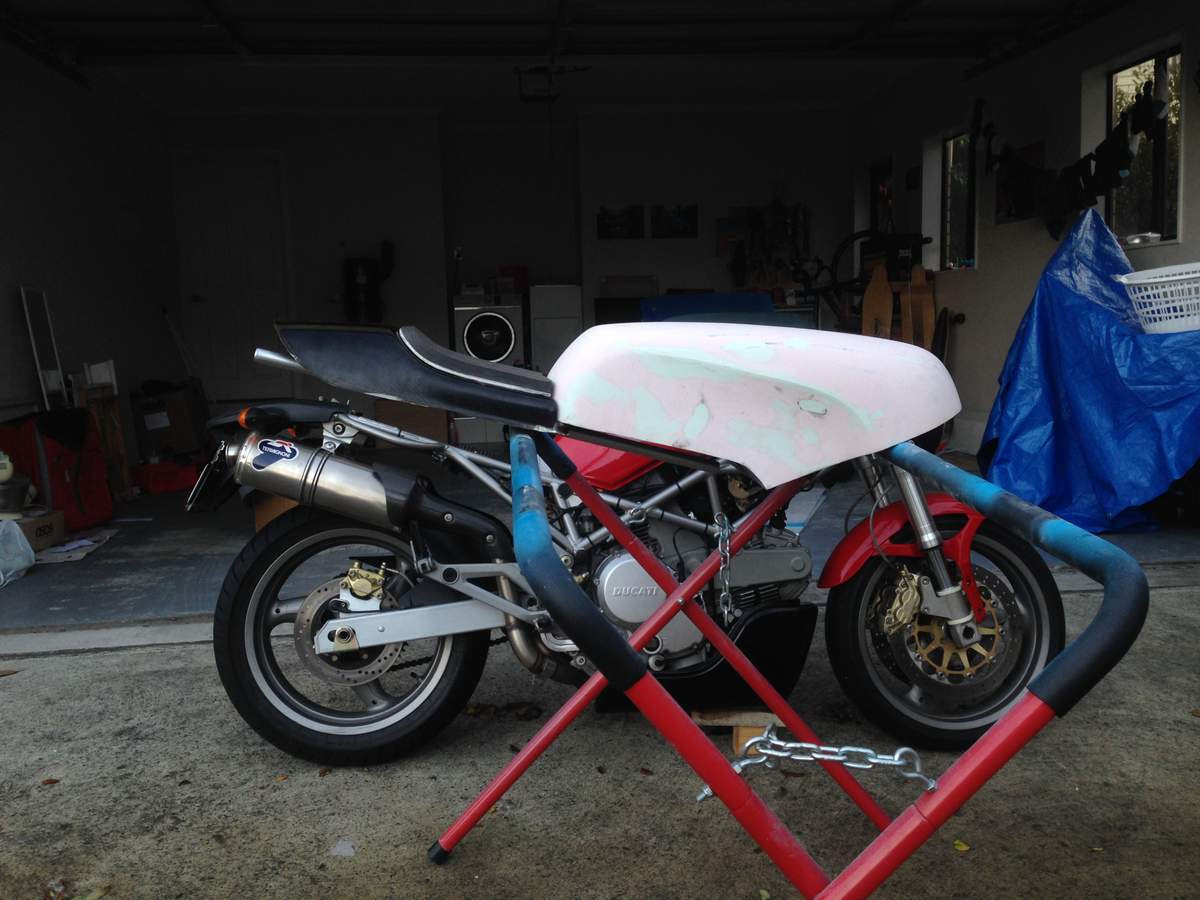
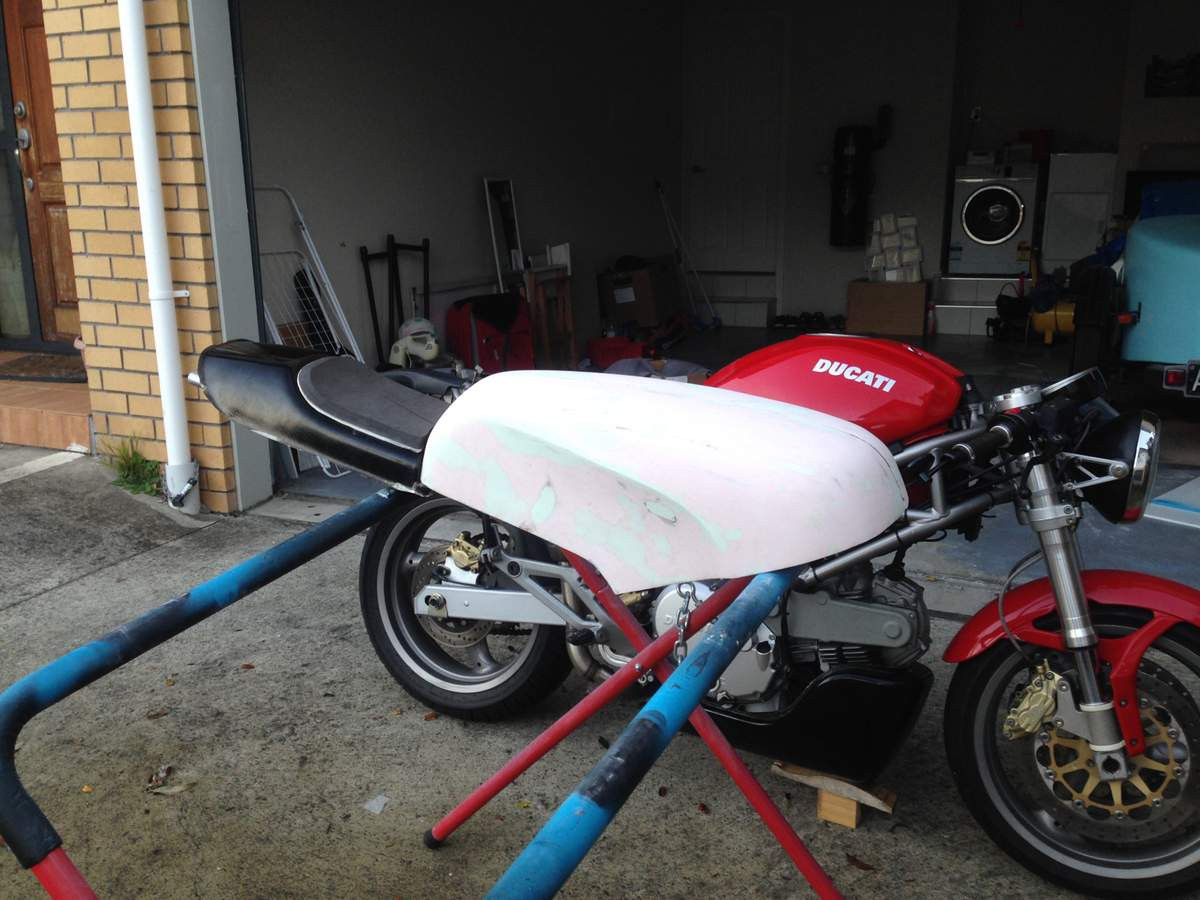
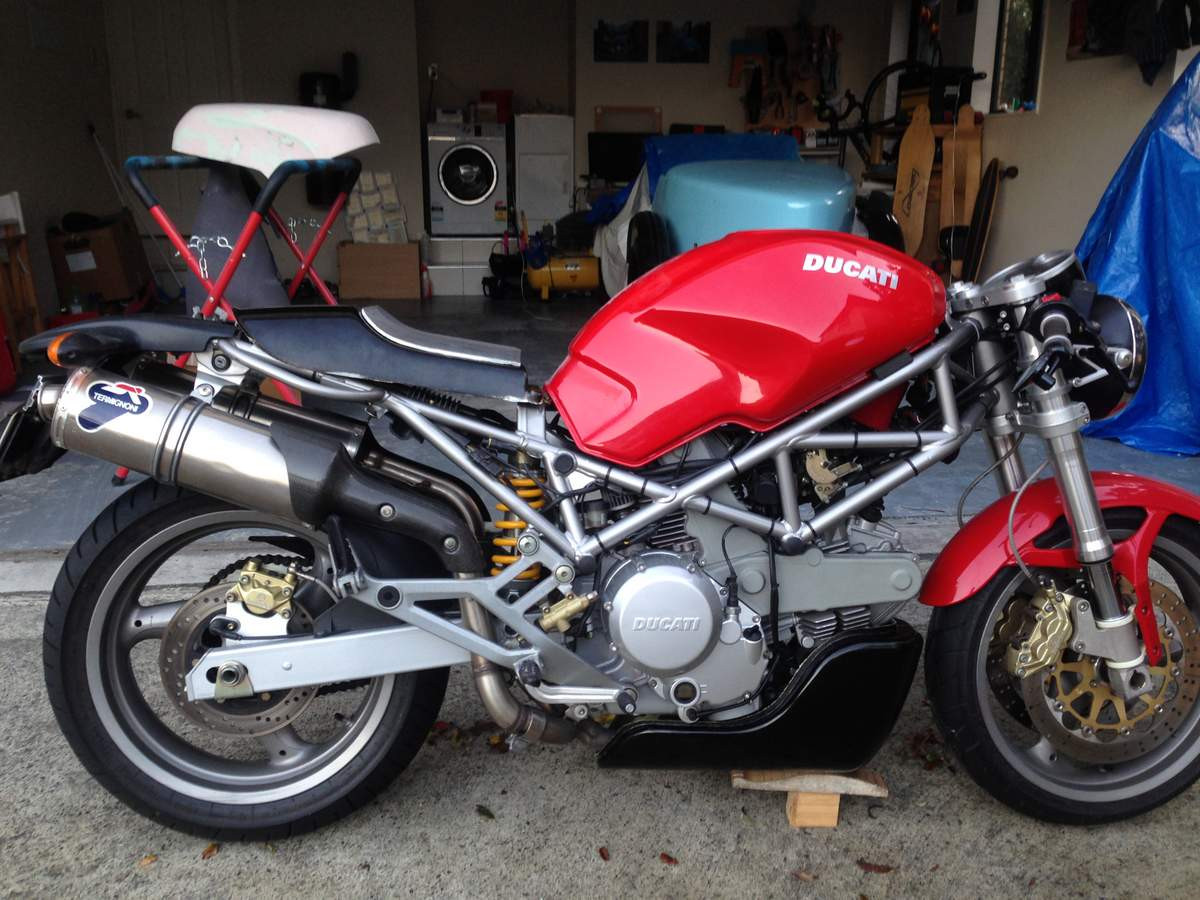
Pretty stoked with how all the components are coming together so far
If anyone's still reading find me on instagram @max_betteridge_design
https://www.instagram.com/max_betteridge_design/
And check out the build on my website:
http://www.maxbetteridgedesign.com/building-the-ducati-cafe-racer
I've been building my tank plug (/form/pattern. Most people think I'm talking about the filler cap when I talk about the 'tank plug'). It's laser cut mdf, filled with expanding foam, one layer of glass, and body filler.
Mocked up with the tail:
I deliberately made the mdf stick out from the serface of the part in CAD so that I could sand it back like this to get to its true shape. This was probably not a great idea in retrospect; should've made the edge of the MDF sit on and below the surface because sanding it back introduced a bit of guesswork:
Next step was filling the skeleton with expanding foam and cutting it back to shape. Messy but satisfying:
Because I was planning to use bog as the top layer and sand it back to the final shape I needed to add a layer of fibreglass on top of the foam. The idea of this was to create a hard protective layer for sanding. I didn't want to sand the bog and sand through to the foam because the foam is so much softer than the bog it would sand away much faster. The glass was intended to prevent that. I used one layer of 200gsm glass which wasn't really enough, two layers would've been much better. I also used polyester resin; because bog is polyester based this made a strong base for the bog to bond to:
Adding the bog:
And sanding it back:
Many many hours summarised in two photographs^^
There's still more work to do on this plug. I think this will be the next thing I work on.
Next is the seat cushion. First I started the fibreglass seat cushion base. This is to attach the foam and upholstery to and will locate into and bolt through the tail part. I used the same mould that I made the tail part with. This was always the plan but actually worked out a whole lot better than I imagined
Laying up the cushion base (no vacuum bag for this layup):
I needed a stud to stick out through the bottom of the seat cushion to bolt the cushion to the tail part:
For the foam I hot glued layers of an old yoga mat to the fibreglass and linished it back to make the final shape:
I added a lip around the perimeter of the seat base so that the leather will stretch around this and the fasteners will sit below the level of the lip. This is something I copied from the DeBolex ducati build. I didn't do this on my last build and it made a HUGE difference! The lip itself is just two layers of core mat soaked with resin.
On to the upholstery. I started out with paper patterns to get the rough shape. Then I scanned it and CADed over the template to get the shape for the leather. I made one test cover with fabric, then a test one from leather, then a final one in leather.
Laser cutting the leather:
Stitching the first leather test:
Test fitting:
There were a few things wrong with the test piece so made a few changes before stitching up the final seat cover:
We got a waterjet cutter at work so I decided to make some custom washers for attaching the upholstery. Don't ask me why... Again copying the DeBolex bike:
Note the fasteners sitting sub-flush:
Fitted and finished:
Also made a captive nut ring to screw my fuel filler cap into when I fit it to the tank. These were cut on the waterjet cutter and I'll tap the holes soon:
Next is the belly pan. 2 layers of basalt fibre and three layer of glass with a foam core. Took almost an entire day just to prep the materials and mould this part >.< Not to mention prepping the mould which took days and days...:
Lastly a few mockups with the parts on the bike (all the parts still need trimming and finishing):
Pretty stoked with how all the components are coming together so far
If anyone's still reading find me on instagram @max_betteridge_design
https://www.instagram.com/max_betteridge_design/
And check out the build on my website:
http://www.maxbetteridgedesign.com/building-the-ducati-cafe-racer
Re: Ducati Mobster
Yowsers Max! What sort of custom moto work shop have you got there fella? Most of us kiwis on these forums do it out in the garage with whatever's lying around like Munro and Britten. I've never seen anything like that sort of tech going into a custom build before. Very cool stuff! It must be awesome having access to all that sweet kit and you have some talent and skill to put it all together too. Looks like I'll miss the gentleman's ride this year too. I get my license back in October after too much twisty wristy on my Z750. Keen to follow this through.
Sent from my SM-G935F using Tapatalk
Wow awesome work, love your attention to detail and the fact that you are using all the modern tech that you have available. Not my style but I will be watching this thread because I can learn and me amazed at modern tech. I'm an old skool fabricator with modern ideas but admire I your skills for sure
Pan1cReaper
New Member
Ive always admired something about the combo of nerd tech and gear head. Pretty awesome what you can do with this stuff. Coming together nicely and I second the attention to detail.
maxBetteridge
New Member
This tank mould has been WAY more work than I expected but it's finally pretty much done! I have been working on it a lot and you'd never know just by looking at it.. Let's just say I have a new appreciation for custom made composite parts.
So in last post I had pretty much constructed the plug(/form) and it just needed finishing. As it turned out the 'finishing' was probably the majority of the work. Every time I sanded it I thought it'd be the last time and then I sanded through into the fibreglass underneath and had to chop out a chunk and fill it back in with bog and sand again, or else I would find a bubble where the fibreglass was not bonded to the foam underneath it so I would have to cut the whole region out and fill it with bog and sand it again.
Anyway..
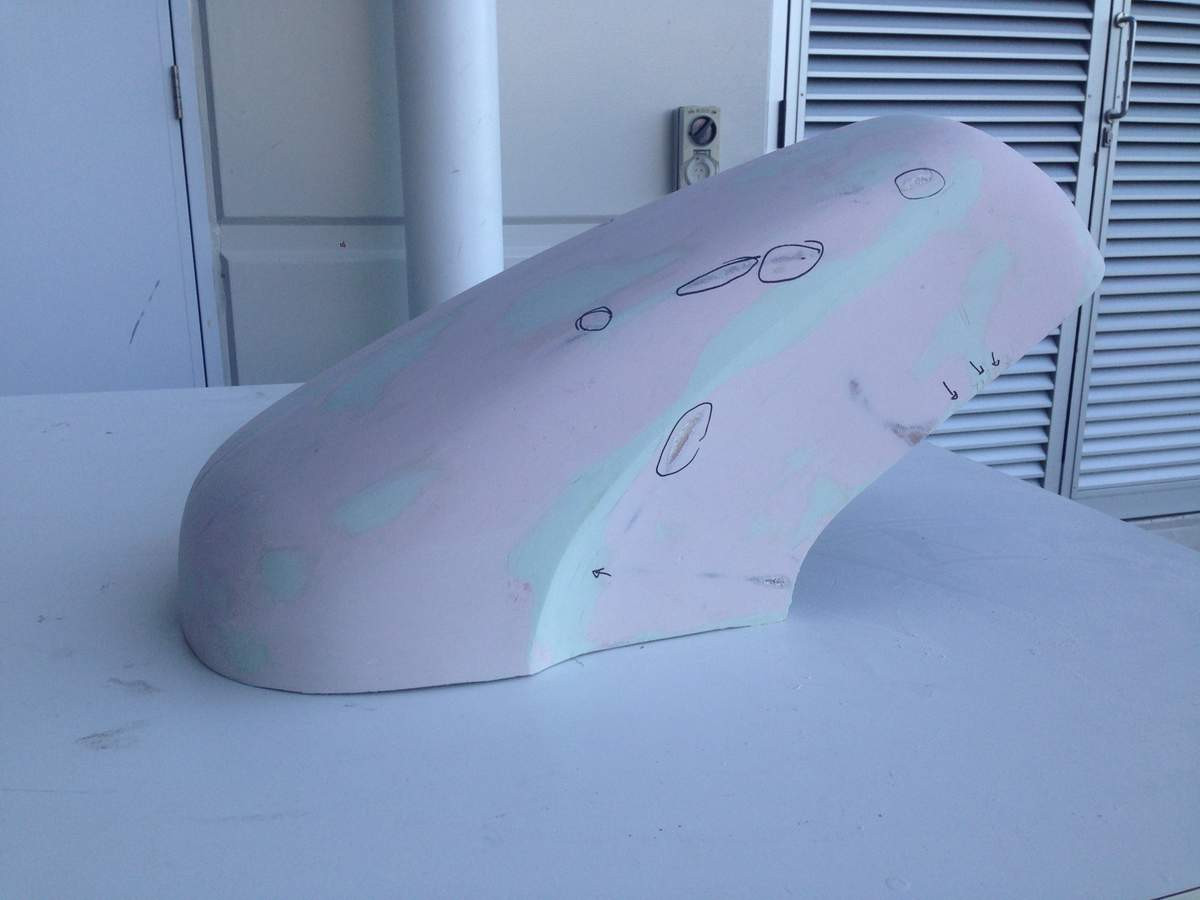
After a lot of sanding and filling I was getting pretty close. I threw down a guide coat with cheap rattle can paint:
And sanded it down with a sanding block to get rid of the high points:
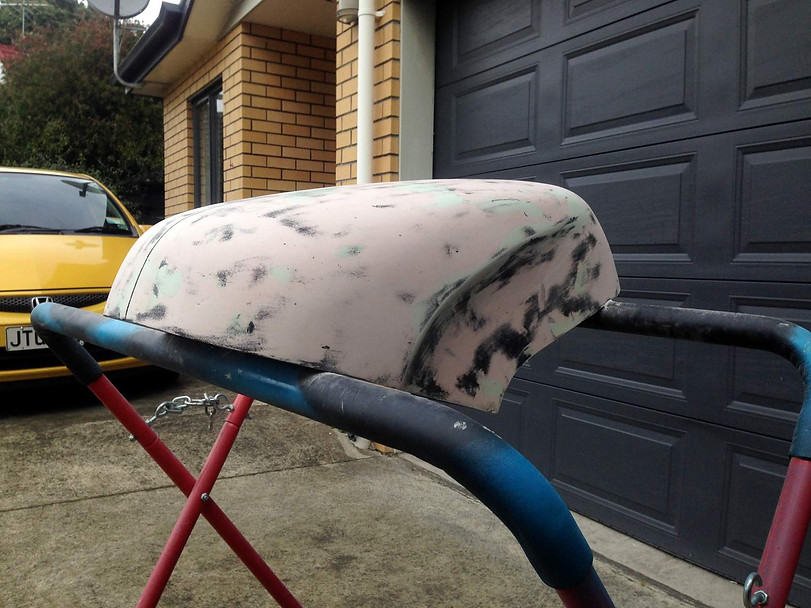
You can see there were still some low areas (where the black paint is still on the part) so it got more filling and sanding until I was happy enough with it and hit it with an epoxy primer I had left over from my last cafe racer project. I used this paint because I thought it would be a nice high build which would help me fill in a few smaller holes and hollows:
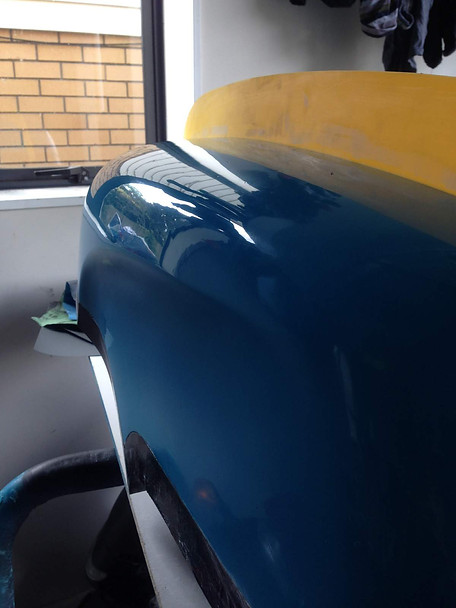
I blocked this down again got it even flatter and smoother.
Next I had to extend the bottom edge of the plug to allow me to build the mould out beyond the edge of the part. I made this flange by gluing strips of EVA foam onto the base of the plug using Ados F2. This then got covered with polyester resin so that the clearcoat would stick to it (not really sure if this was necessary)
Then a couple thick layers clearcoat:
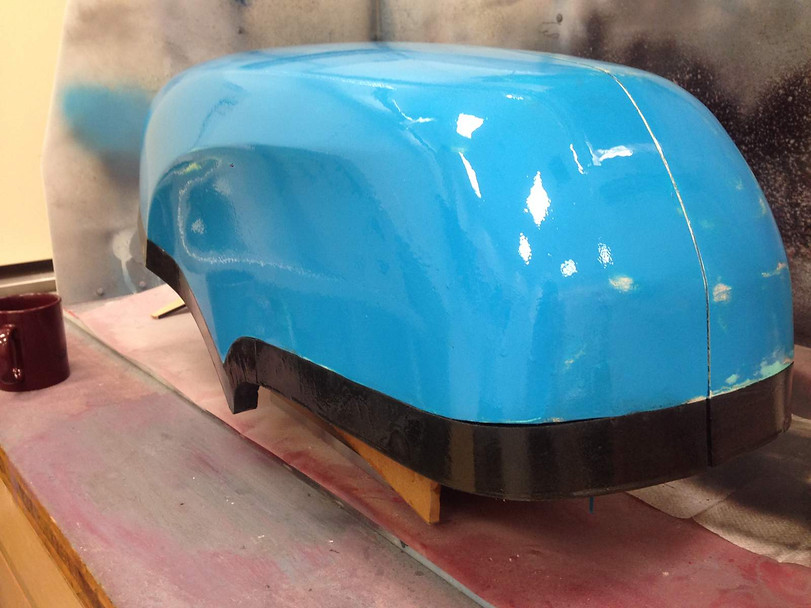
The clearcoat had my signature look - orange peel, fish eyes, and runs - so it needed some scraping with a razor blade (after leaving it for a day rugged up with an oil heater in the garage) and then more sanding and polishing. I went a bit overboard with the polishing, sanding up to 2000 grit then a cutting compound and then a finishing polish. This made for a great result but it didn't really transfer that well to the mould (I think because of the PVA mould release)
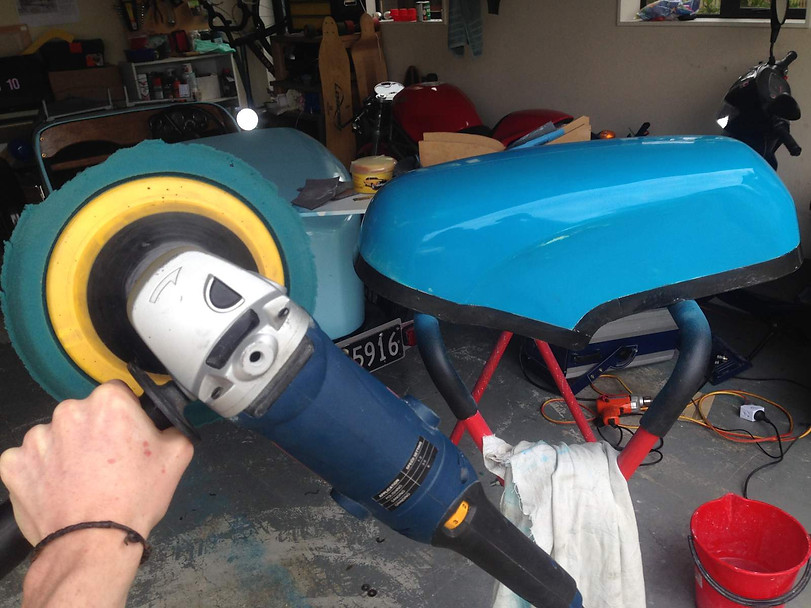
Here's a short video I made for my instagram of the final polish:
https://youtu.be/xdq7ZuSPdyQ
The fish eyes and gaps around the foam flange were filled with plasticine and modelling clay and shaved down with a razor blade:
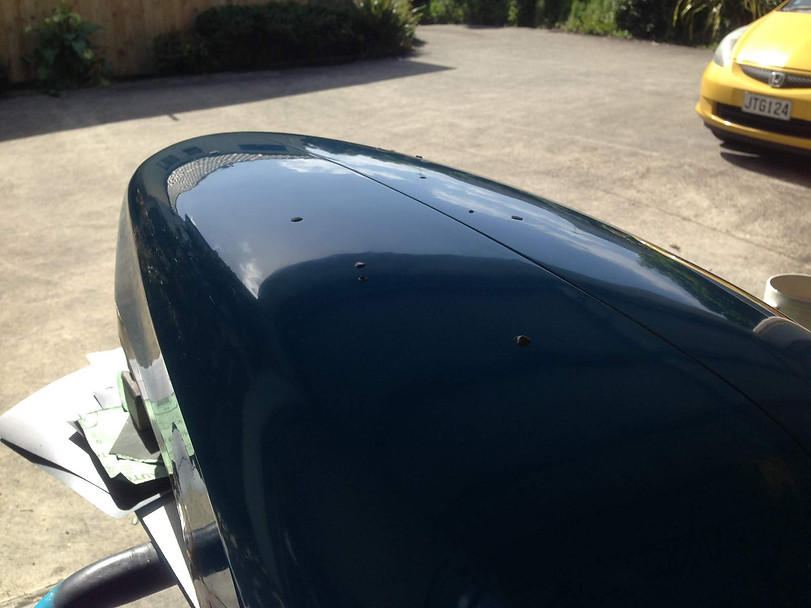
Finally it got 6 coats of mould release wax and PVA before starting the mould.
Here's a timelapse I made of me making the mould. About 12 hours work condensed into a nice three minute video, I hope you enjoy
https://youtu.be/c7sliT8tXnk
Getting the PVA to have a glassy smooth finish without any runs was a nightmare. I have done it before but never with a part this big. I tried spraying on the PVA with my paint gun and thinned it down with alcohol - both bad ideas.
Eventually after many redos I got something good enough.
After the PVA I painted on the tooling gelcoat:
Then laid about 2 layers of 100gsm woven glass:
The next day I filleted the central flange with bog (using polyester resin means the bog should stick good) and laid more glass over it.
I started with some 200gsm offcuts, then about 1.5sqm of chop strand which was about one and a half layers, and then a full layer of 200gsm as a top layer to cover up the nasty chop strand.
It came out pretty good
bolted together and trimmed:
I missed my original deadline - DGR 2016 - so I guess my new deadline is DGR 2017. Still a ton more to do and I have been inspired to put in a lot more effort into the details after I get this bodywork done. I am thinking I will strip the frame and do something special with it and get the engine casings polished up and a few things like that. Probably won't be finishing this any time soon...
And one more thing, I got contacted about a month ago by photographer Johny Cook ( https://www.facebook.com/JohnyCookPhotography/ ) who asked if I wanted to take the bike out for a photoshoot in the ranges out west of Auckland. I was stoked with the shots he got, this is how the bike is looking right now. Totally excited to get this thing finished now and shoot it again properly with that awful red tank gone!!


If you're still reading find me on instagram @max_betteridge_design
https://www.instagram.com/max_betteridge_design/
And check out the build on my website:
http://www.maxbetteridgedesign.com/building-the-ducati-cafe-racer
So in last post I had pretty much constructed the plug(/form) and it just needed finishing. As it turned out the 'finishing' was probably the majority of the work. Every time I sanded it I thought it'd be the last time and then I sanded through into the fibreglass underneath and had to chop out a chunk and fill it back in with bog and sand again, or else I would find a bubble where the fibreglass was not bonded to the foam underneath it so I would have to cut the whole region out and fill it with bog and sand it again.
Anyway..
After a lot of sanding and filling I was getting pretty close. I threw down a guide coat with cheap rattle can paint:
And sanded it down with a sanding block to get rid of the high points:
You can see there were still some low areas (where the black paint is still on the part) so it got more filling and sanding until I was happy enough with it and hit it with an epoxy primer I had left over from my last cafe racer project. I used this paint because I thought it would be a nice high build which would help me fill in a few smaller holes and hollows:
I blocked this down again got it even flatter and smoother.
Next I had to extend the bottom edge of the plug to allow me to build the mould out beyond the edge of the part. I made this flange by gluing strips of EVA foam onto the base of the plug using Ados F2. This then got covered with polyester resin so that the clearcoat would stick to it (not really sure if this was necessary)
Then a couple thick layers clearcoat:
The clearcoat had my signature look - orange peel, fish eyes, and runs - so it needed some scraping with a razor blade (after leaving it for a day rugged up with an oil heater in the garage) and then more sanding and polishing. I went a bit overboard with the polishing, sanding up to 2000 grit then a cutting compound and then a finishing polish. This made for a great result but it didn't really transfer that well to the mould (I think because of the PVA mould release)
Here's a short video I made for my instagram of the final polish:
https://youtu.be/xdq7ZuSPdyQ
The fish eyes and gaps around the foam flange were filled with plasticine and modelling clay and shaved down with a razor blade:
Finally it got 6 coats of mould release wax and PVA before starting the mould.
Here's a timelapse I made of me making the mould. About 12 hours work condensed into a nice three minute video, I hope you enjoy
https://youtu.be/c7sliT8tXnk
Getting the PVA to have a glassy smooth finish without any runs was a nightmare. I have done it before but never with a part this big. I tried spraying on the PVA with my paint gun and thinned it down with alcohol - both bad ideas.
Eventually after many redos I got something good enough.
After the PVA I painted on the tooling gelcoat:
Then laid about 2 layers of 100gsm woven glass:
The next day I filleted the central flange with bog (using polyester resin means the bog should stick good) and laid more glass over it.
I started with some 200gsm offcuts, then about 1.5sqm of chop strand which was about one and a half layers, and then a full layer of 200gsm as a top layer to cover up the nasty chop strand.
It came out pretty good
bolted together and trimmed:
I missed my original deadline - DGR 2016 - so I guess my new deadline is DGR 2017. Still a ton more to do and I have been inspired to put in a lot more effort into the details after I get this bodywork done. I am thinking I will strip the frame and do something special with it and get the engine casings polished up and a few things like that. Probably won't be finishing this any time soon...
And one more thing, I got contacted about a month ago by photographer Johny Cook ( https://www.facebook.com/JohnyCookPhotography/ ) who asked if I wanted to take the bike out for a photoshoot in the ranges out west of Auckland. I was stoked with the shots he got, this is how the bike is looking right now. Totally excited to get this thing finished now and shoot it again properly with that awful red tank gone!!
If you're still reading find me on instagram @max_betteridge_design
https://www.instagram.com/max_betteridge_design/
And check out the build on my website:
http://www.maxbetteridgedesign.com/building-the-ducati-cafe-racer
Tune-A-Fish
BOTM LOSER Proudly Deplorable
Cool plastics, but I'm waiting for the mechanics end, the performance bits, rotating massiveness that swims in oily goodness ness
Ichiban Moto
Bad Ass Cafe' Style
most excellent badass awesomeness
i need to make one of those water jet thingies
i need to make one of those water jet thingies
focusinprogress
City Limit Moto:Parts-Service-Apparel (716)8038606
extremely impressive composite work.


