'77 CJ360T (Café SOS) - Calling it Done (for now...)

Re: '77 CJ360T Café Build

Sonreir said:
My Dad was kind enough to give me my Grandfather's old Craftsman bench grinder and I spent about 30 minutes buffing the cover with tripoli compound. Looking a lot better now. Debating whether or not to use jeweler's rouge. Any opinions on the matter?

Looks like there are a lot of guys on here who swear by "Autosol" metal polish. I ordered some but have yet to use it, so no opinion yet...
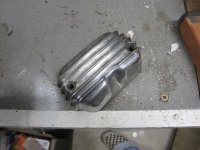
 
Re: '77 CJ360T Café Build

I tried polishing the cover with a cotton wheel with jeweler's rouge and there was a difference, but it wasn't very noticeable. I think I'll stick with the spiral sewn wheel and brown tripoli for the other aluminum pieces.

I also complete more detail work this weekend. I've also polished up some more random pieces and then stripped the triple tree and rear brake pedal. Not sure if I'm going to paint or clear coat just yet...

On Saturday I also masked off some parts of the stator cover put down a layer of primer. The first layer of color goes down tonight. Having a heated shop, rules. :D

Pics attached are as follows:
1.) The stator cover with the first coat of primer
2.) Points cover after the first pass on the buffing where
3.) Stator cover fully primed and curing for 48 hours along with the points cover after 30 minutes on the buffing wheel
4.) Random parts either stripped or polished
 

Attachments

  • More_Bike_001.jpg
    More_Bike_001.jpg
    119.9 KB · Views: 288
  • More_Bike_002.jpg
    More_Bike_002.jpg
    216 KB · Views: 289
Re: '77 CJ360T Café Build

You can't really see it in the third pic, above, but the points cover has some darker spots on it that I believe may be oxidation. I'm going to go for a chemical polish and see if that does the trick.
 
Re: '77 CJ360T Café Build

I spent some more time on the buffing wheel last night, trying to get the oxidation spots off of the points cover. I switched over to a black cutting compound and it only made a minimal difference. I tried a chemical polish from Mother's and that worked a bit better. It's still not a perfect mirror shine though. The aluminum has a bit of pitting and it looks like I may need to remove a good deal of metal before that goes away entirely. At this point, I'm opting to leave it be. It's not too noticeable unless you look quite closely and I think it adds a bit of character. Either that, or I'm rationalizing getting out of another three hours of hand sanding. :D
 
Re: '77 CJ360T Café Build

did you grind out the spot where your grease fitting goes on your swingarm or just clean it up?
 
Re: '77 CJ360T Café Build

Sonreir said:
I spent some more time on the buffing wheel last night, trying to get the oxidation spots off of the points cover. I switched over to a black cutting compound and it only made a minimal difference. I tried a chemical polish from Mother's and that worked a bit better. It's still not a perfect mirror shine though. The aluminum has a bit of pitting and it looks like I may need to remove a good deal of metal before that goes away entirely. At this point, I'm opting to leave it be. It's not too noticeable unless you look quite closely and I think it adds a bit of character. Either that, or I'm rationalizing getting out of another three hours of hand sanding. :D

Nothing wrong with a bit of Patina. You can always look for another one as well. Swap meets rock.
 
Re: '77 CJ360T Café Build

boisdarc said:
did you grind out the spot where your grease fitting goes on your swingarm or just clean it up?

I have a little bit of clean up to do there, still. I'm not 100% sure what I'm going to do with it yet. I'm leaning toward replacing the zerk fitting, but maybe I'll just braze it over and smooth it out.
 
Re: '77 CJ360T Café Build

Yet more work completed over this Thanksgiving weekend. Spent a lot of time with the family (in between coats of paint), too.
Most of my focus over these past few days have been getting some pieces painted in order to have something done. It seems like this one project has a dozen mini projects within it...

Anyway... without further ado:

file.php


file.php


file.php


file.php
 
Re: '77 CJ360T Café Build

The foot peg is already cleared coated and will be reassembled tonight. It's my first piece I can consider, "done" in this project!
The valve covers and breather will get clear coat tonight. The stator cover is going to need some detail work with a fine paint brush before being clear coated.; it looks kind of crap up close.
 
Re: '77 CJ360T Café Build

The stator cover looks really good in the picture. I might have to steal that idea from you...
 
Re: '77 CJ360T Café Build

My first piece that I can consider "done" with this project! Time to set it aside and finish the other 23,872,234 parts... lol

Foot peg used to be black, of course.

file.php


file.php
 
Re: '77 CJ360T Café Build

Looks good. I'm not sure it makes a difference either way on that grease fitting, unless someone can confirm that greasing liberally with your hands/fingers/some tool before inserting the shaft would be insufficient. I'm leaving mine just in case.
 
Re: '77 CJ360T Café Build

I got a bit more done this weekend, but not as much as I'd hoped. I've finished up the right foot peg and clear coated both the breather cover and the valve covers. The points cover is now clear-coated as well.

file.php


file.php
 
Re: '77 CJ360T Café Build

Sorry for the lack of updates... I've been stuck in the "land of the fruits and nuts" (California) for the past week. Back in Oregon now and I've completed a bit more work. I didn't have time to take a lot of pics, so those will have to come later, but I've disassembled the speedo and started cleaning it up. I've also started stripping the gas tank.

The tank is turning out to be a bit more of a challenge than I originally thought. Not difficult, just time consuming and (literally) a pain in the back. I started off with a wire wheel attached to my angle grinder and that was surprising slow-going. I've just picked up some paint remover and I'm going to give that a try sometime this week.

As for the speedo, the main goal was to get a scan of the gauge onto my PC so I could clean it up and get some digital images of it. Those images will be used for custom printing some vinyls that will go over the original and provide a much better look for my bike. The price per unit gets cheaper the more I print, so lemme know if anyone wants some as well. :D

Anyway... here's some pics of the work on the speedo gauge.

Original Gauge:
file.php


Cleaned up stock look:
file.php


What's going on my bike:
file.php
 
Re: '77 CJ360T Café Build

OK... I had a few weeks off for the holidays, but it's time to get cracking again.
This last weekend I painted up the outside of my speedo, polished the metal and the plastic, painted and polished up the needle, and installed the new backing graphic. I'm still waiting on some LEDs from China before I change out the bulb, but I'll post pics of that when I get it working, too.

Also, I have a spare graphic if anyone wants it (I ordered two in case I screwed it up). Yours for $5.

As you may have noticed, I broke the little knob that sits on the end of the odometer reset thingy. I'm probably going to end up coating it with some liquid rubber coating stuff. Something like this: http://www.usplastic.com/catalog/item.aspx?itemid=39156&catid=699

EDIT: Something happened to the speedo pics, so I'm just reposting them now.
 

Attachments

  • speedo 1.jpg
    speedo 1.jpg
    30.6 KB · Views: 256
  • speedo 2.jpg
    speedo 2.jpg
    31.6 KB · Views: 275
  • speedo 3.jpg
    speedo 3.jpg
    24.5 KB · Views: 256
Re: '77 CJ360T Café Build

Dude.. I'm really looking forward to seeing what you're cooking up over there...
 
Re: '77 CJ360T Café Build

So am I. I'll let you guys know as soon as I figure that out... lol...

Seriously though, this is a bike on a budget. I've budgeted for around three grand for the whole project and my disposable income is only a hundred or two per month so thread is going to be going for a while until I'm done. I'm also hoping the IRS sends me a fat return this year. :D

In the mean time, I'm trying to reuse as much as possible and do very little fab work. I'm hoping I can still come up with something unique and "me" without having to make any sacrifices. A tall order, I know, but I'm not in any hurry. I think my speedo is a good example of my build philosophy: It took me a few hours from start to finish, but materials costs were under 10 bucks.
 
Back
Top Bottom