
We noticed you are blocking ads. DO THE TON only works with community supporters. Most are active members of the site with small businesses. Please consider disabling your ad blocking tool and checking out the businesses that help keep our site up and free.
You are using an out of date browser. It may not display this or other websites correctly.
You should upgrade or use an alternative browser.
You should upgrade or use an alternative browser.
The z50 Zombie, Back from the Dead - a Honda Mini Trail resurrection
- Thread starter adventurco
- Start date
iatethepeach
Coast to Coast
How did you know when to stop sawing the outer sleeve on those swingarm bushings? I just did mine, and that's the part that gave me trouble. I cut them all the way down to where the blade was just starting to touch the swingarm on each end, and had a paper-thin section of sleeve left in the center, but they still resisted punching out. They are tenacious devils!
iatethepeach said:How did you know when to stop sawing the outer sleeve on those swingarm bushings? I just did mine, and that's the part that gave me trouble. I cut them all the way down to where the blade was just starting to touch the swingarm on each end, and had a paper-thin section of sleeve left in the center, but they still resisted punching out. They are tenacious devils!
I sawed it through about 90% of the way and then just did a stroke or two at a time until I could see the rusty metal of the swingarm underneath. I did nick the swingarm a tiny bit on the first one but I'm not concerned about it.
I've been getting better at cutting through thin metal without hitting the surface below since I've been removing tons of spot welds during rust repair on the VW Bus. If you go slow enough, and lift the blade every one or two passes (or revolutions of the spot weld cutter), its pretty easy to see when you're through the shiny metal you're cutting as the usually brown/rusty metal below will show.
As for punching them out, I had the swingarm in the vice and took a hammer and blunt punch and bashed it toward the inside. Once it folded over a bit, it loosened up and came right out.
Prepped and painted more engine parts over the weekend. Came home at lunch today and threw the tray in the oven to cure. I’m using Dupli Engine enamel primer/paint and I love this stuff. It’s actually gas resistant without being cured after but since this is all apart I figured why not?
My process is as follows:
-Degrease the heavy crap with mineral spirits and a toothbrush
-Air dry, media blast all surfaces, blow off in blast cabinet
-Soap and water in the sink with a few small brushes. Straw cleaner brushes are great for small areas and bolt holes
-Blow off w/compressed air
-Pre bake 250 degrees for 20 minutes to purge any moisture from the cast aluminum
(Here i put gloves on and never touch the bare aluminum if I can help it)
-Tape up sealing surfaces, etc.
-Wipe down with acetone and cotton rag, blow off any dust w/air
-Prime
-Paint
-18 hour initial cure
-Post bake 250 degrees for 25 minutes
I do 2 mist coats and one medium coat of primer, wait 30 minutes, and then 3 light coats of color with 10 minutes between w/10 minute flash time. I give a few extra minutes if it went on thicker than planned. These went on heavier than I would like on the paint but it’s tough to get good coverage between the fins without spraying a little extra.
Interior surfaces usually get a final wipe down and q-tip cleaning with isopropyl alcohol. I always fit up any spinning parts with oil and make sure there are no stray glass beads that will bite me later.
Ordered a boatload of parts last week that should get this engine all wrapped up and give me some things to do on the frame.
Sent from my iPhone using DO THE TON
Attachments
The Jimbonaut said:Nick do you spray primer on the engine first and then paint? I thought Duplicolor engine enamel had primer built in so-to-speak.
Looking good man.
Yeah Jim, see above but usually 2 very light dustings and 1 medium coat does the trick. I find that it helps to hide the casting imperfections that show up in the bead blasted surfaces and gives a very uniform look to the painted finish. Probably not necessary as I think you're right the instructions make it seem like the primer is optional.
I updated the last post to show my full process for painting engine parts. Hopefully this will be helpful.
advCo said:My process is as follows:
-Degrease the heavy crap with mineral spirits and a toothbrush
-Air dry, media blast all surfaces, blow off in blast cabinet
-Soap and water in the sink with a few small brushes. Straw cleaner brushes are great for small areas and bolt holes
-Blow off w/compressed air
-Pre bake 250 degrees for 20 minutes to purge any moisture from the cast aluminum
(Here i put gloves on and never touch the bare aluminum if I can help it)
-Tape up sealing surfaces, etc.
-Wipe down with acetone and cotton rag, blow off any dust w/air
-Prime
-Paint
-18 hour initial cure
-Post bake 250 degrees for 25 minutes
I do 2 mist coats and one medium coat of primer, wait 30 minutes, and then 3 light coats of color with 10 minutes between w/10 minute flash time. I give a few extra minutes if it went on thicker than planned. These went on heavier than I would like on the paint but it’s tough to get good coverage between the fins without spraying a little extra.
FWIW, this is pretty nearly exactly the process I use for non-catalyzed spray can paint - Duplicolor engine paint nearly exclusively these days as it is available everywhere near me. Really great durable results. I bake about 30 minutes after the last coat a little cooler and for about an hour. A second bake after a complete cool down seems to add a little durability.
The z50 Zombie, Back from the Dead - a Honda Mini Trail resurrection
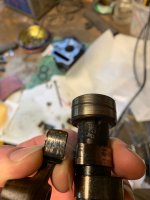
Got the clutch rebuilt with the donor basket and internals. I got a used basket from an ATC70 which has the same clutch but longer springs and a different disc layout, so I swapped in the 50 springs and discs and got everything in place. Also replaced the circlip on the big drive gear as the original one was stretched out from removing and installing it.
A while back I made this clutch holder tool. It’s just some angle with a couple of holes and m6 bolts. Works on pretty much any wet clutch I’ve run into so far. I had to modify it a bit to fit in the small holes on this clutch but definitely worth making.
Self reminder to bend down the locking tabs on the washer under the clutch nut.
Before pic for reference ;D
Attachments

Re: The z50 Zombie, Back from the Dead - a Honda Mini Trail resurrection
Looked back at the first page pics and man this has come a long way. Any plans to refurbish that clutch cover?
Sent from my SAMSUNG-SM-G930A using DO THE TON mobile app
Looked back at the first page pics and man this has come a long way. Any plans to refurbish that clutch cover?
Sent from my SAMSUNG-SM-G930A using DO THE TON mobile app
JustinLonghorn
No Purple Hearts, No Blue Ribbons
Looks like a brandy new motor in there, man.
Re: The z50 Zombie, Back from the Dead - a Honda Mini Trail resurrection
Thanks dudes. I'm making progress slowly. The cam and one rocker was toast so I'm waiting on some funds to free up to grab a new cam to throw in.
LOL. I still have all 3 pieces of it. I actually scored a stator cover and clutch cover with all the auto clutch shift linkage and actuator a few days after I bought the bike for about $50, soon I'll get that blasted and painted and ready to install.
Thanks dudes. I'm making progress slowly. The cam and one rocker was toast so I'm waiting on some funds to free up to grab a new cam to throw in.
clem said:Any plans to refurbish that clutch cover?
LOL. I still have all 3 pieces of it. I actually scored a stator cover and clutch cover with all the auto clutch shift linkage and actuator a few days after I bought the bike for about $50, soon I'll get that blasted and painted and ready to install.
Do you know if the 50 and 70 cams are the same?
Sent from my SAMSUNG-SM-G930A using DO THE TON mobile app
Sent from my SAMSUNG-SM-G930A using DO THE TON mobile app
clem said:Do you know if the 50 and 70 cams are the same?
Sent from my SAMSUNG-SM-G930A using DO THE TON mobile app
Yep I believe so. Here’s the one I bought it’s the aftermarket stock grind from DrATV
https://rover.ebay.com/rover/0/0/0?mpre=https%3A%2F%2Fwww.ebay.com%2Fulk%2Fitm%2F352006737096
Wish I would have caught you sooner, I have an extra that I could have given you.
Sent from my SAMSUNG-SM-G930A using DO THE TON mobile app
Sent from my SAMSUNG-SM-G930A using DO THE TON mobile app
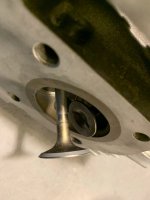
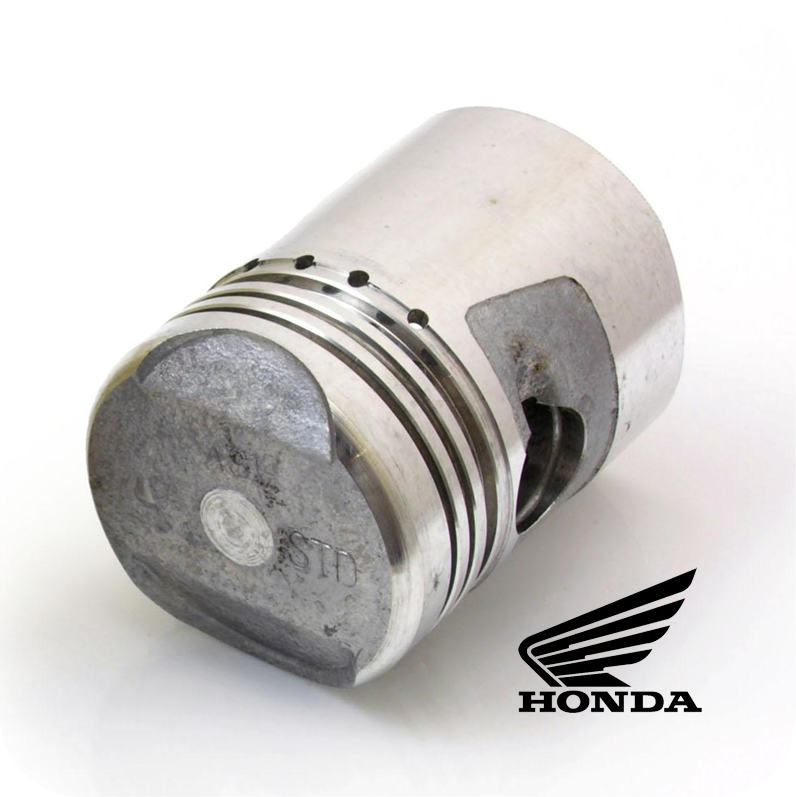
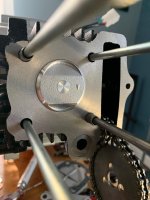
Good ol Clem hooked me up with a good used camshaft so I was able to get the head reassembled and the top end back on the engine. The first time I turned it over I noticed a bit of binding at the end of the power stroke, right after the exhaust valve closed. I pulled the head back off and noticed that the piston is cast or machines incorrectly and they left a “lip” at the edge of each valve pocket, which is catching on the valves. I can probably grind it down but I’m going to see if I can get a replacement sent out.
Here’s what an OEM piston looks like. I noticed it when I installed but I should have compared pistons and it would’ve been obviously incorrect.
Sent from my iPhone using DO THE TON
Here’s what an OEM piston looks like. I noticed it when I installed but I should have compared pistons and it would’ve been obviously incorrect.
Sent from my iPhone using DO THE TON
Attachments
Maritime said:Yep, that's not right at all. Did you watch the James May reassembler episode with the Z50?
I did a ways back, did he run into this? I figure I can probably just grind it down but I emailed the company I bought it from and see if they'll send me a good one.
That doesn't look like the right piston, but that could just be an illusion.
There are a few different pistons for those singles with different crown shapes. The one you show as original looks like the crown shape is different than the one fitted. The reason for the different shapes is the combustion chamber shapes. Some are deeper and some are wider depending on exactly which motor it fits.
There are a few different pistons for those singles with different crown shapes. The one you show as original looks like the crown shape is different than the one fitted. The reason for the different shapes is the combustion chamber shapes. Some are deeper and some are wider depending on exactly which motor it fits.


