1977 MZ ts150 project

flatyre

Active Member
Hey guys this is my first bike build so don't want to get carried away with an over complicated design brief. Basically I want something that I can ride to work every day, small, easy on fuel, cheap to insure, and reliable. I love the café look so I'm aiming for something along those lines. Unfortunately there are two problems, very little budget, and a serious lack of old bikes in this part of the world. This is what I bought...


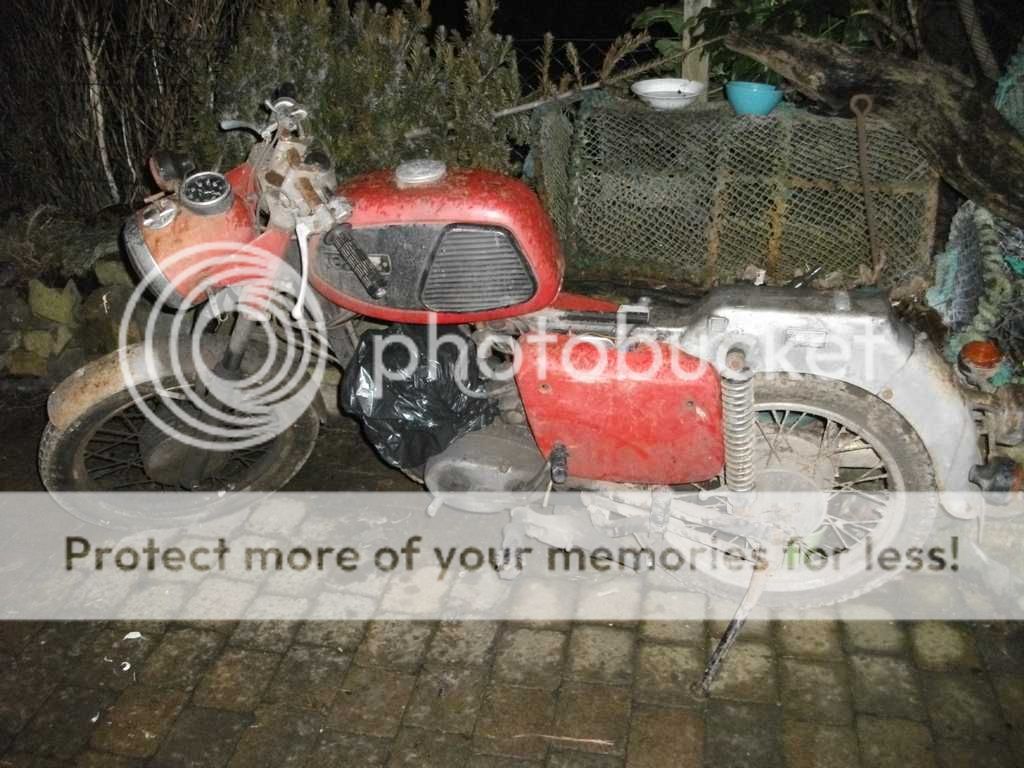
A 1977 MZ ts150 which has been sitting in a barn for over 20 years, 7000 miles on the clock and complete (seat removed in picture). It's not ideal for a café bike with only being 150cc and having a raised alloy rear frame section, but she was cheap (£100), two stroke, and MZ's are supposedly bullet proof. Having been build in East Germany during the cold war, looks were not important, simplicity was. Certainly everything about her is robust (or crude more like).
Anyway I plan losing the cold war commuter look by changing the bars, headlight, tank, seat exhaust etc. The main problem will be the alloy rear section, i'll either keep it and incorporate it into the design, cut it down without weakening the rear end, or fabricate a new rear section out of steel. The good thing is I have no set plan of how the finished bike should look, so it should be a fun build!
 
I have tried working with the alloy rear section on the bike, incorporating the hump into a number of seat designs, primarily to save time fabricating a new rear section, but I can't get that stripped down minimalist racer look with an ugly big alloy rear section. I decided the best thing to do was make a tubular section to give the frame a more traditional look.


here is the bike with the new rear section tacked on, this is a Norton Navigator tank which I'm modifying to fit, and some ace bars I had lying about.


I have some 5mm steel plate to form the bottoms of the diagonals, with a hole for the swingarm bolt to go through, and extend down to meet a 20mm bar where the old foot rests fitted. This should be strong enough to help support the rear frame.


I think i'll extend the swingarm to keep the proportions right, its something I've wanted to try and this is the perfect bike for it. I reckon the simplest way to do it is cut the flat section at the shock bolt and weld in a 3" section of flat bar as this is the only part of the swingarm that runs parallel.


Then beef the section up with an upper and lower plate section for the shocks to bolt to similar to this sort of setup.


I also hope this will raise the rear an inch

 
haven't had a chance to do much to the bike lately, this is a Lafronconi pipe from a motoguzzi I picked up on ebay, I needed to make a sleeve as the bore was about 6mm bigger the the header.


rain got at the bike so excuse the surface rust. once the exhaust wrap goes on it will look a lot better.


on the right side I've only welded the diagonal frame section whereas on the left side there is also a vertical support. I think the right side looks cleaner and better and with it being a small engine bike, I don't think I need the extra framing? oppinions welcome.
here you can see the 5mm plate that connects the new frame to the swing arm, I also fitted a solid bar through the frame where the foot pegs were, this butts up against the plates and welded.


to get round the issue of fitting a speedo, I simply cut out the central section of the original chain guard/speedo mechanism.


here is a closeup of the frame where I welded it to the original front section. this is a mockup of the battery/coil tray which will sit under the hump.


the new gel battery trial fit.


I had planned to stretch the swing arm to make the bike look a bit bigger but decided this might be a bit too much on a first build. So nest is to shorten the rear hoop section so the tail cone finished over the rear axle.
 
I'm in. We have an ES250 in for service; it's like someone gave the East Germans a picture of a motorcycle and they went at it. It all works...it's just all a little bit different.

I believe that pipe is going to rob you of what little power that smoker puts out.
 
Rich Ard said:
I believe that pipe is going to rob you of what little power that smoker puts out.

This. Neat project, would be a shame to shoot yourself in the foot before it really gets going.
 
We should've taken more pictures while the engine was in pieces. Everything works, it's just a little bit different from how it's normally done. The clutch basket is bizarre.
 
I like where this is going. Good job with the frame work.
That original headlight and tank were really cool. It's too bad you didn't incorporate them into your build.
 
cheers for the replies guys. Yeah I like the pipe but it will probably ruin what little performance the bike has. I think i'll take 3" off the rear hoop section and have a play around with the original light, though it is a bit too big and weighs a ton!
 
I fitted the original headlight, cut down front fender, original 60's ace bars (pitted and scabby but original!) bar end mirrors, a set of smaller indicators, original controls, and a brushed aluminium dash. The clock originally sat in the headlight along with the very dodgy ignition, but it doesn't look right with such a big headlight (not very sleek racer looking). So the clock will be mounted on a brushed aluminium dash with a real ignition barrel mounted elsewhere. I'd like to keep the old headlight glass and bowl and cut away the rear 3 or 4 inches and weld up a plate, then fit it using some nice after marked headlight mounts.


I decided to cut 4" off the rear hoop as it looked a bit too long, it means I won't have as much space under the hump for the electrics but gives the bike a better shape. Also started to mock up the hump out of foam.

 
nice to see something a little bit different getting hacked up into something a lot different, keep up the good work

as for the muffler, it will indeed kill what little power that slug of a motor might once have had, maybe something like a left hand muffler from an RD250 might work better, looks fairly similar and is designed to work with a two stroke 125cc cylinder, which is close enough and would have made more power than your 150cc bratwurst burner. just a thought
another thought is of course an expansion chamber, again from something similarly sized and it appears you have some welding skills so try some gentle cutting up and rewelding in an appropriate shape for the frame/cylinder layout (and yes i'm aware its not quite that easy but when we're talking about an MZ150 it can't make it any worse)
 
cheers spotty, your right about the exhaust, at £10 I thought it was a bargain and didn't worry too much about performance. However using something from another stroker of similar cc would be ideal so i'll keep an eye open for one. I don't like that high pitched scream you get from stroker exhausts, if I could get a suitable exhaust with a slightly deeper note that would be perfect!
 
whack it on ebay, some guzzi head should give you your tenner back (and maybe a profit, you never know) and try to find an air cooled RD one, not too shouty and in keeping with the style of the bike
an RD250LC one might be a slightly better shape (with the sort of kicked up end) but def noisier
 
sanded down the foam hump ready for fibreglass when I figure out how to attach it. Also roughly trimmed the old seat foam as it was very comfortable and I'd like to re use it covered in some nice stitch patterned black leather, pulled tight so the seat doesn't sit as high.


Then started re fitting the electrics. The old loom is in perfect condition but i'll be replacing the coil, condenser, points and already have a new gel filled battery which can be mounted on its side. There isn't much room for hiding it all but I have enough room under the tank for the coil.


The condenser fits inside the headlight so that leaves the battery and fuse box under the hump.


Another problem is the clock. I had decided to keep it in the headlight, but with all the cables and wires fitted, its a bit obscured which might throw up some legal issues. Having it mounted on the bar clamps would solve this?

 
got the foam glassed and trimmed ready for filling and sanding.


though I would have preferred the bottom of the tank to line up with the seat better.


temporary seat to test for comfort.

 
Back
Top Bottom