CB360 Engine Rebuild w/pics. Need a little help

Feisti

Active Member
Hey guys,

So last summer i picked up a CB360, got her running, cafe'd it a little. But she never ran correctly. Everything under 5000rpm was great, except for backfiring on deceleration. After 5000-6000 she would run rough, at 6000 she would stop accelerating. Oil is coming out of the left cylinder somehow, either the exhaust or the gasket. PJ did my carbs. But i feel the reason it isnt running right is because air is getting in through the gasket (correct me if im wrong).

So ive taken the motor out before when I was building it originally. When i got it the oil plug was seized and an exhaust stud was broken off inside the head. But ive never taken the motor appart before. In fact the only motor ive taken apart is a 2-stroke dirt bike....so this should be interesting.
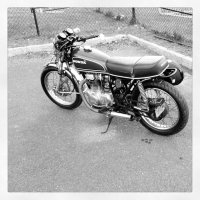
Heres some pics:
 

Attachments

  • IMG_20121018_174605.jpg
    IMG_20121018_174605.jpg
    465.3 KB · Views: 582
So I have a shop manual, that I have yet to look at for the next steps, but everything past this point is above my paygrade. Soooo it should be fun. I'll read over the manual tonight and update you guys when I get farther.

Oh the bike has 6800 miles. And the case has been stamped. I have a D&K gasket and seal kit. I do not have a spring compressor or lapping tool. But I will obviously pick up whatever is needed to get this done.

Thanks

Matt
 
Well. You're off to a decent start... You have two CB360 heads WITHOUT cooked cam journals.

Send that JB Welded one my way so we can get it on mysta2's 69 bike. haha
 
I had the backfiring after deaccel as well. Became even stronger after I replaced my head. For me it turned out to be small (invisible to me) cracks in the rubber mount attaching the head to the carb and my carb wasn't seated in correctly. Good luck with the rebuild but check those out as well!
 
Thanks for the advice guys, one i get a perfectly running bike then we can talk about spare part donations ;D Ill look into those carb mounts too
 
One good / fast way to check carb boots (for future reference) is to spray WD-40 on the boots while it's running... Changes in idle indicate a leak.
 
Hey guys been busy and havent touched this thing, but that changes tonight. I've read through the shop manual and I see how to take the rest of it apart, but im concerned about removing the timing chain and the cam. Do i need to mark off how they were lined up? Or does it not matter how the chain is put back on?
 
Okay i just went for it. Took lots of pictures of the timing setup on the cam and gear markings, so hopefully ill be able to put it back together. Looks like a lot of carbon on that left cylinder. There is zero play in the pistons tho. I have new rings coming and I plan on honing the cylinders. Anyone have any advice on getting the jug off? Besides beating it with a rubber hammer?

IMG_0078_zpsba79548b.jpg

IMG_0074_zpsc4d53faa.jpg

IMG_0073_zps29f1d80e.jpg

IMG_0082_zps5a8dc002.jpg

IMG_0080_zps6409c470.jpg

IMG_0079_zps7b306d44.jpg
 
I used a rubber hammer to break up all my engine parts; valve cover, head, cylinders, lower case.

It works very well in getting those stuck together parts freed up. Try not to beat down on the cooling fins though, maybe attack the cylinders from the braud side.
 
Feisti said:
Hey guys been busy and havent touched this thing, but that changes tonight. I've read through the shop manual and I see how to take the rest of it apart, but im concerned about removing the timing chain and the cam. Do i need to mark off how they were lined up? Or does it not matter how the chain is put back on?

If you are not going to open the bottom end of the engine, then keep the timing chain tight against the crank with a coat hanger or what have you.

Basically, don't let it drop off the crank gear. Then when you are ready to reassemble, Pull the stator cover, turn the engine over to line up the LT mark.

This will get #1 cylinder(left foot side) top dead center. Then put in the cam and line the cam gear up by using the lines on the gear in a horizontal fashion.

You may still have som eplay in the chain at that point, but then the tensioners come into play, and take up the slack.


Don't think of me as an expert, I'm about two weeks ahead of you on my engine, a first for me too.
 
I'm doing this right now too. Where are you at on this? There were a few supplemental service PDFs that were updates from the original manual.
 
Remember to change the front and rear brakes. Check my build, my rear brakes (30 years old) delaminated and locked my rear wheel at 30 MPH.
 
Bruno, you're about to see. mydlyfkryzis thanks for the advice, ive already put a few hundred miles on my cb360 before the rebuild i think my brakes are solid....for now!

So heres where I am. Cylinders honed, new rings install, all new gaskets and seals. Yes ive made sure all the mounting posts on the jug and head are installed as well as those seals. A lot of other threads have helped me get this far!

Now onto the hard part. I've figured out which 180 degrees is the correct orientation for the camshaft from another thread but I still have a few questions.

1) Any tricks to getting the cam chain on easier? I think i loosened the sprocket bolts when I removed it, I will try that again. Is locktite required on these? Wont the heat of the motor undo the "lock" of the locktite?

2)Whats a good trick to make sure all the valves are closed when the rotor is at LT?

3)In the manual it shows two spacers on the camshaft. Mine only has one, but there is very minimal side to side play, was this an update?

4)Does anyone have sizes for the hardware that holds on the points plate? Mine are close to stripping, i'd rather replace them.

Pics of where I am:


This one shows the one spacer on my camshaft:


As always thanks for your help guys!
 
Put the chain on the sproket before you put the sproket on the cam shaft. ;)
 
frogman said:
Put the chain on the sproket before you put the sproket on the cam shaft. ;)
+1 on that. Make sure your tensioner sliders are in place, but not bolted down also.
I dry fit the sprocket with the chain on it, only because you may need to skip a tooth or two to get it lined up correctly.

As for the hardware on the points, my engine had 6mm phillips head hardware installed. Should be pretty easy to find replacements at you local harware store.
 
Haha MGD, ive been slackin but i checked it out tonight.

So i followed everything I thought was correct and I have run into a problem.

At the correct cam position, horizontal lines line up, left piston TDC....these are my valve positions

Left Exhaust- Closed
Right Exhaust- Closed
Left Intake- Closed
Right intake- Open :mad:

Although there isnt any contact when i spin it complete rotations

Ive checked the cam chain position twice and this is what i keep getting!!!

When the tick mark on the rotor is on the end of the arrow, all the valves are closed.....see pic below for this position.

Any ideas guys!?!?


Super frustrated so i'm just gonna get some sleep and look at it with fresh eyes tomorrow.
 
Back
Top Bottom