Take Kop's advice. Period. While is is certainly possible to use steel implements to open blocked passageways without damage, it is dreadfully bad advice to do so, and comprehensively unnecessary. Your bike is already running half way right, so the need to poke anything through any of the passageways is pretty unlikely. Carb cleaner in a spray can and understanding what you are doing should be all that is needed. Half the carbs I have seen that were "professionally rebuilt by a bike shop so I know they are not the problem" - were the problem.
It is not that hard, and vast tuning knowledge is not needed. Just some willingness to understand a few basics, and a close look at the carbs so you understand what all the passageways do so you can have confidence that they are all clean and working.
The main thing to know is not obvious to the casual viewer. It may look like a simple device, where fuel from the bowl gets sucked up into the venturi which is the main bore of the carb by the air rushing by on its way into the engine. While this is true, it is not that simple. It is not fuel being sucked up into the venturi, but fuel AND air, which are premixed before they get to the venturi. Realizing this is the key to understanding what the passageways do and methodically checking each is clean.
Typically, there are two system or circuits that meter fuel and air into the venturi, and they both work the same way. The pilot system is for small throttle openings and main for large. In the pilot system air is provided through a small opening in the intake trumpet. This passageway leads past the pilot air screw, which serves as an adjustable jet for the volume of air used in the mix. The passageway continues to the air chamber that surrounds the pilot jet emulsion tube, where the air mixes with the fuel supplied by the pilot jet. If you look at the pilot jet you can see it is actually two devices. The jet part which is just the hole size in one end which meters the amount of fuel that is able to pass through from the fuel bowl. Fuel passes straight through this part from one end to the other. Fuel does not flow through the numerous holes along the length of the tubular section. That section is the emulsion tube, and air provided by the air chamber surrounding it allows air into the tube from outside it to mix with the fuel as it gets sucked through the pilot jet. Now you have a froth of air and fuel carefully metered by the pilot jet and the air screw that flows out the other end of the pilot jets emulsion tube into a passageway that leads to an opening in the venturi near the engine side of the throttle (slide). So follow the path of the air and know you have it perfectly clean by spraying carb cleaner into the passageways just like the air would travel through. See it spray out where you expect. Follow this process for the entire circuit until you are spraying carb cleaner into the venturi from the pilot jets location. The main system works exactly like the pilot, except the parts are larger, there is a fixed air jet that replaces the air screw, and the port into the venturi is made adjustable by a tapered needle attached to the throttle. Air enters the main system through another small opening in the intake bell, travels through a passageway to an air jet (usually permanent ) and then to a chamber where the main emulsion tube goes. Unlike the pilot jets which are attached to their emulsion tubes, the main jets have separate emulsion tubes so they can be changed to suit specific engine requirements. Fuel flows through the main jet, through the emulsion tube where air is also sucked in, and the resulting mixture combines with the air stream rushing through the venturi. Like the pilot jet, the main jet is submerged in the fuel in the fuel bowl. The bottom of the emulsion tubes are also submerged, and you can see that if the fuel level is too high or to low, holes in the emulsion tubes are either covered or exposed resulting in either a rich or lean fuel mix. So the fuel level is important.
So follow the path of air and fuel and clean and inspect each one, one at a time. It is not at all as bad as it might seem with my explanation. After examining the first carb the rest will be easy. Realize one certainty: No amount of boiling in miracle brew or years in an ultrasonic cleaner is a substitute for manually spraying through every passageway and witnessing the clean blast out the other side. Do that, and KNOW it will work perfectly!
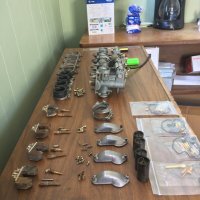
One last thing. I heavily recommend that you retain ALL of your brass from your original carbs. Clean them and put them back in. They do not wear out, are known to be the right thing, and almost certainly manufactured to a much higher standard than the ones in the carb kit. Use the seals and gaskets, pitch the rest. The exception are the needles, but unless yours are obviously worn or damaged, keep them and put them back. If you think you need to replace them, get new ones from the manufacturer, and pitch the ones in the kit.